To avoid these ads, REGISTER NOW!

Blacksmithing Projects Journal

OP
D

DoghouseForge

Well-known member
Joined
May 11, 2013
Messages
374
Location
Lakeland, Fl
(this sections post start lower half of page 6)

Forging and Tuning Door pulls and Handles for the bigger cutting boards.

Ive played with this stuff in the past but never really had any practical uses for it. I suppose the reason was that I wasnt creating anything to attach them to.

My wife suggested that the bigger cutting boards be fitted with hand forged handles. I thought it was a good idea but figured it would be much cheaper, easier, and faster to buy some handles from the craft store and use them instead... Then the brain started spinning and i realized... Your setting up a both full of handforged and hand built items and calling the thing "Doghouse Forge"but your gonna fit the high dollar cutting boards with china made replicas of hand forged items??? exactly, that is totally unexceptable...

So out came the vice and some old tongs... let the twisting begin:

Like most things, the planning is more important than the actuall application. If you dont lay out where to lock the handles into the vice for each twist you will not get them symetrical. A little off is ok considering they are not machiene made but you cant have 1" left on the left and 2" left on the right...

Its also very important to pay attention to how fast you turn your tongs, and to move them up the stock at the same rate of twist. What i mean by that is the faster you turn the tongs the tighter the twist will lock into the steel. If you turn your stock half a turn and then move your tongs up 1/4" before turning the second half you will space out the twist. Likewise if you turn two full twist with your tongs in the same place you will get a twist that basicly doesnt move. So like most forging practices the tong placement and technique is more important than the "dumb" hand applying the force.

Mark out where you want the twist to begin


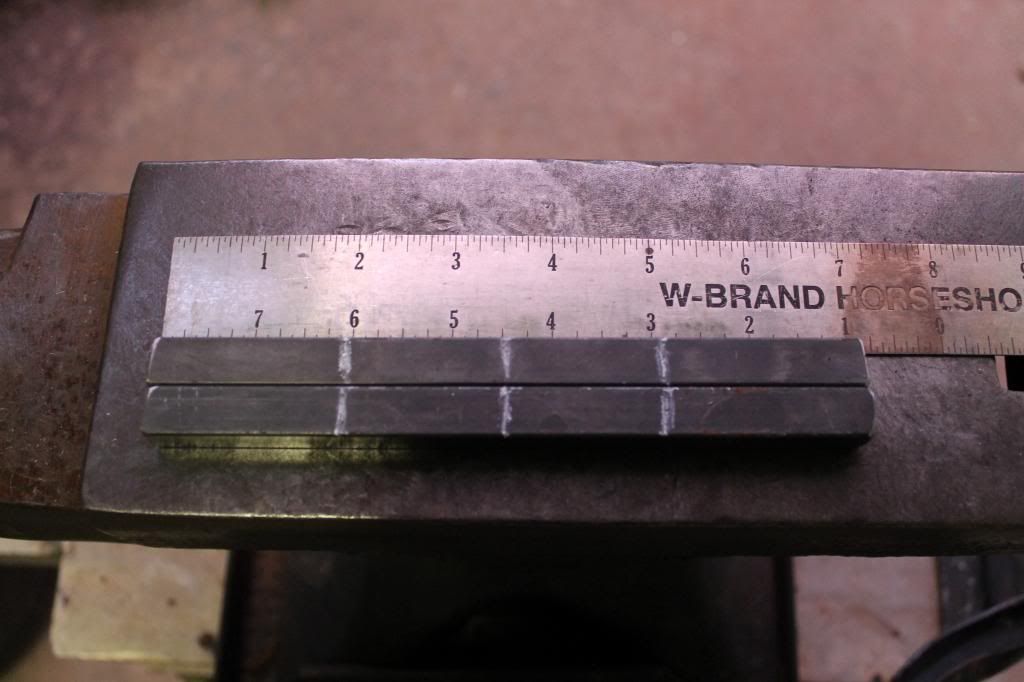
lock the tongs squarly onto the stock and slowly and evenly push or pull the direction your wanting your twist to go.


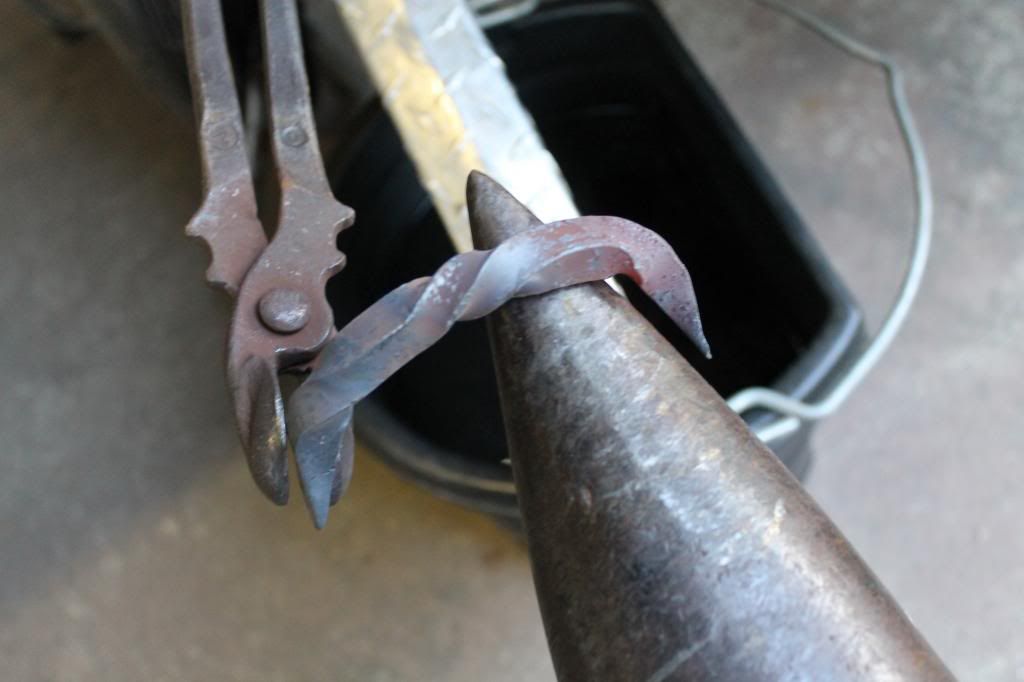
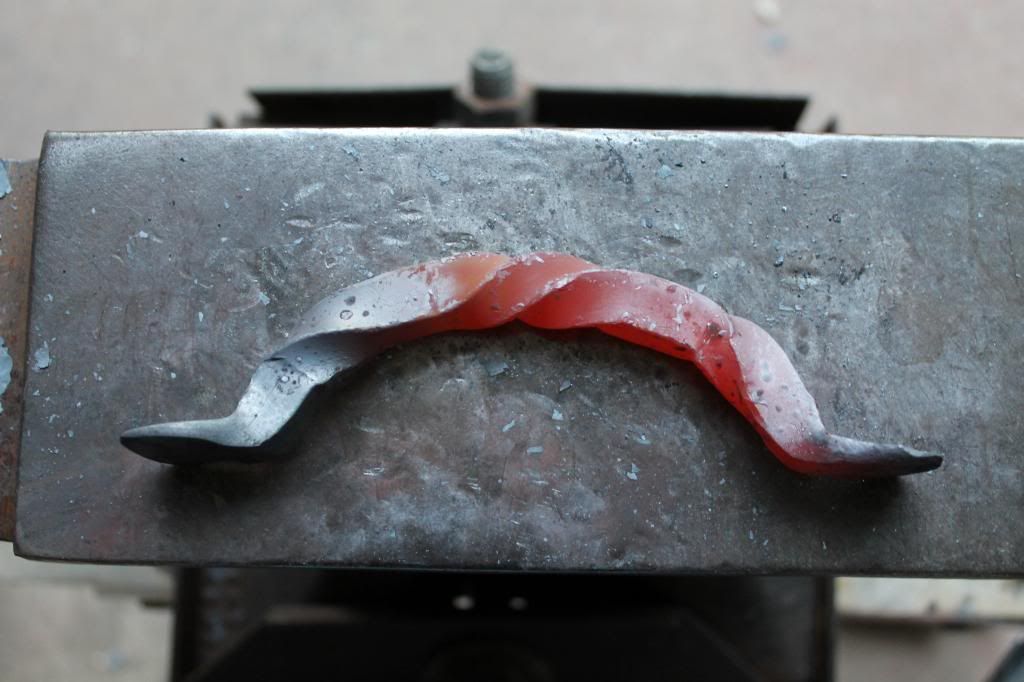
here I have done the center in a double twist and done each end in opposite half twist to accentuate the flow. The middel section was created by moving the tongs up a 1/4 in per 1/2 turn. (this is the most basic twisting style and its simple so its easy to replicate)


This is a twiple twist with the tongs moved every 1/3 turn. Slightly tighter but still flowing through itself. It also has the oppositional twist at the lower sections to assit the eye in seeing the flow in the center


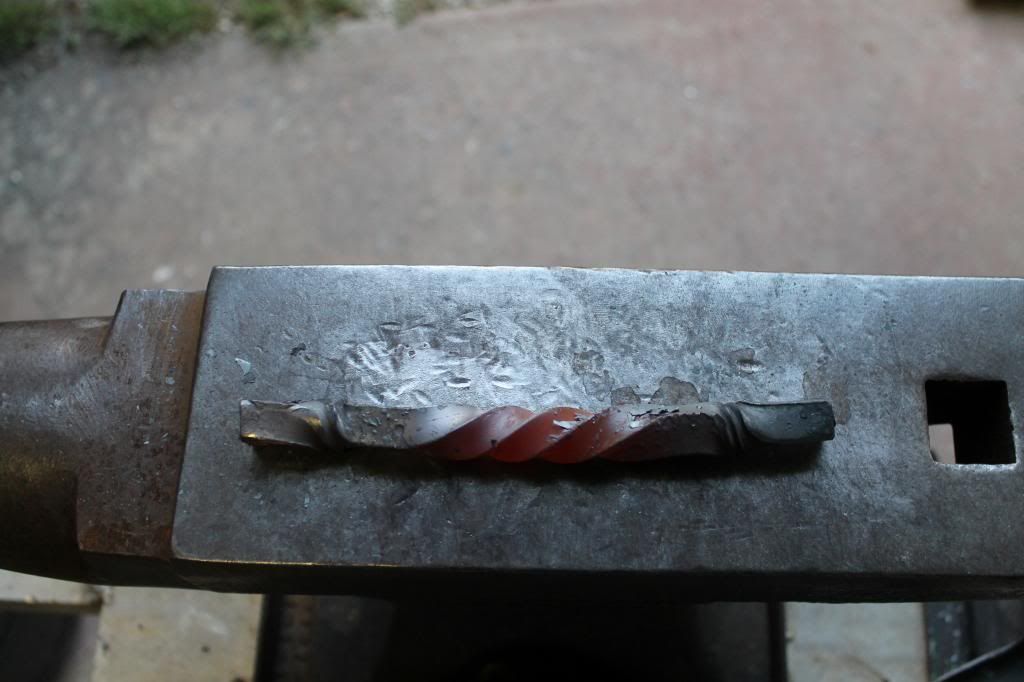
This one has a tripple twist, half oppostional twist, and then a final stationary double twist to accentuate what will be the lowest section before the mounting tabs are drawn out.


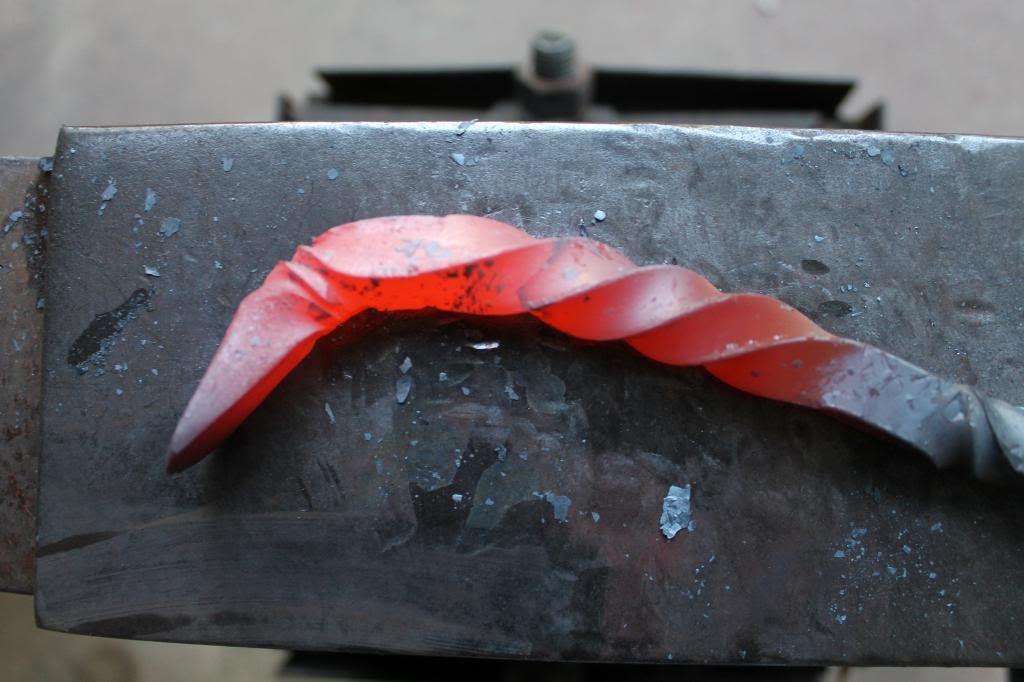
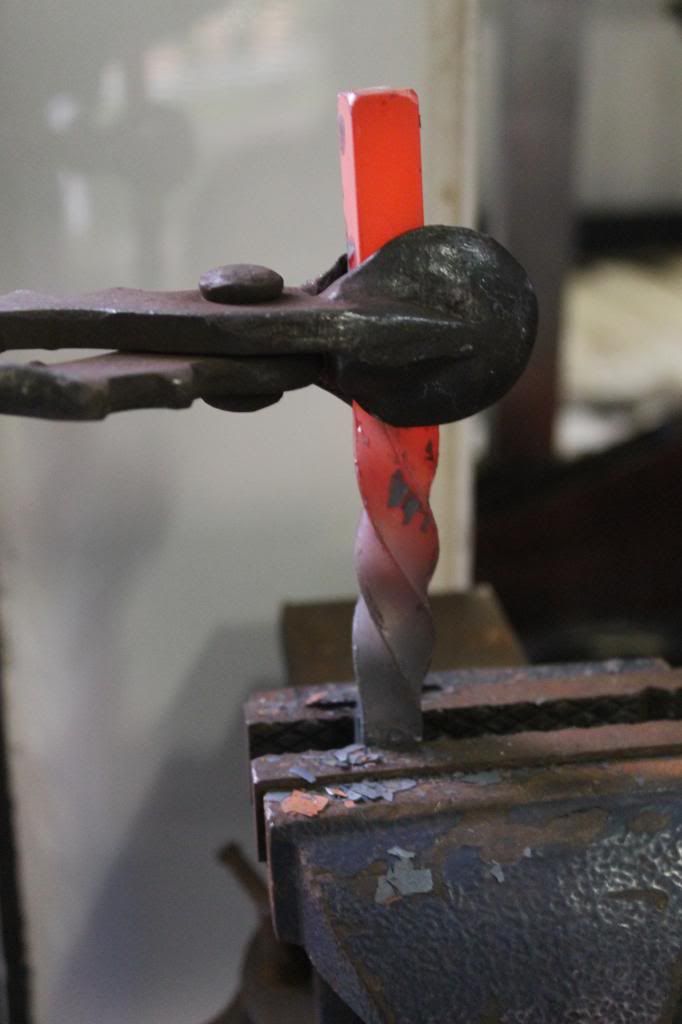
To draw out the mounting tabs that will either be drilled for a screw hole or get "all thread" welded to the back for drawer pulls you strike the end with overlapping blows. Its important to...kinda...glance your hammer?.. of the end, almost rolling it off the steel and away from yourself as you strike it. this pushes the metal outward instead of just making a squashed blob. When your doing this you can watch the shape and adjust your blows to move a little metal into whichever areas you need additional material.


once the tabs are drawn out, flip the handle over ( never strike the top, or viewable surface) and turn the stock just like you would a toe bend in a horseshoe (see first post).


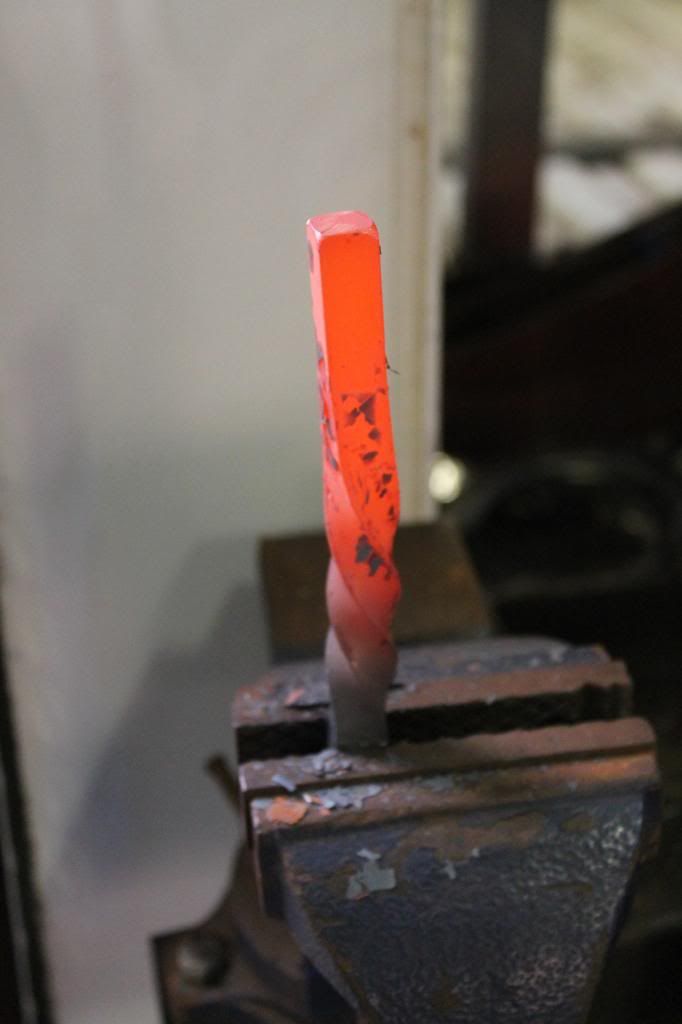
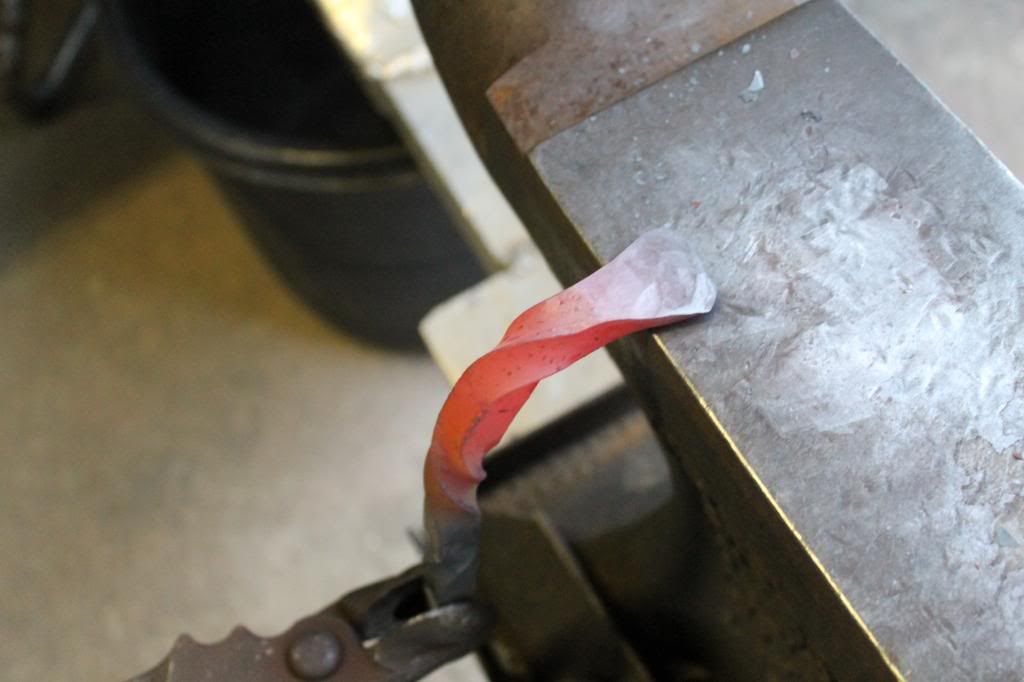
use the horn to fine tune your deminsions


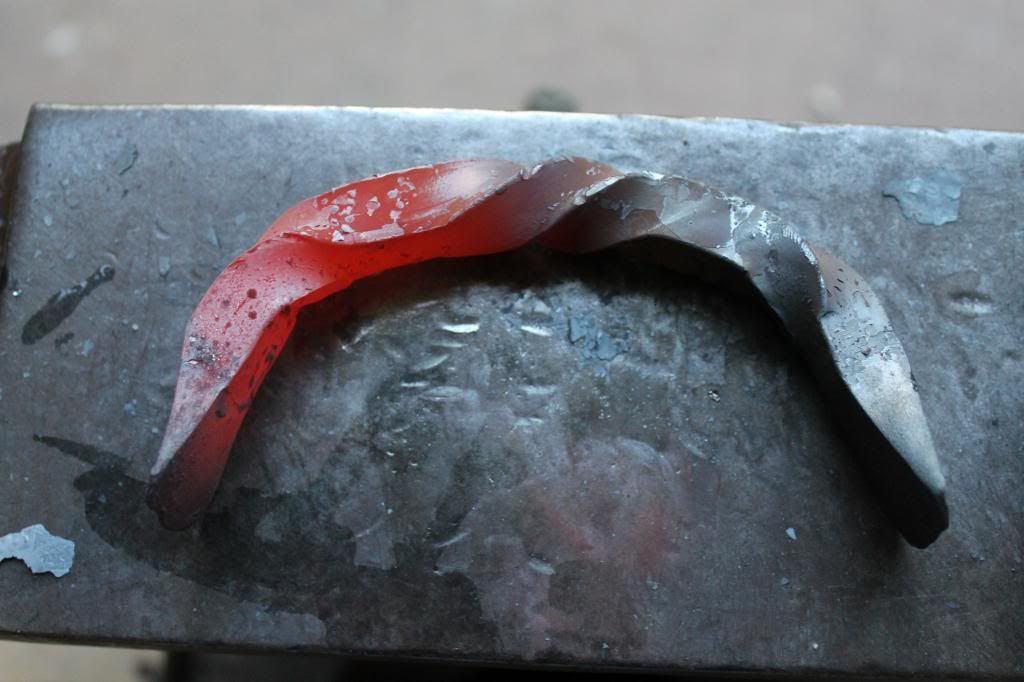
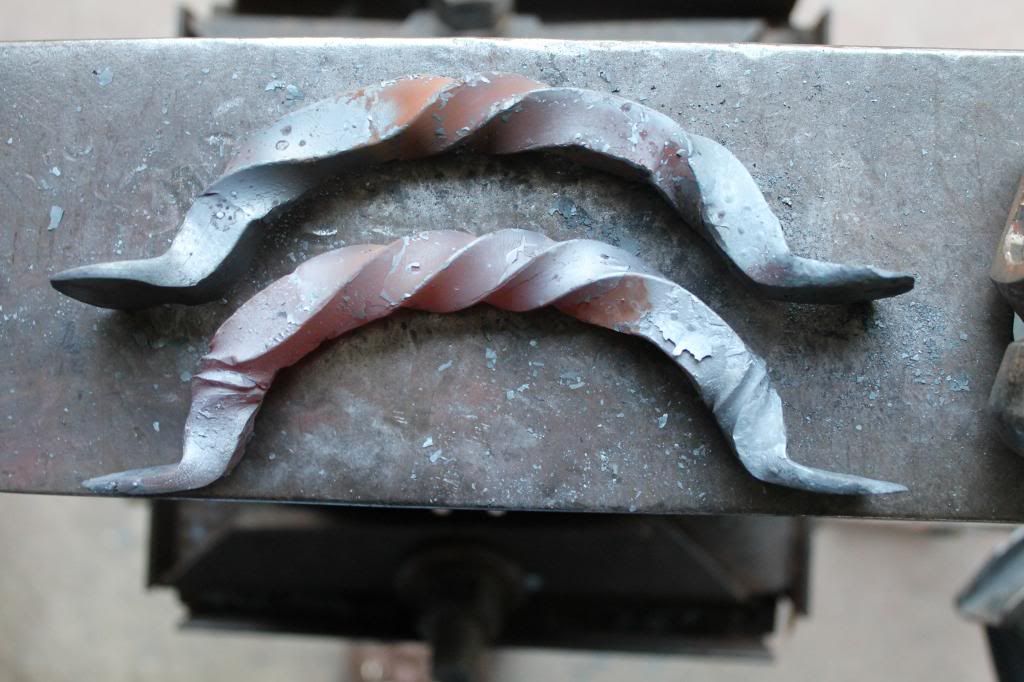
you should end up with something like this


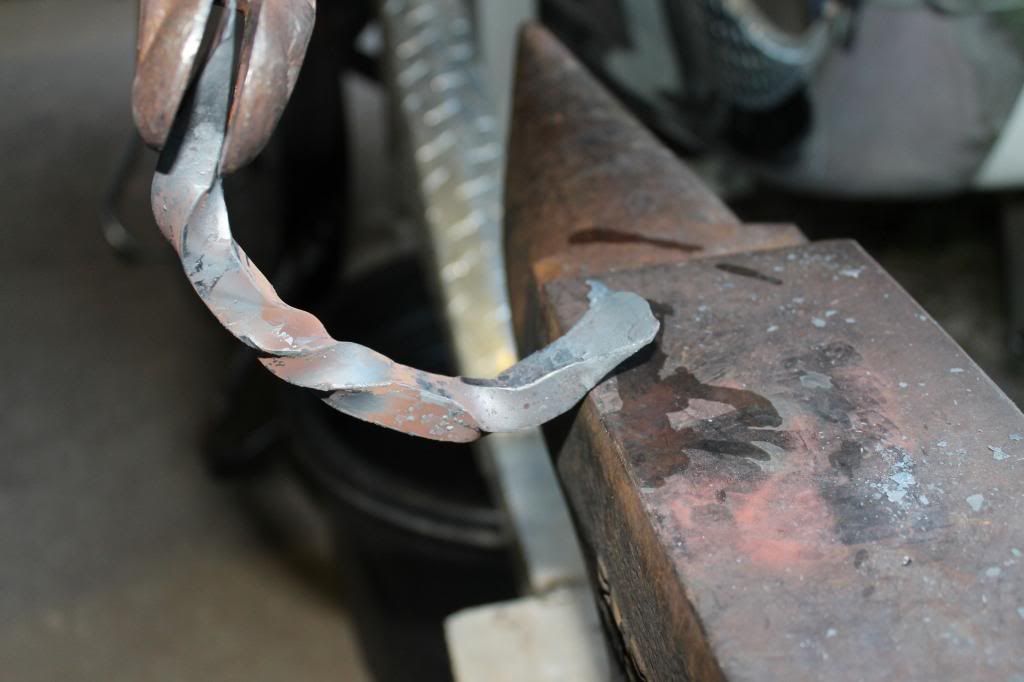
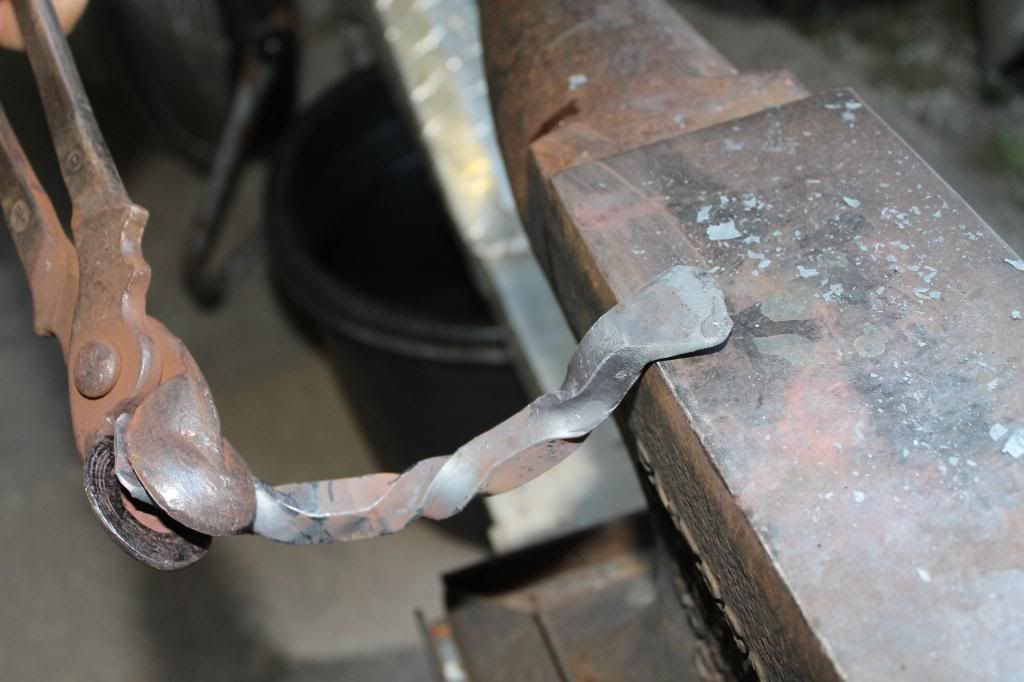
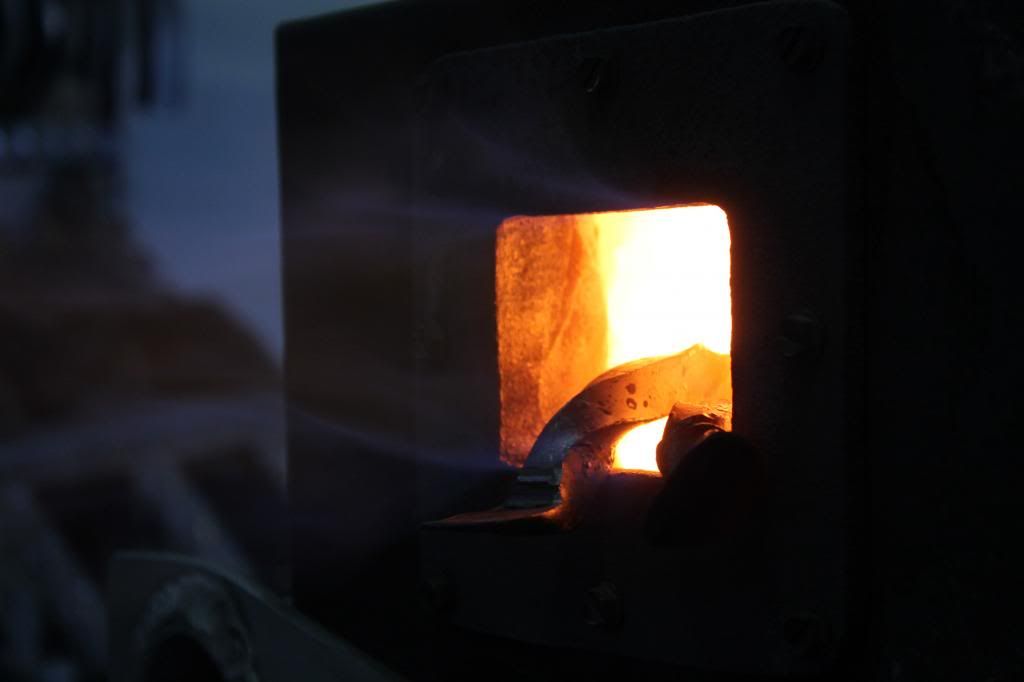
for the next step we need to move the handle back to this position. (this part should be done at an orange heat but for the sake of photgraphing i did it in stages between heats)


You then drive your stright down onto the under side of the tab and at the same time lower your tong hand.


its important to keep the handle in the same place and not alow it to chatter about. Everytime the edge gets moved it will place an unsightly crease. You dont want "creases" you want one! nice tight line that divides the handle from the tab.
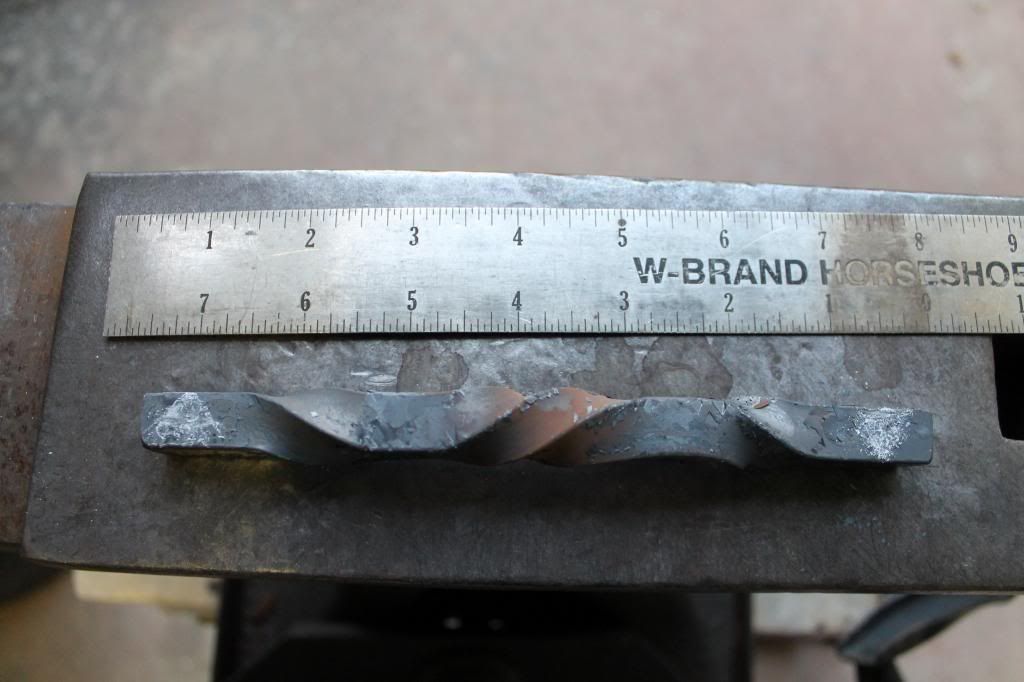
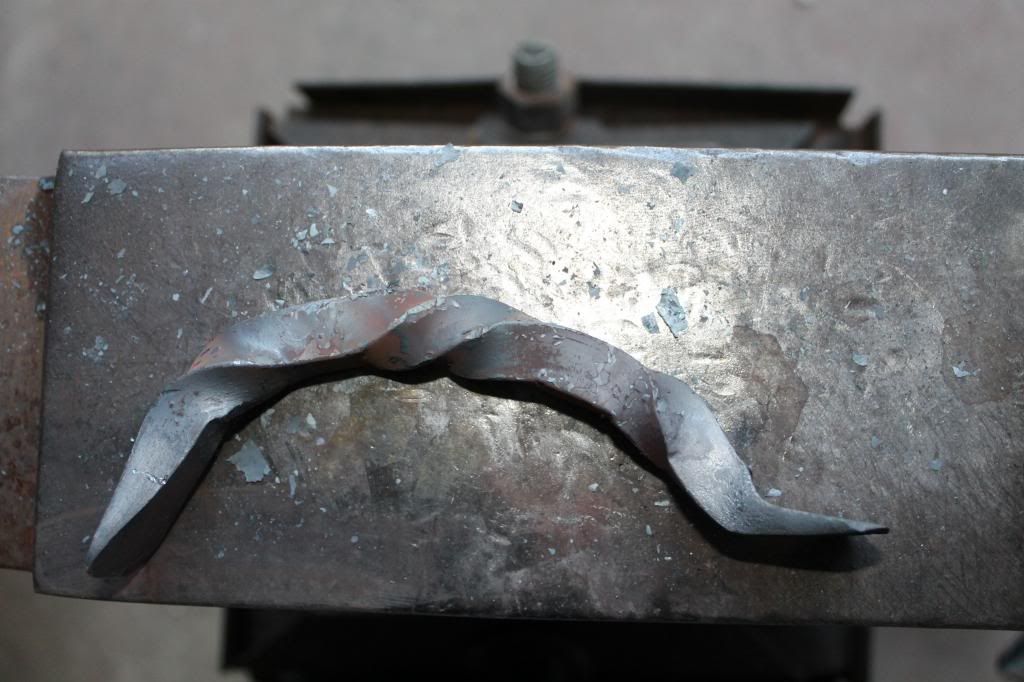
this is what you should come up with:


repeat to the other side:


A little time in the fire and a couple more rounds of the above process


NOW! to get them not to look so "hammered".
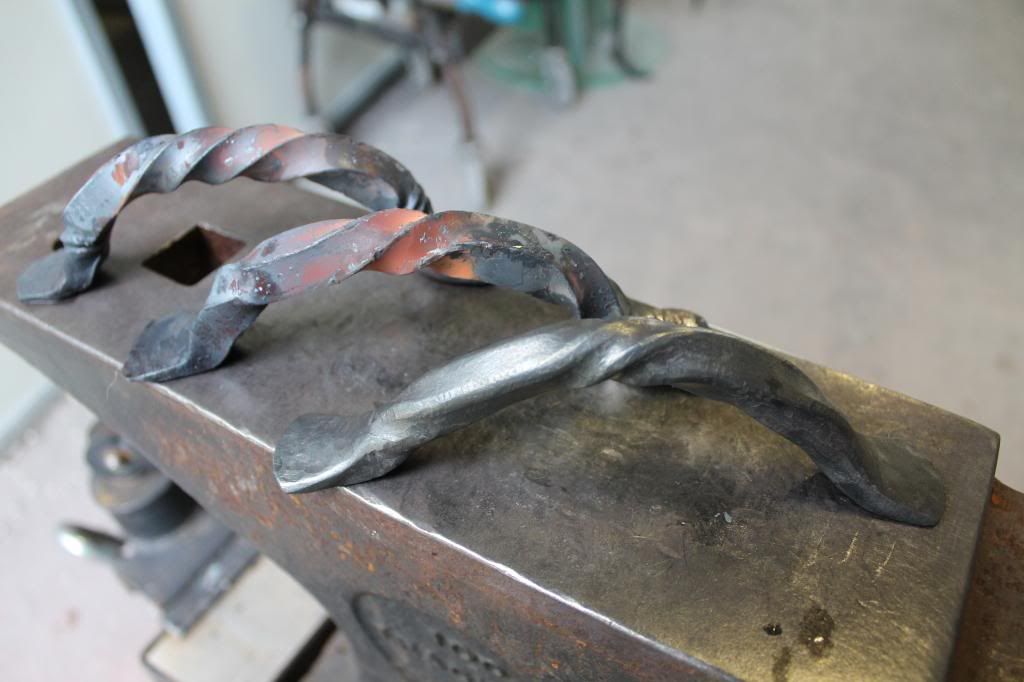
 
Last edited:
To avoid these ads, REGISTER NOW!
OP
D

DoghouseForge

Well-known member
Joined
May 11, 2013
Messages
374
Location
Lakeland, Fl
In the previous pic the first or lower handle has been "softend" and the upper to are straight out of the fire. In order to get the look of the lower handle I used my belt sander and took all the hard edges off the twist and curves. its important to work into each twist and actually roll the handle though it along the belt. This accentuates the curves and since you have removed all the hard edges it makes them flow nicer and cleaner.


Once your happy with the flow they are ready to be block brushed
reheat to dull heat and make sure all the fresh shiney areas you just made are heated to the point of blackening a little bit. You want an even color before you start brushing.


here they are after a nice heavy brushing. (previous post show the block brush if you dont know what im talking about)


I took a sanding sponge and knocked the edges off to add a little shine to the curves once they were finished being brushed.


So you can oil them at a dull heat to make them darker or you can spray them with clear coat to maintain the shine you created. I chose t do a light coat of clear. (people like shiney stuff)


This set wasnt shown in the previous photos but they are for the large cutting board in the center of the display. I will update the photos once I have fastend them to it.


So thats how you turn handles... pretty easy to do, just mark your spacing and use a soapstone to draw arrows that remind you which direction each section is supposed to go. Its gets confusing when your in the heat of the moment trying to get the vice clamped down and your tongs set, all before it cools to much to twist.

This is something you guys can definatly do with a torch and some large vice grips. just start with a little thinner stock than I did. Try 1/4" square instead of 1/2".

One last thing to remeber... if you twist round stock it just looks like it did before you twisted it (dont worry its not the dumbest thing ive tried before). :sad:

thats the end of the second post. Il start putting the final section together and get it up shortly.

Thanks

JP
 
Last edited:
OP
D

DoghouseForge

Well-known member
Joined
May 11, 2013
Messages
374
Location
Lakeland, Fl
For the final edition of the night we will be making a hand forged steel rose.

These are great, once you see the process your all going to be doing it. Its super easy and doesnt require a forge.

If you dont have access to the band saw or belt sander you can look on ebay under (blacksmith blanks) and find sets that are precut and finished.

So as far as the market place goes I expect these to be a big seller. They sell from $35 a piece to $280/ dozen. Time wise they arnt bad but cutting the templates takes a bit. Im going to cut a set out and have my uncle use the lazer jet? (some badass thing that cuts stuff) and do the basic forge work and assembly at the shop. Then while im sitting at the market on saturday mornings drinking my coffee and eating bengiets i will do the artistic part right there in the booth for people to see and hopefully they will take home a few or order a bunch!

To begin:

22guage steel, various metal rod, some scroll tongs (hognose tongs work as well), my templates, and a brass brush for later...


most template sets come with 5 sections but i like an additional smaller section in the center. It helps to fill the space and conceal your rivit or fold over location.
So this set was googled and printed at home, then cut out and numbered accordingly. The "star" is going to become the rose hips...


Band saw and belt sander to cut out and round up the shapes.


I like to use a 320grit belt and taper the edges. Obviously 22guage isnt very thick to begin with but we are talking about a rose petal so the fine edge will pay out in spades later in this process.


For this step i simply use the edge of my ball pien hammer. chip away at all the edges on the pattern and then soften the edges by driving flat blows after the chipping is finished. You dont want to flatten so hard that you remove all your detail but you dont want it looking haggered.


do this to all the sections including the rose hips


Now to bring the 3D into the flower

The rose hips are the curled outer covering of the rose bud that fold downward after the rose blooms. They are concave and curved at the same time. This isnt the easiest thing to achieve from 22 guage steel so i built a little jig to help me

weld together some bar stock in a "V" and then run a couple scraggly weld lines down the inner bottom sides of the stock. They need to be random because you dont want each section of the rosehips to be identical.


place each section of the "star" into the jig and use a tack type hammer or cross pien and drive the metal into the jig. I place each section in a different spot so they are all unique.


you should get something like this, once your happy with it set it aside and we will get back to it in a moment


now a real blacksmith has "swages" for everything but Im a Farrier so I have a **** load of horseshoes hanging on walls instead. But... i also have a jeep, and therefore...alot of tools to fix said jeep, and those tools were very usefull to get the petals to "cup" the way the needed to to.


you get the idea ;)


and you should come up with something like this, the only other step to do to these is to drill an 1/8" hole in the centers.


So set those with the rose hips and move onto the stem,

I forge down the entire stem and forge out the tip. this takes the perfection away from the round stock and the tip being tappered alows me to attach the petals. You need it to be roughly 1/8" to get the petals onto the stem but you need the tapper so that when you set them onto it later and drive them downward the conical shape secures/wedges them in place.
 
Last edited:
OP
D

DoghouseForge

Well-known member
Joined
May 11, 2013
Messages
374
Location
Lakeland, Fl
Ok, you can now slide each layer of the rose onto the stem. starting with the hips and fininshing with the inner most layer.

Once they are on I use a round tiped rod and push the layers into each other and down onto the stem as tightly as possible. Its less important how much stem you have coming out the top because you can just cut off the excess but each layer of the rose needs to be tight against the previous.

So as stated above, cut off the excess stem coming thought the top and leave yourself about a 1/4". Heat the stem top to red hot and use the hog nose pliers to fold it over and down into the center of the pedal stack. I like to twist it a little so i get the top nice and snug. (your going to tweak on this thing for a while, twisting and pulling it so the tighter you start with the nicer the end result)


folded over


you will probably recognize the small propane burner torch, you can use a Oxy/Act torch but the 22 guage is so thin the smaller torch is easier to use in my opinion. It would **** to scald the metal or burn a hole in it after all this work.

Now comes the artistic part...there is no right way, there is only the creators way...Your rose can and will look like you imagine it to so have fun with this part and dont be affraid to try stuff. You can always bend it back and start again.

For myself... i start in the center and fold the hole rose up like a loose bud. then I reverse and work from the outside inward bending the tops of the petals outward and downward to literally bloomm the rose. I do try to overlap each petal into the next when possible...

this is what it looks like:


at this point its all pulled into the bud and i fold the tips outward


So when your happy with it, you need to brush it just like every other forge project. I use a small wire brush and gently rub each petal as much as i can reach untill the nice shine its brought out in the blackend steel.

Since I have a forge I heated mine up equally so i had a uniform pallet to brush from.


you can see how as i brush the heat gets sucked out of the petals and the slag and carbon isnt able to rebuild so you get a nice sheen.


once its all brushed you can clear coat it if your happy with the steel look or for an added touch use a brass brush to highlight it.

Heat the steel just a little, dont scald it. (you just spent however long brushing it!)


then brush the edges with the brass brush, it will leave its mark on the steel.


A little tip...take the torch and lightly! move it around over the brassed areas and it will make it shine! i think it makes it gold in color...

Last but certainly not least...put a drop of rose oil in the center, and give it to your girl! (******* drop!):lol: sorry, varsity blues joke...


So thats how to make a rose.... this one still needs to have its leaves attached but i ran out of time before I got them made. Once i do Ill update the thread with how to make them as well. Its not necessary but I fell like it really completes it to have a small branch and 3 leaves below the flower. It makes a handy method for creating a tripod for holding up the flower as well if you position them right...


So, i believe a side from a few updates this catches us up.

Thanks for checking it out and i appreciate all the comments or suggestions to improve the work or method of working...

have a great weekend from the Doghouse!

JP

 
Last edited:

bimmer1980

Well-known member
Joined
Feb 5, 2009
Messages
2,103
Location
York, PA
This was an intriguing thread! I started with the last page and worked my way to the first page. Lot's of neat stuff. I liked your shop setup--both the truck and the actual shop!

A friend of mine in the steel fabrication business does some knife work as a hobby. He does a folded steel design. He uses a power hammer to flatten the steel after heating it and folding it. I think this is basically damascus steel?

Anyhow, interesting stuff to see... thanks for sharing!
 
OP
D

DoghouseForge

Well-known member
Joined
May 11, 2013
Messages
374
Location
Lakeland, Fl
Thanks Guys! I appreciate the comments and Im glad the post are appreciated,

I feel bad that Im getting such praise for an unfinished project though. :eek:

Sunday, I finished the leaves and stem work so here is the update to the rose I promised.

So same 22 guage
Cut out rough leaf pattern
Marked the veins with a sharpy


Perform the next few steps on a soft peice of wood. It will allow the metal to sink and expand when struck and will allow it to concave into itself a little bit.

I mark the back of my leaves because the technique I have developed for getting them life like looks better if you build them from the backside.
Use a dull/rounded fuller (look in the first post for detailed info on fullers/fullering) and lightly run your marks. Rose leafs viens are staggered and the center line gets lighter towards the tip of the leaf.


when your done it will look something like this


now the cool part...simply flip them over...and...


At this point i go to the belt sander and put the exact shape into each leaf, and then use the edge of the belt to add the jagged edegs that rose leafs have.


Now to soften the leaves use the ball pein hammer and gently create the countour and smooth out the main ridges. I like to flip them over and do each side a few times. Finishing with my topside. Remember your going to have the torch work to get the flow and curves you want so this step is really about getting the veins and edges a life like as possible. Nothing ruins a flower like crappy unrealistic leaves.


I use 1/8" round rod to make the leaves stem and lay it all out to adjust for length and placement. Then cut the stem at an angle and spot weld to the main stem. The leaves are spot welded from the back to the rod as well. I always overhang a little bit of the leaf at the bottom so you can wrap it around the stem and really blend its origin into the metal instead of it just laying on top of it. Use a dremel or other sander/grinder and blend the stem welds and the back of the leaves to as minimal as possible.


torch work done, overlap done, and the shape finished


the brass brush work added


And finished


My wife decided that this was going to be her rose...I explained how I needed it as a display for the booth this weekend and put it in the pile of stuff thats going to be taken to market. When I came home later that afternoon she had reclaimed it... What are you gonna do.??? woman had my steel rose for a few hours and its already living in popuri... :headscrat

Well, I have to admit she styled it nicely


Allright, that completes that project so on to the next.

Thanks again for the comments! They are much appreciated and encouraging.

JP


If anyone hasnt seen the other rose post from today definitly check it out. Its a really nice example of one made in the classic blacksmith style. Complete with forged leaves and what i believe are forge/jump welded junctions...The detail work is way more extensive than my own and its definitly worth a good look.

http://www.garagejournal.com/forum/showthread.php?p=3401565#post3401565
 
Last edited:

gbsmithy08

Well-known member
Joined
Mar 2, 2012
Messages
62
Thanks Guys! I appreciate the comments and Im glad the post are appreciated,

I feel bad that Im getting such praise for an unfinished project though. :eek:

Sunday, I finished the leaves and stem work so here is the update to the rose I promised.

So same 22 guage
Cut out rough leaf pattern
Marked the veins with a sharpy


Perform the next few steps on a soft peice of wood. It will allow the metal to sink and expand when struck and will allow it to concave into itself a little bit.

I mark the back of my leaves because the technique I have developed for getting them life like looks better if you build them from the backside.
Use a dull/rounded fuller (look in the first post for detailed info on fullers/fullering) and lightly run your marks. Rose leafs viens are staggered and the center line gets lighter towards the tip of the leaf.


when your done it will look something like this


now the cool part...simply flip them over...and...


At this point i go to the belt sander and put the exact shape into each leaf, and then use the edge of the belt to add the jagged edegs that rose leafs have.


Now to soften the leaves use the ball pein hammer and gently create the countour and smooth out the main ridges. I like to flip them over and do each side a few times. Finishing with my topside. Remember your going to have the torch work to get the flow and curves you want so this step is really about getting the veins and edges a life like as possible. Nothing ruins a flower like crappy unrealistic leaves.


I use 1/8" round rod to make the leaves stem and lay it all out to adjust for length and placement. Then cut the stem at an angle and spot weld to the main stem. The leaves are spot welded from the back to the rod as well. I always overhang a little bit of the leaf at the bottom so you can wrap it around the stem and really blend its origin into the metal instead of it just laying on top of it. Use a dremel or other sander/grinder and blend the stem welds and the back of the leaves to as minimal as possible.


torch work done, overlap done, and the shape finished


the brass brush work added


And finished


My wife decided that this was going to be her rose...I explained how I needed it as a display for the booth this weekend and put it in the pile of stuff thats going to be taken to market. When I came home later that afternoon she had reclaimed it... What are you gonna do.??? woman had my steel rose for a few hours and its already living in popuri... :headscrat

Well, I have to admit she styled it nicely


Allright, that completes that project so on to the next.

Thanks again for the comments! They are much appreciated and encouraging.

JP


If anyone hasnt seen the other rose post from today definitly check it out. Its a really nice example of one made in the classic blacksmith style. Complete with forged leaves and what i believe are forge/jump welded junctions...The detail work is way more extensive than my own and its definitly worth a good look.

http://www.garagejournal.com/forum/showthread.php?p=3401565#post3401565

JP Awesome work you have done explaining your work and hard dedication. just happened to go thru your post and you had inspired me to do one for the wife as well. I learned my method from Dorothy Steigler, a master blacksmith in Orange county. I also spent a month under a master blacksmith Frank Turley. So been doing it quite a while. Love it. You have a nice setup on your truck.
 

aggierailroad

Well-known member
Joined
Jan 8, 2012
Messages
581
Location
Houston, TX
Thanks man,

Im affraid that im may be taking it a bit far...:headscrat Its a cross between overkill and torture device. :)


JP

You almost are using enough clamps :bounce:

21 ply cherry glue up. Each piece tapers end to end from 1/16" to 1/8" in the middle back down to 1/16". You get the curved leg look without seeing the plies show through from using the bandsaw - as most legs are just glued up and then cut down. These are two legs for a desk.


Here they are the next day with just a dressing on the belt sander to knock off the glue. We used a formaldehyde powder glue - just mix with water. Good stuff but wear goggles, you don't want the powder to float up into your tear ducts!!!


Not trying to hijack, just thought you would enjoy this. Keep the clamps coming!!

Interesting note: Even using 4 layers of backer board we got a little bit of wave caused by the gaps in the clamps. Can't see it, but you can feel it when you run your hand down it. I'm not sure if using less glue would help fix it, on the principle that the glue is not getting squeezed out at much where there is a gap in the clamps; it would be hard to squeeze more clamps in..
 
OP
D

DoghouseForge

Well-known member
Joined
May 11, 2013
Messages
374
Location
Lakeland, Fl
You almost are using enough clamps :bounce:

I hear what your saying but im affraid im confused as to how to get compression from all 4 sides if one side is all jagged and uneven. Do you just add little scrap wood shims into the voids to get even pressure when clamped? Trimming each row down to the same length is definitly more time consuming than I would like but i dont see the alternative.

example: each row is a different length and width before trimming. I need compression from all four sides , the top, and bottom in order to get the seemwork to be as tight as i want it... I wish i had a photo of it layed out but not yet trimmed so you could see how varied the edges are.


you can hijack anytime. Always a pleasure to learn a bit and so far everything you have posted has saved me time, steps, and labor in the process. :thumbup: remind me to post about the steel wool and vinegar stain my shop mate taught me. Its pretty much a fresh/shiney welds worst nightmare..


Now, Mr. Road...I cant let you go without showing you todays haul from woodcraft.

walnut, mapel ambrosia, red oak, poplar, yellow heartwood, purple heratwood, bloodwood, padauk, canary wood, redheart chunks, and some amzing "burls".


These are the "burls".... my first! So excited about these...They are redwood burls and Im going to make a laminate with the orange burl, purple burl, the redheart chunk, and the canarywood. I will definitly post the process and the finished knife. Its going to get used with a huge meat cleaver and a long! boning/fillet knife im working on. When these things get polished up they are amazing. There is no grain pattern in the burl so by using the normal woods as thinner dividing layers you can create some very cool designs. I even scored a piece of brass to possibly work into the laminate.


So a quick update from the Doghouse:
The Lakeland Artisans market was a huge success. I sold a fair bit of stuff, including all of my serving boards!, and a couple knives...Even took a custom blacksmithing order for some "large address numbers" made the same way I made my market sign, ha! never would have thought someone would want old horseshoe numbers on there fancy iron gate. Hopefully the next couple months proves as successfull. My Jeep resto budget needs as much as I can make for it!

I forged a couple more roses during the market and people really enjoyed the process. Took an order for a half dozen, but luckily its a christmas gift, so I have some time to get them done.

Heres the layout,


(please dont kick me off the journal for my cheesy horseshoe pumkins...My wife had the idea and truthfully they all sold but 3! Old ladies lost their **** when they saw them!)


The only other thing to add is a cool natural technique for etching the blades on my knives. I tried it on my home set first, but it worked so well i ended up etching a couple of the market knives. Low and behold the small etched pairing knife sold in the first hour...

If your like me and think acids are scary, then here is a simple solution. Expose the blades in timed, hour long rounds and vary the placement. It's also good to cover the entire surface in the juice. The hard edged lines will only appear with the solid fruit placement but you can get some cool wavy patterns from just the juice. These got about 5 different rounds and turn out pretty cool. Use a "dobbie pad sponge" or other type of non scratch sponge to remove the rust deposits in between rounds. A little elbow grease is needed at times but its worth the effort.


effective and delicious!!!


aside from a literal chafe around my lips fom eating almost an entire pineapple this was a total success.


Alright, thats what i got for now, currently the shop has several projects underway and I will get them posted as i complete them. I apprecitiate the comments and suggestions!! Its been a great week for hobby metal workers on the journal. GBsmithy posted am amazing traditional rose and the new knife builder that joined this week is going to get tired of my questions real quick.


thanks
JP
 

aggierailroad

Well-known member
Joined
Jan 8, 2012
Messages
581
Location
Houston, TX
I hear what your saying but im affraid im confused as to how to get compression from all 4 sides if one side is all jagged and uneven. Do you just add little scrap wood shims into the voids to get even pressure when clamped? Trimming each row down to the same length is definitly more time consuming than I would like but i dont see the alternative.

example: each row is a different length and width before trimming. I need compression from all four sides , the top, and bottom in order to get the seemwork to be as tight as i want it... I wish i had a photo of it layed out but not yet trimmed so you could see how varied the edges are.

So, I guess I was confused on your construction process. Here's my experience on how end-grain cutting boards are "usually" made; however, it does add a step to your process - which might make it easier, but also adds cost in a way.

And since I'm lazy, and a video is worth a million words: Wood Whisperer

Cliff notes: Glue your multi colored boards together as normal, with the cauls. Cross cut the board, lay out the strips in order, turn each one 90 degrees to the left, then flip every other one end over end. Re glue, revealing the interesting checkerboard patterns. Trim the edges and rout the handles/corners.

Your way works, but just takes a bit more precision gluing/fitting because it seems that you are maybe gluing each cube at the same time?? I could be way wrong here.

Lastly - you **** on the purchase. Give me a few days to show you ours.. Have you tried anywhere besides woodcraft? They are awful high...
 

aggierailroad

Well-known member
Joined
Jan 8, 2012
Messages
581
Location
Houston, TX
LAST hijack, I promise... I just don't see this project warranting it's own thread.

Here's where those legs I showed earlier are ending up:

IMG_0586_zps3d9824c9.jpg


And some detail:

IMG_0587_zps7c233cae.jpg
 

Southernbuild

Well-known member
Joined
Aug 25, 2012
Messages
402
Location
North MS
Your rose is inspiring. Might be a project I should attempt some day..... I bet the ladies in my life would approve, which is always nice..
 

archirelic

Well-known member
Joined
Sep 24, 2010
Messages
2,263
Location
texas
Don't know how I've missed this thread for so long...just read through it...Absolutely Amazing work!
 

54FordPanel

Well-known member
Joined
Aug 7, 2009
Messages
5,711
Location
Fort 54, Littleton, Co
Geez. You really need a hobby or something. I used to think I got alot done, and then I look at your thread and feel like a lazy SOB.

And the "***** drop" pictures didn't come thru, so you'll want to re-submit those.


Nice work, JP :thumbup:
 
OP
D

DoghouseForge

Well-known member
Joined
May 11, 2013
Messages
374
Location
Lakeland, Fl
Thanks Guys!

Im loaded up with the real job this week so my update will have to wait untill this weekend.

Aggie, I will post a full response about the cutting boards so we can get to the bottom of why my process is so complicated. (yes, I glue the whole thing at once... :eek: )

Mr. 54Panel,
Im sorry your computer is filtering the ***** drop photos. My wife deleted the files with the ***** drop photos in them years ago so I have no way to retrieve them any longer. :sad:


Im super excited to share this most recent knife build this weekend. It involves two guys, metal, a ten pound sledge, fire, BURLS!!!!!, fire, and more clamps than aggirailroads hijack total! :lol: kidding...;)

The post will show the laminate making process, and a new handling technique that is way better than the previous method. I also have finally gotten a response from "heller Rasp/Delta Mustad" and I know what type of steel I have!!!!! Silly, but this solves a bunch of questions and issues. In response to that information my hardening, and temepering process has changed a bit and i will update that info.


Ok have a great week ,

JP


Heres some pics to hopefully get you guys excited.

Forged Chefs Cleaver from W-2 alloy rasp steel. Full tang with a redwood burl, redheart wood, and rosewood laminate handle. Its pretty much the most Rad thing Ive ever forged/built. The blade is right at 1/16'' thick / 5.75" long and 3'' tall with a 12'' total handled length.


Thanks again and have a great week.
 
To avoid these ads, REGISTER NOW!

Flatland Dave

Well-known member
Joined
Jan 1, 2010
Messages
1,363
Location
SoDak
Awesome talent. Keep up with the artsy stuff and you will make your horse clients jealous. Way back on page 2, I believe in the pic of your truck, you have 2 anvils. One on the stand and another in the truck. Is the second for aluminum shoes or do you use the dame for both metals?

Thanks for a great thread.
 
OP
D

DoghouseForge

Well-known member
Joined
May 11, 2013
Messages
374
Location
Lakeland, Fl
I believe in the pic of your truck, you have 2 anvils. One on the stand and another in the truck. Is the second for aluminum shoes or do you use the dame for both metals?

Thanks for a great thread.

The anvil on the slide out table is the Emerson 100 tradition I have on the swing arm now. The anvil on the arm in that pic is an old 150lb Trenton anvil I used for the first few years of my business. I had just gotten the Emerson and hadn't switch ed them out yet. The Trenton is a great blacksmith anvil but the horn is to small in circumference to accommodate the larger sizes of the shoes. I sold it to a younger guy that was putting his first rig together.

As far as switching for metals I use the same anvil for both steel and aluminum. Aluminum leaves marks on it but they dont last long.

Thanks!
jp
 

aggierailroad

Well-known member
Joined
Jan 8, 2012
Messages
581
Location
Houston, TX
Jonathan, any Cherokee updates?

Talk about someone you don't want hijacking your thread... our work would be swiftly out-classed! :lol_hitti I jest - only because I'm still working on figuring out how to use my planishing hammer from someone that makes it look so easy.

Sidebar - Jonathan, have you happened to have read the Gingery series of books for building a home machine shop from scratch? I just got the books this week and am thinking about taking the plunge, starting with the foundry :willy_nil :willy_nil :willy_nil :willy_nil :willy_nil <-- love that guy
 

MP&C

Well-known member
Joined
Oct 21, 2009
Messages
4,396
Location
Leonardtown, MD
Talk about someone you don't want hijacking your thread...

:lol_hitti


I feel somewhat responsible, Jonathan had PM'd me for some advise, I believe it was before he took the plunge in dissecting the windshield. Of course I told him to cut it open.. :lol:

Just checking to see how it was going... all those nice pieces sold at the market = truck parts :beer:
 
OP
D

DoghouseForge

Well-known member
Joined
May 11, 2013
Messages
374
Location
Lakeland, Fl
:lol_hitti


I feel somewhat responsible, Jonathan had PM'd me for some advise, I believe it was before he took the plunge in dissecting the windshield. Of course I told him to cut it open.. :lol:

Just checking to see how it was going... all those nice pieces sold at the market = truck parts :beer:

"Two roads divereged in a wood, I choose the one with complete windshield disection and it has made all the difference. "

You are correct sir, the goal is to go to the market on Saturday mornings through the holidays and put the sales into the jeep restoration. Untill then I got a sheet of 16guage to redo the floor and since I have the break in the shop now I can do them on site.

On that note the HF110 stick welder is no more, as its replacement the shop now has a MillerMultimatic 200. Its basicly a hot glue gun for metal and I cant believe how much work the stick welder was in comparison.

So now that the market inventory and special order stuff is established I can switch gears back to 50/50 resto and market effort s. Personally, im ready to get back to it. Ill update the jeep thread soon since I made some build decision s recently.

THANKS GUYS!

JP
 
OP
D

DoghouseForge

Well-known member
Joined
May 11, 2013
Messages
374
Location
Lakeland, Fl
Doghouse Update for mid October.

This one will be fun. Theres a cool Chef cleaver with a new handling process as well as the exciting news that the rasp steel mystery is finally solved.

There is also a rather complex but satisfying attempt at forging a Calla Lilly Plant. Ha! yes, I said plant. :lol:


Before the fun projects I would like to update the metalurgy information just in case someone is actually using my trials to build their own blades.


Here is the most current and the most accurate process and tolerances that Doghouse Forge has learned and applied to date:


The steel mystery finally came to an end and Im happy to report that the rasp steel couldnt be more user friendly for knife making. (aside from being one of the hardest possible alloys)

Its W-2 blend steel. Its similar to W-1 except thie alloy blend uses vanadium and tungsten. Im not positive as to the exact amount since he wouldnt tell me, but it has to be somewhere between .1 and .25% in order to qualify as W-2. Its a very common steel used in file making and is rather difficult to purchase as straight bar w-2 so my seemingly endless rasp pile is a great resource. The properties are very similar to 1095 carbon steel, which is the most common knife making steel.


So real quick, some steel label education. Its sad that Im just now understanding this stuff but I guess mild steel isnt really something you worry about the content for if its simply for creating horseshoes.

What do the letters and numbers stand for???

I have only started to learn this stuff so this is the basic into that i have been given. As I educate myself and learn more I will hopefully be able to use different steels with a proper understanding of their properties.

The W stands for water hardening steels, the O stand for oil hardening, and the A steels are air hardening. the A steels are the deepest hardening becuase they never really stop harding.

The numbers stand for a lot of different things but for this reference Im just going to break down the basics.

1 indicates carbon steel 1XXXX
4 indicates molybdenum steel 4XXXX
5 indicates chromium steel 5XXXX
6 indicates chrome vanadium steel 6XXXX
8 indicates nickel chromium molybdenum, steel 8XXXX
9 indicates silicon manganese steel 6XXXX

The second number indicates any additional elements that affect the steels properties.

the third and fouth give the carbon content of the steel


So as an example: a very common tool steel is 1095 -

this steel is a carbon steel with no additional elements and 95% carbon content.

If by chance the steels number was 1195 it tell you that it has an additive.
This number would mean that its a carbon steel, with sulfur added, and 95% carbon. I unfortunatly dont know what every number for aditional elemenst is but at least when Im ordering or finding steel the what and how will be a little clearer to understand. Several cahrts are available online that discuss this method for lableing steel in great depth.


As for the tempering, anneling, and hardening the process is the simplest and easiest with water hardend steels.

here is a list with the particular properties and tolerances for W-2 carbon steel:

Treatment Temperature Range Cooling/Quenching:

Forging
1700-1900° F
Heat slowly to maximum temperature.
Forging should begin as soon as the section is uniformly heated through.

Annealing
1400-1450° F
Cool slowly in the furnace at a maximum rate of 50° F per hour/s..
Protect against surface decarburization by pack-annealing. Hold at temperature for 1 hour.

Stress Relieving
1200-1250° F
Cool slowly in air.
Stress relieve after rough machining

Preheating
1200-1250° F
Preheat time in furnace is ¾ Hr. per inch of thickness

Hardening
1375-1450° F
Quench In water or in a brine solution immediatly upon removal from critical temp.

Tempering
Recommended temperature is 350-550° F
Temper immediately after hardening and quenching..
recommended soak time is 2 hours per inch of thickness.

The tempering scale to determine the rockwell hardness upon completion of the low heat soak looks like this:

Rockwell hardness by definaition is defined by wikipedia - The Rockwell scale is a hardness scale based on indentation hardness of a material. The Rockwell test determines the hardness by measuring the depth of penetration of an indenter under a large load compared to the penetration made by a preload


tempering in rockwell hardness by temp/saturation is as follows:
Quenched at 1450deg - as quenched 67HRC
Quenched at 1450deg - at 300deg - 64HRC
Quenched at 1450deg - at 400deg - 61HRC
Quenched at 1450deg - at 500deg - 59HRC
Quenched at 1450deg - at 600deg - 55HRC


Now understanding whats listed above and actually being able to calibrate it takes more than the forge, water bucket, and oven. Thats why the knife makers have furnaces/kilns to do the treating process. My mentor has a time controlled programable kiln for his blades and i see now why its such an important part of his process.

Here's a chart with the temperature to color relationship. Its not as accurate as a thermometer but at least it will get you in the ball park.


So the process for the cleaver that will be posted next used this information and was adhered to as closely as I was able to achieve. Since I do a "mixed forge/stock removal" blade build, instead of a "stock removal" blade I take a temper after the initial forging and hardening before i cut out the finished shape on the band saw. This extra tempering really made the metal easier for the band saw to handle and the cut time was noticably shortend. It also made the initial grinding and shaping much faster. Once the blade has reached the thickness and shape I looking for the blank is tempered again before the final edge is ground.

So thats where the science is at in the Doghouse as of October 2013. Hopefully ill read this post in 6 months and say "man you left out a ton of steps to make it easier and better" but at least for now Im producing a quality blade that has it roots in a solid build system.

The next thing to learn is how to establish a good differential tempering so I can harden the cutting edge and soften the spine at the same time. This is gonna prove needed when i make the longer, super thin fillet knives I have in mind. Flexible and rock hard will prove to be a tricky combo in sure.

Ok, no more boring technical stuff and on to the fun photo filled build post.

Thanks

JP
 
Last edited:

aggierailroad

Well-known member
Joined
Jan 8, 2012
Messages
581
Location
Houston, TX
Doghouse Update for mid October.


Ok, no more boring technical stuff and on to the fun photo filled build post.

Thanks

JP

Yeah, but I like that kind of stuff... :dunno:

Great write up, I appreciate the science behind it all, especially as I sit here and read while the wife watches drama tv trash.

Any chance for some detail on polishing steel out - specifically a hand technique until I find a buffer on CList?? I'm looking to polish my new (old) tools to a nice shine.
 
OP
D

DoghouseForge

Well-known member
Joined
May 11, 2013
Messages
374
Location
Lakeland, Fl
Forged Chef Cleaver:

This is the truest "forged blade" that I have built so far. Aside from the tang this thing was hammerd to 1/16 "thickness and the initial cutting edge was forged into it as well. The upper draw at the forward most point of the spine was also forged. To accomplish this my buddy Jarrid and myself had to get a 2 man forging system going. He ran the 10lb sledge and acted as the power hammer and i worked the steel with both hands holding the tongs.

It took a little time to get the trust up and the rhythm established but once we got rollin this thing started to move across the anvil face. Jarrids not a blacksmith so a few side glanced sledge blows mared the surface to babdly to get the smooth blade I usually go for but this thing is mean! so a few good scars and forging marks suited it well.

The other cool new addition to this Knife was the building of the "burled" handle laminate. Burls have no actuall grain pattern and because of that when polished they become almost 3-D.

Here's the start of the laminate process. The layout includes chunks of the redwood burl, different exotics, a small sliver of purple burl, and varied thicknesses of rosewood strips.


The pieces get glued and pressed together just like the cutting board builds and then the bandsaw is used to cut strips . I will not lie to you, it took me an hour! to get my band saw tuned up enough to cut straight even sections from the glued pieces. The drift allowance is hard to understand so one day Im gonna find somebody or a class to attend that will teach me about it. The bandsaw I have is 100% capable of resawing up to 14" boards but I wouldnt dare try it at this point.


Heres the tempered blank after its second round in the oven. I wish there was a way to get the finished tempering color to stay but its such a thin layer that it smudges and wont last. ( I actually learned that the thinness is the reason the color displayes the way it does. Its so thin that light passes through it causing the prism of color)

The laminate was attached to a 1/8th inch thick rosewood strip. The idea being the when the edges had all been blended together you wouldnt be able to see the difference between the laminates rosewood and the backing rosewood. Making the colored sections look as if they were imbedded in the rosewood itself.


Handle process chaged at the Doghouse this last knife build. Instead of gluing a gross cut handle; then grinding the shape and pinning after the epoxy has cured, the new process is more traditional. The handle sides are ground to fit the tang. Then the inner layer is ported to alow better grip and adhesion from the epoxy. Once the fit is very close I drill out the tang. Its drilled one size larger than the pins. The handles are marked through the tang to insure alignment and then they are drilled out as well. once they are dry pinned i can grind and sand the remaining issues without worrying about overheating the epoxy. This also insures that if I slip up and mark my blade I can fix it before the handle is in the way.


With the sides in place the extra lenght left in the pins alows me to slide the wooded sections back and forth while adding the epoxy to each side. Then they "AggiMethod" is applied and you find something else to do for the rest of the afternoon...


Before I leave for the day the knife gets removed and the epoxy overage gets sanded away. Since the handle work was already finished up to 120 grit before the assembly the knife looks almost finished right out of the vice.

The rest is the same as the previous. The blade gets finished out to a razor edge and sanded up to 2000grit while the handle is brought to a smooth 400grit finish. The only new process at this point was that instead of using the "Watco butcher block sealer" I made my own finish with mineral oil and beeswax. This was recommended at the woodstore as a beautiful way to bring the depth out of the burl and still be food safe and natural. Id say it worked.

after one coat, no polishing...


The mixture is 5 mineral to 1 beeswax, heated untill the wax is melted and blended. Applied with a rag and allowed to penetrate for 15 min. Then the excess is wiped away. The photo below is after the second coat had dried and been polished with a micro fiber cloth. DAMN! this stuff is rad! Smells good to!


So thats the latest knife build. I was supposed to be making it for someone but I havent handed it over yet... I just might keep it for myself!

Thanks

JP

Next post will be the Lilly plant, gonna start putting it together now.
 
Last edited:
OP
D

DoghouseForge

Well-known member
Joined
May 11, 2013
Messages
374
Location
Lakeland, Fl
Yeah, but I like that kind of stuff... :dunno:

Great write up, I appreciate the science behind it all, especially as I sit here and read while the wife watches drama tv trash.

Any chance for some detail on polishing steel out - specifically a hand technique until I find a buffer on CList?? I'm looking to polish my new (old) tools to a nice shine.

Barrow someone elses buffer.. LOL!

Sorry

JP

Ill be serious after I finish the lilly post. :willy_nil
 
OP
D

DoghouseForge

Well-known member
Joined
May 11, 2013
Messages
374
Location
Lakeland, Fl
So Ive been doing little, mild forge work at the market while i sit and talk to the folks coming by the booth. They seem to dig that something is actually being created right there at the market and it keeps me busy while I burn through a saturday morning.

Roses kept me busy the first couple weeks but I want something bigger and more technical to finish at this weeks market.

So the Calla Lilly came to mind.

Its one of those ideas that Ive been playing with the "how to accomplish that" thoughts for a while now and the time finally came just to jump in.

I started by disecting a fake calla lilly from the "Hobs Lobs".
The fabric was used to help me understand the pattern needed as a blank. (I tried this without the flower and failed , badly, several times.) Its wierd, because the lilly has the long drawn out bloom I thought the pattern would need a "tail" to accomodate it. Well it doesnt.


Fuller technique same as the rose leaves to give my viens life


Using the round side of my rounding hammer and the face of the anvil as leverage I started to work the bend into the bloom.
then the horn was used to finish the radious.


At this point i needed heat to turn the blooms sides into themselves and get the "rolling" effect i was after.


Use the hammer to glance light blows across the seem and tighten the connection


repeat for number two and this is what you get


the next step is to drop the pedal down to create the trademark dip and curl


this created a little buck inside the bloom and i used the ball pien to pop it back out


This was a very stupid idea because the anvil pushed back into the bloom and dented the opposite side


So i used the horn to fix it!
Place the horn inside the bloom/cone and lightly tap around the dent along the raised edges. the force will transfer into the anvil and push the center of the dent out from the inside
 
Last edited:
OP
D

DoghouseForge

Well-known member
Joined
May 11, 2013
Messages
374
Location
Lakeland, Fl
With those fininshed for now the attention was turned to the stems and those cone shaped "Pistals?" or pollen shafts inside the bloom.


If you remeber back to the tomahawk build i went over "bumping" and the same process was used to thincken the base of this cone along the steel rod.


I didnt need a ton but just enough to establish the fatter section at the base of the cone.


To create the texture and mass needed in the pollen section i used forge welding flux. The steel was super heated and i would spin it while dusting the flux on it. Working at it from the base of the cone untill i had filled in what was needed to establish the right shape. The texture was course without any extra effort so that was a little artistic bonus


once they were built i let them soak in the forge so the flux could melt and then harden slowly while cooling. (this was an experiment that luckily worked out the first attempt)


cooled and looking pretty darn real


the leaves and branches were made like large individual rose leaves. The only difference in the process was i forged layerd smoothed edges instead of using the belt sander to add the jagged edges.
I decided on three to give and appealing symetry to the double bloom.


I welded them together to make a solid trunk, and wove them though one another to add texture to the stalk. The were all attached to a 1/8 inch plate section to give a good platform for added suport/stabalization.

Some walnut scraps and poplar scraps made a nice flower box for my calla lilly to live in.


and this is what the blank I took to the market looked like


Welcome to the market shop. No fire marshal yet. LOL. i am raedy though, fire extinguisher and a 3 gallon buckt of water! I hate to burn down the guy next doors "phonix books" ...proof that phonix is a horrible idea is on evey page of this thread. I spell the worst out of my entire family and im the only one born in the phonix age.


The scroll tongs where used to roll and countour the leaves. Calla lilly leaves are big and broad with a slow droop and the edges curling up and down. This was a little time consuming but turned out well.


used the scroll tongs to roll the edges on the bloom and set the tips as well


I used a combination of stainless steel and brass brushes to really get some cool coloring on all the surfaces. The heating and workin of the brass brush is really a lot of fun!


tweaked to a finish and in its home. last step was a sand and teak oil the box.


Heres the finished liily in its finished box. Im planning to add some steel wool or shredded natural fiber burlap as "bedding" inside the box and around the stem. (yes, my dog sleeps in the fireplace, Shes almost 14 and cooler than most people I know so she does what she wants ;) )


The colors really came out better than i had hoped


Really a fun project


Thanks for checking it out and I hope you all have a good week! If you have any questions, as always, feel free to ask away.

JP


Im not sure if he reads this thread or not, but this one goes out to "Mr. E-tek"

I got one too! :lol:

 
Last edited:
OP
D

DoghouseForge

Well-known member
Joined
May 11, 2013
Messages
374
Location
Lakeland, Fl
Any chance for some detail on polishing steel out - specifically a hand technique until I find a buffer on CList?? I'm looking to polish my new (old) tools to a nice shine.


ok, seriously

The $60 buffer from the home improvement store or the $30 buffer frm HF is all you need. The important part is buying tight! sewn wheels and quality rouge. The HF black is cheap and decent for striping but you need high quality "scratchless Jewelers Pink" as your finish,

Heres a link from quick google search, im not sure who has the best price these days.
rouge:
http://jestcoproducts.com/index.php?act=viewProd&productId=46

absolute best buffing wheels out there. made for sharpening knives but the weave is so tight you can do anyting with it
http://www.anvilbrand.com/MUSLIN-BUFFING-WHEEL-6-x-34-x-12-P302.aspx


Untill they arrive you can use wd 40 and steel wool to get the surface rust off and then start wet sanding with various grits untill you get in the 4 digits and beyond. Ive made some mirror finishes with paper but the stuff is expensive and you will spend half of the buffer cost on sand paper. Id just do the best with what you got untill what you need arrives.

JP

;)
 

Zengineer

Well-known member
Joined
Apr 10, 2010
Messages
781
Location
British Columbia, Canada
Welcome to the market shop. No fire marshal yet. LOL. i am raedy though, fire extinguisher and a 3 gallon buckt of water! I hate to burn down the guy next doors "phonix books" ...proof that phonix is a horrible idea is on evey page of this thread. I spell the worst out of my entire family and im the only one born in the phonix age.

LOL, the first time I read this I read "Pheonix Books" and was thinking that was very applicable if he was setting up a book stand next to a blacksmithing stand... lol.
 
OP
D

DoghouseForge

Well-known member
Joined
May 11, 2013
Messages
374
Location
Lakeland, Fl
Worked on this yesterday while the Shop had my truck for repairs.

Not really anything new as far as the processes used to accomplish it so if you have questions about the rose, leaves, or brackets there are detailed post previous to this one that will probably answer them.


Reclaimed Florida cypress and forged rose mantel/wall mount display shelf.

Ive had this wood in the stash for a while. Its off an old barn in Dade City Florida and is Florida Cypress. The barn was built in the 40's -50's according to the clients memory so its at least 60years old. Im not sure of the facts reguarding this next bit of info, but from what i understand you cant cut down this type of cypress any longer or its extinct? One of the two??? So reguardless, its worth alot of money not only because of the patina (rot and wear) but also due to its rareity. I will say that when you cut it the only worn section it the outer 1/16" and it looks brand new inside.

I used it to build a framed backing and small shelf.


For the brackets I used the break and folded up some 1/8"x1" flat bar. I hammer finished and drilled them for mounting access but dont make the same mistake as i did and bend them before hand....made the forgework and drilling slightly annoying... The fininsh was similar to the pintels from previous post but not quite as deep.


A while back another blacksmith posted a rose build thread and I used some of the things he had done to improve the texture of my own roses. The steel was upped to 20guage and the texture was layed in over the entire petal instead of just the edging. The leaves however I like to look more realistic so I opted to stick with my orriginal method.

Added some candle platforms and used the stems and leaves to hide the welds and mounting locations.


Heres the rough finish with the large rose, and two branches with candle holders extended from it.


Everything got sprayed with Polycrylic semi gloss. This really brings out the brass work in the steel. It also gave more depth to the wood without being noticably sealed with something.

Here it is a home the day after:
Its tilted and should be upright but i couldnt get it to stay that way withou actually mounting it. But you get the idea.


to attach and suport the candle brackets i ran the rod through the backing and welded a cap on the other side. This same method was done on the rose stem. solved the issue or threading the rod and made a nice firm clamping method. (i did set the center one on fire so have some water!)


Not a bad days project. Should fetch a pretty penny at the market next week. People are ate up with the reclamed wood down here and the forged rose will seal the deal. My wife thinks its should have some hooks under the shelf for a nice enrty way coat rack function. I kinda thought it would look cool behind an old bar with some scotch bottles and crystal glasses. The other idea was to use it as a headborad for a full size bed. Who knows???

Its built with the pull to the right hand side so a picture frame or flowers or bottle can give the hieght to balance it on the left. I cant believe Im thinking about stuff like that...

Have a great weekend!

JP
 
Last edited:

Junk8

New member
Joined
Nov 6, 2013
Messages
1
Location
Virginia Beach, VA
Awesome work and great info. I spent a couple of hours reading your whole thread. I have been making knives for a couple of years now and am going to start learning blacksmithing now. If you have any questions about knives I may be able to help or at least point you in the right direction.

Sam
 
To avoid these ads, REGISTER NOW!
Top Bottom