So, The Doghouse has gone and entered a contest... The
Garden and Gun "best made in the south awards"... we decided to submit the Cut-Away Chef being as its the most original and Signature piece we build. To win something like that would be incredible...but I'm not jaded to the fact that there are other amazing builders in our category.

Some other cool stuff that's been underway has be a Give Away Contest on Instagram...If any of you folks have and Instagram follow along @doghouseforge
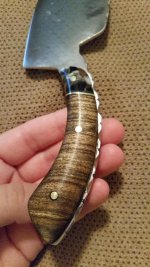
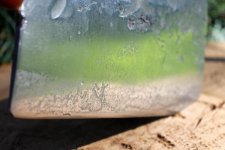
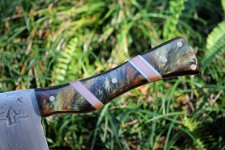
We had 85 entries and reading peoples excited comments kept me entertained for a couple weeks to say the least. The prize was a signature Ambrosia/Walnut/padauk serving board and matching Cheese Cleaver. These will soon be sold as sets in the doghouseforge.com store so it was a fun way to introduce it to the almost 1000 followers currently subscribing to the instagram feed.
Here's some shots I took this week for the listing photos...


 www.doghouseforge.com
 has now been updated to include a newsletter. Aggie has been working his fingers off trying to navigate the endless web design tutorials and get these gems up and running. So if your interested in getting an email newsletter with updates on newly released "ready to ship" items, new blog entries, and promotional stuff that's happening at the Doghouse jump over to the page and sign up. While your there check out the other entries and let us know what you think. The most recent might include a embarrassing memory from my childhood.
http://www.doghouseforge.com/blog/2...e-caspi-a-solution-to-drips-and-growing-pains
Blade building process current specs
There are several members that have contacted me about a current process update...Meaning forging though heat treatment and final finishing. This means SCIENCE CONTENT!!!!! sweet!
So if you need allot of detail I will link the corresponding pages and post numbers throughout this entry to fill you in but for this update I'm just going to list the specs.
Current technical directory and info:
Stock selection - Farrier Rasp - Heller Brand - W-2 steel is a water quenched steel.
Forging - slow heat up to 1700 -1900 deg... forge evenly alternating sides and direction...
for a detailed forging post use this link - post #263
http://www.garagejournal.com/forum/showthread.php?t=200204&page=14
Normalizing/Stress relief #1 - Heat to 1450deg (non magnetic) and hold for 15 min. Block the forge ports off with insulated blanket to maintain slow controlled decline of temp. The normal timeline for this is 3-4 hours before its cool enough to touch (even then its sometimes still hot)
After forging the rasp into workable flattened billets I perform this step, before cutting the profiles. This relaxes the steel molecules after the forging assault and softens it to make cutting the profile easier.
Profile and Stamp and flatten -
Draw shape and cut blank into the design profile. Clean up edges and do final shape work on the grinder, slowly bring temp up to 1200deg (indirect heat) and stamp with makers mark. Fine tune flatness at this point.
Normalization #2 - repeat previous normalization
Grind - take it to 90% finished edge and blade thickness. Alternate sides, control over grinds and uneven thickness issues as best as possible.
Drill Pin Set holes and epoxy bridges - do not forget to do this before you harden! or you will ruin several bits tying to get it done afterwards. Choose pin set location and drill extra holes for your glue bridges at various sections along the tang.
Pre-heat - Indirect heat. use of baffles is recommended when using the forge to preform hardening process. Kiln or oven simply need to control the rate of heat build. As an example a 1/8" piece of steel needs no less than 12 minutes to heat from room temp up to hardening temp. DO NOT RUSH THIS STEP!!!!
Normalization #3 - repeat previous normalization
Pre heat #2 - repeat previous pre heat instructions
Harden - After completing second preheat to 1450deg (non magnetic or critical temp) remove knife from the heat source. Be careful to keep it vertical as a horizontal removal will most likely allow the blade to bend under the heat and forces of gravity. Cool immediately in quenching medium... I have had success with both differential quenching techniques and full submersion techniques. Differential has a great risk for warping, but regardless pre-heating the water to just below boiling in either technique drastically cuts down the warp issue.
(so will keeping your grind thickness even and performing the normalization as previously mentioned)
Tempering #1 - do not try to adjust or straighten any warp or issues you find with the blade after the hardening.... run a tempering cycle first. 480deg for 1.5 hours with natural in oven cool down is my personal system. After a round of tempering you can clamp the blades to a flat plate if needed before the second round of tempering. This will remove most any minor warp related issues.
Tempering #2 - repeat 480 deg for 1.5 hours with natural in oven cool down.
Finish grind - complete remaining 10% grind work . Try not to use less than 220 grit from this point as it greatly reduces the scratches. Most buffers and rouge systems can remove scratches up to 320 grit... Put an edge on it, and check for evenness but don't worry about the final edge at this point because its gonna get taped up in the handling steps anyway.
Handling - several post of techniques and material usage can be found throughout the thread.
one reference is here post #149 -
http://www.garagejournal.com/forum/showthread.php?t=200204&page=8
Finish grind edge and buff - final cutting edge applied and buffed to desired polish level. After this step try to avoid handling the blade and clean with alcohol if needed to remove oils. Once you have put the knife into service and started the patinas development this becomes a non issue.
That's the process at this point... over 20 hours is spent in heat treat stages!!! so don't be in a rush!
Here's the link to decoding steel and the post with the heat /color reference charts. The Rockwell tempering chart is in this post as well. I have added and changed the process since this post but the parameters are still applicable.
post - #147
http://www.garagejournal.com/forum/showthread.php?t=200204&page=8
Don't be shy looking back through the thread. Lots of little tips and mistake posting have been scattered throughout the pages...
As I've always said, if you build one post it on here and lets see it..if your embarrassed don't be, just look back at my first builds...

So have a great week everyone and please come over to check out doghouseforge.com for the blog and newsletter...stuffs about to really get going over there and I wouldn't want any of you all to miss it.

JP


")


 will we ever win?


 out of me! So while possibly a stupid fear, moving through it was a big success.