
You are using an out of date browser. It may not display this or other websites correctly.
You should upgrade or use an alternative browser.
You should upgrade or use an alternative browser.
Blank Slate
- Thread starter RonB001
- Start date
Morning work:
Go get more wood.
Cut rafters.
Afternoon work:
Put rafters up on breezeway ceiling.
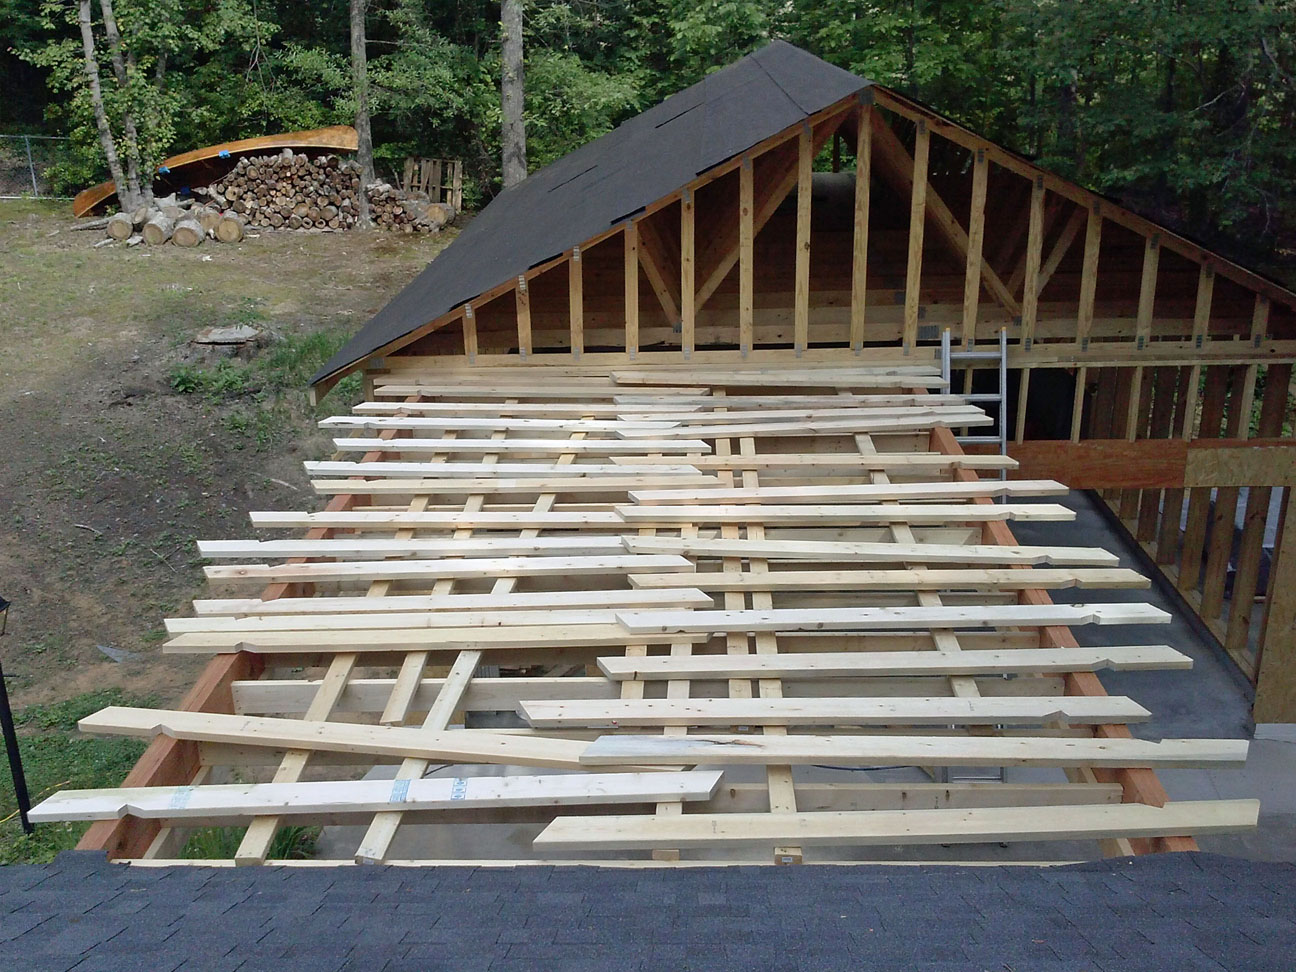
Erect rafters.
One hour later:
Tomorrow, put on hurricane clips and collar ties, the put on sheathing and black paper.
Plus, tie in valley.
Regards,
Ron Butterfield
Go get more wood.
Cut rafters.
Afternoon work:
Put rafters up on breezeway ceiling.
Erect rafters.
One hour later:
Tomorrow, put on hurricane clips and collar ties, the put on sheathing and black paper.
Plus, tie in valley.
Regards,
Ron Butterfield
Last edited:
volleyball
Well-known member
That is some breezeway
madoc1
Well-known member
nice work. I take it you have done this before?
nice work. I take it you have done this before?
Yes, quite a lot. I was a supervisor for a custom home builder for 10 years when I was much younger.
Took all day yesterday to cut and frame in the valley where the breezeway ties in to the house, then sheath and felt the roof. Finished with some very rudimentary clean up by 8:30.
It was "only" 85 degrees yesterday afternoon, but it totally kicked my ****.
More pics tonight.
Regards,
RonB
It's coming along nicely, keep up the hard work.
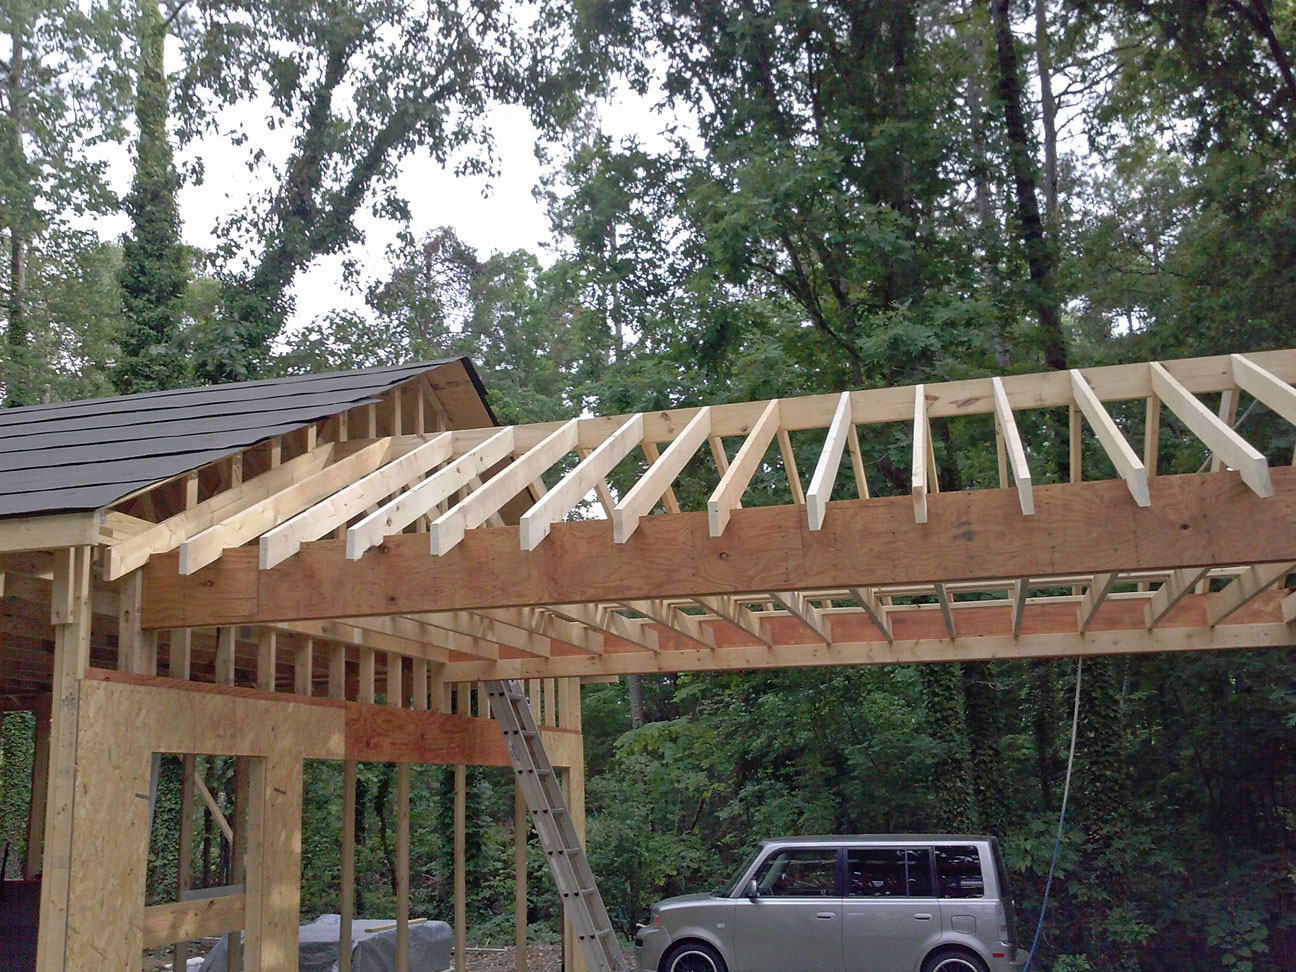
Here is a pic of yesterday's work:
The breezeway has a span of 20 feet, and is 12 feet wide from beam to beam. With the overhang, that works out to 14 feet wide, which is enough for my wife's xB to fit underneath. I guess I got a free carport in the bargain!
I don't know what the official term is, but I cut in to the original roof with what my dad used to call a California valley. This is where you cut back the shingles in a straight line just above the valley line, and work the new shingles up the slope underneath the old ones. So far, it is just tar paper, but we had a nice thunderstorm today and it hasn't leaked yet.
When I do the actual shingles, I will run a bead of roofing caulk just above the cut line.
Regards,
RonB
2x4 walls 16" O.C. and the 2x8 24" O.C. ?
Kevin54
MEMBER EMERITUS
California Valley or California cut. It can be called either.
As far as the garage, it's looking great. I'm still waiting on getting my estimate. Looking forward to seeing your updates, although I may have to go by another monitor that is a little larger.
As far as the garage, it's looking great. I'm still waiting on getting my estimate. Looking forward to seeing your updates, although I may have to go by another monitor that is a little larger.
2x4 walls 16" O.C. and the 2x8 24" O.C. ?
Exactly. The 2x8 wall is flush with the inside of the concrete block, so I can run drywall all the way down to the floor (well, not quite, I'll leave a 1/2 inch space so it doesn't wick moisture from the floor).
The back wall is 2x4 because it is so short, and I was originally going to have the soffit shelves run across the back. The front wall is 2x4 because I don't want the garage door inset that far, nor did I want to furr the header in that much.
The 16 vs 24 inch on center follows the stud size: the trusses bear directly on top of the 2x8 studs, with a single top plate. The lower top plate of the 2x4 walls gives me an overlap at the corners, which I prefer.
Regards,
RonB
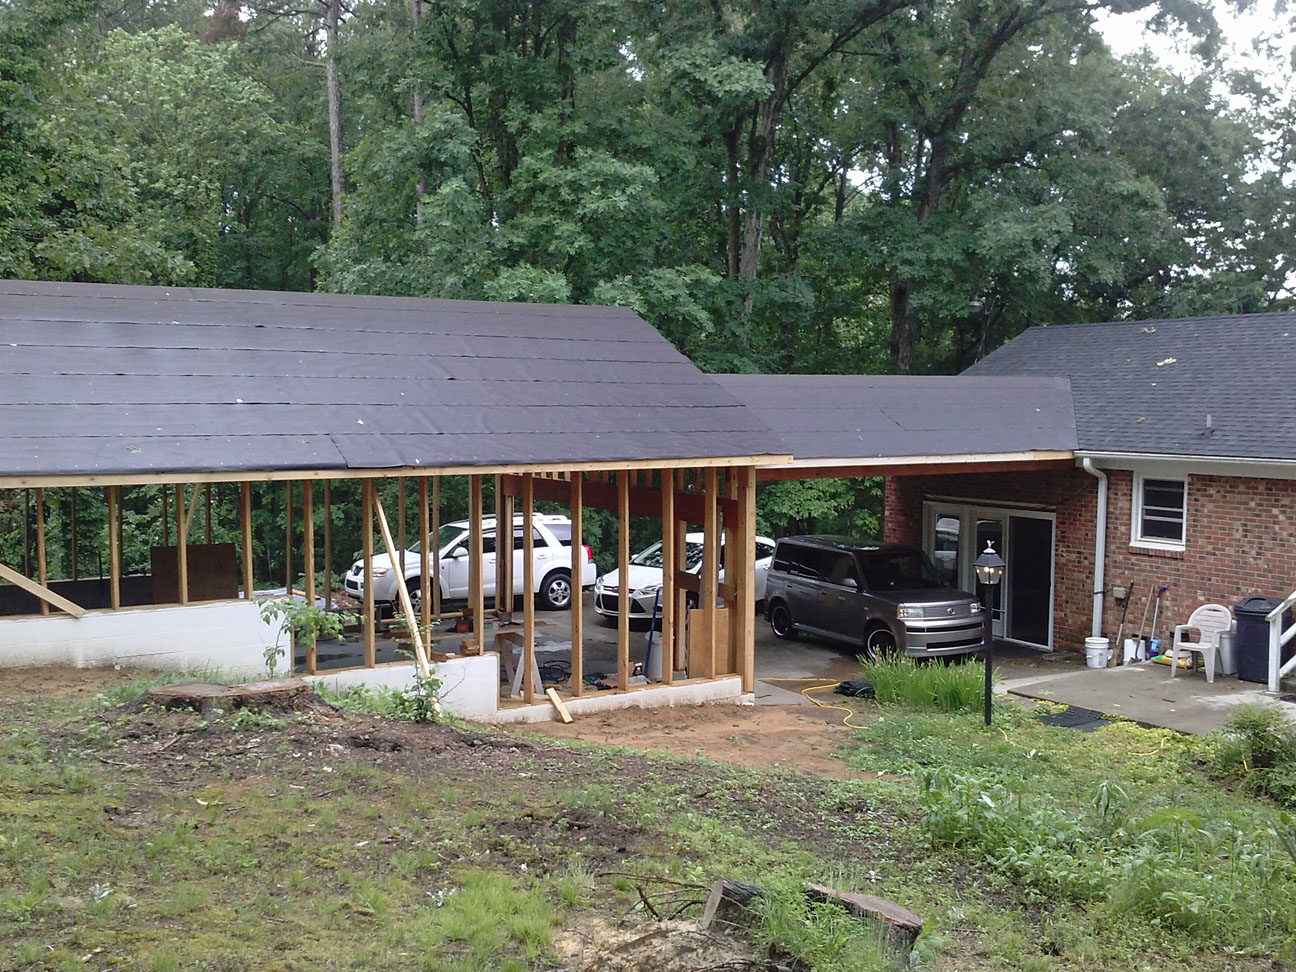
Sometimes it seems as though nothing is getting done. But...
First, I did the wall sheathing. Well, most of it, anyway.
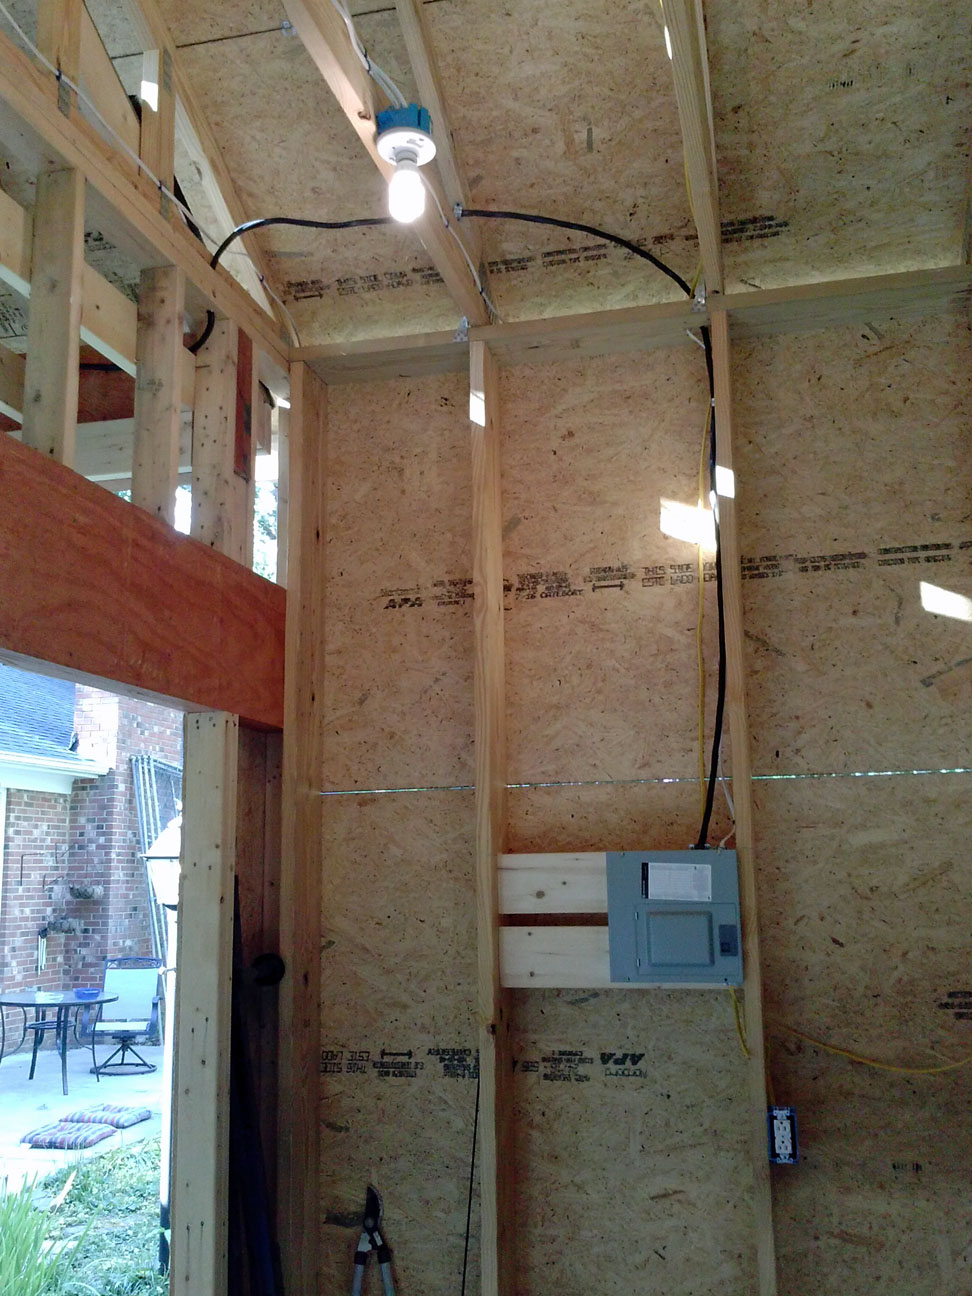
Then, I ran basic power and a few outlets and lights, so I didn't have to have extension cords all over the place.
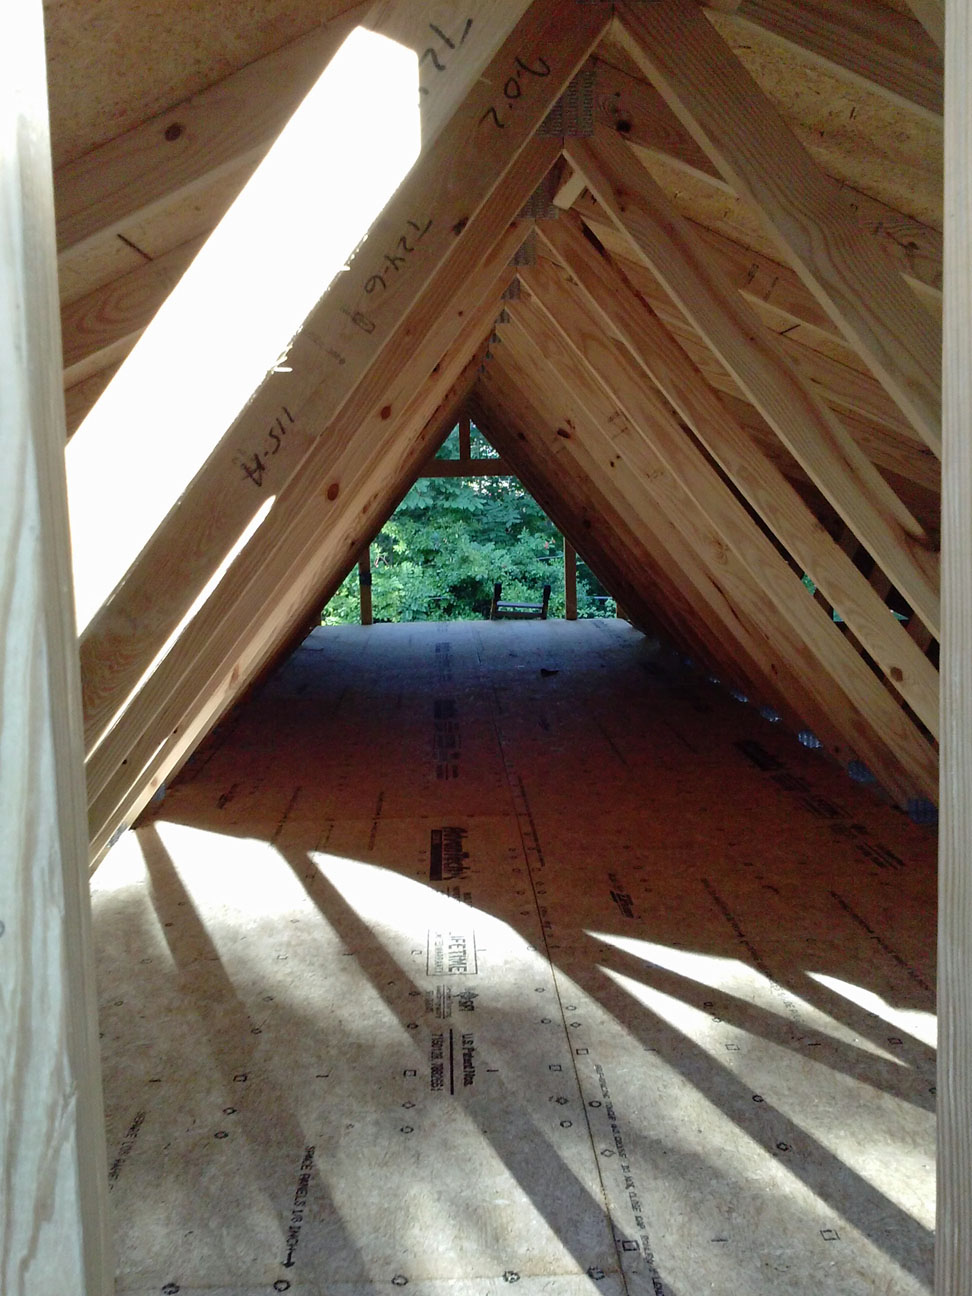
Next, I finished the floor in the attic, so that I could put some lights up there as well. This is looking through the gable studs at the front, out the door at the back. The back door is ~4 feet tall and 5 feet wide. I haven't figured out exactly what I am going to do there yet.
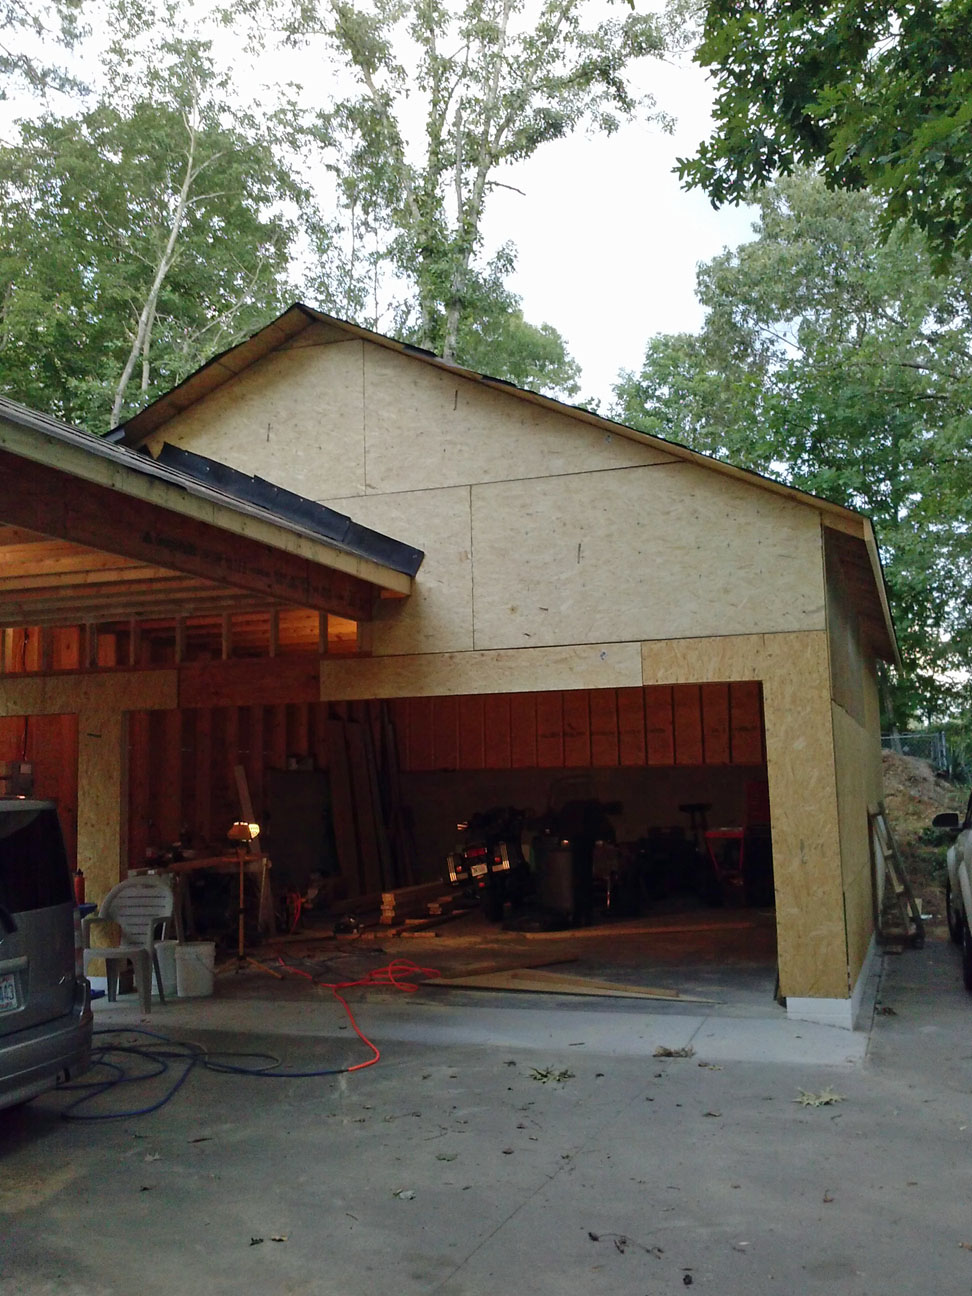
This is the gable end with sheathing finished.
Once I got the pile of sheathing out of the way, I ordered shingles. So far, I have the breezeway done.
Now, I have to do the rest of the roof, change the oil in my wife's car, and change the timing belt in the V-6 Saturn Vue which I am supposed to deliver to my mom in Missouri over the July 4 weekend.
First, I did the wall sheathing. Well, most of it, anyway.
Then, I ran basic power and a few outlets and lights, so I didn't have to have extension cords all over the place.
Next, I finished the floor in the attic, so that I could put some lights up there as well. This is looking through the gable studs at the front, out the door at the back. The back door is ~4 feet tall and 5 feet wide. I haven't figured out exactly what I am going to do there yet.
This is the gable end with sheathing finished.
Once I got the pile of sheathing out of the way, I ordered shingles. So far, I have the breezeway done.
Now, I have to do the rest of the roof, change the oil in my wife's car, and change the timing belt in the V-6 Saturn Vue which I am supposed to deliver to my mom in Missouri over the July 4 weekend.
I'm tired of summer. Still 90F at 8PM.
Oh, wait, it's not summer yet :-(
Anyway, whining aside, I finished the gable rafters and drip edge this evening.
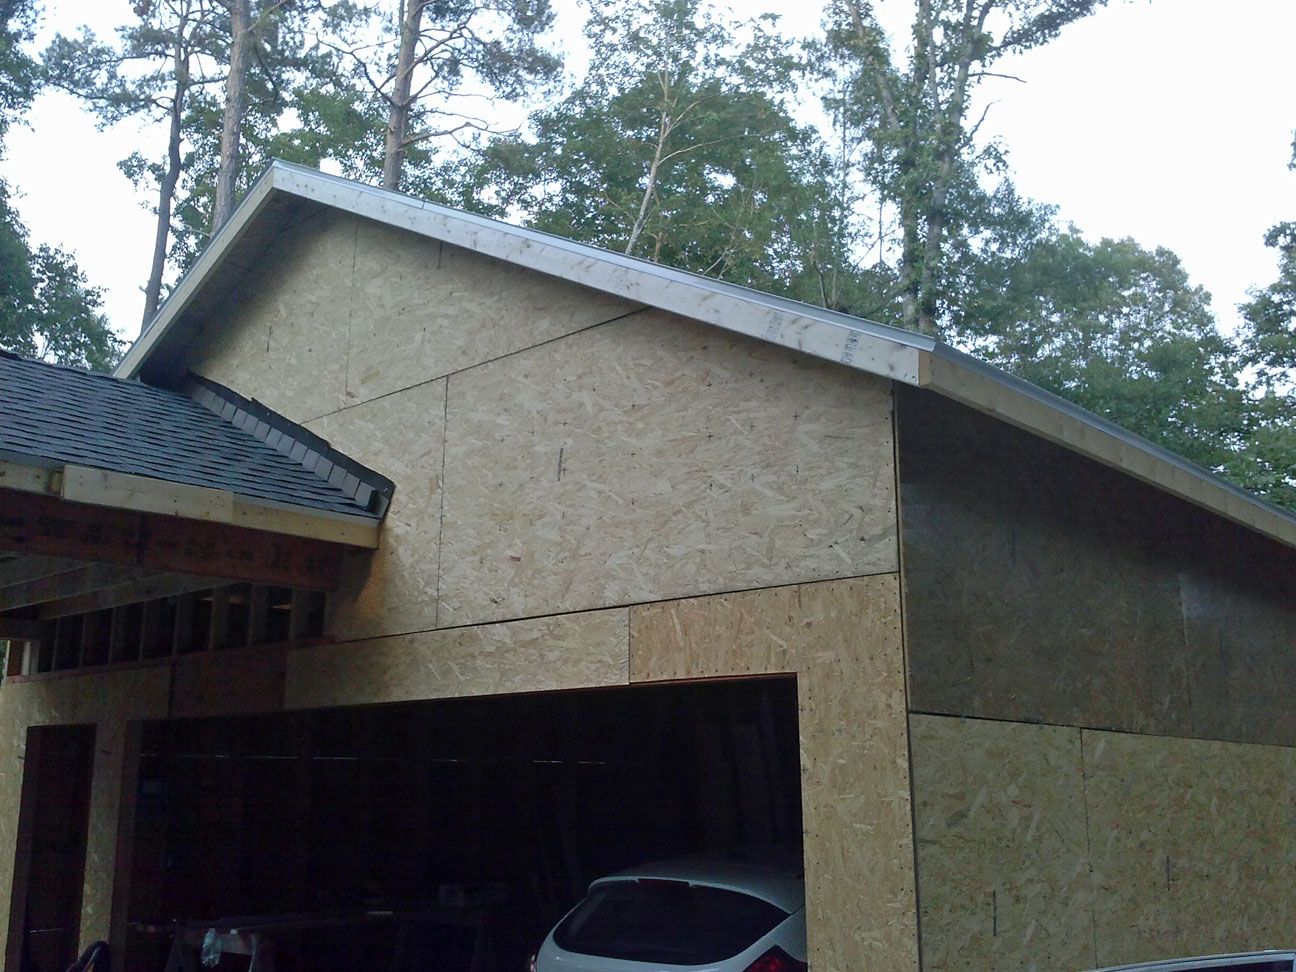
In the OCD details department, the eave drip edge is under the felt paper, and the rake drip edge is over the felt paper, and the top piece of rake drip edge laps over the lower pieces so that any rain that might be running down its face cannot get behind the lower piece.
I will also be using peel and stick shingle starter strip, both at the eaves and along the rake, nailed near the edge. This is so that the shingle have something to seal against along all the outside edges, to prevent them from being blown up by wind from any direction. This is not the same as having proper high-wind shingles, but is better than letting the edges flap in the breeze.
Regards,
RonB
Oh, wait, it's not summer yet :-(
Anyway, whining aside, I finished the gable rafters and drip edge this evening.
In the OCD details department, the eave drip edge is under the felt paper, and the rake drip edge is over the felt paper, and the top piece of rake drip edge laps over the lower pieces so that any rain that might be running down its face cannot get behind the lower piece.
I will also be using peel and stick shingle starter strip, both at the eaves and along the rake, nailed near the edge. This is so that the shingle have something to seal against along all the outside edges, to prevent them from being blown up by wind from any direction. This is not the same as having proper high-wind shingles, but is better than letting the edges flap in the breeze.
Regards,
RonB
Wow, 4 pages deep in just a couple of days. I guess my progress isn't fast enough to stay on page 1 ")
Thunderstorms this week. Yesterday, I worked on fixing some sheathing mistakes on the front gable wall. Due to high temperature brain fade, I hadn't put the treated jack studs on the inside of the doors before sheathing. That made the plywood smaller than it could have been. With the nailing schedule for this type of gable bracing (3" apart according to the NC building code), coupled with my reluctance to go to storage and get the sheathing nails, gave me a major nail pulling job. Replacing 2 sheets of OSB took 3 hours :-(
Today, my garage door was delivered. Tonight, I put it up. So now I have a garage door. I do NOT have an operable garage door, as the upper rails are not yet installed. I found out too late that my sabre saw, which is the only saw I have with metal cutting blades, is still in storage. Oh well
Tomorrow depends on whether, and when, it rains. We have 30% chance of thunderstorms again. Hopefully I can get some shingles on. If not, I can work on finishing the garage door.
Regards,
RonB
Looking good--lots of attention to detail on the framing and the roof.
if you have concerns about the block wall could you dig out behind it and put a retaining wall in? I know it would be a major PITA especially as you would have to do siding over concrete block and retaining walls are no fun to build (I had to build one in Michigan).
if you have concerns about the block wall could you dig out behind it and put a retaining wall in? I know it would be a major PITA especially as you would have to do siding over concrete block and retaining walls are no fun to build (I had to build one in Michigan).
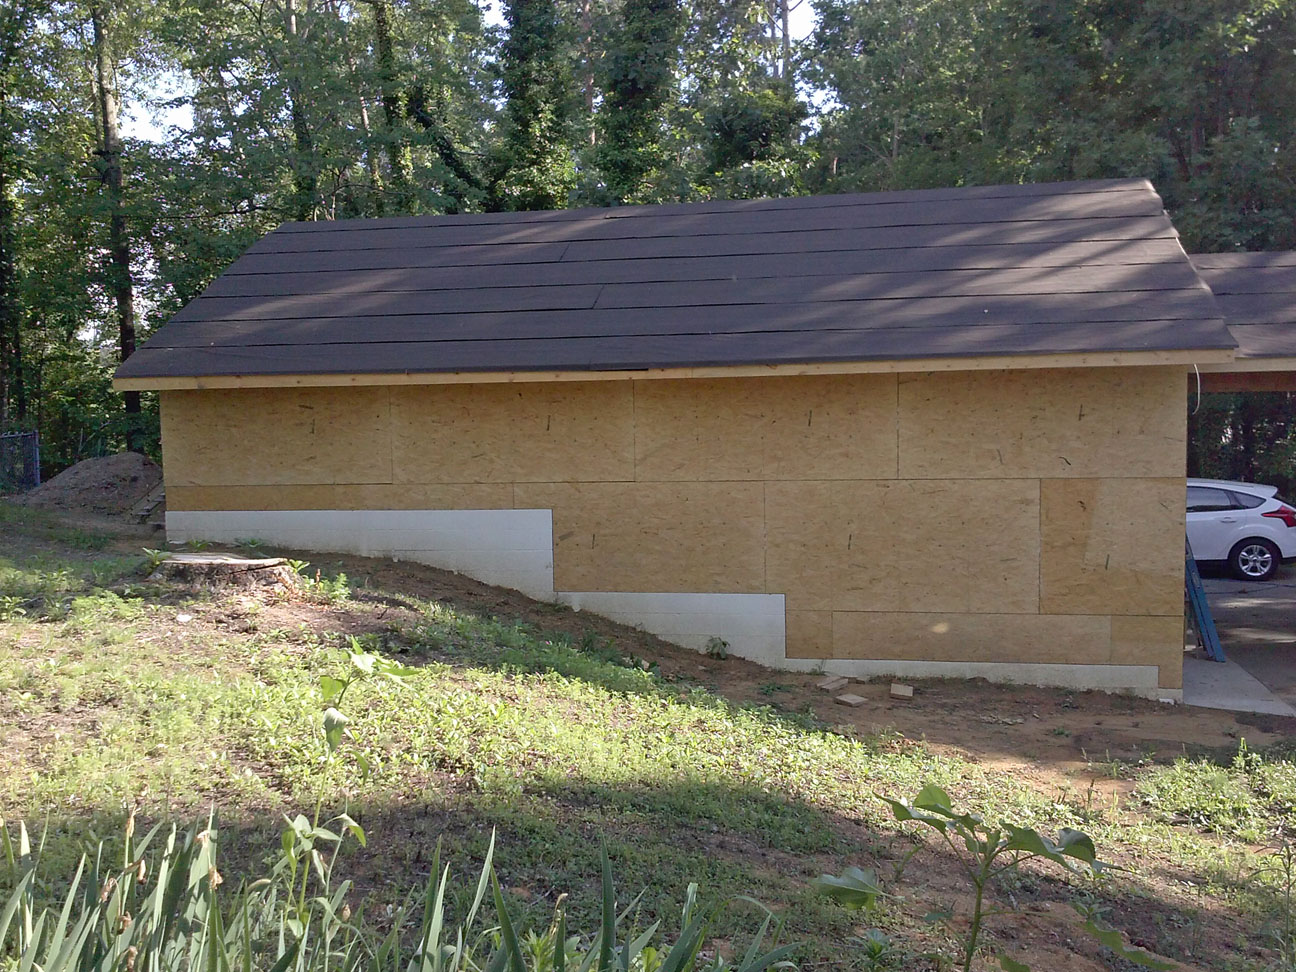
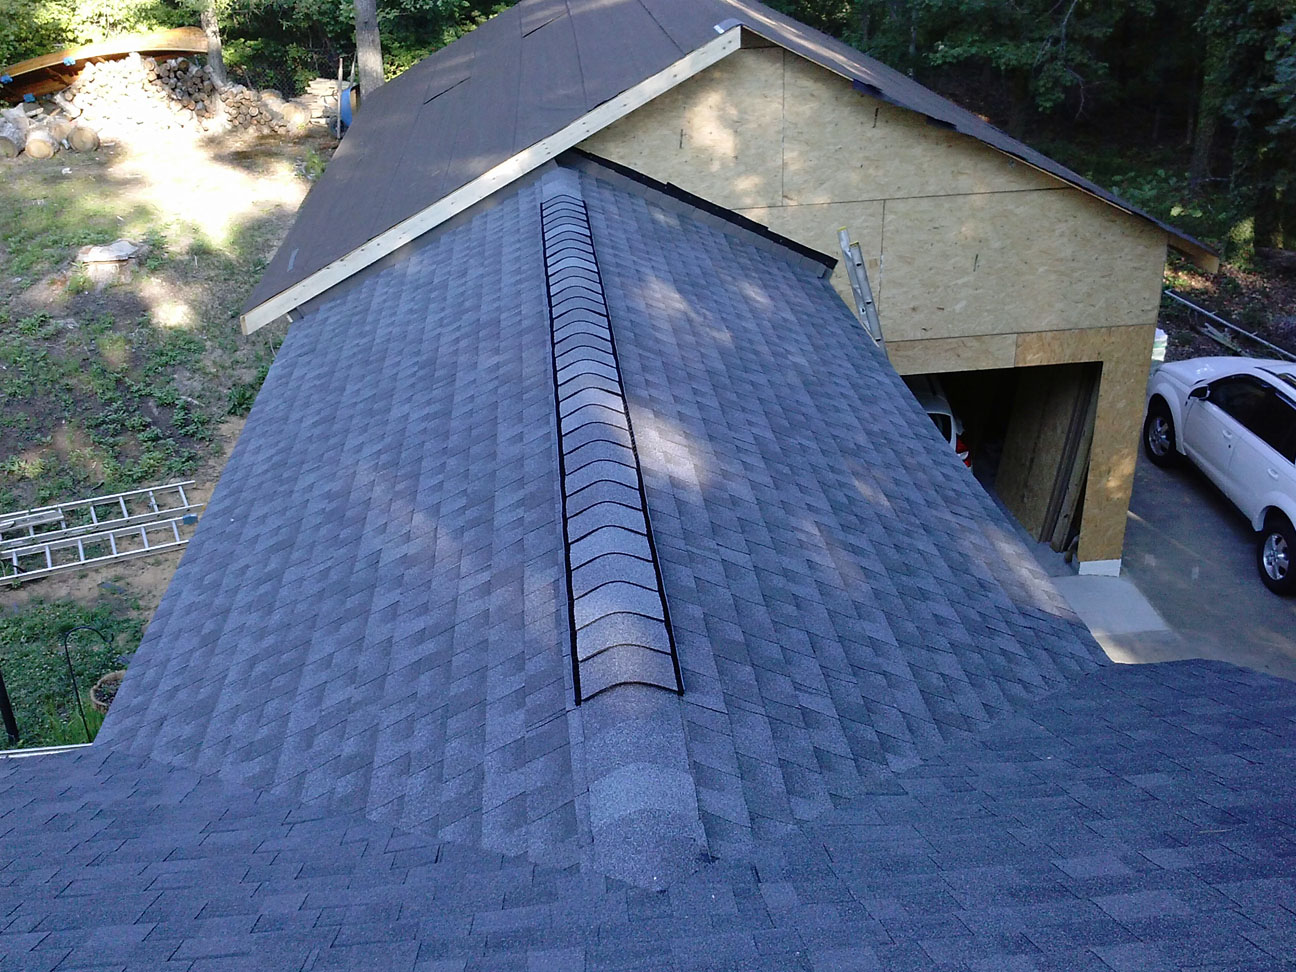
Well, it's done:
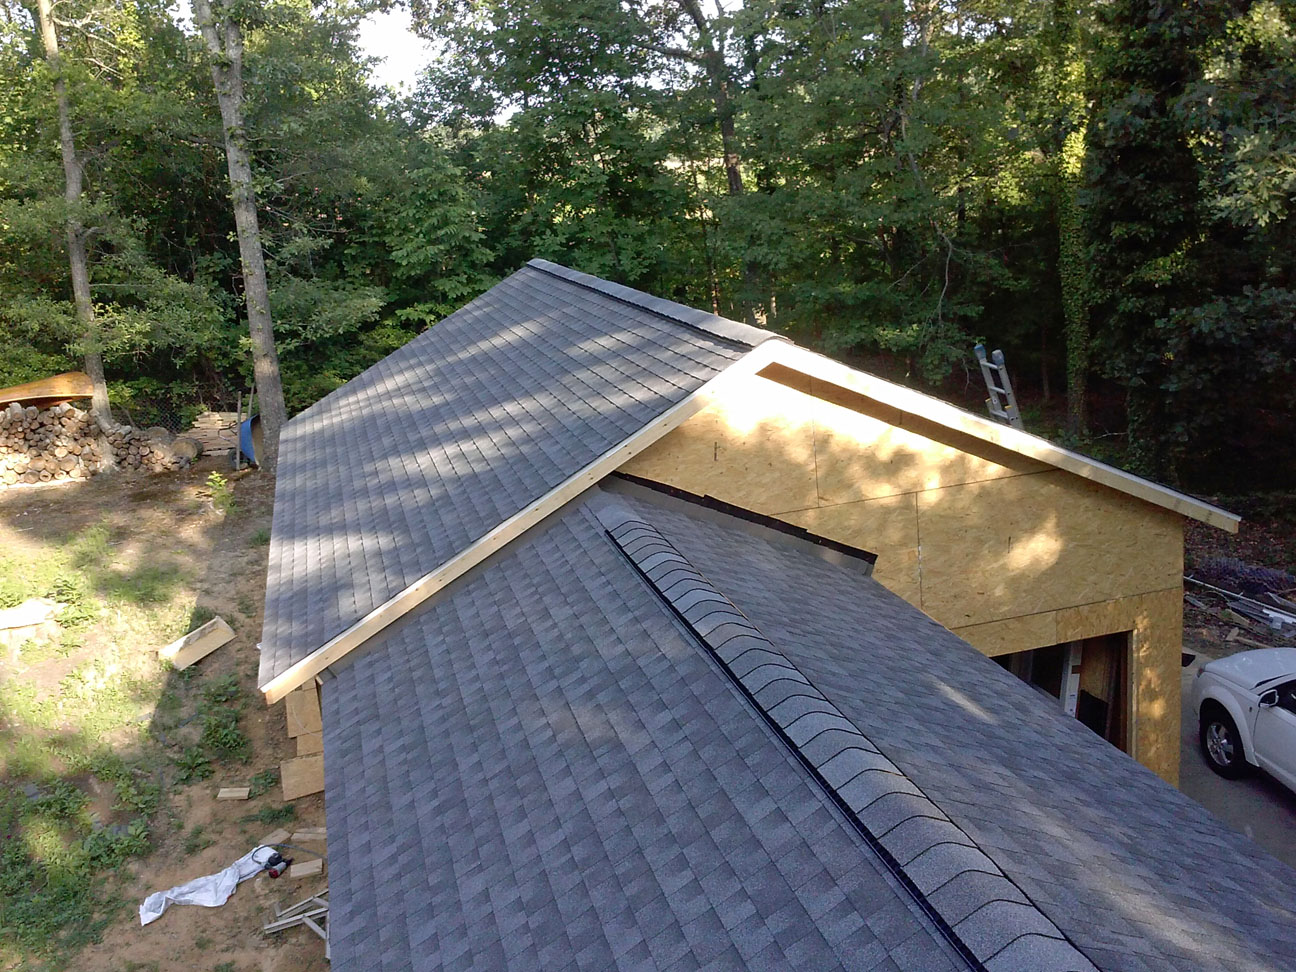
Man, what a job. Just over 10 squares of shingles on the garage, almost finished in a weekend. I had to do the last bit of ridge cap tonight; I just couldn't bring myself to carry another bundle of shingles up the ladder at 8:50 last night :-( FYI total time for the garage shingles: 15 hours. I had to stop in the middle of each day due to the sun making the shingles so soft I was tearing them up by walking on them.
BTW Getting older does slow you down. About 30 years ago, I did a house just a little larger than this garage in a weekend, by myself, without the air nailer, and that even included tearing off the old shingles.
Anyway, I also got the garage door installed this weekend, but forgot to take a picture.
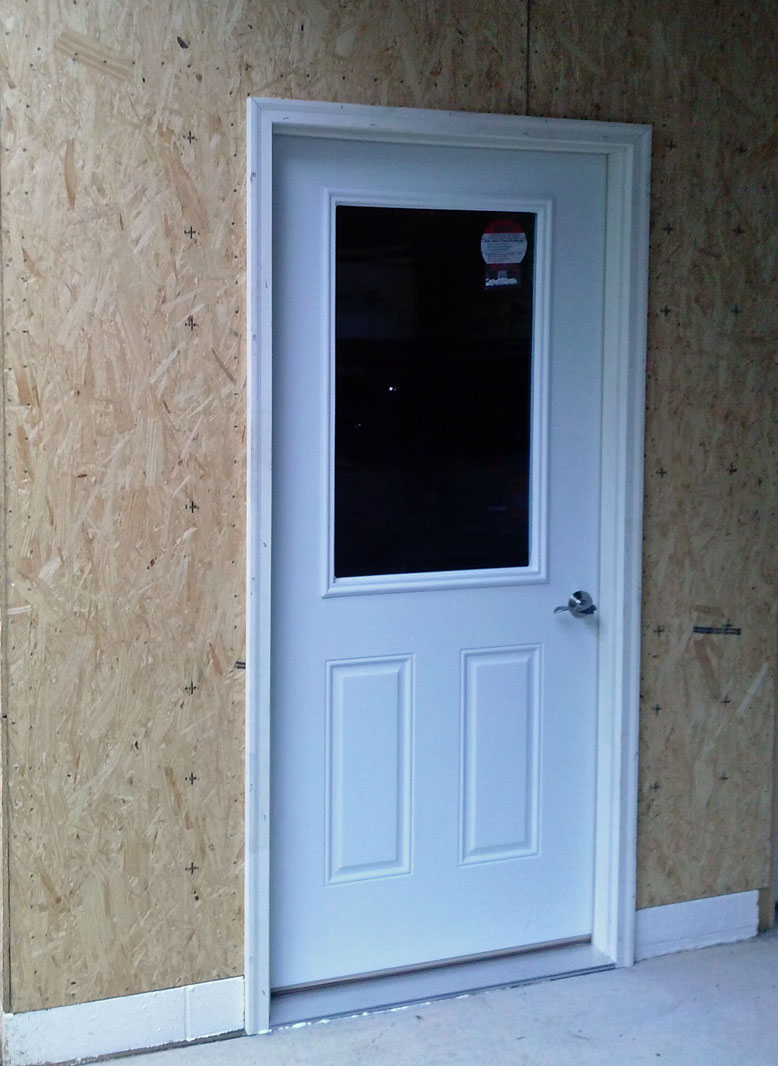
What's next? I also have the people door to install, then finish the sheathing on the other gable end.
Plus car work, and out-of-town for work, and a trip to mom. You probably won't hear more from me until mid-July.
Regards,
RonB
Man, what a job. Just over 10 squares of shingles on the garage, almost finished in a weekend. I had to do the last bit of ridge cap tonight; I just couldn't bring myself to carry another bundle of shingles up the ladder at 8:50 last night :-( FYI total time for the garage shingles: 15 hours. I had to stop in the middle of each day due to the sun making the shingles so soft I was tearing them up by walking on them.
BTW Getting older does slow you down. About 30 years ago, I did a house just a little larger than this garage in a weekend, by myself, without the air nailer, and that even included tearing off the old shingles.
Anyway, I also got the garage door installed this weekend, but forgot to take a picture.
What's next? I also have the people door to install, then finish the sheathing on the other gable end.
Plus car work, and out-of-town for work, and a trip to mom. You probably won't hear more from me until mid-July.
Regards,
RonB
metalhead140
Well-known member
Looking good!
jbmatth
Well-known member
This is looking good, what part of Missouri are you going? I'll be headed to my parents place in SE Mo. to help them roof their house, roof my brothers house, and help him on his home rebuild from studs to fully functional in 2 months. He has 1 month to go, I don't think he will make it, but with 5 brothers helping him we are going to give it a shot!
Xporter
Well-known member
Looks great, looking forward to the progress.
This is looking good, what part of Missouri are you going?
My mom is in Mountain View, which is in the south central Ozarks. Of course, no need to go right now if I don't get her car ready.
Thanks to all for the compliments. I will endeavor to continue earning them.
Now I have to start using the garage, rather than working on it. Not that it's anywhere near done, understand.
I have been very pleased with the service and prices I get on auto parts from rock auto. The Gates timing belt package (including water pump), new iridium spark plugs, and filters came to less than $250 including shipping. Now comes the hard part.
When you do an engine swap, you don't really expect things to be straightforward. When you buy a factory original vehicle, you DO expect things to be straightforward. But what about when you buy a factory engine swap?
From 04 through 07, Saturn got 3.5 liter V-6s from Honda, to put in their Vue. Great vehicle, but I am finding out that it's a pain to work on the engine. Oh, well, I'll plug away at it like I do on the garage
I cleaned out the garage with my new HF magnetic sweeper and the leaf blower, so that I could walk around barefoot, then I set up my work area:
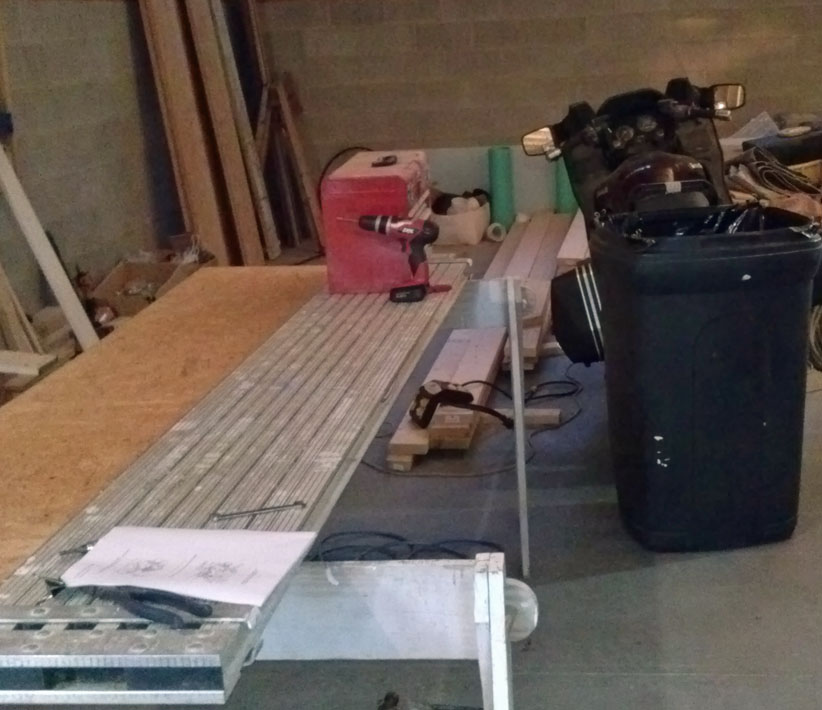
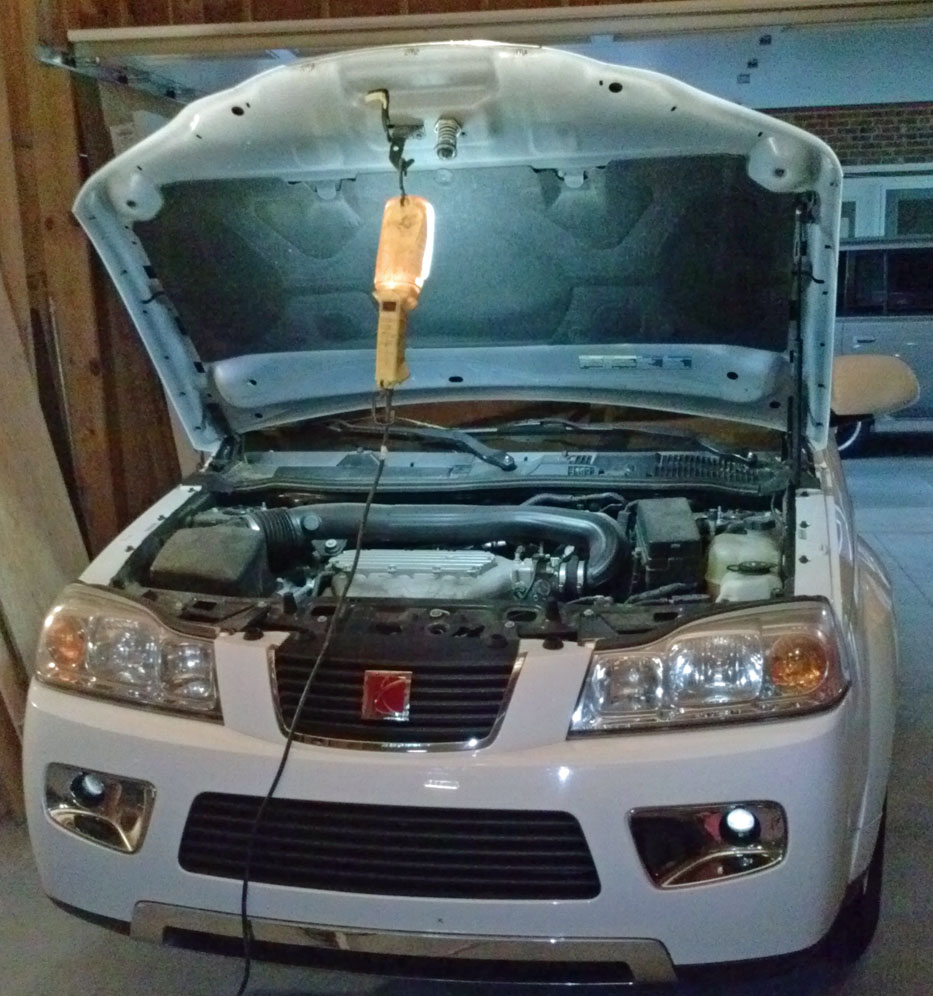
I don't have anywhere to put anything yet, although I am continually bringing more stuff home from storage, so the mess will probably get worse before it gets better. To add insult to injury, I also have to go out of town for work, for the week before I was planning on going to Missouri. I don't know if I will get the timing belt etc. all installed by then or not.
Oh, and I missed the part in the instructions where it says "remove right front wheel". So, tomorrow I get to bring home a jack and jack stands from storage to add to the mess
Regards,
RonB
jbmatth
Well-known member
I've been to Mountain View more times than I can count, never really stopped for anything other than gas and food....well I did stop for a cop, he was the lucky one to write me my first ticket. I'll be heading through there tonight around 10-11 on my way back to my home town. Good luck with the vue, they are sooooo much fun to work on.
A bit more progress this weekend, although still very slow and tired :-(
Finished the sheathing on the gable ends.
Emptied a can of wasp killer on the mud daubers that were trying to take over. Need more wasp killer.
Bought a bunch of lights.
Started the soffit/storage. Got one side framed up, but don't have the shelf flooring in place yet. Found out that my chosen height would interfere with the garage door lift mechanism, so stopped that side ~4 feet short of the corner.
No pics this weekend.
Regards,
RonB
digitalsolo
New member
- Joined
- Apr 30, 2010
- Messages
- 2
Nice space you are putting together.
Thanks, digitalsolo.
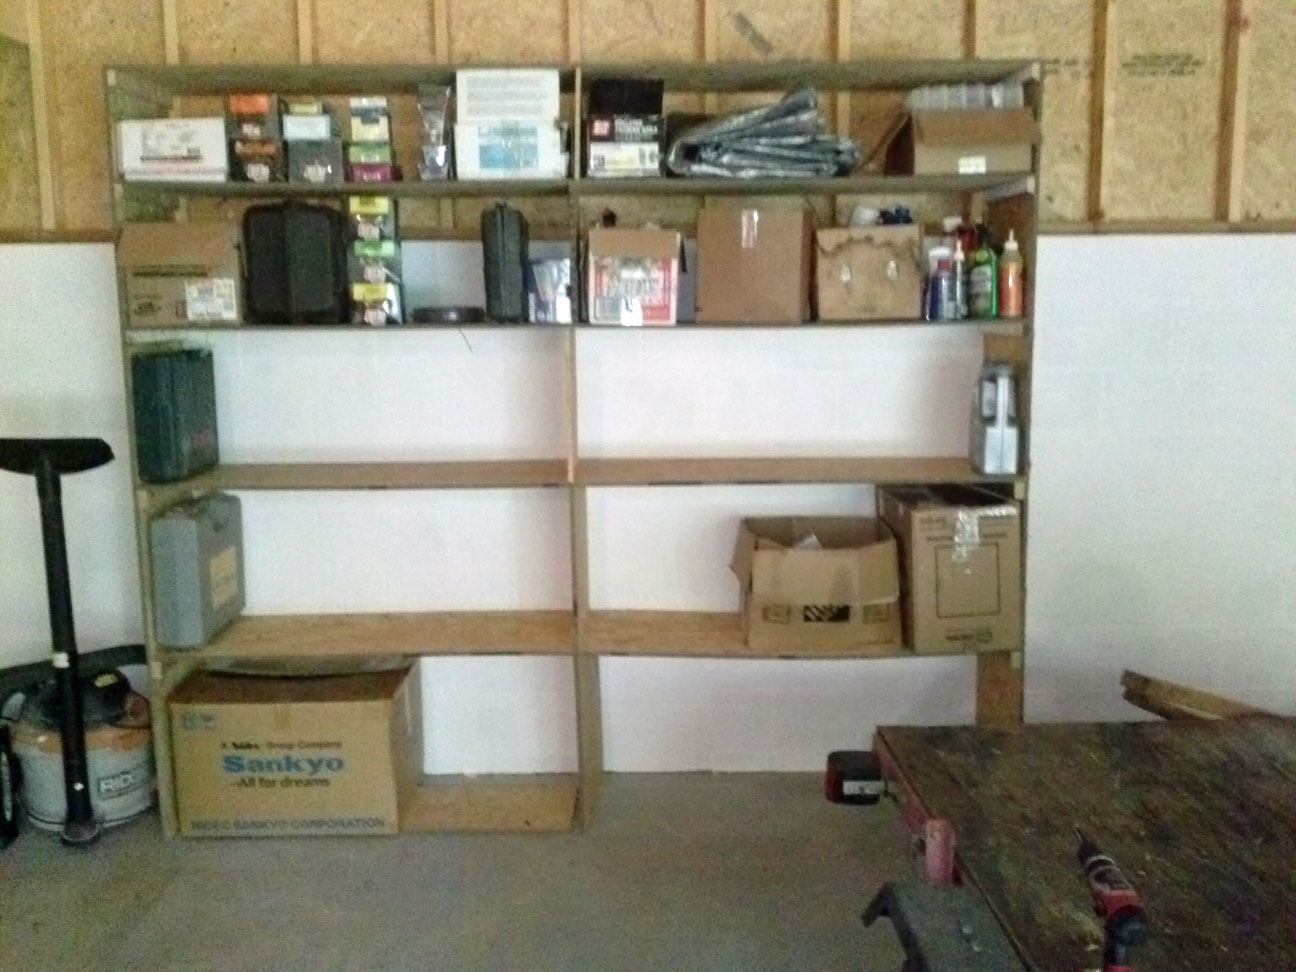
I have a small bit of progress to report, with a couple of pics. I am stealing the soffit/shelf idea from XcYZ, and have one side framed up.
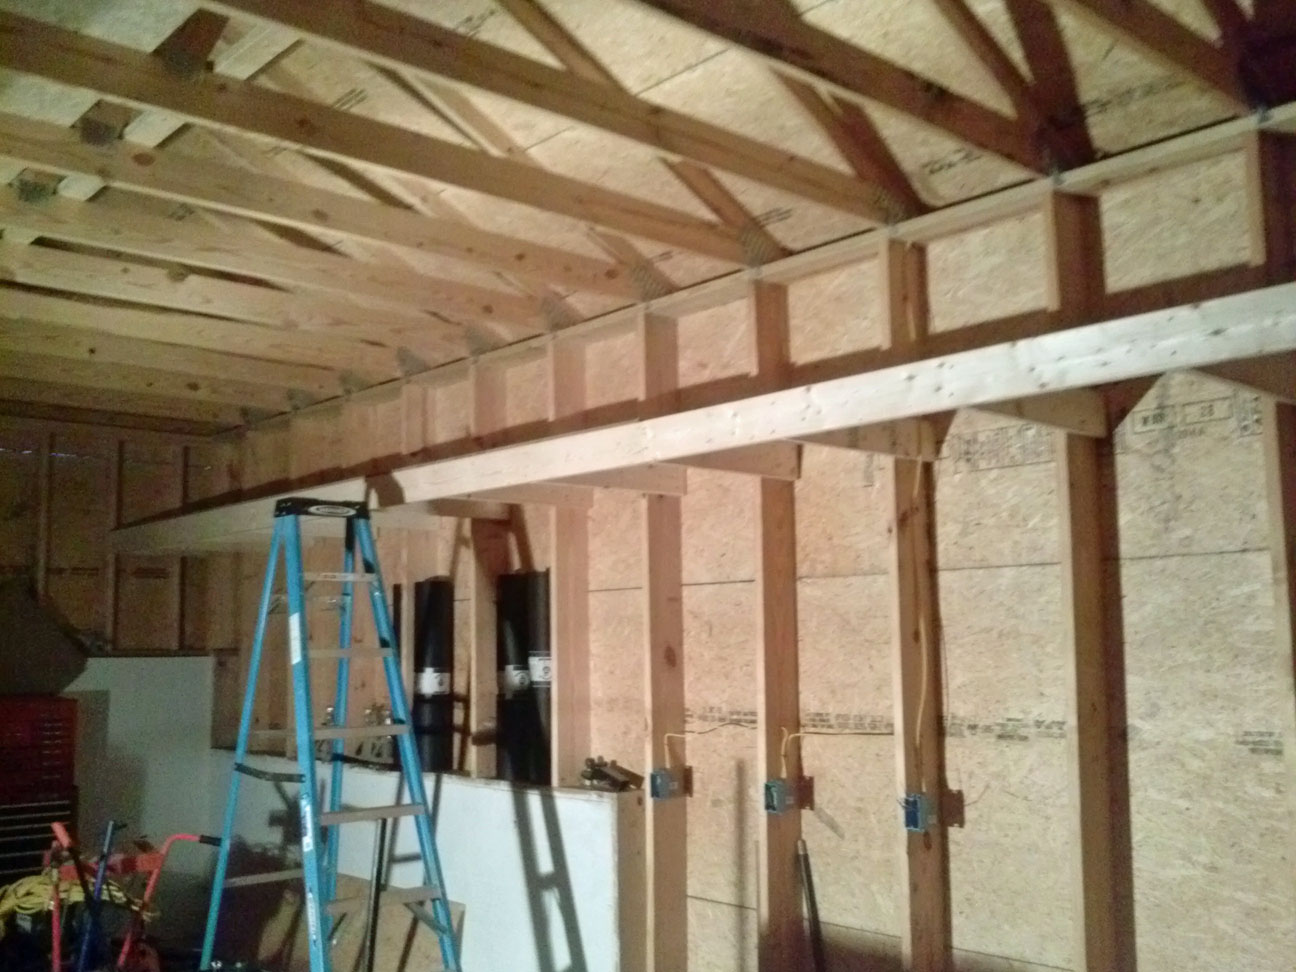
The pieces projecting from the wall stick out 22-1/2 inches, and have 6 nails into each stud. The shelf is only meant for light stuff, but I can grab onto the edge rail and do a chin up (all 200 pounds of me), so I don't think it is going to fall down.
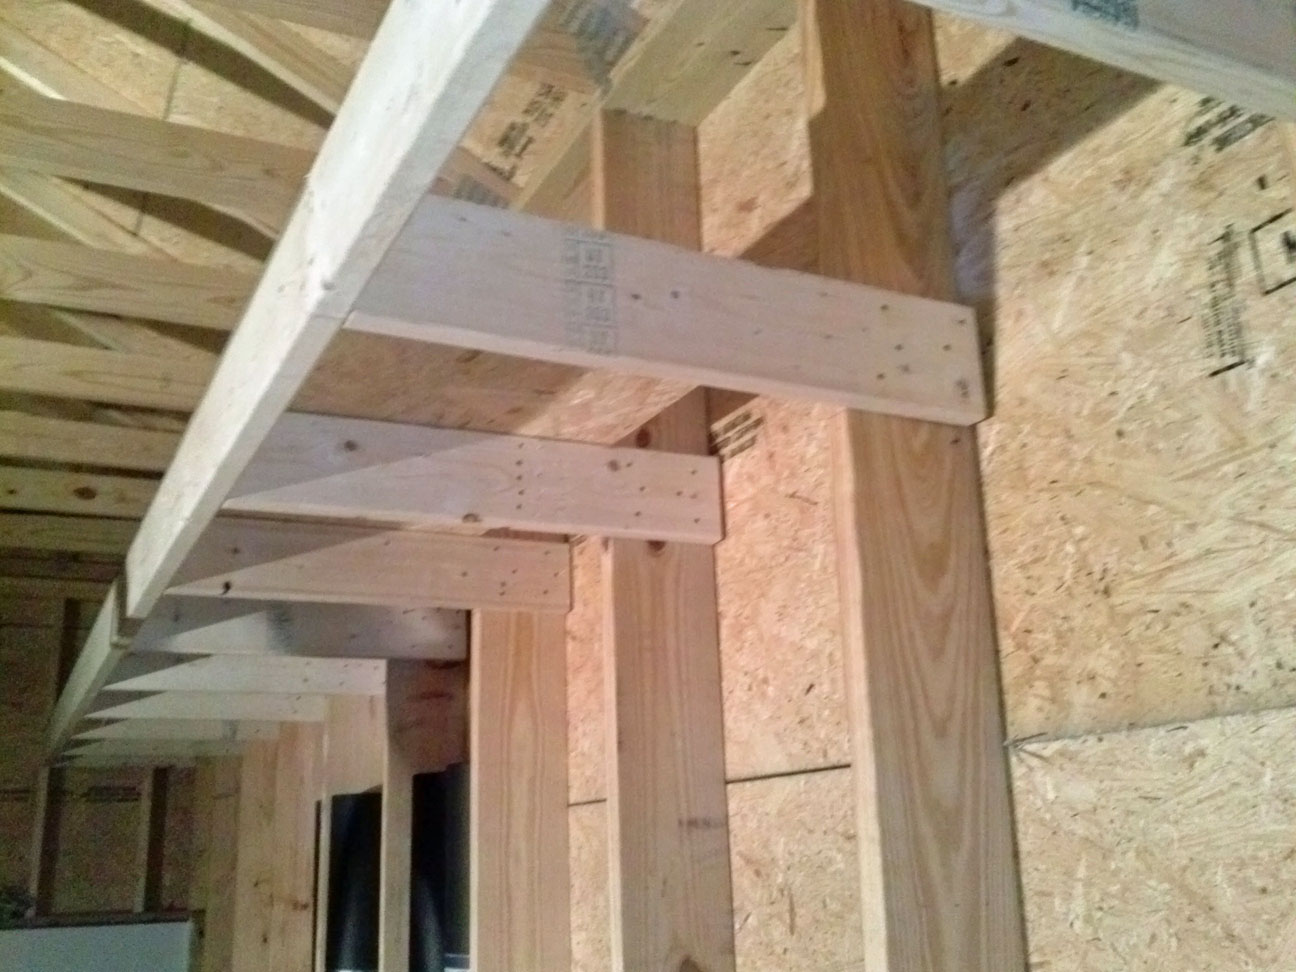
Here's a closer look at the details of construction:
I am using left over OSB for the shelf material, and the storage space will be 24 inches from shelf to ceiling drywall. I'll use hardboard or something like that for the sliding doors, just like XcYZ.
I hope to put some recessed lights in there as well, but am having a hard time finding a decent, economical unit that will fit. Any ideas?
Regards,
RonB
I have a small bit of progress to report, with a couple of pics. I am stealing the soffit/shelf idea from XcYZ, and have one side framed up.
The pieces projecting from the wall stick out 22-1/2 inches, and have 6 nails into each stud. The shelf is only meant for light stuff, but I can grab onto the edge rail and do a chin up (all 200 pounds of me), so I don't think it is going to fall down.
Here's a closer look at the details of construction:
I am using left over OSB for the shelf material, and the storage space will be 24 inches from shelf to ceiling drywall. I'll use hardboard or something like that for the sliding doors, just like XcYZ.
I hope to put some recessed lights in there as well, but am having a hard time finding a decent, economical unit that will fit. Any ideas?
Regards,
RonB
Dustoff 35
Well-known member
a 3 inch recessed light should fit in there, I used one like this in a cherry soffit built above our kitchen sink:
http://www.lowes.com/ProductDisplay...gId=10051&cmRelshp=rel&rel=nofollow&cId=PDIO1
I like the LED lights as they don't generate much heat in an enclosed space as compared to an incandescent or halogen.
http://www.lowes.com/ProductDisplay...gId=10051&cmRelshp=rel&rel=nofollow&cId=PDIO1
I like the LED lights as they don't generate much heat in an enclosed space as compared to an incandescent or halogen.
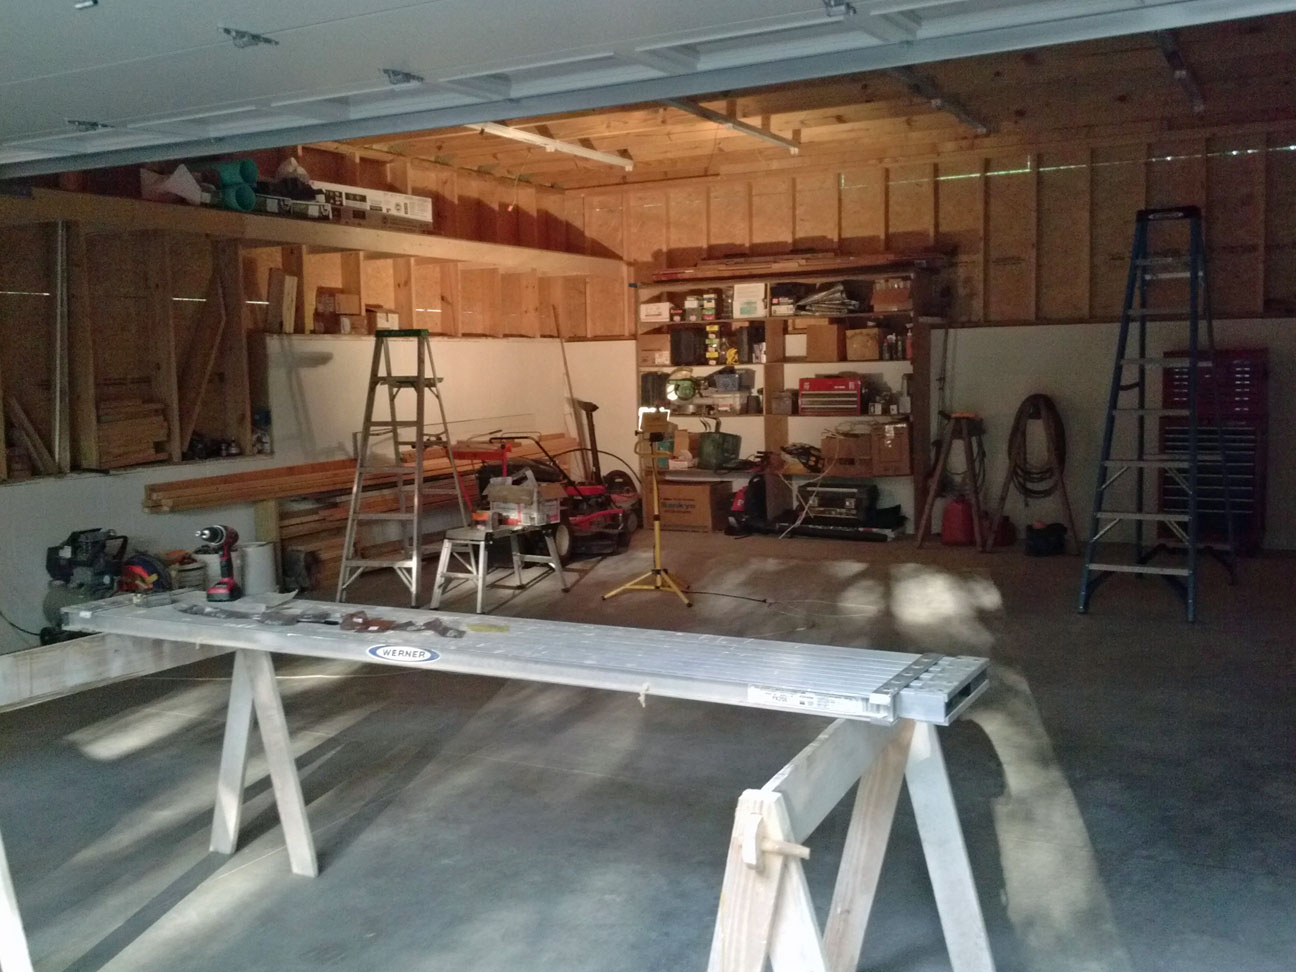
I made some actual progress this weekend.
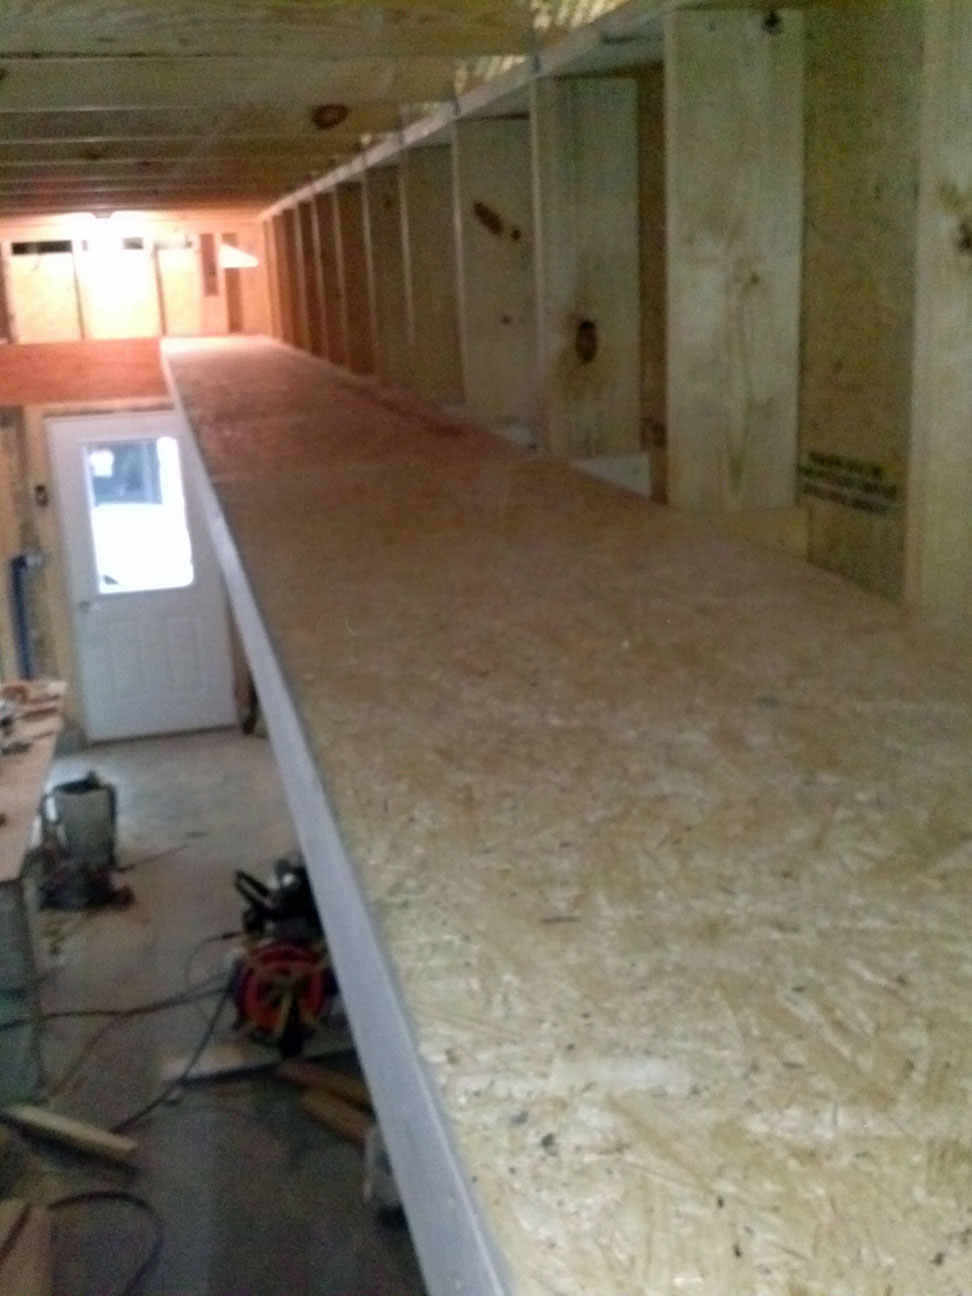
I finished the soffit shelving:
I threw together another shelf unit out of scrap OSB:
Then I filled up the shelves and swept the whole thing out:
And, I put up the flourescent lights:

After I got the fixtures up, I realized I didn't have any more cable clamps, so I'll have to get some of those tomorrow before running the wire.
Regards,
RonB
I finished the soffit shelving:
I threw together another shelf unit out of scrap OSB:
Then I filled up the shelves and swept the whole thing out:
And, I put up the flourescent lights:
After I got the fixtures up, I realized I didn't have any more cable clamps, so I'll have to get some of those tomorrow before running the wire.
Regards,
RonB
metalhead140
Well-known member
Coming along nicely!
And there came to be light...
It took until 10PM, but I managed to get all the lights wired up and turned on. Wow!
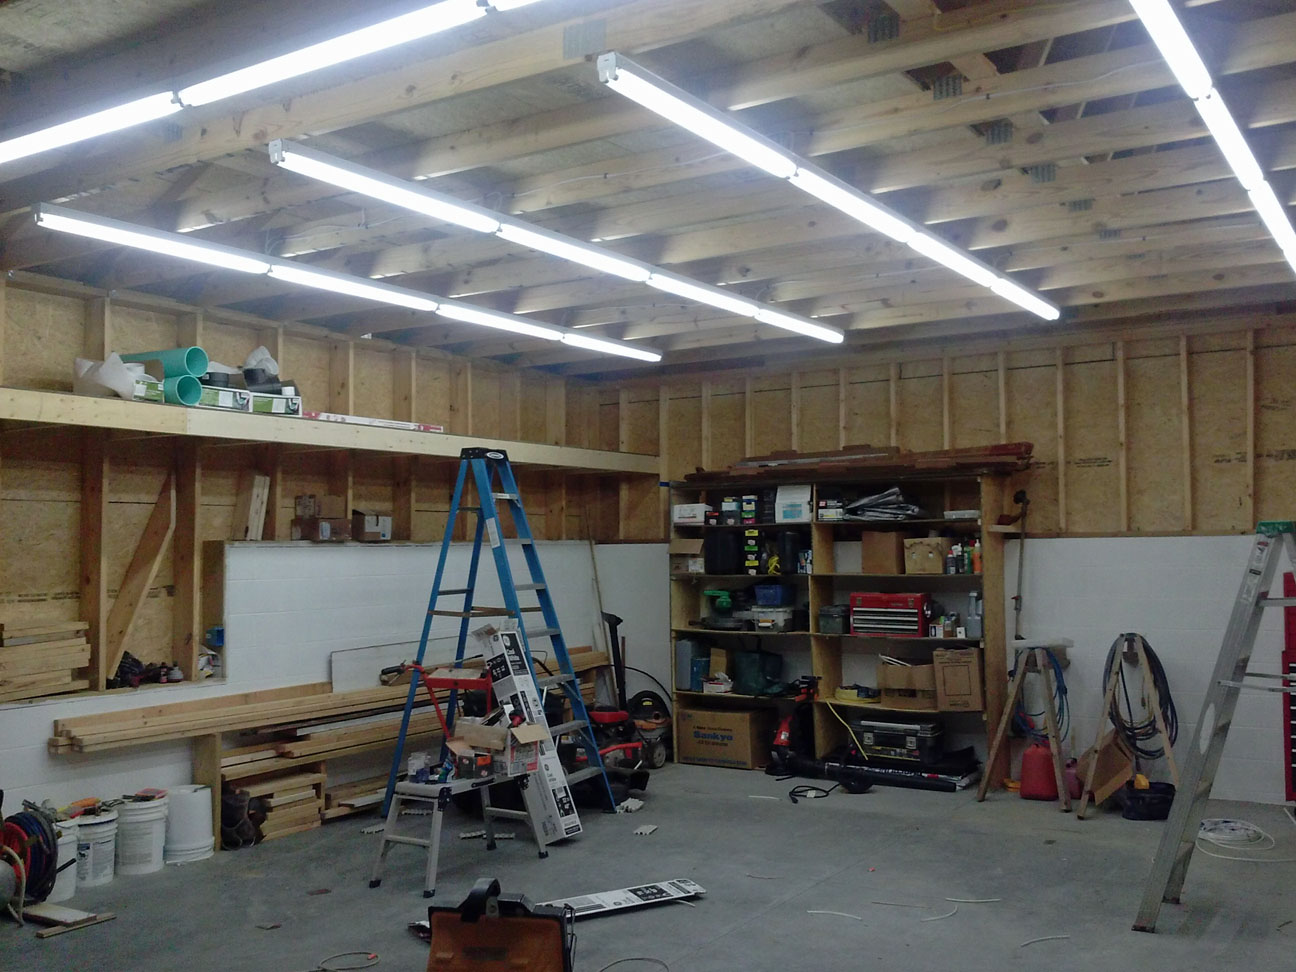
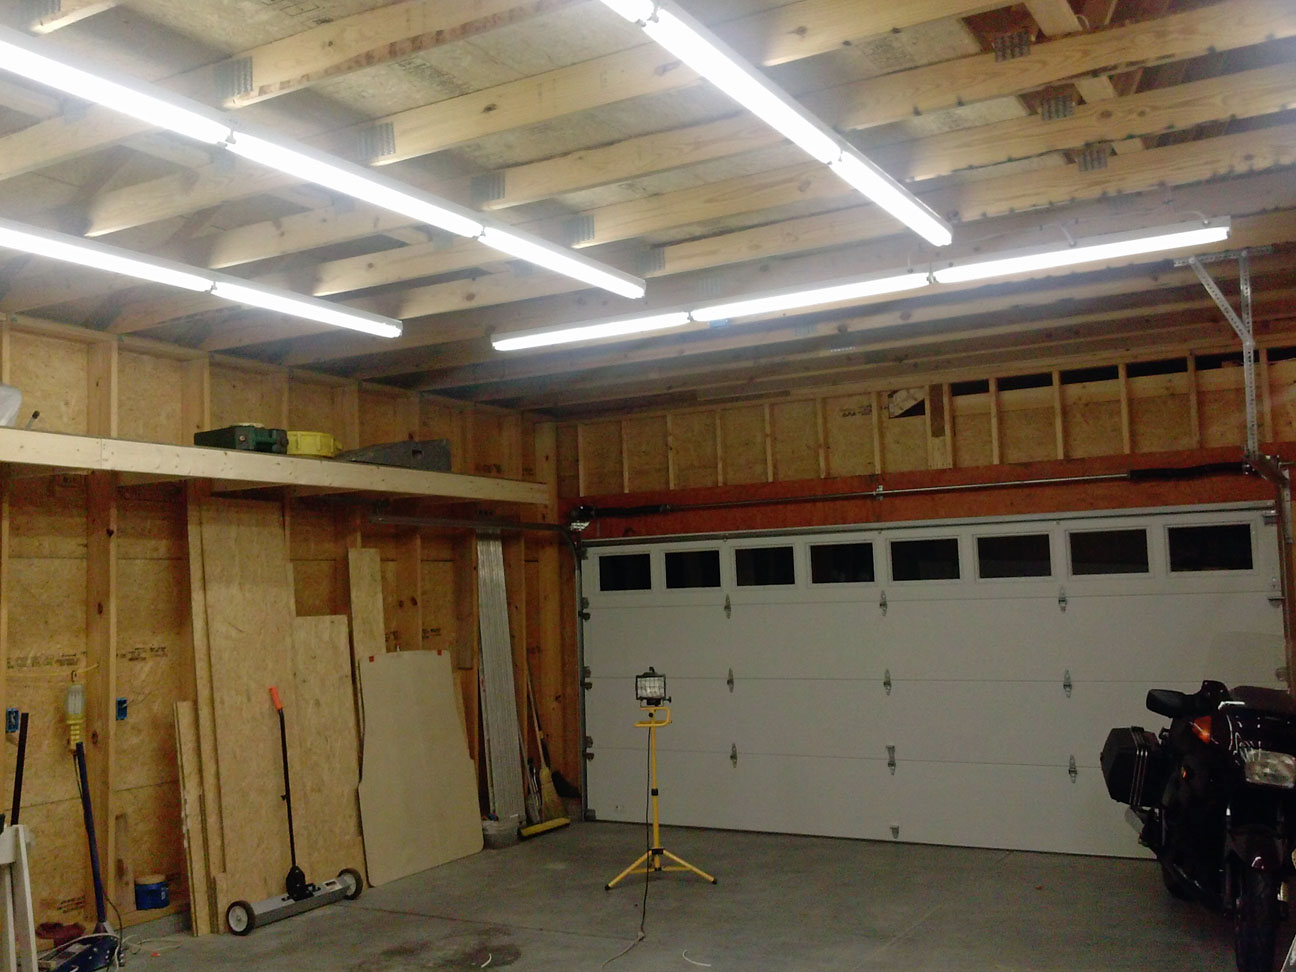
There are 9 8 foot and 1 4 foot fixture, for a total of 38 bulbs. They are 32 watt T8 bulbs, so there is a total of almost 1200 watts of lighting. That is exactly 1.5 watts per square foot. And, I can see what I am doing!
Regards,
RonB
It took until 10PM, but I managed to get all the lights wired up and turned on. Wow!
There are 9 8 foot and 1 4 foot fixture, for a total of 38 bulbs. They are 32 watt T8 bulbs, so there is a total of almost 1200 watts of lighting. That is exactly 1.5 watts per square foot. And, I can see what I am doing!
Regards,
RonB
Well, today I failed my electrical inspection. Here's why:

Here in North Carolina, any penetration of the top or bottom plates has to be sealed with a fire block. The can above looks like it would work, right? The inspector pointed out that the tested to: code was for commercial use only. In order to pass, it has to be E136 for residential use.
So, I used a needle nose pliers to dig it all out, got a tube of the right stuff (only 1 of the 4 "fire block" items on the shelf had the right number), and did it again. I set up for a re-inspection Monday.
In other news, I got my garage door opener. Putting it together, it just wouldn't (couldn't) apply any tension to the belt. Plus, the belt-to-trolley connection didn't match the picture. So, I called the tech support number, waded through a few menus, and described my problem. After checking a few things, it turns out the belt that I have is the wrong one for my opener. So, they will ship me a new one Monday. By way of apology, they are also sending me a pair of extra garage door openers.
Coming soon: Siding (wife says yay; she's tired of looking at OSB).
Regards,
RonB
hoho98925
ALLIANCE MEMBER
I am enjoying your progress.
Since you already put up lights, are you not insulating the or covering the ceiling ?
Since you already put up lights, are you not insulating the or covering the ceiling ?
Well, yes, but not now. When the time comes, I'll have to take the lights back down to put up the drywall. At the rate I'm progressing, not happening this year.
Meanwhile, the (unfinished) garage is getting used some. A couple months ago, I put a new timing belt and water pump in the 07 Saturn Vue I was going to give (trade) to my mom. In exchange, I got her 97 Toyota 4Runner. Which is in good shape, considering its miles. The front brakes are marginal, though. Even my 84 year old mother managed to warp the rotors, and she does not drag the brakes.
4Weeler magazine had a nice write-up of an upgrade: using Tundra rotors and calipers. I got the parts (new rotors, calipers, and pads) from Rock Auto for $350, and set about performing the upgrade. It was almost just a bolt on, until I tried putting the wheels back on. The only modification I needed to make was a small trim to the heat shield with some tin snips.
Then came the wheels. Since the Tundra calipers have larger pistons, they stick out more in all directions than the original ones. After about 2 hours of bolting stuff on and bleeding bubbles out, I needed to spend about 6 hours grinding the insides of the wheels to clear the new calipers. I ended up making a jig out of scrap 2x4 as a go-no_go gauge to cut down on the number of trial fits needed. I have a Hitachi angle grinder that I got from Lowes for $40, then I got a pack of grinding wheels from HF for $13 for 10. (I think it took 2 sweeps and a blow to get the grinding dust out of the garage)
When all was back together and fitting properly, I did a quick brake bed procedure, then went to Discount Tire to get them all balanced again.
It's still not perfect, but there is a very noticeable improvement in the braking performance.
What project is next? Who knows. But, my bike will most likely need tires some time this summer. And, there is a hoped-for solar pond fountain project. Stay tuned...
Regards,
RonB
sean Buick 76
Well-known member
Nice job on the lighting! Do you have a few light switches or ar they all on the same switch? I am planning to leave two light bulbs on one switch and then the rest of the lights on another so I can either have some light or MEGA light when needed...
Nice job on the lighting! Do you have a few light switches or are they all on the same switch?
Thanks. It makes so much difference to be able to see what you are doing.
There are two switches. The one just inside the door turns on just one light. I plan on putting the soffit lights on that switch as well.
The second switch has all the ceiling strip lights on it. It is right next to where the first work bench will be.
Regards,
RonB
More progress to report.
I have windows. 2 little ones on each side. On the south side, they are split apart, and will have one of the workbenches between them.
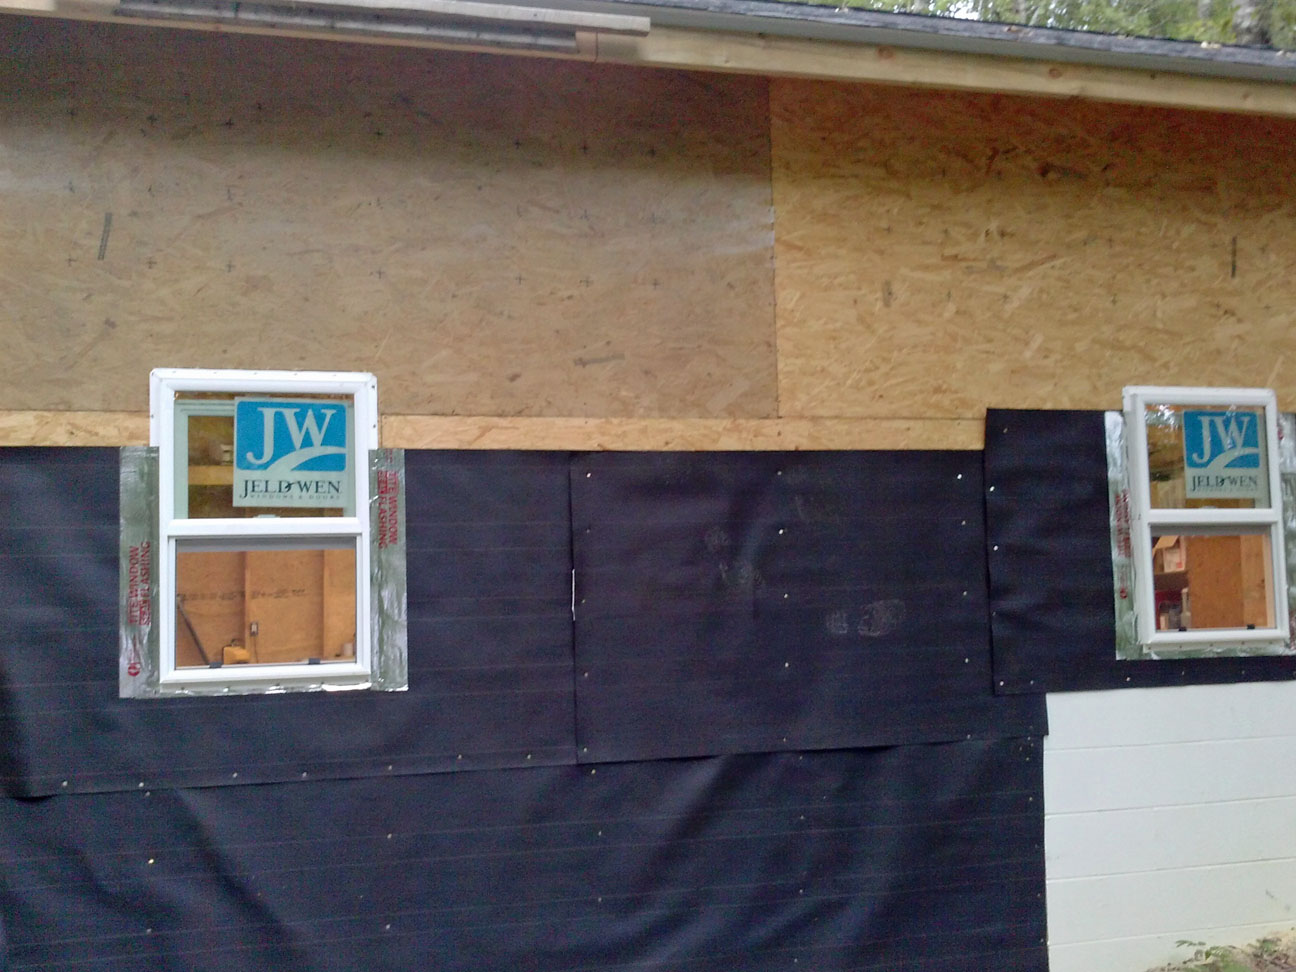
On the north side, they are together as a double, with workbenches to be on each side of them.
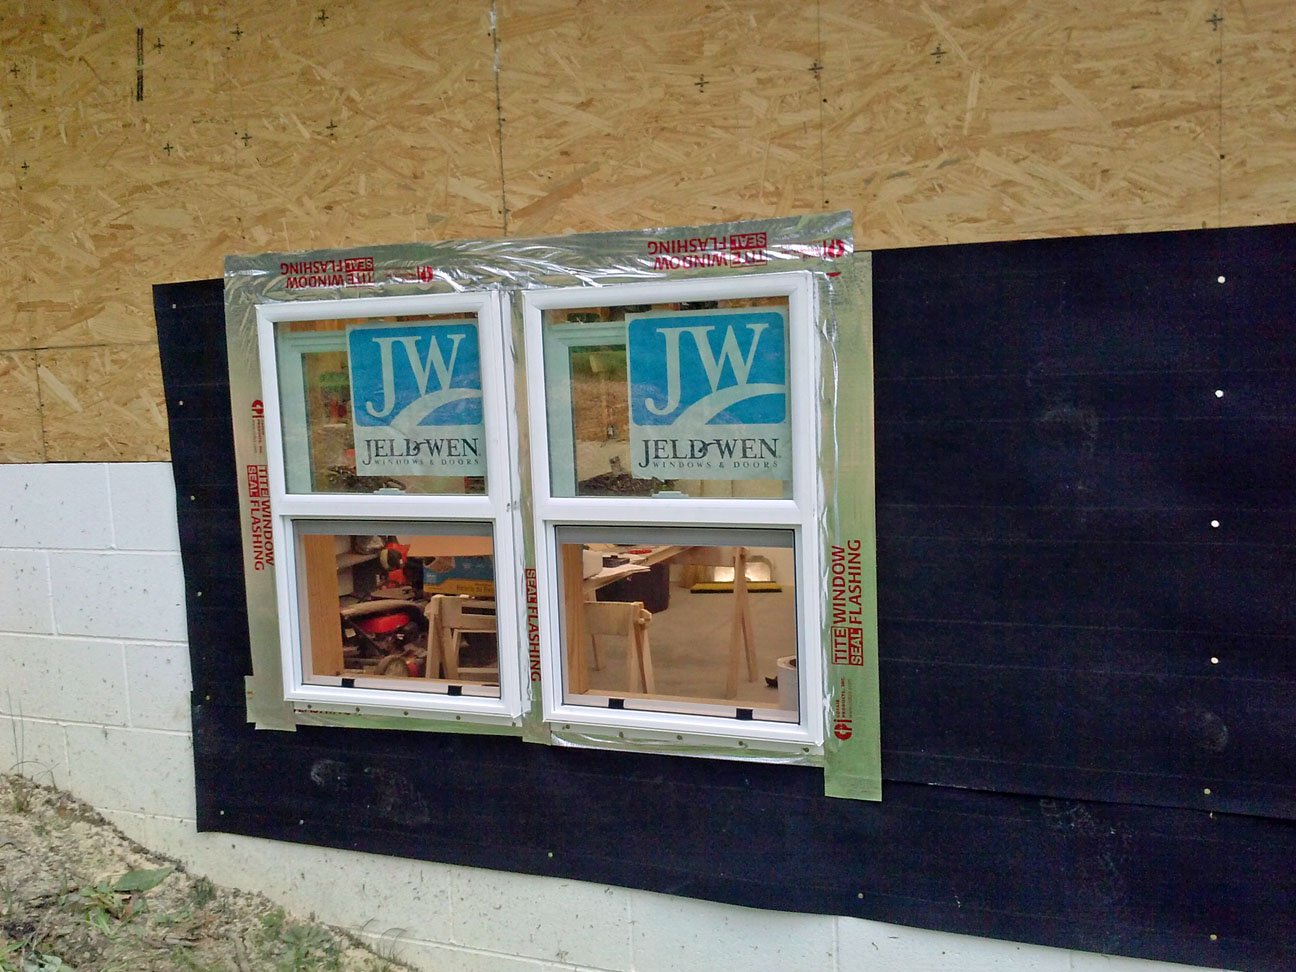
Regards,
RonB
I have windows. 2 little ones on each side. On the south side, they are split apart, and will have one of the workbenches between them.
On the north side, they are together as a double, with workbenches to be on each side of them.
Regards,
RonB
Will you have any thieving issues since your windows are so close to the ground ?
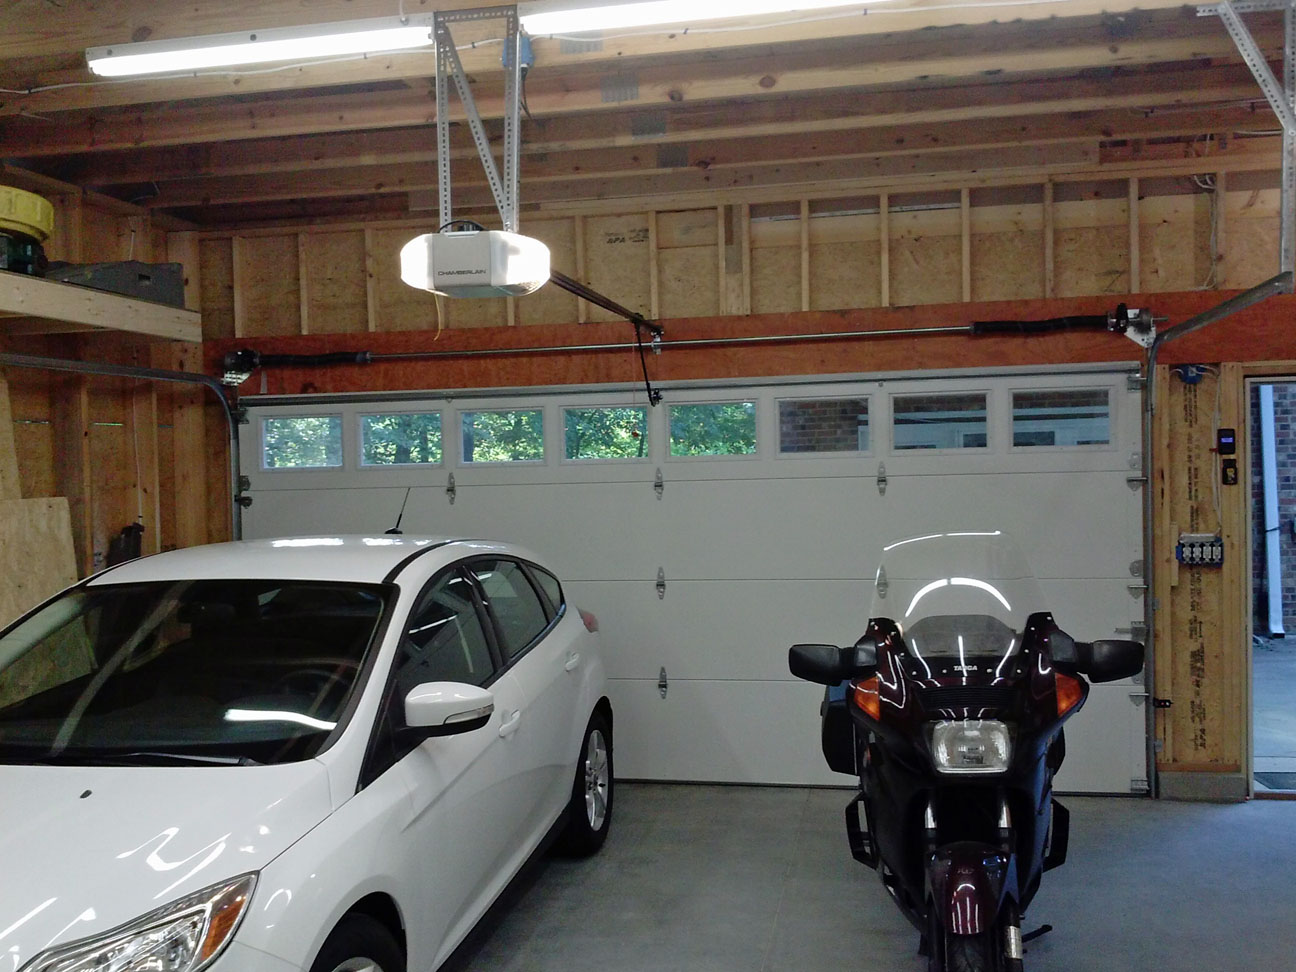
More progress, as well as a comedy of errors.
I picked up a garage door opener last week. While assembling the unit, I found that the belt could not be tensioned. When I gave up and called tech support, it turns out the wrong belt was put in the box. They shipped me a new one, and it arrived Friday.
Put it all together, and it looks OK. Went to mount the opener to the ceiling, and found that it was about 2 feet longer than I expected, which put it right in the middle of a light. So, I had to take down 2 lights (one 4 foot, and one 8 foot), swap places with a gap in the middle for the bracket, and re-wire them.
Next, time to hook up the wall switch and safety beam. Guess what? The wires are too short to reach the opener while being hidden. Off to the store for more wire.
Guess what else? The safety beam unit brackets don't stick out far enough from the wall to clear the garage door track. Instead of globbing a block of wood on the wall as a shim, I drilled out a couple of rivets and bolted them to the track instead.
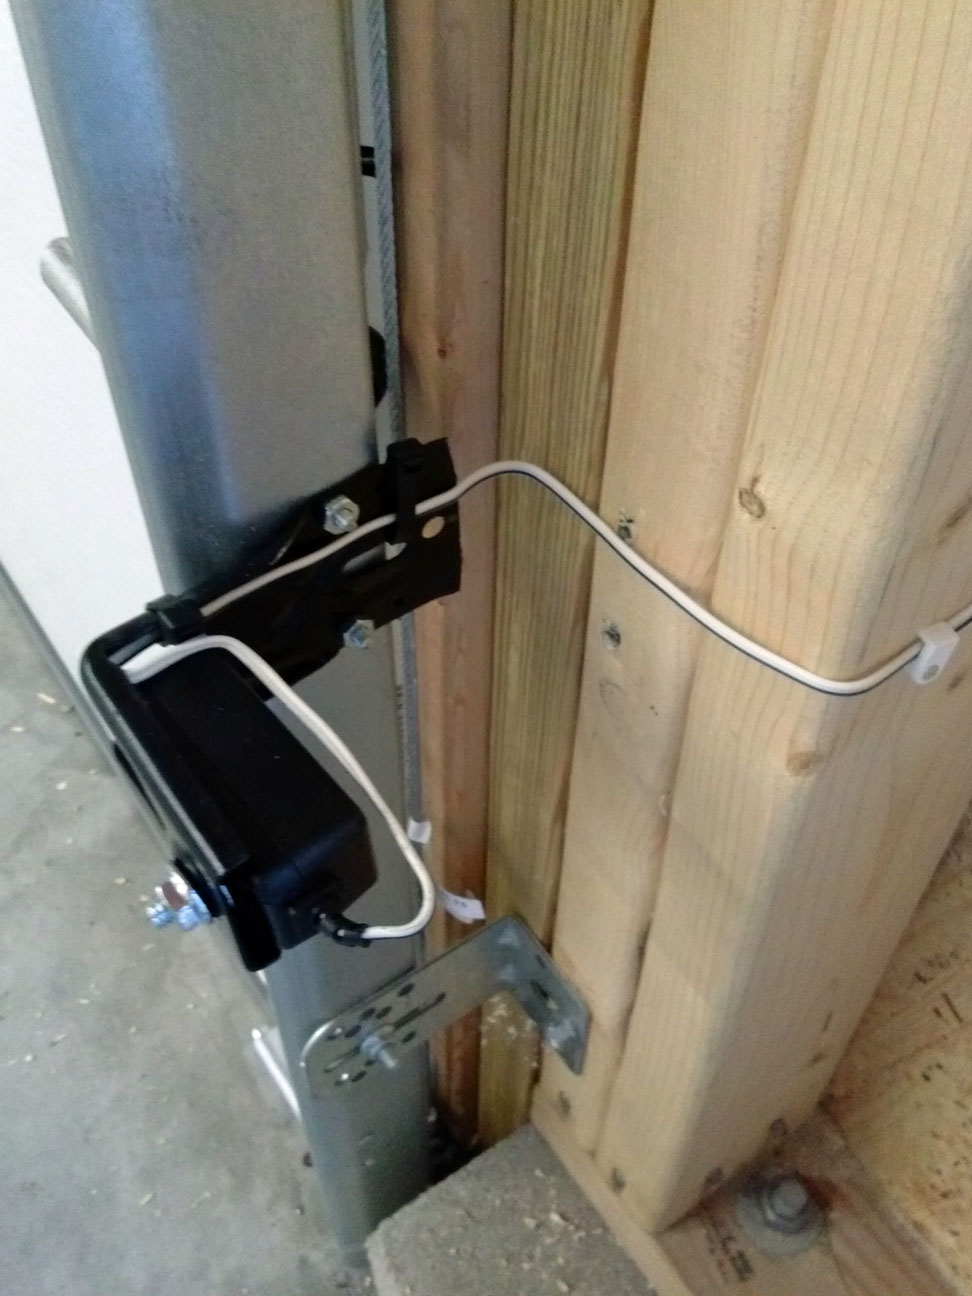
Next, the belt was still too loose when the opener was in place. It sagged about 4 inches in the middle of the track. So, I took the tensioner/link assembly apart and changed the order of components to allow some adjustability.
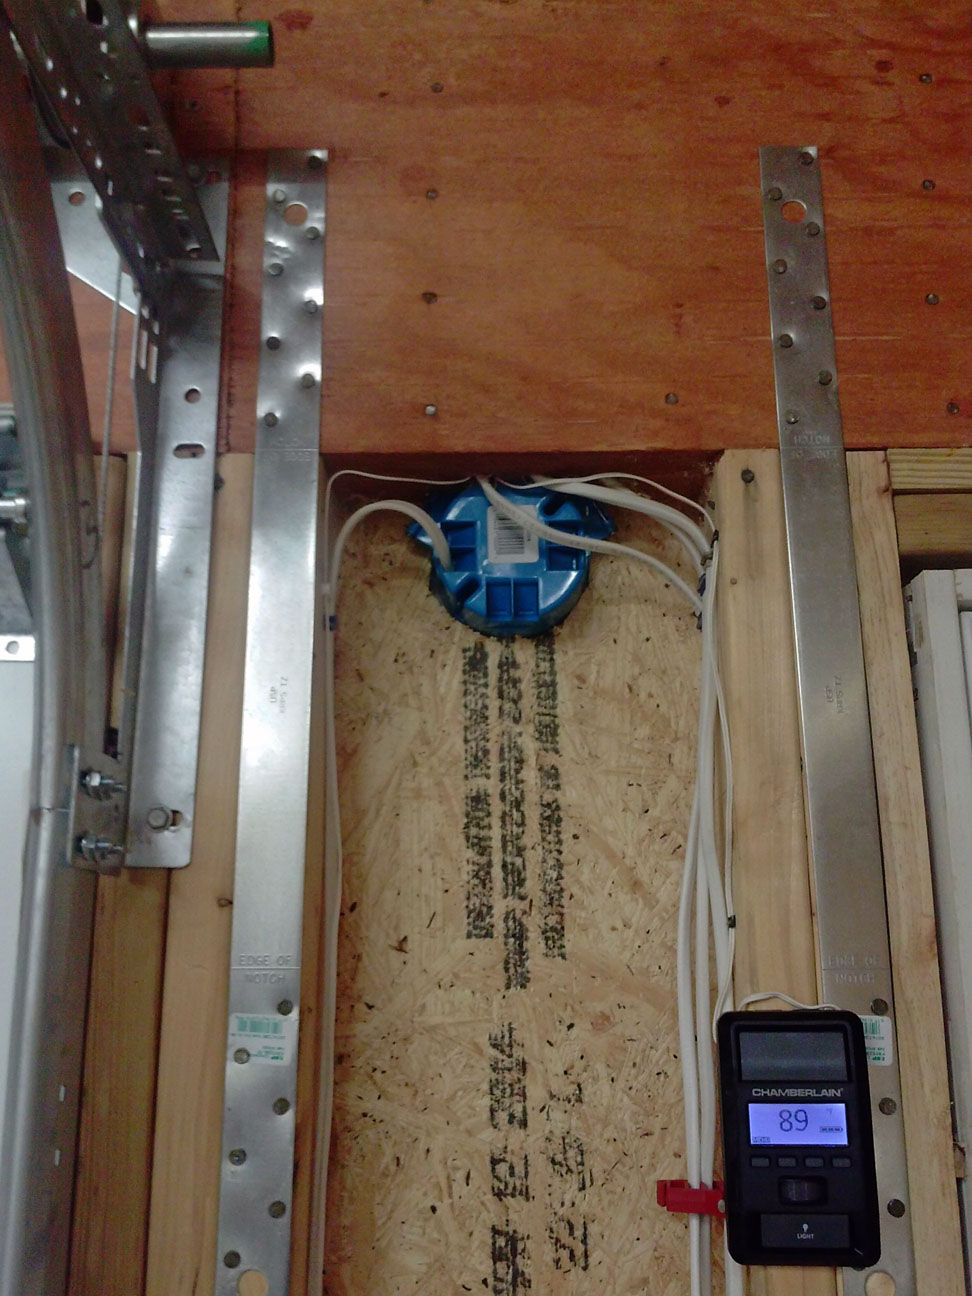
The adjustments are easier than they used to be, and there are more features included. There is even a backup battery so the door can open and close if the power is out. The remotes reach to the bottom of my driveway. There is a motion sensor built into the wall switch, so the light comes on if you walk in the people door. Plus, the wall switch has a clock and thermometer built in, so you can see how hot/cold/late you are
Next project: shocks and struts for my wife's xB.
Oh, and I picked up a pile of vinyl siding parts last week, so that can start as soon as I get the framing inspection done.
Regards,
RonB
I picked up a garage door opener last week. While assembling the unit, I found that the belt could not be tensioned. When I gave up and called tech support, it turns out the wrong belt was put in the box. They shipped me a new one, and it arrived Friday.
Put it all together, and it looks OK. Went to mount the opener to the ceiling, and found that it was about 2 feet longer than I expected, which put it right in the middle of a light. So, I had to take down 2 lights (one 4 foot, and one 8 foot), swap places with a gap in the middle for the bracket, and re-wire them.
Next, time to hook up the wall switch and safety beam. Guess what? The wires are too short to reach the opener while being hidden. Off to the store for more wire.
Guess what else? The safety beam unit brackets don't stick out far enough from the wall to clear the garage door track. Instead of globbing a block of wood on the wall as a shim, I drilled out a couple of rivets and bolted them to the track instead.
Next, the belt was still too loose when the opener was in place. It sagged about 4 inches in the middle of the track. So, I took the tensioner/link assembly apart and changed the order of components to allow some adjustability.
The adjustments are easier than they used to be, and there are more features included. There is even a backup battery so the door can open and close if the power is out. The remotes reach to the bottom of my driveway. There is a motion sensor built into the wall switch, so the light comes on if you walk in the people door. Plus, the wall switch has a clock and thermometer built in, so you can see how hot/cold/late you are
Next project: shocks and struts for my wife's xB.
Oh, and I picked up a pile of vinyl siding parts last week, so that can start as soon as I get the framing inspection done.
Regards,
RonB
kyle@hcb
Well-known member
Nice progress. The lights are super bright!
 , I'd do the people door at 36 inches wide, rather than the window at 19 inches.
Framing inspection: Fail
Little stupid stuff, though.
The drawings for the trusses and beams didn't get the engineer's stamp from the supplier, so they need to re-do this paperwork.
Finish tar paper on walls.
Blocking needs to cover the inside of any seam in the wall sheathing that is within 4 feet of a corner.
And, I forgot to put in the tie-down straps for the bracing wall with the garage door.
Apparently, there have been numerous complaints about racking of walls with only a narrow wall on either side of a garage door. So, the normal minimum is 2 feet on each side of the door, with at least one panel of 4 feet. I didn't have room enough for that, so I used the alternate bracing method: run the garage door header continuous from one end of the wall to the other, with just a single stud running continuous from top plate to bottom plate on either end. To help prevent racking, though, you also have to have a strap with minimum 1000 pound strength on each side of each opening in the wall.
I forgot to put those in. The big box home supply stores don't make it easy on you, either, because they do not supply specifications for the products they sell. At least you can take the manufacturer part number, go to that web site, and get the real specifications. The ones I got are almost twice as strong as needed, but the only others in stock were inadequate.
The spec sheet called for actual 3-1/2 inch long 16D nails, which is rare for this type of product.
I used a recent tool purchase to do this, a palm nailer that I got from Harbor Freight for $20. I see they have it for $17 this weekend. http://www.harborfreight.com/compact-air-hand-nailer-99555.html There is a magnet inside the end, and a small pneumatic cylinder that is activated by you pushing on it. So, you just lean on the nail a bit and it is gradually pounded in. This little tool would have saved me from my most recent black thumb, caused while trying to nail truss hurricane clips in an awkward position. I wish I had this years ago.
Regards,
RonB