old__man
Well-known member
You shingled in the dark? That's commitment!

"Commitment" is really close to "committed". SWMBO may be considering both meanings....You shingled in the dark? That's commitment!


Looking forward to watching you dress out the garage after you get buttoned up.
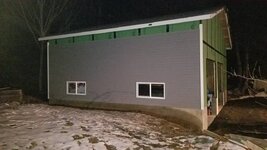
BlueBomber, the garage looks great! I love the DIY approach as that is how I like to do most things, even those outside of my wheelhouse. I am looking to build a similar garage in New Hampshire and I am trying to DIY it, just new to a project to this scale. I have built sheds, decks, etc. and I am pretty handy. A couple of questions if you don't mind:
- How complete are the plans? Do they list all aspects of the building from spacing to materials and foundation specs, etc.? I can follow a set of plans as I have basic construction understanding.
- Did you just hand the plans to the concrete guy? I am looking to put a two post lift in as well. How did you measure where the posts will go for those footings?
- I may have missed it but did you use 2x4's or 2x6's? I am going to insulate mine and heat it and just want to make sure I go the right route for NH, which is the same for you in the Boston area.
Again, love the garage build and followed along the way. Thanks in advance for any advice you can offer!
Chris


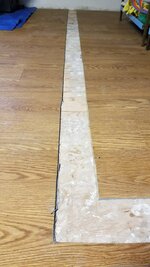
I squeezed in a little more midnight roofing and got the ridge vent shingles nailed down. Now the only shingle work left is to trim 72 linear feet of shingle edges.
I'd like to do that with a power tool, but I don't own a shingle shear and unlike the roofing nail gun, I can't justify the expense for this one job. Any ideas out there?
Sent from my SM-G950U using Tapatalk
A cheap (relative) electric metal shear and a guide ????
https://www.harborfreight.com/14-gauge-4-amp-heavy-duty-metal-shears-62213.html
Assuming your compressor is up for the task, you could go pnuematic: http://www.grizzly.com/products/Pneumatic-Sheet-Metal-Shear/T23094
~Jon
Sent from my SM-N920T using Tapatalk
I’m glad to see the weather cooperated with you for the roof shingles. You know the shingle line is straight so that’s all that matters .
Now for the safety question of the day. Were both of the ladders shown in the daylight shingle Installation pictures fully extended? In the fire service, we like to have 3-5 rungs above the roof line to make it so much easier to mount and dismount from the ladder to the roof. Plus it makes It easier to spot if you have to leave quickly. Thanks
After you get it weather tight, I think you’ve earned a break to spend time with the SWMBO.
I squeezed in a little more midnight roofing and got the ridge vent shingles nailed down. Now the only shingle work left is to trim 72 linear feet of shingle edges.
I'd like to do that with a power tool, but I don't own a shingle shear and unlike the roofing nail gun, I can't justify the expense for this one job. Any ideas out


Thanks, wrenchguy. I hope to get some door and window work done this weekend. I may also put that chalk line to work if the temps get high enough to tempt me up on the ladder to trim the shingles.i got a couple them crown top chalk lines. oh yea, nice job.


Depending on temps tomorrow, I may try to get either the man door installed or take a stab at starting the siding.
Sent from my SM-G950U using Tapatalk
I discovered the hard way that how I cut siding in warm weather and how I had to cut siding in the cooler temps was quite different.
Care to share your technique? I am currently storing the siding in my mother heated garage and plan to cut it in there and take it out to the building.
How did you do it?

")


Thanks, cap'. My indentured labor goes back to school next weekend, so I'm going to lay out the sanding tools for him to use during the week.Win some lose some. You remember the measure twice cut once until you forget it again.
Quick work on a Sunday by 1600 hours. Drafted labor is great isn’t it?
Ah, the joys of home maintenance. I keep reminding myself of the money I'm saving and the satisfaction I'll have when its all done and working that I did it myself. It helps get me through the swearing sessions.


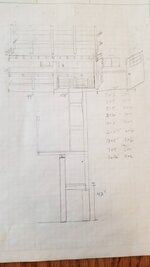
Snowing again, temps aren't going to get above freezing again for a while. So, instead of working on the garage, I'm doodling designs for the workbench and storage mezzanine.
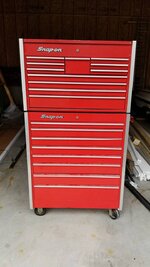
The workbench will stretch just over 17 feet from the back right corner of the garage. I'm planning on a height of about 40" above the slab and a depth of 30 inches from the studs. The work surface will be oak butcher block that I'll assemble from old oak fence boards I salvaged from my parents' farm in Virginia. I'm also seriously thinking about putting a pair of Harbor Freight 44" tool chests under the section between the two windows for plentiful small tool storage.
Overhead, a pair of 6x6 posts will support a beam of triple 2x6s that will in turn support a 5-ft wide mezzanine that will provide access to a bank of 2-ft deep by 4-ft wide storage shelves. With the 13'-4.5" ceilings, I should have just over 6.5 ft of head room under the cantilevered mezzanine joists and just over 6 ft of headroom on the balcony of the mezzanine. Fortunately, that matches my height perfectly.
For access to the mezzanine, I'm thinking of one of those rolling library type ladders, although I may just build a fold-up ladder on the end facing the door.
All just day dreaming until it gets warmer outside....or until those Harbor Freight boxes go on sale again.
Soon as the electrical is installed and inspected. I may wait until the final inspection, however, so the town guy doesn't ask for an amended permit...[emoji16]BUMP...
...you need to build this so I can copy it for my shop.


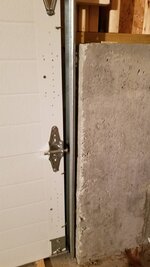


 Your one door looks good so far, it won't be long now before you'll be able to shoo the mice out of there for good! LOL
The instructions said to make sure the first panel was level. It took that shim to get it there. Of course, that means my slab across the doorway is not level. This build is reaffirming for me the truism that there is usually some differences between architectural drawings and the actual construction. In this case, the variance from level across the nine-foot three-inch doorway is about a half inch. More than I'd have liked, but I'm hopeful the door gasket can absorb it. This weekend I'll try to get the other garage door in.whats with the shim at the bottom of the door?