To avoid these ads, REGISTER NOW!

Building a pole barn/garage

NUTTSGT

Super Moderator
Staff member
Joined
Sep 14, 2009
Messages
50,849
Location
Northern Central Ohio
Now after looking at some of the beautiful garage builds here and at other places it pains me to put up this next pic. Let me remind you that it will not always appear this way and someday will be all one color. I was even thinking of putting a nice camouflage pattern on it to keep the tax collector from seeing what's going on.

attachment.php

Sometimes you do what you have to do and other times, you do what you do because you want to. I wouldn't worry about what other people think. Anybody that has had to scrap to get by on their build understands and at times the in progress pics don't look fabulous.

If you scroll through my refurb thread, you'll see that our place looked like a dump when we bought it. I had to tell the wife to look past what she saw and think of the potential.
 
To avoid these ads, REGISTER NOW!
OP
M

mx842

Well-known member
Joined
Feb 24, 2011
Messages
227
Location
Richmond Va
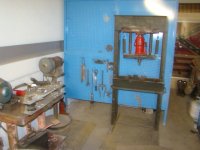
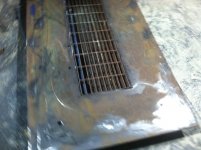
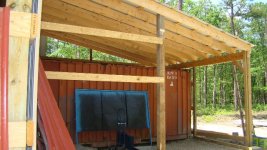
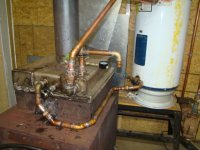
The last couple days have been slow and I haven't gotten much done. I'm at a point now where I have to spend some more money to go much further. I was cleaning up the job site and looking around for other things that needed to get done that didn't cost too much money. I came around to the back of the building where the back roof covers my old container. This is a 16' wide section of roof that is 21' out from the main part of the building.

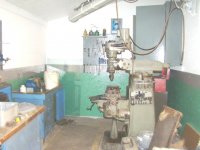
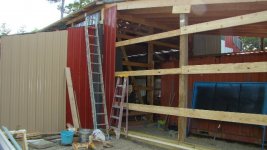
This container is going to be divided in two parts with sand blast room in the back portion. I'll put a divider in the middle and the other half is going to be a spray booth. This will leave me with another 8'x21' room that I want to also divide up with a small part used for my acid dip tank to strip paint and old powder coated parts that will be re-coated. The rest of the space will be used for a cleaning and prep station to clean parts and apply an iron phosphate solution to the parts that are going to be painted or powder coated.

I'll be kind of short on space but I think I can manage with this for now and if needed later I can always add on to the other side of the container. The acid cleaning station has to be sealed off in it's own little world with good ventilation to exhaust the fumes that comes off this stuff as it is a very nasty stripper. It works really good but you have to be extremely careful of it because it will strip flesh as easily as it does powder paint and the fumes will remove the hair and who knows what else from your noes if you breath to much of it.

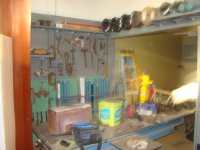
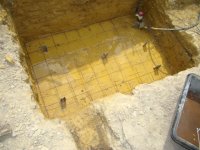
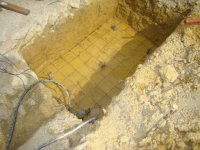
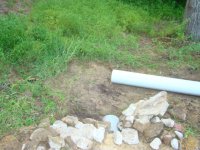
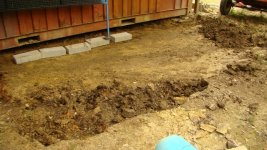
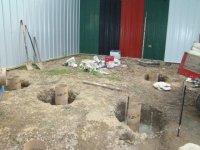
I was lazy and didn't want to go up to the house to get my camera to snap a shot of what this space looked like before I started yesterday but here are a few shots after I had removed most of the dirt in the area. I had been using this space for storage of materials but it had gotten out of hand and there was a lot of trash and junk that had been thrown in the area just to keep it in one local area.

Also, when I had my friends skid steer the last time I remember telling myself that I should be putting stone in that area rather than the top soil I filled it in with but at the time I didn't think I was going to put concrete in that area because it was uncovered and I had no plans to use it the way I do now. This meant I had to dig out the dirt in the 21'x10' section with a shovel and throw it in my trailer to haul it out. I needed this dirt anyway to fill in under my wrap porch on my house, a project that I had been putting off for like 20 years or more.:dunno:

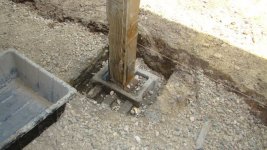
I spent the whole day digging this out and digging a post hole to put in a post for the side wall.

attachment.php


attachment.php


attachment.php


attachment.php


Tomorrow I'll place the post in position if the concrete footer is dry enough.
 

Attachments

  • DSC02424.JPG
    DSC02424.JPG
    124.4 KB · Views: 566
  • DSC02426.JPG
    DSC02426.JPG
    93.6 KB · Views: 564
  • DSC02425.JPG
    DSC02425.JPG
    101.7 KB · Views: 566
  • DSC02428.JPG
    DSC02428.JPG
    117 KB · Views: 564
OP
M

mx842

Well-known member
Joined
Feb 24, 2011
Messages
227
Location
Richmond Va
It's been stormy the past few days and I haven't been able to get very much done. I did get my post in and cemented in place.

attachment.php


attachment.php


Heading down the driveway to the shop with a arm load of tools, ham sandwitches and coal drinks I almost stepped on one of my back yard pets.

attachment.php


I almost stepped on him/her before I saw it and after I picked up all the stuff I had dropped in the road from getting the crapolla scared out of me I saw that he had made a retreat into the grass.

attachment.php


I don't know why he thought this stance would be a good idea. It looks to me like if I was a bad guy it would be easier to stomp the heck out of him in a pile like that but I guess he remembers me from a past run in or two with him and knew I wasn't going to stomp him. :lol:

I went to Lowes to get some lumber to put on the sides of the back part of the shop to screw siding to. I needed a few 2x6 salt treated for the bottom and some 2x6's for the other runs and as I was looking around I saw that the 2x8 #2 pine boards was cheaper than the normal 2x6 boards they sell. Actually the 2x6 salt treated boards were cheaper than that stuff they sell. Anyway I got the 2x8's to finish out what I had started, it lookes a little funny but once the siding is on you'll never notice the difference and should be even stronger and more nailing surface to boot.

attachment.php


attachment.php


attachment.php


My buddy just came by with some more siding off one of his jobs so now I can take down some of the old ratty stuff and replace it with something a little better. Hopefully this will be enough to finish out most of the sides and I won't have to buy much new stuff.

I'll post up more when I find time.
 

Attachments

  • DSC02439.JPG
    DSC02439.JPG
    110 KB · Views: 501
  • DSC02443.JPG
    DSC02443.JPG
    135 KB · Views: 502
  • DSC02436.JPG
    DSC02436.JPG
    131.3 KB · Views: 497
  • DSC02430.JPG
    DSC02430.JPG
    114.9 KB · Views: 500
  • DSC02437.JPG
    DSC02437.JPG
    104.7 KB · Views: 497
  • DSC02440.JPG
    DSC02440.JPG
    108 KB · Views: 497
  • DSC02441.JPG
    DSC02441.JPG
    97 KB · Views: 496
OP
M

mx842

Well-known member
Joined
Feb 24, 2011
Messages
227
Location
Richmond Va
Do you have anymore sides that you can add onto ? Your shop seems to be constantly growing. :thumbup:

Well there are not many more places I can add rooms to but I did find a little room on the other side of the container where I could add my boiler/acid dip tank room. I decided that it would be some time before I could build my SS boiler so I decided that I would put my old wood stove boiler in this room where I could get some heat off the sides as well as making hot water for the floor.
 

Attachments

  • sky light cut in.JPG
    sky light cut in.JPG
    111.8 KB · Views: 19
  • facier board up ready for gutters.JPG
    facier board up ready for gutters.JPG
    109 KB · Views: 21
  • digging out bad material and getting ready to pour floor.JPG
    digging out bad material and getting ready to pour floor.JPG
    101.9 KB · Views: 22
  • water line and floor drain pippimg.JPG
    water line and floor drain pippimg.JPG
    113.9 KB · Views: 20
  • piers for acid shack.JPG
    piers for acid shack.JPG
    104.9 KB · Views: 22
OP
M

mx842

Well-known member
Joined
Feb 24, 2011
Messages
227
Location
Richmond Va
It's been awhile since I up dated my progress and since I have a few pics of what I've been up to I guess this is a good time. As you can see from the last post I've been busy. I got the boiler room almost complete for the most part but I had to scrap my old boiler because I just got tired of messing with that old tube boiler.

I moved it into the boiler room just in time for the cold weather to hit after spending almost a month rebuilding it. Then I did something dumb and fired it up to warm it up without turning on the pump. This was a normal thing when I fired it up cold to fire it and let it burn hard for 10 or 15 minutes then turn on the pumping system to circulate the water. Well after I fired it I got distracted and forgot about it and when I did remember about it, it was too late. When I came in the room the whole thing was red and glowing. I didn't know weather run or try and cool it down but chose the latter. I opened the fill valve a little to let in a little cold water and when I did I heard something go pop bang inside the tank and I guess something must have broke inside.

When it cooled down I ended up with a small leak that would come and go from time to time just enough to not let it burn properly and it made a lot of creosote. I got by that winter then came up with another solution for this year. The first pic shows the old setup and the others show what I am using now and it seems to be working really well.

I have since moved my pump over to where the manifold is and it seem to work a lot better this way. It turns cold water into a 40 gal water heater tank full of 140 degree water in about 25 minutes. It works by natural flow from the stove top heater in to the port where the pressure valve was and then returns out of the port where the drain was on the tank. Then I have it plumbed to the manifold out of the hot supply pipe on the water tank where it circulates through the manifold and back into the cold water fitting on top of the water heater.

Right now I let the pump run all the time with no controls on it but now that I see this setup will work I plan to add some controls this summer to try and make it better. It uses about a wheel barrow full of water a day and the shop was comfortable all winter even on the coldest days it was a little cool but was nice working temp. and I still have very little insulating on the roof. I have only been able to put 1/2" R-Max board on about half of the roof in the main part of the building. All of the other rooms have as much as I could pack in the rafters before I put OSB over it though.
 

Attachments

  • wood drier.JPG
    wood drier.JPG
    111.3 KB · Views: 39
  • side view of water heater.JPG
    side view of water heater.JPG
    106.6 KB · Views: 36
  • new stack.JPG
    new stack.JPG
    111.5 KB · Views: 38
  • new system plumbed to water tank..JPG
    new system plumbed to water tank..JPG
    124 KB · Views: 46
  • new 1inch copper feed lines to manifold.JPG
    new 1inch copper feed lines to manifold.JPG
    118.8 KB · Views: 39
  • new water heater ready to mate with stove.JPG
    new water heater ready to mate with stove.JPG
    77.2 KB · Views: 42
  • 4 inch SS sq tube fitted and ready for welding.JPG
    4 inch SS sq tube fitted and ready for welding.JPG
    102 KB · Views: 42
To avoid these ads, REGISTER NOW!
OP
M

mx842

Well-known member
Joined
Feb 24, 2011
Messages
227
Location
Richmond Va
I have a little more time this morning so I'll post some more updates before I have to bail.

As you can see I've started putting things together. I have used 31 gals of paint so far and I still have some to go. That OSB is a bear to cover up especially the white stuff. I still have a long way to go but at least now I am putting stuff in places where I wont have to move them again. I have several projects I am also working on while trying to get ready so I can work out of it. One is I have to cut my large oven door off and cut it in half. The way it is now it's too heavy and never closed right so I'm going to cut it down to where the opening is only 4 feet. I'll post more pics of this when I have the time. Also I need to finish my paint booth, the sand blast room, and the part cleaning room. Also I need to rebuild my air compressor or at least remake it. I have a new Sailor Beall 705 pump I want to mate with the old motor and tank and also I need to finish running my air supply lines.

Then finally.....I hope....... I need to build some kind of air cleaning and dust removal system to clean the air in the building. I'm sure there will be more to do even after all this but at least I can see the light at the end of the tunnel now.:)
 

Attachments

  • peg board painted and tools starting to go up.JPG
    peg board painted and tools starting to go up.JPG
    129.3 KB · Views: 37
  • new bullet room.JPG
    new bullet room.JPG
    132.6 KB · Views: 45
  • more peg board and storage.JPG
    more peg board and storage.JPG
    104.5 KB · Views: 41
  • new shelves on tool walls.JPG
    new shelves on tool walls.JPG
    120.1 KB · Views: 38
  • more junk on the walls.JPG
    more junk on the walls.JPG
    102.7 KB · Views: 41
  • new home for press.JPG
    new home for press.JPG
    133.9 KB · Views: 42
  • mills new home.JPG
    mills new home.JPG
    97.1 KB · Views: 41
OP
M

mx842

Well-known member
Joined
Feb 24, 2011
Messages
227
Location
Richmond Va
It's been awhile since I did an update. Still haven't finished the building but I'm at the point where I can work out of it and do the rest when I have the time and money.
I wanted to put in a drainage system to help get some of the runoff away from the building and into a space that will be able to handle it when we get heavy rains. I have what the government calls a wetland about 100' from my property line. It's a low lying natural drain that winds it's way through the woods but when I built my house they decided it was worthy of being protected. Water doesn't stand there long, even when we get the heaviest rains but it was a way for them to get a little more money out of me for permission to build on my own dang land.

Anyway I didn't want any problems with them so I put in drain lines to catch all the roof runoff and I graded everything to send all my runoff to this low area I have on the front and side of the building. I had planed to put in a small pond there at one time but they put so many restrictions on that project that I just scrapped the idea. It takes up an area of about 1/2 ac and more than enough to use as a catch basin to filter the runoff before it gets to this protected area.

I also wanted a place that I could wash my truck run my boat and not have a wet land in front of my building so I put in a catch basin in front with piping to catch future gutter water and most of the runoff as it comes down the hill from my house. This like most of my projects turned into a giant man killing chore because my buddy with the ditch witch never seemed to find the time to lend me a hand so Me, my wheel horse, a pick and several shovels along with my little trailer took on the task of digging the hole for the catch basin and digging all the pipe lines to and from the catch basin. I also had to dig roughly 150' of drain line in the back of the building to catch roof runoff back there.

Murphy's rule says that every where I need to dig there has to be either a stump hole with at least a million or so roots right where I need to dig. Or....the ground has to be at least the hardness of mild steel or better before the project can begin. Even then I got it done in a little over a week.
 

Attachments

  • ready for concrete.JPG
    ready for concrete.JPG
    124.9 KB · Views: 17
  • floor poured inlet and out pipe laid.JPG
    floor poured inlet and out pipe laid.JPG
    122.1 KB · Views: 17
  • ready to pour floor.JPG
    ready to pour floor.JPG
    122.3 KB · Views: 17
  • outlet pipe.JPG
    outlet pipe.JPG
    112.6 KB · Views: 20
  • front right corner gutter drain.JPG
    front right corner gutter drain.JPG
    123.6 KB · Views: 17
  • drop inlet box excavation.JPG
    drop inlet box excavation.JPG
    130.7 KB · Views: 20
  • laying out pipe inlets.JPG
    laying out pipe inlets.JPG
    122.3 KB · Views: 21
Last edited:
OP
M

mx842

Well-known member
Joined
Feb 24, 2011
Messages
227
Location
Richmond Va
Once I got the hole dug and the floor poured I had to build the walls and construct some kind of top to cover it. I had an old welding table that I no longer used so I cut the top off it and welded in some channels in the center for a piece of grate I had in the scrap pile to use as an inlet. I built the walls out of 8" and 6" cinder block, rebar and filled the blocks solid with concrete to the top. I plan on pouring a concrete pad in front of the building at some time in the future that will tie into this box to catch surface runoff.
 

Attachments

  • DI view 4.JPG
    DI view 4.JPG
    118.7 KB · Views: 15
  • DI view 3.JPG
    DI view 3.JPG
    118.5 KB · Views: 18
  • drop inlet box.JPG
    drop inlet box.JPG
    117.8 KB · Views: 16
  • Cover in place.jpg
    Cover in place.jpg
    147.3 KB · Views: 16
  • bottom view.JPG
    bottom view.JPG
    116.1 KB · Views: 15
  • frame for grate.JPG
    frame for grate.JPG
    115 KB · Views: 15
  • ready to cut off legs.JPG
    ready to cut off legs.JPG
    119.5 KB · Views: 16
OP
M

mx842

Well-known member
Joined
Feb 24, 2011
Messages
227
Location
Richmond Va
The drain out back took another week of my life because the dirt was so dang hard I couldn't dig it with a pick. Some places didn't have to be too deep but other places were 2' or more.

In the end it all worked out pretty good and the silt basin is doing it's job so hopefully the 'G Men' will remain happy.
 

Attachments

  • pipe end runs at silt basin.JPG
    pipe end runs at silt basin.JPG
    132.9 KB · Views: 12
  • front and rear drains come together.JPG
    front and rear drains come together.JPG
    133.2 KB · Views: 11
  • DSC03337.JPG
    DSC03337.JPG
    134.2 KB · Views: 10
  • rear gutter drain pipe.JPG
    rear gutter drain pipe.JPG
    131.4 KB · Views: 11
  • 6 inch run left side.JPG
    6 inch run left side.JPG
    126.6 KB · Views: 10
  • 6 inch pipe almost covered.JPG
    6 inch pipe almost covered.JPG
    112.4 KB · Views: 10
  • Rear drain line.jpg
    Rear drain line.jpg
    149.1 KB · Views: 14
Last edited:
OP
M

mx842

Well-known member
Joined
Feb 24, 2011
Messages
227
Location
Richmond Va
One of the rooms is almost complete. That's my machine shop and I have been using this area for some time now. I have had to make a lot of parts for different projects that have gone on while I have been working on the building. Here are a few shots of the machine shop and some of the inner walls that are done.
 

Attachments

  • machine shop 018.jpg
    machine shop 018.jpg
    99.6 KB · Views: 18
  • machine shop 019.jpg
    machine shop 019.jpg
    104.6 KB · Views: 19
  • machine shop 003.jpg
    machine shop 003.jpg
    79.2 KB · Views: 19
  • machine shop 011.jpg
    machine shop 011.jpg
    100.5 KB · Views: 18
  • machine shop 012.jpg
    machine shop 012.jpg
    106 KB · Views: 18
  • machine shop 006.jpg
    machine shop 006.jpg
    100.7 KB · Views: 20
  • machine shop 021.jpg
    machine shop 021.jpg
    90.4 KB · Views: 15

RifleA

New member
Joined
Sep 1, 2012
Messages
1
Location
Southern New Jersey
One of the rooms is almost complete. That's my machine shop and I have been using this area for some time now. I have had to make a lot of parts for different projects that have gone on while I have been working on the building. Here are a few shots of the machine shop and some of the inner walls that are done.
Just stumbled upon this thread and read the entire thing, you are one very talented person, your skill, vision and persistence is amazing. Would love to see how it finally turned out.
 
To avoid these ads, REGISTER NOW!
Top Bottom