To avoid these ads, REGISTER NOW!

Building Another Garage.

zappman

Well-known member
Joined
Dec 22, 2013
Messages
57
Location
West Central Florida
Having read this forum as a visitor for awhile now, and deciding to build another garage on my property, I figured it was time to register so I can post and share some of the experience with others.
Having completely overwhelmed my existing 22' X 36' detached garage / workshop with to many tools to be able to keep organized, I decided to build a second garage / workshop. Laying this one out to accommodate the tools I use most in a more practical way, with the ability to convert from woodworking to automotive projects with minimal effort.
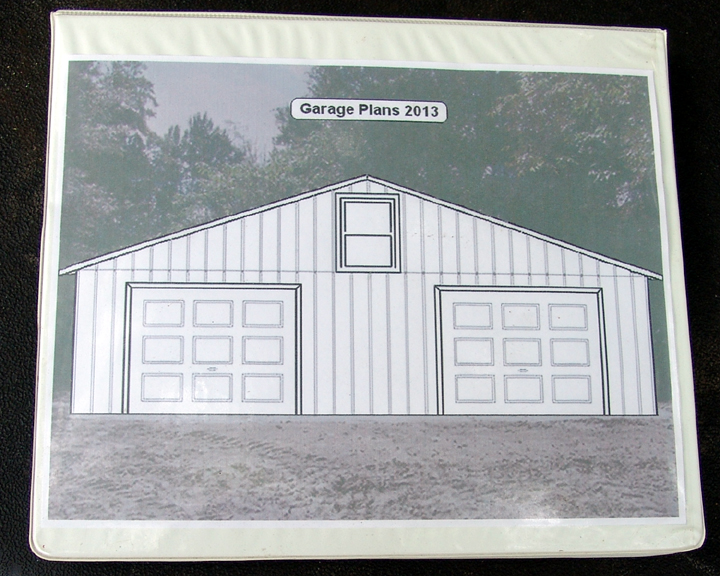
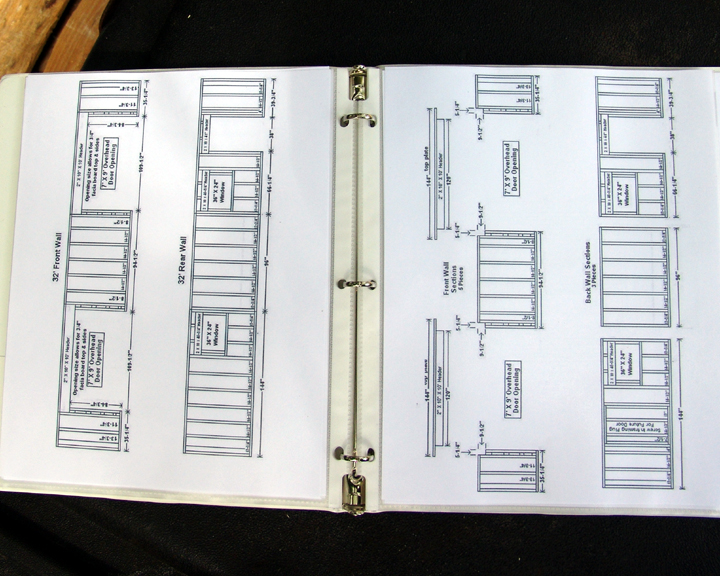
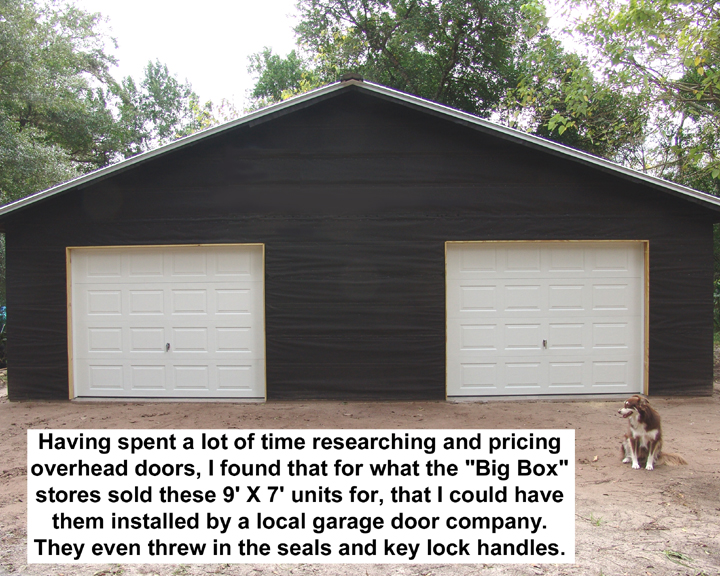
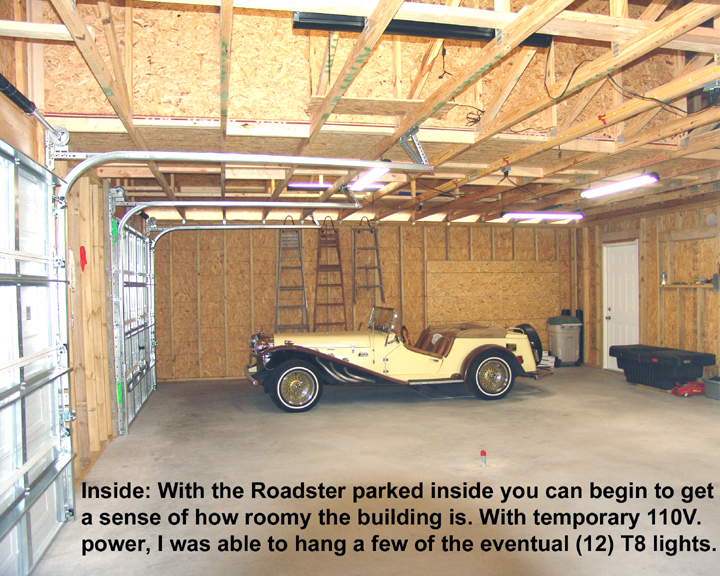
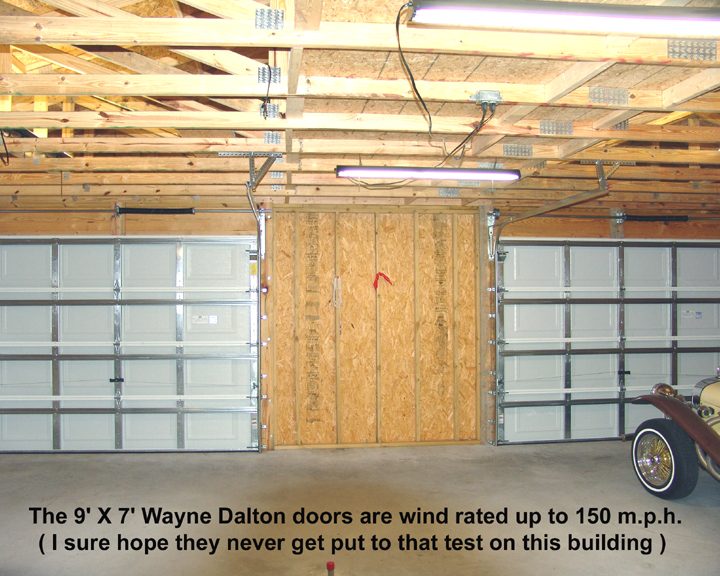
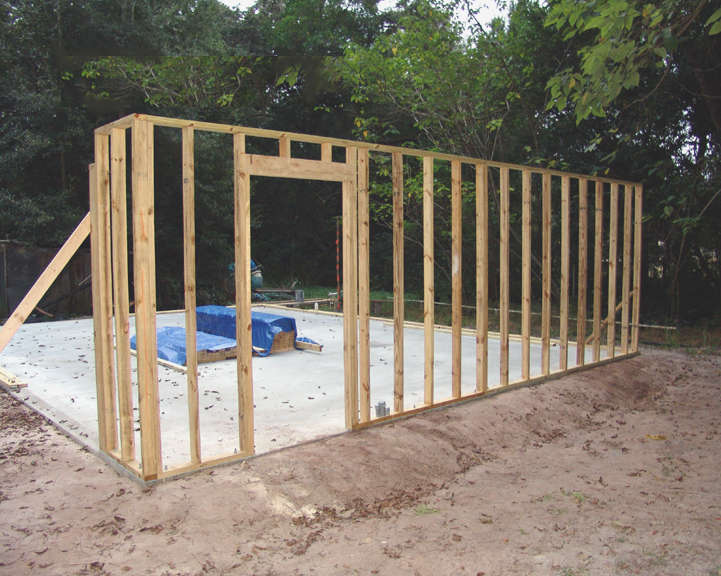
The layout more or less dictated the buildings dimensions and I ended up deciding on a 32' wide by 24' deep building. The 32' wide with (2) 9' wide roll up doors will give me the 8' space between the doors for my 8' X 8' Table Saw Bench and still give me almost 3' from the doors to the side walls to have work benches down both sides while still keeping (2) open bays available.
Layout.jpg

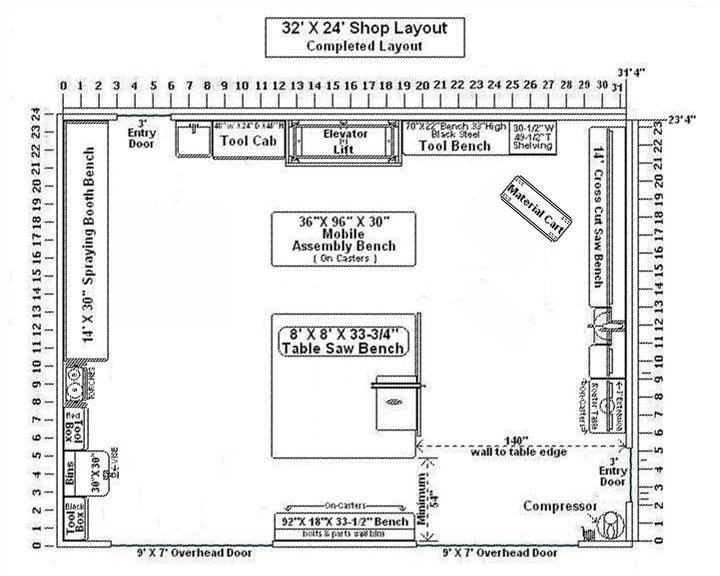
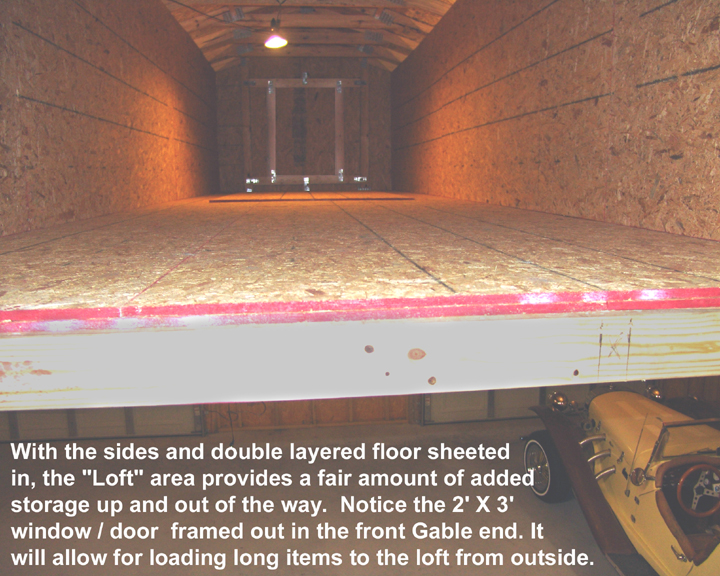
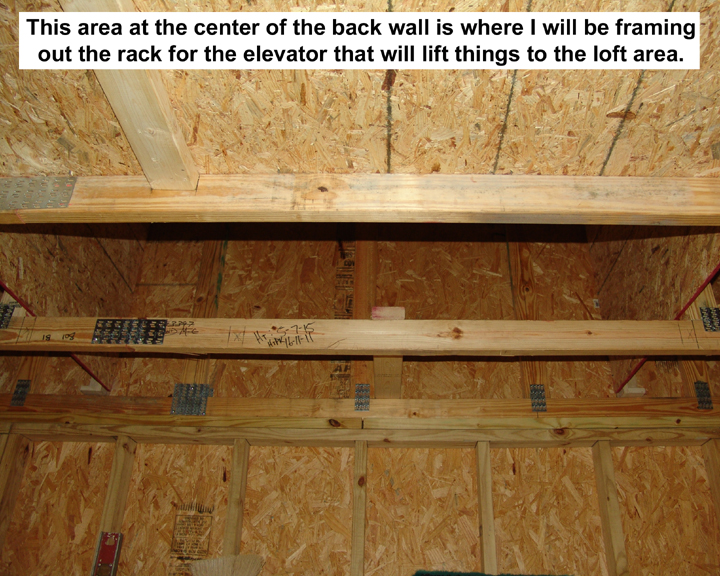
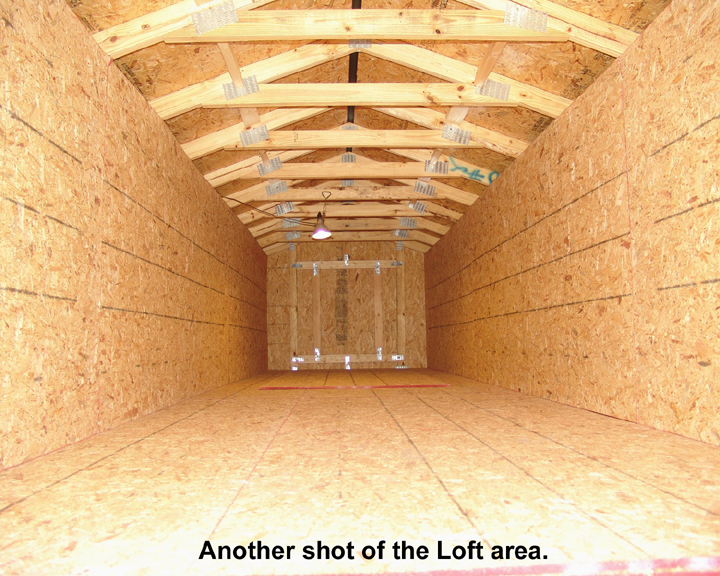
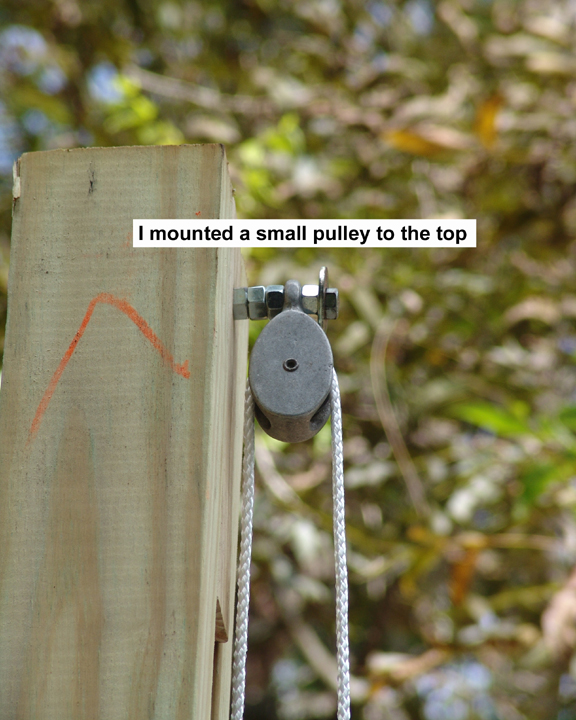
My current shop has a huge loft that with the use of a cable winch, I built a small elevator to store tools I only use occasionally like Pressure Washer, Sand Blaster, etc. upstairs out of the way. It has worked out well so I will build another in this shop to utilize the loft area above.

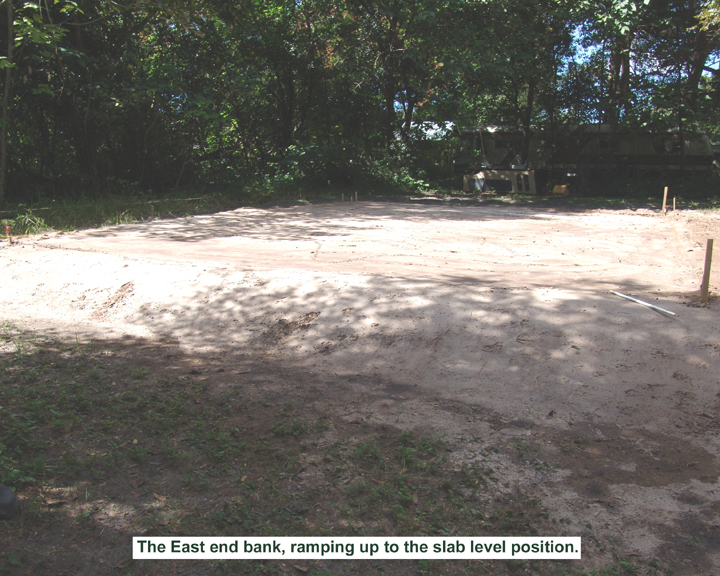
The area of my land that I decided on as the building site, took some work clearing (by hand) and was a bit more un-level than I had realized, but I was finally able to break ground (or build ground in this case) and get things under way.
001.jpg

003.jpg

006.jpg

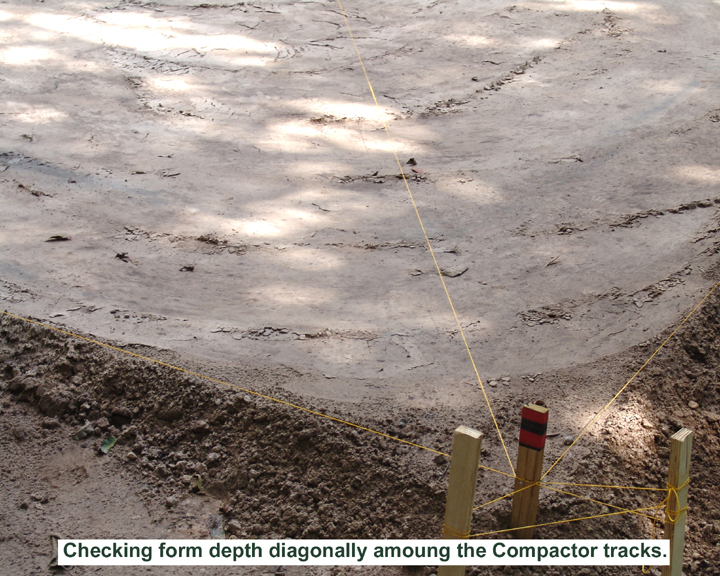
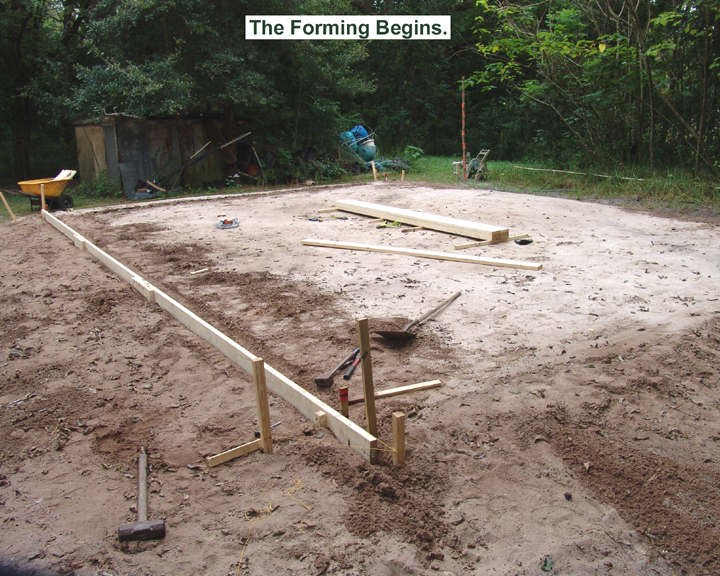
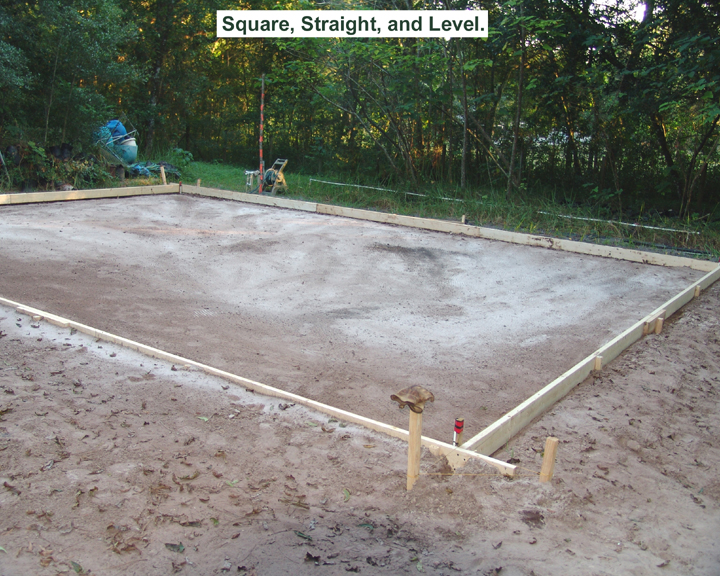
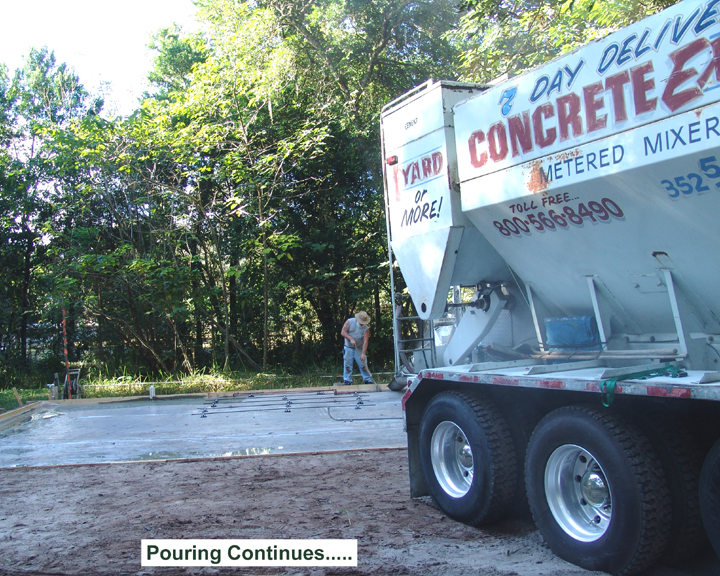
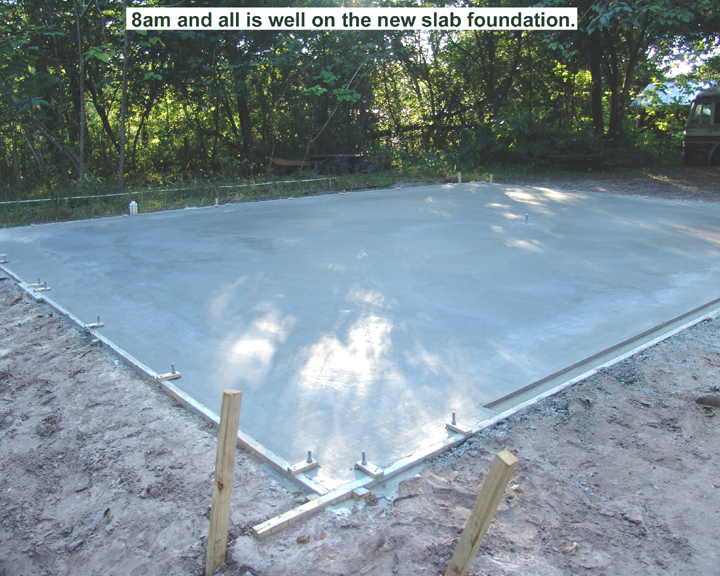
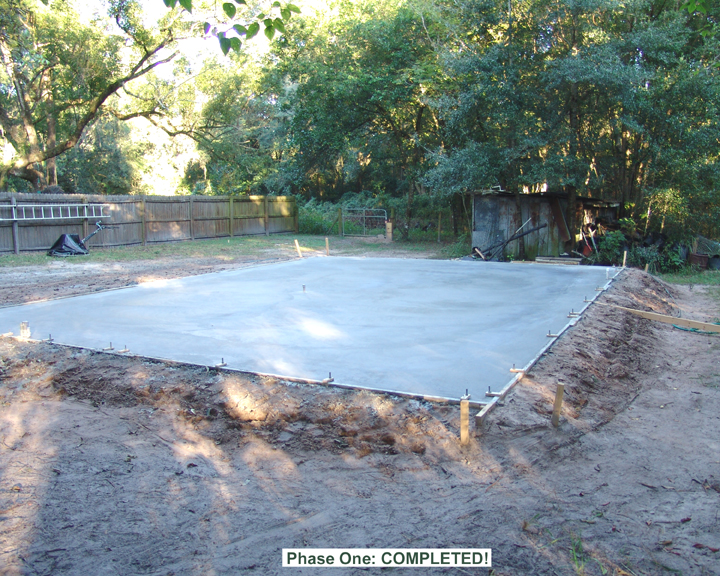
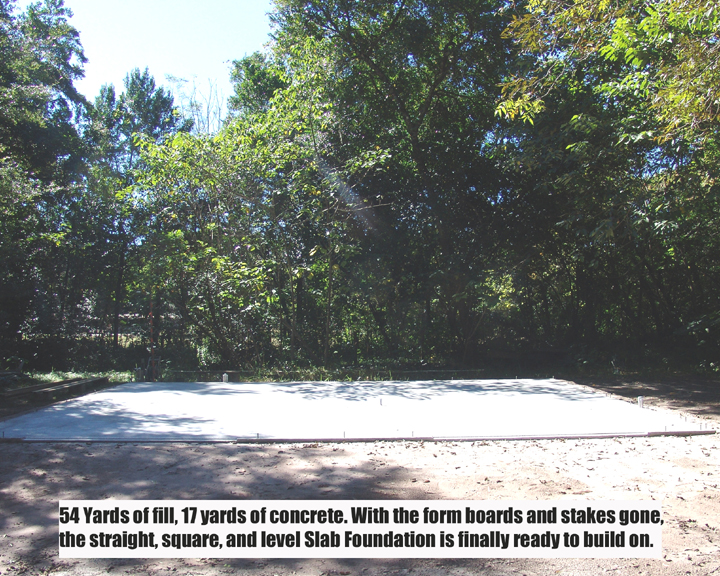
Working alone doing most of the leveling with a shovel, a hard rake, and a wheelbarrow, is a bit time consuming, fortunately the fill I had brought in has excellent packing qualities and with a borrowed compactor, I finally get the grade where I want it and start forming up the foundation for a Monolithic pour.
007.jpg

008.jpg

010.jpg

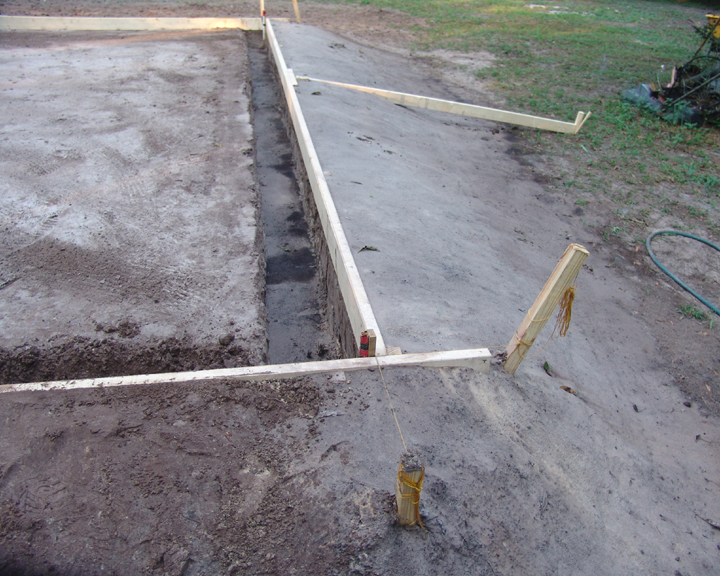
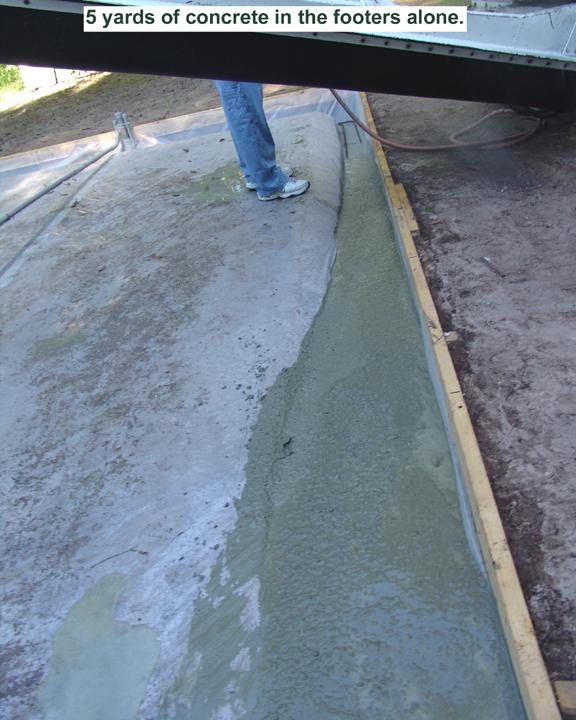
Needing to take the footers back to the original soil causes it to end up almost 24" deep on the East end.
011.jpg

Well, that's all for now. I hope the post didn't bore you guys to much. I'll continue posting the build as it goes if anyone is interested. Till the next time, thanks for reading.
Regards,
Zappman
 
To avoid these ads, REGISTER NOW!

Aquaticbob

Well-known member
Joined
Dec 3, 2013
Messages
488
Location
Seattle
Looks like a pretty cool layout. I think it's interesting having the big table saw bench in the middle with the idea of going between wood and auto. Is it a movable bench? I really like the cargo lift idea for the back. I have an elevator in my house and it really does make it nice transporting goods up and down floors.
 

55 carman

Member
Joined
Dec 22, 2013
Messages
20
Location
Indy
Thanks for posting looks like a nice project. I built a home and garage a few years ago in north Florida. It was on a slab it was amazing to me the hoops I had to jump thru to meet the hurricane standard. Even though the property was over 50 miles from the coast. If I remember right all the rerods in the footings had to be continuos to the rafters. And metal ties every were with the special nails. One thing for sure the inspector earned his money on that project. Ron
 

Kevin54

MEMBER EMERITUS
Joined
Jan 12, 2005
Messages
29,341
Location
Urbana, Ohio
Zappman....welcome to Garage Journal!!! :hellobye:

Looks like you have a plan. If I may make one suggestion if it's not too late.....You may want to reconsider the 24' depth and maybe add another 4' to it. With a fullsize vehicle in a garage, 24' gets tight especially if you have a bench up front. And you really don't want your bench off to one side where you would have to walk back and forth just to get a wrench. 28' for the depth lets you have a bench up front and still gives you room to maneuver around. One other thing to consider is door width. If you plan on using it for any vehicles, or that time or two when you may want to pull a trailer in, a 10' door is way better suited for that instead of a 9' wide door. There have been quite a few threads on this in the past. Anyways...just a suggestion or two.

With that being said, I'm looking forward to seeing updates. With it being cold and winter up here, we can get our plans put to paper for the mods we want to make, or even put to paper the plans for new builds that will be coming in a few, hopefully short months.

So with having a woodworking shop, what do you build? Just projects in general, or do you have a specialty shop like furniture and such.

As far as us being interested in updates...we all like updates and the more the better. And if you don't already know....WE LIKE PICS!!!! The more pics the better. Some of us don't even read, we look at pics though :lol:

Again....Welcome to Garage Journal and we hope you hang around for a long time. And WE LIKE PICS!!! :lol_hitti
 
OP
Z

zappman

Well-known member
Joined
Dec 22, 2013
Messages
57
Location
West Central Florida
No Aquaticbob, the 8' X 8' Table Saw Bench doesn't move, which is why for me having enough room for it between the two bays will be nice as opposed to how badly it hinders the layout in my current workshop. The new shop (as the layout drawing shows) is pretty much centered around it. It's placement from the walls will allow me to rip 12' long stock, and still cross cut an inch (or less) off of 4' X 8' sheet stock.
The Table Saw that the Bench wraps around is the 5 HP industrial version of the Rockwell Unisaw with a Biesemeyer T-Square Fence system that extends 50" to the Right of the blade and 12" to the Left of it.
The Table Saw Bench is framed of 2" X 4", Decked in 1" MDF, and Laminated with Wilsonart white satin mica. At 8' X 8' it's large enough to accomidate the Table Saw, with it's own Dust collector unit, and still have room to slide 4' by 8' stock under it as a material rack. The 110 VAC recepticals wired into all four sides, as well as the 220 VAC saw and dust collector, will be fed from the service panel via NM conduit ran under the slab and surfacing under the Saw Bench.
So all in all, it is very stationary indeed.

Yes 55 Carman, aside from Florida's State Hurricane codes, some counties impose their own additional demands. Some zones do require the threaded rod running from the footer's rebar, all the way through the walls top plate. Here, I'll get by with 1/2" X 10" J-Bolts through the bottom plates, and Hurricane Straps everywhere.
I am going with an "Engineered Truss System" but will be beefing up the Gable End Trusses with additional bracing support.

Thanks for the suggestions Kevin54, I did consider going deeper at the start, but in designing the layout, the depth kept comming back to 24'. As for full sized vehicles I will still have the shop I am replacing with this one. As for this building, any automotive work I do in it will be with the small roadster style kit and replicars like my little '29 Benz Replicar, so we're talking a VW Beetle wheelbase.
Pretty much the same thing with the doors. The 9' wides are just very common around here, and I am hoping to find a nice nearly new used pair. I was seeing them on Craig's List locally, (until I needed a pair that is) although I think they were people parting out their houses they were getting foreclosed on.
As for your woodworking question, I've been a Cabinet Maker for 30 years. Although now retired I still take on small custom cabinet projects when past customers come to me. I've also done quite a bit of antique furniture restoration, so I get those occasional request as well. Although the local replicar club seems to think I am the fiberglass doctor and auto finish Guru and would keep me hopping if I'd let them.

Thanks for the encouraging words LLWillysfan and the welcome 1/2 Cup


Well, with the ground inside the forms treated and the barrier down, the Re-bar all in place, and the fiber mixed into the concrete, it's finally time to cover up all that digging I've been doing.
012.jpg

The Footers really consume a volume of concrete.
013.jpg

014.jpg

014a.jpg

015.jpg

016.jpg

017.jpg

018.jpg


Time to start making Vertical progress
 

Hounddog

Well-known member
Joined
Nov 3, 2013
Messages
386
Location
NW Florida
2 AM for the last post.......I've been there....woke up yesterday at 3:30 AM thinking of a few nails I needed to drive before the OSB goes up on my build. Compressor and gun in hand by 4 AM...then off to work at 7 AM.

Since you've yet to go Vertical...a suggestion. If space allows....could you ever see a shed roof coming off the front above the overhead doors? A "Phase 2" of the building one of these days. If so, add that header during the framing. This consideration could also apply to the right or left side...if on the right or left you may want to frame in a door access that could be cut out too...header, bucks, and the like.

Good luck with the build.
 

55 carman

Member
Joined
Dec 22, 2013
Messages
20
Location
Indy
Thanks for the update, I like the way you held in the plate bolts. Nice work it's always nice to have a nice flat surface to work from.
That picture of waiting for concrete to cure brought back memory's. Seems I remember sending the wife to pick up some work lights to finish the slab. Ron
 
OP
Z

zappman

Well-known member
Joined
Dec 22, 2013
Messages
57
Location
West Central Florida
Thanks for the input Hounddog. I actually did plan some future use options into the framing. While I will be putting in a back entrance door during the original build, I will be adding a bathroom and an additional room to use as an upholstery shop onto the backside of the building in the near future. So an additional doorway will take nothing more then unscrewing a 41" X 89-1/2" framing plug and pulling it out of the back wall's frame.

I agree 55 carman and those little plywood tabs worked well at holding the J-Bolts right at dead center of the bottom plate too.

Setting up beside the slab
018b.jpg


Laying out the wall plates
019.jpg


Prep work
020.jpg


Maximum material yield.
022.jpg
 

Ch3No2

Well-known member
Joined
Nov 27, 2009
Messages
356
Welcome to the GJ...your attention to detail looks familiar. Someone once told me never should a machinist be a framer...guess that applies to a finish carpenter as well.
Good Luck with the build!
 

uncletater

Well-known member
Joined
Oct 6, 2011
Messages
500
Location
China Grove, NC
Very impressive. I like how you precut everything. Hats off to the minimal waste. I would have had at least one or two almost full boards from some errors in that pile.

Keep up the good work.
 

santagary

Well-known member
Joined
Mar 23, 2010
Messages
821
Location
Pagosa Springs, Colorado
It looks a little moist at your site, (humid), and a haven for mosquitos, How do you cope with those conditions? I love your OCD approach to minimize wasting time during the "assembly" of your shop. My greatgrandfather always said measure twice and then cut once...born in 1885 and a carpenter for B&W in Barberton, Ohio with no power tools. Welcome to Garage Journal and we all love your photographic skills also...keep the dialoge and pics coming.
 
OP
Z

zappman

Well-known member
Joined
Dec 22, 2013
Messages
57
Location
West Central Florida
Thanks for the Welcome ripper70.

You know CH3No2 that's probably true, especially with the frustration of trying to use what we're able to find for materials these days. Someone once told me that I'd never make any money in the Biz being so **** retentive. I guess he was right too. Thanks for the well wishes.

Thanks uncletater. Trying to build anything in today's economy doesn't leave much room for waste.

Yes santagary we have very Tropical conditions here. I guess after almost 30 years of living on this land, I just got used to swatting at mosquitoes.
Another big problem in this area are the Subterranean Termites. If you lay a piece of white wood on the ground here, odds are it will be gone in a month or two. They are like little Parana just under the ground surface, just waiting.
Treating the ground just before applying the vapor barrier before pouring the slab helps, but also I am using Pressure Treated lumber for all of the wall framing as well.
OCD? Me? Nah... (well, ok maybe a little Ha-ha)
I like how your Great Grandfather added the "and -then" to that saying. I always heard it said just simply "measure twice, cut once" which I did a lot. Unfortunately, the second of the two measurings was usually to figure out why it didn't fit after I cut it.


"Preliminary Planning for Optimization"
Here is a little tip for anyone with very little carpentry experience contemplating their first build. While common sense, or un-nessasary to the more experienced of this forum, hopefully helpful to someone.

After years of working as a Project Manager and then General Manager of a very large Cabinet Manufacturing Company that produced Custom Cabinetry on a Production Shop basis, I got in the habit of producing 2D shop drawings that left very little for the crew to figure on their own. It eliminated any lack of communication, and also gave me accurate material ordering abilities.
Whats more, with the type of equipment we ran at this shop, from the computer in my office, I could tap into the Saw's "brain", and send it a cut list.
HP250.jpg

In the blink of an eye, it would not only set itself up to cut the parts, but also send me back an "Optimization Schedule" showing me how it intended to cut the 4 X 8 panels to get the least fall off,(waste) and how many panels it would take to complete the list. Asking if I had a better cut plan and waiting for a confirmation.
Try as I might, in all those years I never did beat it's optimization plan but, I did develop the ability to look at a cut list and visualize how to get the parts from the least amount of material.

The biggest trick is to cut out the entire job first. In framing up a building, arrange the cut list by length (longest to shortest). Pre-cutting all your materials allows you to cut all your longest pieces first (using the straightest lumber) then using the fall-off (and warped lumber) for the shorter pieces.
Aside from the optimizational benefits, once you get the framing gun in your hand, your already done with the chop saw and you don't have to bounce yourself back and forth between tools wearing yourself out and making wrong cuts because the number you just measured somehow got mutated in
your head on your way to the saw. (come on guys, you've done it and you know it)


Although I am fluent with CAD based softwares (like 20/20) which are great for modular cabs with nominal sizes, laying out custom cabs with them requires changing parameters at the set up level, and becomes very cumbersome. Not needing 3D capabilities for shop drawings I found that the simple "Paint" application that comes with "Windows" was sufficient and quick for 2D stuff. So, to give myself an accurate materials list, and cut list for this Garage project, I did the layout and made similar "shop drawings" with the "Windows" "Paint" application. Each section of the framing got a "shop drawing" like this:
22b.jpg

Combined, the numbers at the upper right corner of the pages produce the complete material list to frame the building, and the numbers at the lower right corner of the pages produce the complete cut list. (Note that the cut list is arranged by longest to shortest)

Hopefully someone might find something beneficial in all that rambling, but now, back to the build.

"Vertical Progress"(or....up we go!)


023.jpg


Here is one of the many (countless) ways I end up compensating for taking on projects like this alone, without help.
024.jpg

025.jpg

026.jpg

027.jpg

028.jpg

029.jpg


The West 24' wall up in (2) 12' sections
030.jpg


Onward with the Upward!
031.jpg

032.jpg

033.jpg

One Guy, One Afternoon, One Wet Heavy stack of PT 2X4s gone Vertical!
And to all......a Good Night!
 

Bib Overalls

Well-known member
Joined
Dec 4, 2006
Messages
3,318
Location
Jonesboro, Arkansas
Interested in seeing your trick for single handily putting up roof trusses.:dunno:

Actually, I'm always rigging up some kind of third hand myself. With a little forethought and ingenuity one man working alone can accomplish a lot. My hat is off to you.:thumbup:
 

SARG

Well-known member
Joined
Jan 25, 2011
Messages
999
Location
Northeast
A question for clarification...... You are using pressure treated for all the framing ?

Are termites the issue ?
 
OP
Z

zappman

Well-known member
Joined
Dec 22, 2013
Messages
57
Location
West Central Florida
Actually Bib Overalls, as a rule I rarely use trusses, and prefer laying out rafters. However this build is an exception. Because I want to utilize the loft area, I opted for running the gables the 32' span, with a 6' wide loft running the 24'depth. With the 32' being a clear span inside the shop, trusses were the more logical solution this time out.
The last time I used trusses however, I actually did set them alone. After screwing 2X6s on edge, vertically to the outside of the wall that extended 5' above the top plate to hold the gable truss up for me, I have a panel hoist that I strapped a truss to and brought it up diagonally inside of the building. However, I had to lean them against the gable truss to maintain enough room diagonally to bring the next one up. All and all, it was a very time consuming task, but I was able to single handedly set the trusses.
As the saying goes, Necessity is the Mother of Invention. (or was that Desperation is the Mother?)


Yes SARG, let me Clarify that for you. I am using pressure treated in all the framing for the walls. And Yes, Subterranean Termites are the issue. They are relentless here. They will come out of the ground at the edge of a slab and make little tube tunnels (that they travel inside of but are very hard to see) right up the slab bypassing the bottom plate (being PT) and destroy half the untreated studs by the time you realize they are there.
There are basically two choices around here. Either pay 8 hundred to a thousand dollars a year for continuous yearly treatments, or frame with PT.


As for the build:
034.jpg
 

Ch3No2

Well-known member
Joined
Nov 27, 2009
Messages
356
Just curious...hard to tell but did the double top plate get attached after the walls were stood?
 
OP
Z

zappman

Well-known member
Joined
Dec 22, 2013
Messages
57
Location
West Central Florida
Just curious...hard to tell but did the double top plate get attached after the walls were stood?
No and Yes Ch3No2.
No, a "double top plate" didn't get attached after the walls were stood, but
Yes, a single top plate was attached after the walls were stood (staggering the wall section vertical connection joints, and pulling them straight and rigid) which when added to the wall's existing single top plate, created a "double" top plate.


Actually I am sure that's what you meant, but when I read the question I had this image of standing up a wall section with no top plate (studs splaying in all directions) and having two 2X4s nailed together in the other hand.

plates.jpg


B.T.W. Ch3No2 I was looking at what all you had to go through in your site prep and foundation work, and suddenly felt pretty silly complaining about having to bring in 54 yards of fill and move it around some.
Your entire build and it's results are very impressive (and very humbling as well). I respect the obvious pride you took in the quality of your work.
 
To avoid these ads, REGISTER NOW!

Ch3No2

Well-known member
Joined
Nov 27, 2009
Messages
356
Zappman...We do what we have to do is the bottom line and we have to challenge ourself if we really want it bad enough.
Are you going with trusses or conventional for the roof?
Keep up the good work!
 

santagary

Well-known member
Joined
Mar 23, 2010
Messages
821
Location
Pagosa Springs, Colorado
Interested in seeing your trick for single handily putting up roof trusses.:dunno:

Actually, I'm always rigging up some kind of third hand myself. With a little forethought and ingenuity one man working alone can accomplish a lot. My hat is off to you.:thumbup:

I would use our Kurbota 3030 and chain on the bucket for that task...another excuse to have a tractor and also we barter with neighbors when we need a third hand. They watch our cattle and we watch their horses, etc. when we need to or want to leave town...develops trust and cooperation in the neighborhood. :)
 
OP
Z

zappman

Well-known member
Joined
Dec 22, 2013
Messages
57
Location
West Central Florida
That's true Ch3No2. We do what we have to, and sometimes push things as far as we dare to. The first picture in this update is a testament to that. This update also answers your question as well.

Thanks for the encouragement flybefree.

It is great to be able to depend on and trust your neighbors santagary. That's how it should be everywhere. I told myself when I got rid of my Bobcat, that I'd look into a small Kubota. I just always seem to find other things to spend the money on.

On with the Update.

Dirty Harry once said "A man's got to know his limitations". Well, I haven't come to terms with mine yet, but I think I found my truck's.
035.jpg


Having read to much about the down side to Tyvek and similar house wrap products, I decided as usual to stick with the old school ways of my Grandfather, and go with #30 felt.
Growing up, I thought it was really the siding on Grandpa's "Black House".
036.jpg

037.jpg


And it's a good thing too, because:

038.jpg


Now, when your used to working alone, and you know your buddy is going to bring over his GradeAll with an insane lifting capacity to help you get your 34' long trusses up onto your building, it tends to give you ideas that can make things easier yet.

039.jpg

040.jpg

041.jpg


Now as long as the good weather holds awhile longer. I've been fortunate with very few rainy days so far during this build. (Knock on Wood)
 

Malcolm

Member
Joined
Oct 11, 2007
Messages
5
Thanks for posting your garage build on here! I'm taking notes for a very similar build in 2014.


Malcolm
 

80WTI_55_CHEV

Well-known member
Joined
Dec 8, 2012
Messages
820
Location
bundamba australia
Nice build zappman, the old f-truck didn't look to happy about the load. This is how i had to pick up my timber until i bought a pickup, it took 6 trips for 1 pack of timber.
P1310288.jpg
 
OP
Z

zappman

Well-known member
Joined
Dec 22, 2013
Messages
57
Location
West Central Florida
Your welcome Malcolm. I'm glad your finding somethings useful in the thread.

Thanks 80WTI_55_CHEV. The old f-truck didn't act to happy about the load either but it brought it home. :3gears:
I don't usually work it very hard, but it is a truck.

I can't beleive you crammed two dozen 2X4s through the window into the interior of a 55 Chevy Show Car. "What was ya thinkin' Mate?" and not once, but six times as well? Good to know you bought a pickup though, and won't have to treat the Chevy that way again.
 
OP
Z

zappman

Well-known member
Joined
Dec 22, 2013
Messages
57
Location
West Central Florida
I thought I'd post a few update pics of the build.
I can't say enough about what a hassle saver pre-assembling the gable ends with the 1st adjoining common truss was.
Having the gable ends already in sheeting, felted, and the overhang "ladders" already mounted when the gable ends went up, was sooo much easier than doing it all once they were in place.
Massive thanks to my buddy and his GradeAll telescoping boom crane.

If you are going to have your trusses lifted into place by something that can handle the weight, I highly recommend pre-assembling the ends.

042.jpg

043.jpg

044.jpg


Until the next update:
 

MagKarl

Well-known member
Joined
Oct 15, 2012
Messages
684
Location
Olympia, WA
Excellent planning on your part to install blocking for your roof sheeting seams. That's the kind of little stuff that really makes a difference in how things look after a few years. Well done.
 
OP
Z

zappman

Well-known member
Joined
Dec 22, 2013
Messages
57
Location
West Central Florida
Thank you for the encouraging words JCQuick and RSOllie.


As they say MagKarl, "The difference is in the details".

Actually, as far as the planning goes, prior to starting, I wrote "The Book" on this building.
PD01.jpg

This notebook covers the building's every phase of construction in great detail. I think it was in my 4th posting in this thread that I discussed "Preliminary Planning for Optimization". and posted a page from the "Framing" section of the book to show that each page of a section's drawing, includes not only every dimension of the section, but also a stock materials count, as well as a complete cut list for that page.

With additional drawings to show how the sections of those pages actually fit together.
PD02.jpg


Every detail and dimension drawn out, every material quantity listed.
PD03.jpg


The sections cover every phase from Foundation Forming, to final Light Fixture Placement. Covering every detail from J-Bolt placement, to Wire Routing, counting and accounting for every fastener and strap, to every inch of wire along the way.

With every cut of material pre-calculated, so far in the entire build, the amount of fall-off (waste) has only filled a standard outdoor trash can 3/4 full (and a lot of it is packaging)
Thus, the material cost has been kept to a minimum, and the labor cost has been Zero (having worked alone with a couple exceptions).
In today's economy, "Preliminary Planning for Optimization" is the only way I could have afforded the build.


Until the next update:
 

domecreek

Well-known member
Joined
Jul 9, 2011
Messages
53
Meticulous Planning - well done. You should publish it as I am sure it would be a best seller among your Garage Journal followers and dreamers ! I know I would certainly purchase a copy to at least remind me or my son of the value of "planning."
 
OP
Z

zappman

Well-known member
Joined
Dec 22, 2013
Messages
57
Location
West Central Florida
I guess it comes with being retired with lots of time on my hands domecreek. Although, it pales in comparison to the one I created for a (7) floor resort back in my days as a "Project Manager", it did seem to dazzle the local Building Permit Department when they asked if I had a plan.

Now for some update pictures:
045.jpg


046.jpg


Now that I have had enough rainfall to see how the run off will flow, and what effect the elevation change for the foundation has on the rest of my land, I will be bringing in another 2 loads (32 yards) of fill to extend the East end bank, and level the approach.

047.jpg


Wanting to pre-drill the panels for the fasteners, I had drawn up this product info page (again using the Windows "Paint" app) for the book. There are 940 screws (including the Ridge Cap) in the 26' X 36' of panel surface on this roof.
I spent the better part of a day just "Screwing Around", and gave my old Hitachi cordless quite a workout.

047b.jpg


Once the roofing was completed, I immediately pushed onward to the doors, wanting to finally get the building sealed up. My research bringing me to having the over heads installed by a door company.
Having just completed the roof, my exhausted muscles welcomed the reprieve from installing the over heads myself. Taking advantage of someone else doing their install, I used the time to myself, to install the two 36" entrance doors.

048.jpg

049.jpg

050.jpg


Having finally gotten the building sealed up, What a good feeling turning the key in the entrance door's deadbolt was.


Until the next update:
 

christopizza

Well-known member
Joined
Dec 3, 2010
Messages
129
Location
NC
Subscribed! Looking great. I hope I'm only a month behind you.

We just pulled the stumps and graded the area for my 28x36. I'm doing material takeoffs today.
 
OP
Z

zappman

Well-known member
Joined
Dec 22, 2013
Messages
57
Location
West Central Florida
Subscribed! Looking great. I hope I'm only a month behind you.

We just pulled the stumps and graded the area for my 28x36. I'm doing material takeoffs today.

Well congrats on the new project. If your only a month behind me though, then I'm just incredibly slow. Unless your bringing in a crew of outside help or something. I am sure glad that I am not back at the grading phase though. Although I love to build, I must be getting old because it's beginning to seem like work.
 
OP
Z

zappman

Well-known member
Joined
Dec 22, 2013
Messages
57
Location
West Central Florida
Timing is everything!

It turned out that I got the building closed in with perfect timing. As soon as I did, the weather turned rainy and cold. (cold by Florida standards anyways) With things closed in though, I was able to get things going inside.

051.jpg

052.jpg

053.jpg

054.jpg

055.jpg

056.jpg

057.jpg

058.jpg

059.jpg


With the Temp.(phase 1 electrical) completed, a flip of the switch powers up the partial lighting. I also have a wall receptacle powered for use at each end up the shop.

Until the next update:
 

ginslung

Member
Joined
Jun 20, 2012
Messages
5
Location
Denver
I'm not sure the thread title "Building Another Garage" does justice to this build. Very impressive work.

One question, why zip tie the romex between the multi-cable holders? Just to keep things neat?
 
Last edited:
OP
Z

zappman

Well-known member
Joined
Dec 22, 2013
Messages
57
Location
West Central Florida
I'm not sure the thread title "Building Another Garage" does justice to this build. Very impressive work.

One question, why zip tie the romex between the multi-cable holders? Just to keep things neat?

Thank you for the compliment ginslung. It's been a lot of long days so far. Working primarily alone, throughout the build has presented a few challenges, so it's been as much a test of ingenuity, as it has carpentry skills. Overall though, I am fairly pleased with the resulting product thus far.

As for the "zip ties", yes basically. As the circuits are layered in the runs across the building, after being coiled up, the romex does not want to lay flat at all. between the plastic stack holders they want to twist and hang loose. So it's a matter of starting at one end of the run and working the layers down tight and flat and keeping them that way with the zip ties.
If you look closely to the image re-posted below, at the center truss, and between the red cable stack holders, you can see how straight and cleanly (4) 20 amp circuits run across the building, tucked up tightly and safely out of the way.

051.jpg


Thanks for posting!
 
To avoid these ads, REGISTER NOW!
Top Bottom