To avoid these ads, REGISTER NOW!

Building from scratch

Drinkin-N-Thinkin

Active member
Joined
Jun 4, 2011
Messages
30
Since I was a kid, I wanted a cabin in the woods. For the last seven years or so, I've been exploring different geographic areas of interest until I narrowed down the area I wanted, based on my criteria. As gasoline topped $4.50 a gallon (the first time) I decided I didn't like the $250 transportation costs per trip related to towing the parachute (I mean trailer) and would be better off buying a place and storing my toys there.

My property critera was as follows:

1) I'm a snowmobiler so it must be on or very near the snowmobile trail.
2) It must be on a county maintained (plowed) road.
3) It must be a wooded lot.
A) I don't like cutting grass.
B) I like the privacy, quiet, fresh air and beauty of the trees and surrounding nature.
C) I don't like cutting grass, especially on a vacation home where I'm not close.
4) The lot has to be big enough to put up a workshop where I can build the cabin from scratch, and have some storage space so my target (i.e. budget) is about 2~3 acres for this area.
5) I must be allowed to erect a garage first with no time limit before putting up a house. A lot of towns in this area allow you to put the garage up first, but require the house to be built within one year of erecting the garage; outside my budget.
6) It must be all high-land or at least no low-lying areas as wetlands are protected and therefore, you can't build on them in this area which would limit my options.
7) Would prefer an area zoned R1 (residential as opposed to business, or agricultural).

Tough sell.

I literally browsed the realestate ads daily sometimes which got me very familiar with the area and what properties were for sale and even their locations. Many had some of the qualities, not all so they were all deal-breakers leaving me time to save my pennies. My thinking is I would rather get what I want, even if it is outside my range as long as I save for it and pay cash (or borrow in small increments) to minimize my interest costs, I can sit on it and do no improvements until I save enough for the next phase.

To make a long story short, the housing collapse happend in 2007 and a property that was previously out of my range was reduced and appeared on my radar. It looked perfect! Lucky for me, we had a three day holiday the next week so I drove up to check it out and two months later I was the new owner of a very nice high-land wooded 5 acre lot just off the trail where I could build a garage with no time limit for the house!

I hope to share the progress and the problems I encounter and how I solve them as I build with this forum as I have been reading this for ideas and insight, too. Hopefully, something in here will help someone as I have been helped in the past by others.

I have some obvious limitations--logistics: this property is about 400 miles from my home, so I'll only be working on it when I have some vacation time or holidays. That being said, I will also need to incorporate some local professional help to accomplish some things that I either cannot do or need to have done to keep a schedule. I intend on this being a fun thing and want to work on it at a pace that keeps it fun. I also live check-to-check like everyone else so as I save alittle, I'll do alittle.

The front
IMG_0816.jpg

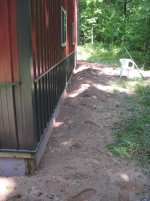
Future driveway entance
IMG_0785.jpg

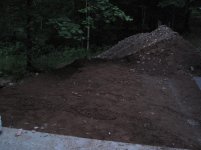
The garage building site on the left with future trail in the distance
IMG_0793.jpg

Straight on view of site
IMG_0909.jpg

Driveway in with site in the background
20100706_SITEPREP_0023.jpg

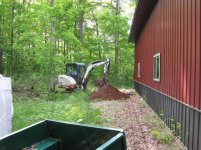
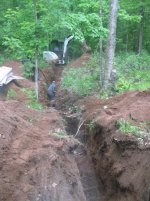
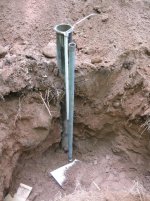
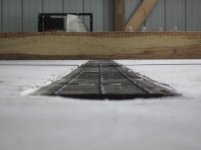
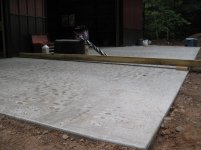
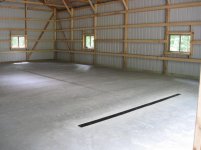
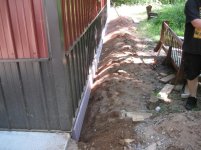
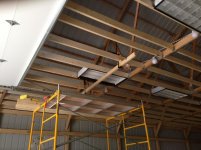
The contract was made for the building and I had to set the batton boards for the position. My original plan was for building to be built on a slab, but the concrete guy I met never called me back. Bummer. Plan "B"--put the posts in the ground and pour the slab later. My original building size was 30X50X12, but in delaying the slab, I increased the building to 36X54X14.
IMG_0522.jpg

The other end of the lot where the driveway loops back to the street
20100706_SITEPREP_0002.jpg
 
Last edited:
To avoid these ads, REGISTER NOW!
OP
D

Drinkin-N-Thinkin

Active member
Joined
Jun 4, 2011
Messages
30
Congrats on your dream property. And welcome to the board. Is the property in Michigan?

Thanks, it's in Wisconsin.

While evaluating what building to put up (size, builder, colors etc), I created a few drawings to help me visualize the end result. My concern was snow load and I wanted to make sure I had enough slope to shed the snow and keep the weight down I don't want clear it. I do not intend on having anything protrude through the roof (i.e. vent stacks) because it's both a leak point and the sliding snow could rip them off. I went with a 6/12 slope which was the minimum in this area because I also have a height restriction. Due to vagueness in the code description, I could have gone higher (and bigger) because I found they use a mean height. Uh--measure twice, cut once.

FutureBarn.JPG

Building up
Barn_0008.jpg

The trusses on my building were engineered for 42 pounds per square foot live load (4 TC DeadLoad, 5 BC DeadLoad, 51 total load) and the roof load requirements in this area are 40 psf (60 psf ground load).

After the slab goes in, I will finish the inside and need to put a ceiling up so looking for ideas on how to finish the ceiling without overloading the cords and keep the moisture minimized. My thoughts at this point are put up steel on top (same type as on the outside; T1 11 plywood on the sides), spray an inch of closed cell foam down first (ceiling and walls) then blow in some cellulose on the ceiling (making some pockets to protect the venting). I realize the steel condenses so looking to control the moisture. The eaves and gables all around extend 24" and are (at this point) naturally vented all the way around (i.e. no fan), there are two 10 foot long large throat ridge vents on top. It is not a deep heal (I think) so I'll use the knee braces as extra space for insulation and making a pocket for the vents.
Barn_0037.jpg

So far, it appears about 7 inches of snow will accumulate before it gets heavy and slides off, so I'm pretty happy about that.
IMG_3045.jpg

Before the slab goes in, need to get the electric in.
ElecctricLayout01.JPG
Since the future house is about 200 ish feet away, I decided to split the distance and use a pedestal for the electric. Going in is a 400 AMP pedestal with two 200 AMP services: 1 for the workshop and the other for the house in the future. I did it this way to lessen the voltage drop by not having the meter on the workshop (this cuts off about 90 feet), to split the distance and avoid digging up the electric when I put the drive in on the other side to the house. Plus I think it looks cleaner not having the meters on the building.
ElectricLayout3.JPG
 
Last edited:
OP
D

Drinkin-N-Thinkin

Active member
Joined
Jun 4, 2011
Messages
30
The pedestal is in (just waiting for the electric company to hook me up to the grid).

201105_0165.jpg

The two trenched external access boxes for future access. These boxes have 1 1/2 PVC conduit the whole length so I can pull wires in the future with minimum hassle.
201105_0163.jpg201105_0164.jpg

Load center mounted on the inside. I also mounted the girts on the inside, but didn't really take any pictures of those.
201105_0160.jpg

Barn light mounted on the outside above the door
IMG_3292.jpg

Testing the light at night with the generator. I used an LED because it's a 25,000 hour life and didn't want to use CFL because they don't start well when it's cold (which is exactly when I'll be needing it). It will do--only consumes 18 watts and will last longer than the incandescents which are going away anyway
IMG_3301.jpg

And the garage door opener has been mounted. I decided to go with a jackshaft because it would be easier to mount at this height and I think they're more secure.
IMG_3353.jpg
 
Last edited:

Sr. WiNdTeCh

Well-known member
Joined
Apr 15, 2011
Messages
241
Must have very nice checks to do that and still live check to check...

Very nice, every mans dream!
 

sbhockey

Well-known member
Joined
Feb 26, 2010
Messages
222
Location
Chattanooga, TN
Very, very nice. This is exactly what I've been wanting to do for quite some time now. Basically build my retirement home while I'm young-ish.
 
OP
D

Drinkin-N-Thinkin

Active member
Joined
Jun 4, 2011
Messages
30
It looks like it will be a grand getaway; very nice! :thumbup:

What CAD program are you using?

Home Design Architectural Series 18 from "Punch!" software. It's ok for stick building--fast and easy and will make an inventory list with prices for you, but not too useful for the framing of a pole barn (I did it, but it time consuming and kind of inaccurate). I can't find any [free inventory] downloads for it, either so I'm somewhat limited on what inventory there is. You can make objects (I made that pedestal) if you take the time. There's no function for SIPs, if your looking for that, either.

I'll probably be looking into others like Google Sketch up or Dietrich's D-CAD-L, but need to find something with some more flexability for framing. Anyone have any recommendations?
 
Last edited:

W650Mike

Well-known member
Joined
Dec 17, 2010
Messages
1,093
Location
North Central Texas
Looking good! I like your color choice.

How do you plan to address security? I lived in Spooner for a number of years when I was young and we never locked doors - but I’m guessing that has changed.
 

theoldwizard1

Well-known member
Joined
Feb 22, 2011
Messages
43,076
Location
SE MI
I'll probably be looking into others like Google Sketch up ...

Google Sketch Up is great for 3D, but the free version does not include 2D capabilities. More companies are adding libraries of their products (windows, doors, etc) so that you can get a realistic view of your building. Nothing like flying though a window and looking around !

There is a paid version that includes 2D and a bunch of other features.
 
Last edited:

trbomax

Well-known member
Joined
Mar 21, 2010
Messages
2,556
Location
starvation lake,mi.
Looks good! Thats exactly how we started up here about 15 yrs ago. At some point it got so that we had more stuff here than there,so we just relocated. Now we go back to the place in ohio to "visit". One mistake we made was building the house as a sledding cabin instead of a home,so when we did move up here we had to add on and about double the sq ft. to be comfortable.Just sayin',dont build only for your present needs because 10 + yrs down the road they will be different!
 
OP
D

Drinkin-N-Thinkin

Active member
Joined
Jun 4, 2011
Messages
30
Looking good! I like your color choice.

How do you plan to address security? I lived in Spooner for a number of years when I was young and we never locked doors - but I’m guessing that has changed.

Thanks--changed it in the last minute (for the better I think).

Well, right now I have nothing to steal (I don't want to load it up with stuff because I'll have to move it to put the slab in)--but I'm keeping it in mind. Any ideas?
 
Last edited:
OP
D

Drinkin-N-Thinkin

Active member
Joined
Jun 4, 2011
Messages
30
Looks good! Thats exactly how we started up here about 15 yrs ago. At some point it got so that we had more stuff here than there,so we just relocated. Now we go back to the place in ohio to "visit". One mistake we made was building the house as a sledding cabin instead of a home,so when we did move up here we had to add on and about double the sq ft. to be comfortable.Just sayin',dont build only for your present needs because 10 + yrs down the road they will be different!

Thanks. I have already gone through that thought process with the workshop I just put up (should have build bigger). And for the house, I was just going to do a simple "little cabin"....
:willy_nil
 
Last edited:
OP
D

Drinkin-N-Thinkin

Active member
Joined
Jun 4, 2011
Messages
30
Well, the electric company has tapped into the grid and installed the transformer across the street; however, despite my extensive planning and explicit instructions to "Please trench the cable on the WEST side of the drive-way
because I will be bulldozing a branch off the drive-way to the house on the EAST side
", they just put it right where I need to put the driveway for the house. There is an underground fiber on my side of the street they are waiting to locate so they don't cut it when they bore under the street to make the connection. So I still have no power yet.
201107_0159.jpg 201107_0160.jpg

Three thick aluminum cables about 5/8 inch thick (two hot, one common) were run to the 400 AMP pedestal and probably 1/2" from the pedestal to the load center in the shop (didn't want to under size this). I don't like aluminum, but my electrician assured me it was fine for the service side. The workshop is all wired with conduit and copper for the future insulation. The meter is also not yet installed. (NOTE: I've been working on getting this installed since last fall).
201107_0163.jpg

Here's a view of the girts installed on a wall and the light coming through the soffet vents in the inside (left) and the gable end on the front (right). Also seen is the electric for the overhead door light mounted on the outside, the conduit across the bottom cord feeding the west side receptical bank and for access boxes for the future lights on the ceiling. The overhead door opener is also wired along with the door switch in the shadow in the lower right
201107_0161.jpg 201107_0162.jpg

The load center shown with some circuits going in; there is one 4 inch receptical box with a pair of recepticals in each box mounted on each post (one every 9 feet) for a total of 14 boxes all around three feet high. Off the Load center, I had an additional 220 volt box installed. The recepticals are divided among four separate circuits, one for each quadrant. All corners are one piece bends to be able to pull wires without opening the wall later or snagging the fish line. The lights will be on their own separate circuit after I put the slab in (safer to work on a stable flat floor than an uneven dirt floor).
201107_0164.jpg 201107_0165.jpg
 
Last edited:
To avoid these ads, REGISTER NOW!

patman2

Well-known member
Joined
May 15, 2011
Messages
58
Location
NH
despite my extensive planning and explicit instructions to "Please trench the cable on the WEST side of the drive-way
because I will be bulldozing a branch off the drive-way to the house on the EAST side
", they just put it right where I need to put the driveway for the house.​


So can/will they come back to move the cable? (esp since it's not hooked up yet) Maybe this time take a can of blaze orange and draw a line for them on the ground. Cut here.​
 
OP
D

Drinkin-N-Thinkin

Active member
Joined
Jun 4, 2011
Messages
30
So can/will they come back to move the cable? (esp since it's not hooked up yet) Maybe this time take a can of blaze orange and draw a line for them on the ground. Cut here.

Nope, but nice tip! I'll keep that in mind for next time.
 
OP
D

Drinkin-N-Thinkin

Active member
Joined
Jun 4, 2011
Messages
30
Will have an update hopefully the first week of August or so--insulated concrete floor with PEX going in now...
 
OP
D

Drinkin-N-Thinkin

Active member
Joined
Jun 4, 2011
Messages
30
Lot's of planning this year, in summary here are the results:
1) Well drilled, trenched (insulated) into workstop. Pressure tank system all under ground for freeze protection complete with curb stop.
2) Yard hydrant placed inline.
3) Drain field, trench drain (insulated), sink drain, water supply (insulated with heat tape up the riser) and PEX tube roughed in.
4) 2" Foamular 250 insulation board placed on the entire bottom and 16" down on the sides.
5) 6" 4,000 PSI concrete floor poured; smooth trowel finish.
6) Additional layer of 2" foam layed vertically from bottom of grade board to bottom of inside foam and back-filled.

Drilling day
Clearing the well site.
Drilling the well (hit a rock here).
Positioning the depth of the well.
The well screen.
Developing the well.
Well site completed.
Future site for the fire-wood shed.
 

Attachments

  • DrillingDay_2012_0039.jpg
    DrillingDay_2012_0039.jpg
    153.3 KB · Views: 62
  • DrillingDay_2012_0038.jpg
    DrillingDay_2012_0038.jpg
    154.8 KB · Views: 75
  • DrillingDay_2012_0028.jpg
    DrillingDay_2012_0028.jpg
    153.7 KB · Views: 69
  • DrillingDay_2012_0015.jpg
    DrillingDay_2012_0015.jpg
    149.9 KB · Views: 87
  • DrillingDay_2012_0018.jpg
    DrillingDay_2012_0018.jpg
    119.6 KB · Views: 72
  • DrillingDay_2012_0009.jpg
    DrillingDay_2012_0009.jpg
    150.1 KB · Views: 79
  • DrillingDay_2012_0004.jpg
    DrillingDay_2012_0004.jpg
    153.4 KB · Views: 67
Last edited:
OP
D

Drinkin-N-Thinkin

Active member
Joined
Jun 4, 2011
Messages
30
Trenching Day
Trenching 6' down, 100 feet from the building to the well.
The yard hydrant.
Insulating and backfilling the trench.
The pitless adapter and curb stop installed.
Installing the "In-Well-no tank" system.
 

Attachments

  • Trenching_2012_0004.jpg
    Trenching_2012_0004.jpg
    152.5 KB · Views: 43
  • Trenching_2012_0001.jpg
    Trenching_2012_0001.jpg
    152.7 KB · Views: 46
  • Trenching_2012_0002.jpg
    Trenching_2012_0002.jpg
    89.2 KB · Views: 46
  • Trenching_2012_0003.jpg
    Trenching_2012_0003.jpg
    154.8 KB · Views: 46
  • Trenching_2012_0009.jpg
    Trenching_2012_0009.jpg
    152.4 KB · Views: 59
  • Trenching_2012_0008.jpg
    Trenching_2012_0008.jpg
    106.8 KB · Views: 49
Last edited:
OP
D

Drinkin-N-Thinkin

Active member
Joined
Jun 4, 2011
Messages
30
Concrete
Wasn't around for the the remainder of the work, but think my concrete/plumber guys did a very nice job. The apron has a nice 1 1/2 inch slope, the trench drain has a nice 1 1/2 slope (that wet 4X4 is sagging under it's weight) and all the tounge-and-groove foam (Foamular 250) is 16" down vertically on the sides and covering the entire bottom. The plumber put in 7 loops of 1/2" PEX tube for later and trenched the drain out the back to a drain field (for freeze and rodent protection). Also note the 4" sleeve installed in front of the PEX tube incase I need to pull anything up through the concrete avoiding drilling/hitting a tube.
 

Attachments

  • Concrete_2012_0006.jpg
    Concrete_2012_0006.jpg
    77.7 KB · Views: 134
  • Concrete_2012_0004.jpg
    Concrete_2012_0004.jpg
    67.4 KB · Views: 138
  • Concrete_2012_0003.jpg
    Concrete_2012_0003.jpg
    105.7 KB · Views: 129
  • Concrete_2012_0007.jpg
    Concrete_2012_0007.jpg
    78.5 KB · Views: 115
  • Concrete_2012_0010.jpg
    Concrete_2012_0010.jpg
    89.6 KB · Views: 123
  • Concrete_2012_0008.jpg
    Concrete_2012_0008.jpg
    76.6 KB · Views: 119
Last edited:
OP
D

Drinkin-N-Thinkin

Active member
Joined
Jun 4, 2011
Messages
30
Clean up
One more for the finished well site.
Hand dug the gravel around the perimeter to add a second layer of 2" foam from the bottom of the grade board to the bottom of the inside layer of foam.
The scaffold to start framing the ceiling.
Finished grade.
Left over gravel will be spread around the trail system I made to keep the weeds down [hopefully].
 

Attachments

  • Concrete_2012_0010.jpg
    Concrete_2012_0010.jpg
    99.8 KB · Views: 42
  • Concrete_2012_0007.jpg
    Concrete_2012_0007.jpg
    87.8 KB · Views: 41
  • Concrete_2012_0006.jpg
    Concrete_2012_0006.jpg
    122.9 KB · Views: 45
  • Concrete_2012_0011.jpg
    Concrete_2012_0011.jpg
    89.7 KB · Views: 50
  • Concrete_2012_0004.jpg
    Concrete_2012_0004.jpg
    80.6 KB · Views: 51
  • Concrete_2012_0012.jpg
    Concrete_2012_0012.jpg
    129.1 KB · Views: 54
  • Trenching_2012_0013.jpg
    Trenching_2012_0013.jpg
    152.4 KB · Views: 42
Last edited:

PCO6

Well-known member
Joined
Dec 25, 2008
Messages
4,573
Location
Newmarket, Ontario
I have nothing to add except that I think you have one of the best "screen name / avatar" combinations on GJ. :thumbup:


... Oh ... I like your garage too.
 

93L#3008

Well-known member
Joined
Feb 12, 2010
Messages
201
You asked about ceiling options. I would use #2 bright white metal on the ceiling. Looks like with the span you'll need to add some runners for support. The metal is perfect for ceiling. lightweight and you can blow cellulose right on top.
 

Kevin54

MEMBER EMERITUS
Joined
Jan 12, 2005
Messages
29,341
Location
Urbana, Ohio
One word of advice...Security!!!!

I would put some type of camera inside that works with night vision. A building setting there with no house is just an invite for thieves. Whether it be to steal copper, tools or whatever. Even though you don't have anything inside, they don't know that. I'd also put a couple of signs around like ADT Security just to help deter a thief.
 
OP
D

Drinkin-N-Thinkin

Active member
Joined
Jun 4, 2011
Messages
30
I have nothing to add except that I think you have one of the best "screen name / avatar" combinations on GJ. :thumbup:


... Oh ... I like your garage too.

With an avatar like yours, I will most certainly take that as a complement.

:rocker:
 
OP
D

Drinkin-N-Thinkin

Active member
Joined
Jun 4, 2011
Messages
30
Must be nice to have a floor in.

What the next step? Insulation?

Was late in posting some pics, but didn't take a pic of as far as I got on the next step (just snapped the scaffold).

Next step is to frame in the ceiling to prepare for lighting, finishing and insulating it. "My" building season is typically spring and fall; was pretty hot up there so only got one row done. I'll finish in the fall when it's cooler.
 
OP
D

Drinkin-N-Thinkin

Active member
Joined
Jun 4, 2011
Messages
30
You asked about ceiling options. I would use #2 bright white metal on the ceiling. Looks like with the span you'll need to add some runners for support. The metal is perfect for ceiling. lightweight and you can blow cellulose right on top.

You're right, but without the floor in, I dared not get on a ladder 14 feet up on unstable dirt so waited until the concrete was in to start. I have started framing the ceiling and [so far] have decided to install 2X4's 24" on center between the 9' truss spans. The reason I picked 2X4's and 24" on center (and not 2X6's or 16" on center) is because just these 2X4 weigh about 1,110 pounds.

I considered a metal roof, but am hesitant because of the condensation issue with temperature swings (still undecided, but leaning to wood to mitigate). Additionally, I think it would be easier for me to install wood as the pieces are smaller and easier to handle (read: tongue and groove car siding).

I'm with you on the cellulose--was my first choice as well, but now that I am running some weight calcs, it is 3 times the weight of fiberglass. I am now leaning to spraying maybe 2 or 3 inches of closed cell spray foam (2" is about 650 pounds and R13) then adding 12" fiberglass (950 pounds; maybe batts, not sure yet). Goal is to get as close to a R49 ceiling with the least weight as possible. Anything over R49 (in my area) for the ceiling provides diminishing returns.

Was going to spray the walls with a few inches of closed cell and the rest with dense pack cellulose, but as I learn more about dense pack, it is a similar performer to closed cell for a fraction of the cost. My only worry is insects/rodents liking that or getting in somehow. Might just spray the seams. Anything over R21 (in my area) for the walls provides diminishing returns.

Thanks for the suggesstions and the possibilities are still open because up to now, (except for the 2X4's 24" on center) have not made any solid decisions, but that is where my thinking is headed.
 
Last edited:
OP
D

Drinkin-N-Thinkin

Active member
Joined
Jun 4, 2011
Messages
30
Well, after making a spread sheet of all the components and adding up the weight I decided to go with 2X6's 24" on center; 2X4's aren't strong enough for that span (I was more worried about the weight). After adding all the estimated weights for everything up, I'm running about 4.4 pounds per square foot for the bottom cord (where it is rated for max 5 lbs per sq. ft). I also picked up 18 three bulb 2X4 recessed troffers on Craig's list for $20 apiece.

I have decided on some pre-finished pine car siding for the ceiling for a few reasons: 1) on a 24" span, sheet rock and OSB will probably evenually sag between the joists under the weight of the insulation. The car siding will support that span nicely. 2) Post and beam buildings flex under load (strong winds, snow etc) so sheet rock will eventually crack as the building flexes (maintenance issue). 3) I don't really like doing sheet rock, mudding, sanding and painting (who does?). 4) At 14ft up, I don't really want to risk putting up 61 4x8 sheets that are 47 lb. each--even with a drywall lift (that typically only goes to 11 ft and the hardware store doesn't have the extension). Since I'm doing this myself, lifting several 14~16ft long, 8" wide pieces of car siding is much easier for me (and safer) to handle and probably cheaper than a possible broken bone (or worse); and I don't bounce so well any more.

So far I put the Strong Tie's up, and mounted all the 2x6's and mounted all the lights (will have a local electrician wire them up as I ran out of time). The T&G will go up later. Originally, I wanted only two switches--one to control one bulb in each light, the other to control the other two bulbs in each light. However, I ended up with lights that have only one ballast and at $20 for each ballast, it is cheaper to just have each row of lights (4) on their own switch.

Apparently, GJ does not like my iPhone panorama pics which I thought would give a better perspective and throws an error when uploading. This is the only "normal" pic I took.

:mad:
 

Attachments

  • IMG_0337.jpg
    IMG_0337.jpg
    137.1 KB · Views: 275

Kevin54

MEMBER EMERITUS
Joined
Jan 12, 2005
Messages
29,341
Location
Urbana, Ohio
attachment.php


Why do you have coiled wire between the round lights? I've never saw electrical wire that looks like a telephone cord. Is that temporary lighting or permanent?
 
OP
D

Drinkin-N-Thinkin

Active member
Joined
Jun 4, 2011
Messages
30
attachment.php


Why do you have coiled wire between the round lights? I've never saw electrical wire that looks like a telephone cord. Is that temporary lighting or permanent?

Those are just some patio lights I put up so I could have some temporary light.
 
To avoid these ads, REGISTER NOW!
Top Bottom