To avoid these ads, REGISTER NOW!

Building myself a proper shop

OP
S

StinkBug

Well-known member
Joined
Jan 24, 2008
Messages
76
Location
San Diego
I know I've been slacking on updates, but most of that is due to lack of progress. Danny was out most of last week, and this week was a short one. That said we've made a lot of progress over the last couple days. Right now we have about 3/4 of the roof sheeting and insulation up. Turns out we are missing one roll of insulation, but I called the building company and it's on the way. Tomorrow we'll be putting up the last pieces of roof sheeting that we can without the insulation, putting on the ridge pieces and probably the ridge vent. From there we just have the roll up doors and interior panels left to do.

100_6427-R.jpg


100_6493-R.jpg


100_6495-R.jpg


100_6499-R.jpg


100_6502-R.jpg
 
To avoid these ads, REGISTER NOW!
OP
S

StinkBug

Well-known member
Joined
Jan 24, 2008
Messages
76
Location
San Diego
I'm using the boom lift you see here.

100_6419-R.jpg


It has a 60' reach, and I think that's in addition to the height of the actual chassis, which is probably 8-9'

As for power and lighting initially I'll just be running an overhead line to power at 30A sub panel that will just power a light outside the walk door. The city requires this light to meet code, and to get my final inspection on the building. Once the building is all finished I'll be going back and upgrading the panel on the house, then digging a trench to bring some real power to the shop underground. There will be 120v outlets everywhere I can think of, 220V outlets on all 4 walls at least for the welders/plasma table, and compressed air plumbed throughout as well.

I should be going to pick up my 2 post lift in the next few days as well.
 
OP
S

StinkBug

Well-known member
Joined
Jan 24, 2008
Messages
76
Location
San Diego
I've been sick for a couple weeks now, and decided to take the last couple days off to try and actually get better. Danny however has been kicking *** on the shop. We're still waiting on the missing roof insulation, so we cant put up the last couple panels, but the interior walls are going up really quick.

100_6520-R.jpg


100_6523-R.jpg
 
OP
S

StinkBug

Well-known member
Joined
Jan 24, 2008
Messages
76
Location
San Diego
On tuesday I was ******* waiting for an engine to be delivered, so my buddy Wayne was kind enough to go pick up my lift for me. I'm really lookin forward to finally having a lift for doing suspension work. Plus it has enough capacity for my chevy crew cab diesel. Now I just need to start gathering all the required goodies that go with the lift.

100_6527-R.jpg


100_6526-R.jpg
 
OP
S

StinkBug

Well-known member
Joined
Jan 24, 2008
Messages
76
Location
San Diego
went out and got a few more pictures. Danny got the back wall buttoned up and started working on finishing the left side. As you can see there's only a small strip of roof missing, and I've been assured that our insulation will be here tomorrow and we'll be able to finish it up.

100_6531-R.jpg


100_6533-R.jpg


100_6538-R.jpg
 

rburke65

Well-known member
Joined
Nov 10, 2007
Messages
12,349
Location
Canfield, Ohio
With a manfg. date of 10/23/03 where has that lift been for the kast 6 years.....or did you buy a used lift? But where ever.....I'm envious. Nice build.
 
OP
S

StinkBug

Well-known member
Joined
Jan 24, 2008
Messages
76
Location
San Diego
It was installed in an offroad shop that opened.....then closed not long after. The lifts were all removed and sent to one of the companies warehouses where it's been for well over a year now. The company that owned the store sponsors the race team I work for and we managed to negotiate it into the contract for this year. It's used, but very lightly, and the price sure was right.
 
OP
S

StinkBug

Well-known member
Joined
Jan 24, 2008
Messages
76
Location
San Diego
Things have been pretty busy lately with other jobs and Grand Nationals, so I haven't been working on the shop much myself. Danny however has been finishing up all the little details for me. The building is done now except for the roll up doors. Unfortunately the wrong doors were ordered so I'm now waiting on the correct ones to arrive. Kinda annoying, but fortunately the building inspector didn't care. Yesterday I got my final inspection signed off so I can actually start doing all the interior stuff and the real electrical.

For inspection I just ran the minimum required electrical, which is a light outside the walk door. I ran an overhead line from the house back to the shop and called it good. Once we do the final wiring I'll be using the standoff where the overhead wires come in now to mount a motion detector that'll light up the place if anyone comes close. I'll be coming back in the next week or 2 and digging a trench for the real power. I'll be running a 200Amp panel at the shop, and at the house I'm upgrading to a 400Amp panel, that has 2 200A main breakers so that the shop and house will be split systems. We'll also be oversizing the underground wires just in case I ever need more.

100_6721-R.jpg


100_6722-R.jpg


100_6724-R.jpg


100_6719-R.jpg


100_6720-R.jpg
 

yellow2000S/R

Member
Joined
Jul 4, 2009
Messages
23
Once we do the final wiring I'll be using the standoff where the overhead wires come in now to mount a motion detector that'll light up the place if anyone comes close.


Put a bunch of lights on one of those high amp electric sitches/relays or whatever they are (magnetic switch), nice and audible. Light it up bright and get a prison siren mounted on the top of the shop. Really scare anybody that trespasses and ALL the neighbors for miles will be up.


In all seriousness, it looks awesome :thumbup: Nothing better then a garage/shop getting used for something besides storage of a fancy car.
 
OP
S

StinkBug

Well-known member
Joined
Jan 24, 2008
Messages
76
Location
San Diego
Not a lot of progress lately as I've been way too busy working over in the old shop since this one still doesn't have electricity. About a week ago we did get the floors all done up though. After talking to Danny about my goals for the floor I took his suggestion to buff out the concrete and use a clear sealer. This should keep oil from soaking in and staining the floor, and wont get damaged by welding sparks like an epoxy would. It was also pretty cheap.

As you can see there were a lot of tire marks on the floor from the various fork, and boom lifts we used to erect the building.

100_6745-R.jpg


A few hours with a floor buffer and a garden hose and they all disappeared. Plus the floor is smooooooooth now.

100_6742-R.jpg


Here is a shot of the floor with 3/4 of the sealer done. you can see the obvious difference in shine.

100_6752-R.jpg
 
OP
S

StinkBug

Well-known member
Joined
Jan 24, 2008
Messages
76
Location
San Diego
The new doors showed up this week and today we took the original (incorrect) ones back down and put the new ones up. In the process we also found a new use for a set of 39" red label BFG Krawlers.

When we put the doors up the first time we had a smaller warehouse style forklift....and it wasn't tall enough. We had to get creative by stacking some stuff on the forks to get the door up high enough, and it was quite sketchy. This time I made sure to get a taller forklift, but discovered a new problem. As the forks go up, the carriage goes up MUCH higher. Too high for the inside of my roof. The only way to get the forks up high was to lift the door from the outside, but since the drum sits higher than the door frame we once again needed something to rest it on. It just so happened that I had these tires around for a customer project. Worked like a charm, and much less sketchy than last time.

For those that aren't familiar with those tires, they are a specially built competition tire that BFG makes for rockcrawling, and are only sold to racers.....and guys that need to install doors.


100_6834-R.jpg


100_6833-R.jpg


100_6829-R.jpg
 

heffneil

Well-known member
Joined
Apr 12, 2009
Messages
722
Location
Naples FL
I love the second use for the tires! Very smart! Looks nice. I just went in to costco the other day and they polished and sealed the floors and it looks nice! Is sealing them cheaper than epoxy? Besides the welding problem is there any other benefit of the sealer?

Thanks!

Neil
 
OP
S

StinkBug

Well-known member
Joined
Jan 24, 2008
Messages
76
Location
San Diego
The bucket of sealer cost me about $100 and I have a little left over. Renting the buffer for the day was around $45. Good epoxy on the same size floor would have been a LOT more expensive.
 

autoclassicnut

Well-known member
Joined
Nov 24, 2007
Messages
1,382
Location
Montana
Nice work!
How about an updated picture of the floor logo in the cement slab?
That's a killer idea!
Keep up with the pix, we love it!
 
To avoid these ads, REGISTER NOW!
OP
S

StinkBug

Well-known member
Joined
Jan 24, 2008
Messages
76
Location
San Diego
WOOOO HOOOOO at last, I finally have doors!

Got em all finished up on sunday, and even had enough time to anchor the 2-post lift.

100_6835-R.jpg


100_6838-R.jpg


100_6839-R.jpg


100_6841-R.jpg


100_6836-R.jpg
 

12valve

Well-known member
Joined
Aug 7, 2009
Messages
63
When buffing out the concrete did you use any cleaners or was it just water. Can't wait until next spring to start my build.
 
OP
S

StinkBug

Well-known member
Joined
Jan 24, 2008
Messages
76
Location
San Diego
Sorry i haven't been back to update this recently. I've been really busy with work the last few months, and haven't even had a chance to move in yet. I just moved all my tools and equipment out of my old shop this week and right now it's all stacked on pallets in the middle of this shop.

Where did you get your doors from?
They look insulated what brand and do you like them.
chris

The doors were supplied with the building, but come from DBCI. They are insulated and so far I like them a lot. The only issue I've had so far is with some rainwater making it's way underneath them, but I dont really think that's the doors fault, it's just a downside of any roll up door. I've since gotten a roll of storm threshold to glue down across the bottom of the openings which should fix the problem.

When we polished the floor we just used water.
 

thump186

Well-known member
Joined
Aug 23, 2005
Messages
70
Location
maine
Very nice all I can say is I am in Complete awwwwwww!!!! :drool::bowdown:
Definetly look like it will be in the need of a moving/ garage warming party.:beer:
 
OP
S

StinkBug

Well-known member
Joined
Jan 24, 2008
Messages
76
Location
San Diego
what make and size plasma table is that you have, what did it cost you? thanks

It's a Torchmate 4x4 small shop machine. IIRC that model starts at around $7500, plus the plasma cutter. I dont really remember what all I have in mine as I've added a bunch of optional things like the Arc Voltage height control, plate marker, etc. It's a really great machine and has done wonders for the shop.

So what... like are you HAMMERED at work or something?:spit::pimpflash:lol_hitti

LOL, yeah, exactly. I was getting ready for the King of the Hammers Desert Race.

 
OP
S

StinkBug

Well-known member
Joined
Jan 24, 2008
Messages
76
Location
San Diego
Well this weekend saw a lot of progress. I had a whole crew of guys over here running wiring all over the place. They got my new 200Amp sub panel mounted up and a TON of conduit with outlets all over the place. They also hung 6 High bay fluorescents, and they are BRIGHT. I just walked out there and I swear it's brighter in there at 10pm than it is at noon with the doors open.

Yesterday I also got started on upgrading the electrical service to my house, which will feed the shop in back. The house currently has a very beat up old 100A panel, with a number of pretty questionable things going on, including a 220V feed going to the old garage and the laundry room that are routed through PVC plumbing pipe. We're upgrading to a 400Amp panel with split mains. It'll feed 200A to the house, and a separate 200A to the shop. I really didn't understand why the people at the city looked at me funny when I said I was putting in a 400A panel. When I saw the size of the cables and the panel I realized why. There will be 3 cables goin up that riser that are each roughly 1" diameter.

Last week I also picked up a bunch of pallet rack and started getting it set up. I'll be using those 3racks as a base for a mezzanine that I'll use for storage, as well as a small office on the end near the window.
 

Attachments

  • 100_8961-R.jpg
    100_8961-R.jpg
    120.5 KB · Views: 229
  • 100_8962-R.jpg
    100_8962-R.jpg
    95 KB · Views: 203
  • 100_8958-R.jpg
    100_8958-R.jpg
    83.4 KB · Views: 203
  • 100_8960-R.jpg
    100_8960-R.jpg
    78 KB · Views: 199
  • 100_8967-R.jpg
    100_8967-R.jpg
    108.8 KB · Views: 242
OP
S

StinkBug

Well-known member
Joined
Jan 24, 2008
Messages
76
Location
San Diego
All this work going on in the new shop got me pretty motivated, and excited to be finally moving in. One of the things I've been really waiting for was a bit of remodeling in the original garage. I've always wanted a nice clean space to store my toys. I love garages that are really just showrooms for cars and bikes, and car related stuff, and since this house already had a rather large garage I've been really wanting to fix it up. Unfortunately It's been getting very cluttered with construction stuff, and with things I was storing while waiting for the shop to be built.

Right now it's not the prettiest space, but at least it'll be empty of all the junk soon. I'm planning to finish the drywall, and paint all the walls then hang some of the nice racing posters I've collected over the years. I've also gone back and forth a lot on what to do about the ceiling, since about 1/3 of it is finished, and the rest is just rafters. I think I've decided that the best way to make the space look nice, as well as feel larger is just to rip out the existing ceiling and paint all of the rafters and roof sheathing white. I'll get rid of all the **** thats up there and hang a bunch of track lighting to spotlight the vehicles.

The other big issue this garage has is the raised floor on half of it. There is actually a step in the slab, but for some reason the previous owner actually extended the raised floor several extra feet. Since I'm really sick of parking the stinkbug all crooked halfway on the floor (wit all of it's now cracked tile, thanks to it's weak structure) I finally decided to rip it out today. Oh, and my girlfriend Amber came and helped too ;)
 

Attachments

  • 100_8977-R.jpg
    100_8977-R.jpg
    64.8 KB · Views: 356
  • 100_8974-R.jpg
    100_8974-R.jpg
    80 KB · Views: 367
  • 100_8973-R.jpg
    100_8973-R.jpg
    91.7 KB · Views: 255
  • 100_8970-R.jpg
    100_8970-R.jpg
    90.8 KB · Views: 285
  • 100_8969-R.jpg
    100_8969-R.jpg
    97.8 KB · Views: 275
OP
S

StinkBug

Well-known member
Joined
Jan 24, 2008
Messages
76
Location
San Diego
Well I've been doing a bit more work on the place, but the electrical is still holding me up. We got the new panel all installed and all the wires run where they need to go, but SDG&E is being a real pain in the ***. Basically they wont allow my electrician to do the final hookup. Instead they want to come out themselves in the morning, disconnect, have me do all the work, get it inspected, and then come back to reconnect later the same day. Seems reasonable until you think about how much work it takes to get a new panel of this size installed and hooked up. It took us 3 days of work to get where we are now. Thankfully i was able to put the new panel in a different spot than the old one, and will be gutting the old one and using it as a junction box. If I had to put the new where the old was I would have been without power for a minimum of 5 days thanks to SDG&E's retarded policy.

ANYWAYS.....the new panel is up, and I have the service guys scheduled to come out, but unfortunately they cant come out til next tuesday, which means another 2 weeks without real power in my shop :( 
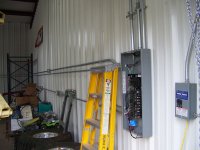
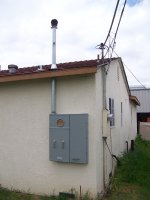
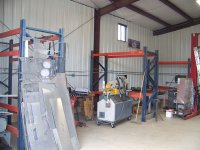
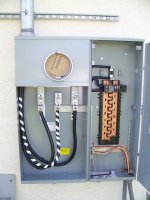
At least I have this pretty new panel to look at though. As you can see, it's pretty massive. In the first shot you can see my current weatherhead and hookup behind the new one. Can you say BEEF!

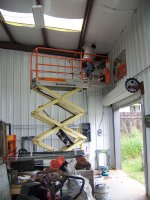
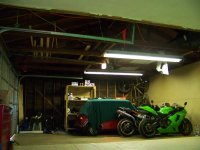
Right now I'm essentially working off of extension cords and one 30A overhead feed that turns on the lights. Did I mention they are bright? These pics were taken just a few minutes ago (around 10pm) with no flash. :D

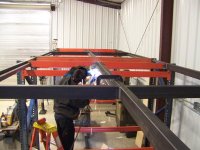
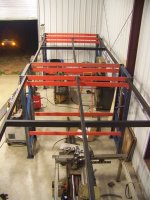
Thankfully I was also able to run a 220V cord to the old panel to run my welder, so I've been working on getting my mezzanine built. The orange pallet rack beams have a notch in them so that you can just lay 2x6's down flat to make shelves. I'm gonna copy this design on the beams I added using some 2" square tube so that the entire floor will be 2x6's with sheets of plywood across the top. Should make for a nice sturdy storage floor. I'm hoping that I can get at least the mezzanine floor all finished up this week, and start getting all my cabinets and stuff put away upstairs so that when I finally get power I'm ready to work.
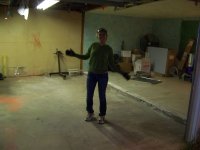
 

Attachments

  • 100_9020-R.jpg
    100_9020-R.jpg
    113.7 KB · Views: 240
  • 100_9018-R.jpg
    100_9018-R.jpg
    113.6 KB · Views: 196
  • 100_9014-R.jpg
    100_9014-R.jpg
    120.2 KB · Views: 270
  • 100_9012-R.jpg
    100_9012-R.jpg
    92.7 KB · Views: 169
  • 100_9011-R.jpg
    100_9011-R.jpg
    65.5 KB · Views: 151
OP
S

StinkBug

Well-known member
Joined
Jan 24, 2008
Messages
76
Location
San Diego
Congrats on the new shop

One question... Why so many windows but such a low ceiling? Can you cut out a few windows and put the toward a 9 or 10 ceiling? Also, why no drain in the floor, if you can put PVC in the floor for everything else?

Id rather have a 30x30 or 30x40 building with higher ceilings and a drain in the floor, if I had to choose. You can always expand off the back or side later with a lean-to if you need.

Just my


I'm not sure if I'm following you here. I have 16' clear at the lowest point of my building, and only one small window. You sure we're talkin about the same building :headscrat 
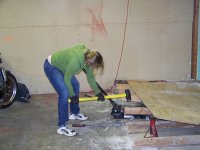
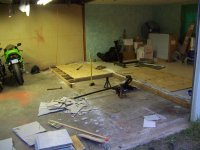
As for why no drains......I hate floor drains. With the work I do they just end up clogged up with rusty metal ****. Also for them to work you need some sort of slope in the floor. I wanted a nice level flat floor. It's easy enough to just squeegee out the 2 roll up doors. I think you must be thinking of a different building though, cause there's nothing in my slab but concrete and a LOT of steel.
 
Last edited:
OP
S

StinkBug

Well-known member
Joined
Jan 24, 2008
Messages
76
Location
San Diego
The last few days have been pretty productive thanks to a little help from my friends. This week I got all the board supports cut and welded to the cross beams. As you can see I created a step for the boards to simply sit on. This made it super easy to make all the floor support boards, as there are no fasteners, and they dont have to be all that precise. My girlfriend Amber came out to check on the progress and took her first walk around up top. She didn't really like the springiness and small gaps in the floor at that point, but it's much different now.

Since I was planning on decking the entire floor with OSB I probably could have spaced out the support boards a bit, but I decided to go ahead and do a full deck with 2x6's for maximum floor strength. Who knows what I'm gonna be putting up there, ya know. Last night my buddy Josh and his cousin came by and helped me cut and place all the boards. It took quite a bit of wood, The shot of my trailer is after I cut up about half of it.
 

Attachments

  • 100_9026-R.jpg
    100_9026-R.jpg
    97.7 KB · Views: 181
  • 100_9036-R.jpg
    100_9036-R.jpg
    81.2 KB · Views: 363
  • 100_9033-R.jpg
    100_9033-R.jpg
    85.7 KB · Views: 187
  • 100_9039-R.jpg
    100_9039-R.jpg
    102.1 KB · Views: 192
To avoid these ads, REGISTER NOW!
Top Bottom