To avoid these ads, REGISTER NOW!

Building shop cabinets

theundermount

Well-known member
Joined
Jan 17, 2016
Messages
489
Location
ON
hey guys

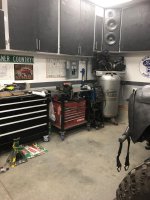
So I'm going to be building some shop cabinets along the back wall in my garage. I'm looking for idea or opinions on what to do here.

My floor has a good slope to it towards the front door, this is good for drainage but makes my floor terribly unlevel. What I'm wondering is when i build my cabinets do you recommend i build a "deck" to have a nice leveled surface or should I incorporate the slop into the bottom of the cabinets at the toe kicks?

The cabinets and work top will be an L shape around the back corner of my shop so they will have two opposing angles of uneven floor to work around. any ideas or photos would be greatly appreciated !
 
Last edited:
To avoid these ads, REGISTER NOW!

WunTon

Well-known member
Joined
Jun 22, 2018
Messages
339
Location
My house in Purcellville VA
My floor slopes about 4" over 17 feet so I had a similar issue. After weighing options I opted to go with adjustable feet for a few reasons. One its way easier to build square cabinets than it is to try and incorporate variables for floor slope into a cabinet. Two its also easier to adjust feet for a perfect level than it is to build a base although a base isn't complicated it does restrict you to having to leave you cabinets in one location. That may not be an issue but if you ever wanted to rearrange your shop or move you would then have to build new bases instead of just adjusting the feet. Once you have everything leveled you can then add a removable toe kick to cover the space between the floor and cabinet really easily for a finished look.
 
OP
T

theundermount

Well-known member
Joined
Jan 17, 2016
Messages
489
Location
ON
I'm loving this idea! I'm thinking I would run strips of wood along the bottom of the cabinet with the feet installed ? then hide it all with a tow kick?
 

ford33

Well-known member
Joined
Feb 26, 2011
Messages
2,118
Location
Chicago, IL. USA
Yes, it is easier to build the cabinets square and then use adjustable feet to level them. You may want to elevate the cabinet 4 or 5 inches off the floor with the legs so you can sweep or clean under them and get the bugs and mice out from hiding behind and beneath them.
 

Chevota Guy

Well-known member
Joined
Aug 29, 2019
Messages
90
Location
Palm Springs CA
As others have suggested, adjustable feet are the way to go. Just make sure your cabinets are sufficiently strong on the bottom. Many manufacturers of adjustable feet have clips that allow for a toe kick to be snapped onto the front legs. This way one can remove the toe kicks if needed to vacuum or rinse the floor. Removable toe kicks also make it easier if unwanted critters take refuge under your cabinets.
 

K'ledgeBldr

Well-known member
Joined
Aug 22, 2011
Messages
1,925
Location
Johns Creek, GA
I used to know a couple guys that did "on-site" cabinet builds (old school guys)- they always built bases then the cabinet box sat on top of the base. The base would be shallower than the cabinet- creating the toe-kick.

Now, if there's a possibility that you would move and take the cabinets with you you're only out the base. But with adjustable feet it's just a matter of re-adjustment.
 

Git

Well-known member
Joined
May 18, 2008
Messages
6,894
Location
S Cal
Personal preference. Do you want a toe kick? Build a level base and then you don't have to deal with cutting out the cabinet sides

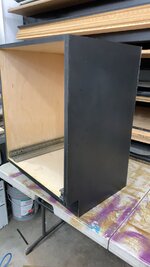
I just built this small drawer unit that I needed to fit into my 'tool closet' and I needed the face of it to be parallel to the door jam. The carcass has 3 vertical pieces and I elected to use levelers because I wanted to be able to slide it back out if I ever needed to. These worked out quite well and were reasonably cheap. (I made this so the bottom of the face frame was flush with the floor and the sides of the jamb - nothing can get under it)

Here is a pic before the face frame and drawer fronts went on

attachment.php
 

Attachments

  • GR8-II-163.jpg
    GR8-II-163.jpg
    128.9 KB · Views: 1,574
  • GR8-II-164.jpg
    GR8-II-164.jpg
    150.4 KB · Views: 209
Last edited:

tfb

Well-known member
Joined
May 21, 2012
Messages
61
Location
Eastern PA
Not sure what your budget is for this project, what you'll be storing, or if you'll ever want to move these base cabinets.

However my suggestion would be to just build a 2x4 base frame for the two L sections with -4" projection from the rear wall for a toe-kick, then build a 2x cabinet frame without a bottom, or back, (screw it to the wall). Then add your sides, (scribe the rear cuts) and build your 1x face frame for the doors.

You can then figure out what shelving configuration you want as you go along, using the floor as the lower shelf.

Any lumber other than framing or osb can get real expensive really quick, no need wasting time or money on something you'll never see or benefit from.

As for the floor pitch, just shim the rear of the base after you get it leveled in position. Once its anchored to the wall it's not going anywhere. If you need to shim the front of one end of the L, you can finish capping the toe kick with a piece of 5/16 lauan.
 
Last edited:

Stuart in MN

Well-known member
Joined
Sep 8, 2005
Messages
23,157
Location
Minneapolis
One other benefit of putting the cabinets on feet or on a base is it will help keep the cabinet wood (as well as the contents of the cabinet) separated from moisture on the floor.
 

NUTTSGT

Super Moderator
Staff member
Joined
Sep 14, 2009
Messages
51,097
Location
Northern Central Ohio
I built a workbench first, then added some facing and doors. It's lagged to the walls so it's nice and solid.

If you choose to do something like that, you could angle cut your facing to match the floor but keep it off the floor due to any water in the garage. The same thought with the workbench posts, use PT 4x4s.
 

Verado1250

Well-known member
Joined
Feb 9, 2016
Messages
97
I built a "ladder" base out of treated cca 2"x4"s, 3" narrower than the base cabinet depth and 3/4" shorter than the length (one end of cabinets are against a wall). I set the "ladder" on the floor, shimmed it level, and secured it with a small amount of liquid nails. Then placed the lower cabinets on the ladder and placed several screws though the bottom of the cab's, into the ladder and a few from the back into the wall. After everything was done, I cut the toe kick front out of 1/4" material and skin the front of the ladder, which covers any shims. Lots easier than trying to use adjustable feet and trying to turn the back ones. If your cab's are 24" deep, make your ladder 21" deep. When it's done and the skin is on, your toe kick area will be 2 3/4" deep, which is comfortable, and keeps things from rolling under your cabinets.
 
To avoid these ads, REGISTER NOW!

ProGun3400

Well-known member
Joined
Sep 16, 2008
Messages
460
Location
Will County, Illinois
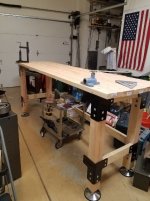
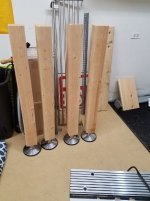
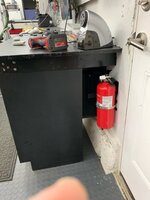
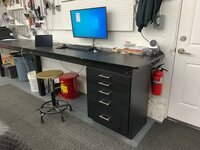
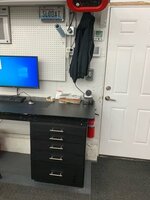
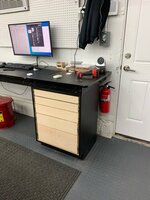
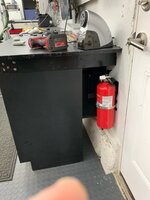
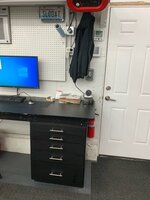
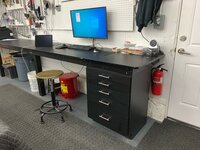
I built this bench to deal with the same issue, floor slope in the garage. The adjustable feet are from a pool table. I purchased the 1/2-13 threaded mounts & drilled a hole into each leg, attached threaded insert to bottom of legs with 4 small screws.
 

Attachments

  • 263020CD-8922-4ADD-AECE-DFE1BA19D27F.jpeg
    263020CD-8922-4ADD-AECE-DFE1BA19D27F.jpeg
    68.1 KB · Views: 207
  • A3188FF9-F01F-4BE6-89D7-848CF5B8B737.jpeg
    A3188FF9-F01F-4BE6-89D7-848CF5B8B737.jpeg
    55.6 KB · Views: 186
  • 7AE1E4D6-5D6B-4D36-9EE4-15BC06A95698.jpg
    7AE1E4D6-5D6B-4D36-9EE4-15BC06A95698.jpg
    130.1 KB · Views: 144
Last edited:

slodat

ALLIANCE MEMBER
Joined
Feb 6, 2010
Messages
3,682
Location
Central-ish, WA
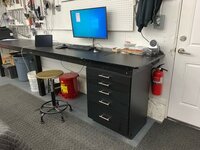
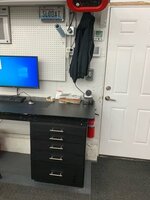
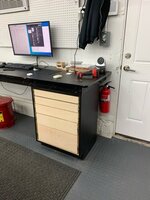
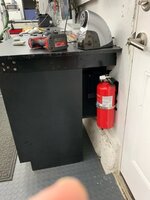
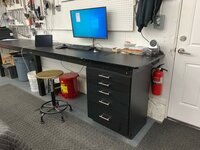
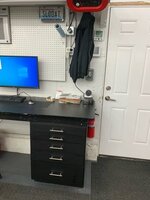
I built a 2x4 framed 14' long work bench. It's lagged to the wall with three legs.
13632439a14c0cceaadfe25da00356e8.jpg

I recently applied black laminate (formica) to the top.
2573a401162a8736466c25eab2007d90.jpg

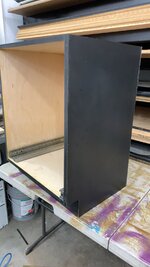
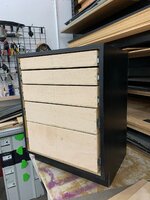
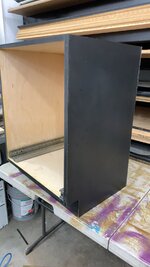
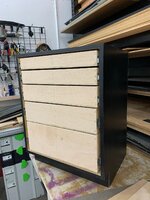
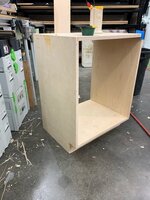
Cabinet frame made out of 3/4 plywood with toe kick built in. When I built the cabinets at my house I built the base/toe kick as a separate piece. Was easier to level it and then install cabinets on top.
0f86e6d18cf14f7c50e07a6af8340131.jpg


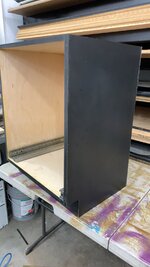
Cabinet laminated on exposed sides.

028d4b69c6977ab6c6fc4246a1f65f7e.jpg

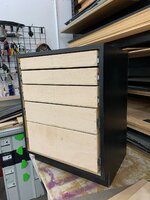
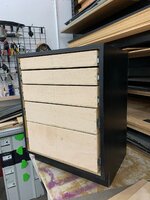
Drawers are mounted.

997ce4fc0fa67e63e0f64d4e40df7714.jpg


0dac64e984e887b2f7b5d04664a25d01.jpg

625ebf6315c5d417ee1494c827cfc9b5.jpg

Drawer fronts made the same way.
d3f46c250d49977b57c7ca9c17309ca8.jpg

52862b471942ef6f4597983c578eb6f6.jpg

If the laminate was black all the way through they would be even better. These are great for the shop.
 

Attachments

  • 625ebf6315c5d417ee1494c827cfc9b5.jpg
    625ebf6315c5d417ee1494c827cfc9b5.jpg
    34.6 KB · Views: 2
  • 2573a401162a8736466c25eab2007d90.jpg
    2573a401162a8736466c25eab2007d90.jpg
    52.5 KB · Views: 3
  • 0f86e6d18cf14f7c50e07a6af8340131.jpg
    0f86e6d18cf14f7c50e07a6af8340131.jpg
    42.3 KB · Views: 3
  • 028d4b69c6977ab6c6fc4246a1f65f7e.jpg
    028d4b69c6977ab6c6fc4246a1f65f7e.jpg
    178.2 KB · Views: 3
  • 997ce4fc0fa67e63e0f64d4e40df7714.jpg
    997ce4fc0fa67e63e0f64d4e40df7714.jpg
    339.9 KB · Views: 3
  • 0dac64e984e887b2f7b5d04664a25d01.jpg
    0dac64e984e887b2f7b5d04664a25d01.jpg
    43.2 KB · Views: 3
  • d3f46c250d49977b57c7ca9c17309ca8.jpg
    d3f46c250d49977b57c7ca9c17309ca8.jpg
    47.1 KB · Views: 3
  • 52862b471942ef6f4597983c578eb6f6.jpg
    52862b471942ef6f4597983c578eb6f6.jpg
    37.9 KB · Views: 3
  • 13632439a14c0cceaadfe25da00356e8.jpg
    13632439a14c0cceaadfe25da00356e8.jpg
    56.3 KB · Views: 4

rattle_snake

Well-known member
Joined
Jun 25, 2015
Messages
5,225
Location
Chandler, AZ
I build a large shallow cabinet on the wall, up off floor. Mine's not sloped, but wouldn't matter if it was. Could use similar concept with legs on front for deeper/heavier setup.
085143326d93706ecc228f978563b67c.jpg
357389f815f15f6eae4aadcc095ed40d.jpg
 

Attachments

  • 085143326d93706ecc228f978563b67c.jpg
    085143326d93706ecc228f978563b67c.jpg
    86.6 KB · Views: 4
  • 357389f815f15f6eae4aadcc095ed40d.jpg
    357389f815f15f6eae4aadcc095ed40d.jpg
    41.6 KB · Views: 4

TylerRNEMT

Well-known member
Joined
Dec 18, 2012
Messages
127
Location
Pendleton, IN
I build a large shallow cabinet on the wall, up off floor. Mine's not sloped, but wouldn't matter if it was. Could use similar concept with legs on front for deeper/heavier setup.
085143326d93706ecc228f978563b67c.jpg
357389f815f15f6eae4aadcc095ed40d.jpg

Those cabinet doors look great!! What material did you use for the panels? It looks like etched glass almost from the front?

-Tyler
 

Attachments

  • 085143326d93706ecc228f978563b67c.jpg
    085143326d93706ecc228f978563b67c.jpg
    86.6 KB · Views: 4
  • 357389f815f15f6eae4aadcc095ed40d.jpg
    357389f815f15f6eae4aadcc095ed40d.jpg
    41.6 KB · Views: 4

machsnell

Well-known member
Joined
Jun 12, 2010
Messages
942
Location
Northern Virginia
I built a 2x4 framed 14' long work bench. It's lagged to the wall with three legs.
13632439a14c0cceaadfe25da00356e8.jpg

I recently applied black laminate (formica) to the top.
2573a401162a8736466c25eab2007d90.jpg

Cabinet frame made out of 3/4 plywood with toe kick built in. When I built the cabinets at my house I built the base/toe kick as a separate piece. Was easier to level it and then install cabinets on top.
0f86e6d18cf14f7c50e07a6af8340131.jpg


Cabinet laminated on exposed sides.

028d4b69c6977ab6c6fc4246a1f65f7e.jpg

Drawers are mounted.

997ce4fc0fa67e63e0f64d4e40df7714.jpg


0dac64e984e887b2f7b5d04664a25d01.jpg

625ebf6315c5d417ee1494c827cfc9b5.jpg

Drawer fronts made the same way.
d3f46c250d49977b57c7ca9c17309ca8.jpg

52862b471942ef6f4597983c578eb6f6.jpg

If the laminate was black all the way through they would be even better. These are great for the shop.
Where did you get the laminate? Not the top surface but the sides and edges of cabinets. I know there is a vertical and a horizontal grade. Curious how expensive/cheap it was for the thinner vertical grade.

Looks good!

Sent from my SM-G960U using Tapatalk
 

Attachments

  • 2573a401162a8736466c25eab2007d90.jpg
    2573a401162a8736466c25eab2007d90.jpg
    52.5 KB · Views: 5
  • 0f86e6d18cf14f7c50e07a6af8340131.jpg
    0f86e6d18cf14f7c50e07a6af8340131.jpg
    42.3 KB · Views: 5
  • 13632439a14c0cceaadfe25da00356e8.jpg
    13632439a14c0cceaadfe25da00356e8.jpg
    56.3 KB · Views: 5
  • 028d4b69c6977ab6c6fc4246a1f65f7e.jpg
    028d4b69c6977ab6c6fc4246a1f65f7e.jpg
    178.2 KB · Views: 5
  • 997ce4fc0fa67e63e0f64d4e40df7714.jpg
    997ce4fc0fa67e63e0f64d4e40df7714.jpg
    339.9 KB · Views: 5
  • 0dac64e984e887b2f7b5d04664a25d01.jpg
    0dac64e984e887b2f7b5d04664a25d01.jpg
    43.2 KB · Views: 3
  • 625ebf6315c5d417ee1494c827cfc9b5.jpg
    625ebf6315c5d417ee1494c827cfc9b5.jpg
    34.6 KB · Views: 3
  • 52862b471942ef6f4597983c578eb6f6.jpg
    52862b471942ef6f4597983c578eb6f6.jpg
    37.9 KB · Views: 3
  • d3f46c250d49977b57c7ca9c17309ca8.jpg
    d3f46c250d49977b57c7ca9c17309ca8.jpg
    47.1 KB · Views: 3

slodat

ALLIANCE MEMBER
Joined
Feb 6, 2010
Messages
3,682
Location
Central-ish, WA
Where did you get the laminate? Not the top surface but the sides and edges of cabinets. I know there is a vertical and a horizontal grade. Curious how expensive/cheap it was for the thinner vertical grade.

Looks good!

Sent from my SM-G960U using Tapatalk

It's all the same stuff from Home Depot. About $45 for a 4x8 sheet. They stopped stocking in the store. I had to use the ship to store option on the website for it recently. I don't know anything about a different material for vertical. I'm quite happy with how this is turning out.
 

nadogail

Well-known member
Joined
Jan 23, 2009
Messages
32,032
Location
Coronado, CA
IMHO, a plinth under the cabinets will close the gap and give you a level surface to mount your cabinet boxes on.
 

k1rodeoboater

Well-known member
Joined
Feb 1, 2011
Messages
357
Location
NC
IMHO, a plinth under the cabinets will close the gap and give you a level surface to mount your cabinet boxes on.

Clearly I'm a troglodyte....I had to look up the word "plinth."

But yeah I agree build the base out of dimensional then mount the boxes on top would be the way I'd go. Cheaper than leveling feet too.
 

csp

Well-known member
Joined
Mar 23, 2010
Messages
5,720
Location
Franktown, CO
Mine are a box sitting on a platform made of 3/4" plywood that is leveled. I use scraps of 3/4" ply to level the low side of the platforms, which can be seen in the attached photo. The platform faces were covered with rubber baseboard trim.

Cabinets were made of 3/4" cabinet grade (not Baltic birch quality though) plywood, glued and screwed with pocket screws.

Even the toolbox (HF 44 painted) sits on a plywood platform, leveled.
 

Attachments

  • cabinets1.jpg
    cabinets1.jpg
    42.6 KB · Views: 49
Last edited:
To avoid these ads, REGISTER NOW!
Top Bottom