To avoid these ads, REGISTER NOW!

Built-it-myself tools/machines - show us what you've done

Jim Stabe

Well-known member
Joined
Feb 18, 2009
Messages
801
Location
San Diego, Ca
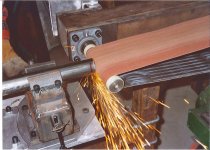
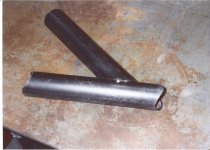
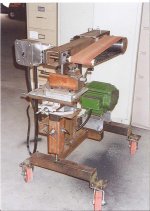
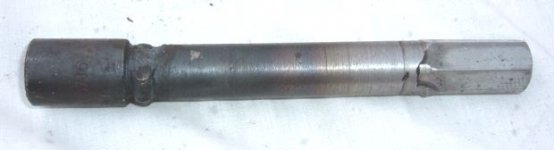
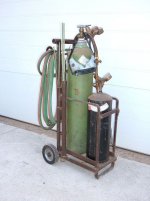
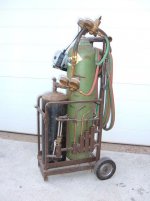
I have been hanging around here for a few months now and I really like this place because it is full of tool lovers. I am a fanatic also but I have built many of mine mostly for economic reasons but also because I want features or capabilities I can't find commercially.

So grab the digital camera and show off a little.
 
To avoid these ads, REGISTER NOW!

jam022316

Well-known member
Joined
Jul 31, 2008
Messages
971
Location
Indiana
You first :) Just kidding. I don't have anything but love these types of threads. They always give me so many ideas!!!
 

lametec

Well-known member
Joined
May 5, 2008
Messages
2,099
Location
Michigan
I only have pictures of two of my creations handy:

Valve spring compressor:
3.5%20Valve%20spring%20compressor%20001%20(Small).jpg


Sand blasting cabinet:
Blasting%20cabinet%20001%20(Small).jpg


Blasting%20cabinet%20006%20(Small).jpg
 

bimmer1980

Well-known member
Joined
Feb 5, 2009
Messages
2,103
Location
York, PA
Here is a tube notcher that my twin brother and I built. It is an abrasive belt notcher that will quickly and easily notch a tube at any angle.
 

Attachments

  • _0511173844_002.jpg
    _0511173844_002.jpg
    147.8 KB · Views: 3,710
  • _0511173844_004.jpg
    _0511173844_004.jpg
    146.6 KB · Views: 2,803
  • _0511173844_003.jpg
    _0511173844_003.jpg
    147.7 KB · Views: 3,755

lilredex

Well-known member
Joined
Apr 29, 2006
Messages
5,943
Location
Toronto
A sampling of a few simple helpers:

#4 - Extended 9/16" extra deep socket for things like gas tank "J" bolt nuts. 1/2" drive socket, length of 1/2" pipe topped off with a 1/2" coupling nut.

#5 - Puller for those steering box pitman arms. 7/8" threaded rod with a captured nut internally. Big, ugly, crude.............but it works.

#6 - Assortment of thread chasers for cleaning the crud out of threads (like those "J" bolts on gas tanks or your table saw adjustments) These nuts clean the threads rather than climb on top of the junk, as an unaltered nut does.
 

Attachments

  • Copy of Tools - Misc. #4.JPG
    Copy of Tools - Misc. #4.JPG
    15.5 KB · Views: 1,063
  • Copy of Tools - Misc. #5.JPG
    Copy of Tools - Misc. #5.JPG
    29.8 KB · Views: 1,082
  • Copy of Tools - Misc. #6.JPG
    Copy of Tools - Misc. #6.JPG
    64.5 KB · Views: 1,582
Last edited:

bimmer1980

Well-known member
Joined
Feb 5, 2009
Messages
2,103
Location
York, PA
THe tubing notcher can do different sizes by swapping out the front shaft. We made a couple of different shaft sizes. It is a bit forgiving in that you can grind a couple of different tube diameters with the same shaft--of course, you will have joint that isn't as tight as it could be... but as long as you're not building an aircraft, it will work. it is especially less critical when MIG welding. for thin walled TIG, it is best to have a tighter joint... but it sure beats using a hand grinder or a hole saw!
 

bimmer1980

Well-known member
Joined
Feb 5, 2009
Messages
2,103
Location
York, PA
yeah, we had looked at that style when we were building ours, but given the materials we had on hand, it made sense to build it that way. Also, keep in minde that the mill bit will turn way sloooower.... so the machine would have to be geared way down. Notice the gear box.... it also requires a collet holder--a lot tougher to find or build. It is a nice compact machine, but it probably costs a couple of grand. We built our machine for a couple of hundred buck--that was mainly for the bearings, belts and pulleys. we had nearly everything else on hand....
 

eborcim

Well-known member
Joined
Apr 5, 2009
Messages
2,425
Location
Central, MO
yeah, we had looked at that style when we were building ours, but given the materials we had on hand, it made sense to build it that way. Also, keep in minde that the mill bit will turn way sloooower.... so the machine would have to be geared way down. Notice the gear box.... it also requires a collet holder--a lot tougher to find or build. It is a nice compact machine, but it probably costs a couple of grand. We built our machine for a couple of hundred buck--that was mainly for the bearings, belts and pulleys. we had nearly everything else on hand....

I see another plus, you have a heavy duty sander to remove rough edges on metal :thumbup:
 

jamesemery728

Well-known member
Joined
May 2, 2009
Messages
961
#6 - Assortment of thread chasers for cleaning the crud out of threads (like those "J" bolts on gas tanks or your table saw adjustments) These nuts clean the threads rather than climb on top of the junk, as an unaltered nut does.[/QUOTE]

The photo kind of tells it all but can you explain how you made these and how they work. Thanks
 

lilredex

Well-known member
Joined
Apr 29, 2006
Messages
5,943
Location
Toronto
#6 - Assortment of thread chasers for cleaning the crud out of threads (like those "J" bolts on gas tanks or your table saw adjustments) These nuts clean the threads rather than climb on top of the junk, as an unaltered nut does.

The photo kind of tells it all but can you explain how you made these and how they work. Thanks[/QUOTE]

OK, they are simply standard nuts that fit whatever you are working on. Hack saw cuts are made through about 1/3 of the way (that provides an outlet for the crud). Then oil up the stud/bolt and put on that modified nut, with the leading edge having the saw cuts. You could just use a thread chasing die if you have one and it fits, many times there is no room to swing a die. Next time you have a rusty old bolt you do not want twisted off, try it. Good example are the bolts holding up gas tanks, the nuts are cranked way up and leave a bunch of threads open to the elements.
 
Last edited:

krehmkej

Well-known member
Joined
Mar 20, 2009
Messages
197
Location
Oregon
Bead breaker for motorcycle tires.

beadbreak.jpg

When needed, it just bolts to the top of my welding table.
 

jamesemery728

Well-known member
Joined
May 2, 2009
Messages
961
Thank you for the explanation. Great idea, using something you already have with a little modification and no $$ spent. I like it.
 

jam022316

Well-known member
Joined
Jul 31, 2008
Messages
971
Location
Indiana
Man! Awesome idea's everyone!!! Especially love that sand blasting cabinet. Thanks for giving me more things to add to my ever growning list of things to make/do!!! :)
 

jkeyser14

Well-known member
Joined
Dec 19, 2008
Messages
1,814
Location
(rural) Maryland
Bimmer, modify it to is a mill bit instead of an abrasive like Mittler Bros. machine.

Ultimate%20Notcher.jpg

I'm not a fan of those notchers, on thin walled tubing the endmill always bends the tube and doesn't give crisp, tight-fitting cuts. We ran into this problem on .049" wall chromoly and smaller. We wound up making a tool holder for our lathe (similar to a boring bar holder) to hold the tubing at any angle. We put a hole saw in our lathe and power fed the tubes into the hole saw. Perfect cuts every time.
 

1320stang

Well-known member
Joined
Dec 28, 2006
Messages
4,563
Location
Edmond, OK
I see another plus, you have a heavy duty sander to remove rough edges on metal :thumbup:

Yeah, but if you're TIGing something then you have to worry about inclusions in the metal.

I'm not a fan of those notchers, on thin walled tubing the endmill always bends the tube and doesn't give crisp, tight-fitting cuts. We ran into this problem on .049" wall chromoly and smaller. We wound up making a tool holder for our lathe (similar to a boring bar holder) to hold the tubing at any angle. We put a hole saw in our lathe and power fed the tubes into the hole saw. Perfect cuts every time.

Depends on what you're building, that machine is designed around the thought of it being in a chassis shop. Jerry Bickle's shop has many of thos in it, .083" 'moly is the thinnest you can legally run in a drag car for a structural member and the fit is great. You should quantify your statement with what you do, A&P?
 

lametec

Well-known member
Joined
May 5, 2008
Messages
2,099
Location
Michigan
I like the valve spring compressor. Did something similar to get long reach vise grips from the cheap HF ones.
Clamp 001 (Medium).jpg

Same cheap grips I used. Bought a two pack and kept one intact. :) The compressor cost about about $15 to make. To buy one would have been at least $50.
 
To avoid these ads, REGISTER NOW!
OP
J

Jim Stabe

Well-known member
Joined
Feb 18, 2009
Messages
801
Location
San Diego, Ca
Good one........let's see that O/A cart behind it!
Not the cart you were referring to but here is the one I made. I wanted something that would store in a narrow area so I put the bottles in-line. The front and rear braces swing up and hold the bottles in place with turnbuckles. The rear brace also has the handle for moving the cart around. Quick to change bottles and holds them very securely.

Welding tank cart 001.jpg

Welding tank cart 003.jpg

Welding tank cart 005.jpg

Welding tank cart 004.jpg

While I was taking the pictures of the bottle cart I ran across this and thought it might be interesting. It is a plate bender I made and it can bend up to 1/4" plate up to 90*. You lock the work down with the 2 bolts on top and then lift like a regular brake. It can bend 3/16" up to about 6" wide and 1/4" up to about 2" wide. You can do 1/4" wider but you have to heat it first. It is very handy for making brackets and the like

[/ATTACH][/ATTACH]
 

Attachments

  • Plate bender 002.jpg
    Plate bender 002.jpg
    112.9 KB · Views: 1,407
  • Plate bender 001.jpg
    Plate bender 001.jpg
    92.3 KB · Views: 1,705

jkeyser14

Well-known member
Joined
Dec 19, 2008
Messages
1,814
Location
(rural) Maryland
You should quantify your statement with what you do, A&P?

This is for baja cars I used to build. We used the thin wall tubing in a lot of places to attach components to the chasis. For example, a piece of tubing coming off the cage to mount the steering wheel/shaft to.
 

Falcon67

Well-known member
Joined
Jun 11, 2009
Messages
18,371
Location
Merkel, TX
Mr. Stabe, I think you just solved my Oxy/Actyl tank problem. I haven't bought tanks because of space issues. *ding* why didn't I think of that. ;)

I make small tools as required. Things like spanner wrenches for rear end bearing install, spring compressor for auto trans work, press tools, seal drivers, etc.
 
OP
J

Jim Stabe

Well-known member
Joined
Feb 18, 2009
Messages
801
Location
San Diego, Ca
Mr. Stabe, I think you just solved my Oxy/Actyl tank problem. I haven't bought tanks because of space issues. *ding* why didn't I think of that. ;)QUOTE]
The bottle cart I had before was one I made in 1972 when I got my first O/A torch set. It had the bottles side by side and the wheels stuck out beyong that so I really took up a lot of room. It had a chain holding the bottles in place but I could never get it tight enough and they would flop around. It only took 35 years of hating that thing before I finally snapped and made a decent one.

I'll post some pictures of some of my other stuff when I get a little more time. I have an English wheel, helve hammer, power shrinker, ring roller, stand for my 4' finger brake, powered bead roller, belt grinder and a 12' jib crane

Jim
 

72chevy

Well-known member
Joined
Jul 12, 2006
Messages
169
Not the cart you were referring to but here is the one I made. I wanted something that would store in a narrow area so I put the bottles in-line. The front and rear braces swing up and hold the bottles in place with turnbuckles. The rear brace also has the handle for moving the cart around. Quick to change bottles and holds them very securely.

/QUOTE]

I'm digg'n this idea too. :)
 

lilredex

Well-known member
Joined
Apr 29, 2006
Messages
5,943
Location
Toronto
Not the cart you were referring to but here is the one I made. I wanted something that would store in a narrow area so I put the bottles in-line. The front and rear braces swing up and hold the bottles in place with turnbuckles. The rear brace also has the handle for moving the cart around. Quick to change bottles and holds them very securely.

While I was taking the pictures of the bottle cart I ran across this and thought it might be interesting. It is a plate bender I made and it can bend up to 1/4" plate up to 90*. You lock the work down with the 2 bolts on top and then lift like a regular brake. It can bend 3/16" up to about 6" wide and 1/4" up to about 2" wide. You can do 1/4" wider but you have to heat it first. It is very handy for making brackets and the like = QUOTE]


Yes, I like that narrow cart and your plate bender. I was looking at these, but yours is better (sturdier, and ready for bigger jobs) Note on the last one where he has an adjustment on the clamping jaw to compensate for various thicknesses.

http://www.millerwelds.com/interests/projects/ideagallery/project/1924165732/

http://www.millerwelds.com/resources/communities/mboard/showthread.php?t=14831

My version of the "narrow isle" O/A set up. but on a smaller scale.
 

Attachments

  • Ox-Ace Cart 01.jpg
    Ox-Ace Cart 01.jpg
    76.1 KB · Views: 789
  • Ox-Ace Cart 02.jpg
    Ox-Ace Cart 02.jpg
    67.8 KB · Views: 780
OP
J

Jim Stabe

Well-known member
Joined
Feb 18, 2009
Messages
801
Location
San Diego, Ca
Not the cart you were referring to but here is the one I made. I wanted something that would store in a narrow area so I put the bottles in-line. The front and rear braces swing up and hold the bottles in place with turnbuckles. The rear brace also has the handle for moving the cart around. Quick to change bottles and holds them very securely.

While I was taking the pictures of the bottle cart I ran across this and thought it might be interesting. It is a plate bender I made and it can bend up to 1/4" plate up to 90*. You lock the work down with the 2 bolts on top and then lift like a regular brake. It can bend 3/16" up to about 6" wide and 1/4" up to about 2" wide. You can do 1/4" wider but you have to heat it first. It is very handy for making brackets and the like = QUOTE]


Yes, I like that narrow cart and your plate bender. I was looking at these, but yours is better (sturdier, and ready for bigger jobs) Note on the last one where he has an adjustment on the clamping jaw to compensate for various thicknesses.

http://www.millerwelds.com/interests/projects/ideagallery/project/1924165732/

http://www.millerwelds.com/resources/communities/mboard/showthread.php?t=14831

My version of the "narrow isle" O/A set up. but on a smaller scale.
I like your rack on the side, a version just may appear on mine...
 
OP
J

Jim Stabe

Well-known member
Joined
Feb 18, 2009
Messages
801
Location
San Diego, Ca
This is my first tool project ever that I didn't have any cash out of pocket to build - zero! Everything I had left over form something. It is a 1" belt sander that fits on the end of a pool pump motor. The previous owner of my house left the pump behind when he moved out, it was really cruddy and the pumpmade a lot of noise. When you remove the pump there is a nice 4 bolt corcle on the shaft end to bolt to. Once the pump was off the motor ran beautifully so I had a 1 hp 3450 rpm motor. The motor mounts in a piece of 4" channel and I can rotate it around to different angles. I have no idea what I bought the clamps for eons ago but they fit the motor perfectly. I milled 3/8" slots in some 1/2 x 1" for the attachments / adjusters. The frame is 3/4 x 1 1/2" x 1/8" tubing. When I slit the top another piece of the 1/2 x 1" was a perfect fit for the tensioner. The tensioner spring was something in my can of old springs that I finally found a use for - one out of about 60 I have accumulated isn't a bad hit rate. The wheels are old iron casters that I bored and installed oilite bushing stock in and crowned the surface on the lathe. Most of what I use this for is slack belt deburring and tool sharpening. I still need to put a short platen behind the belt for about 4" of the height for those times when I need it.

I just finished a 2" x 72" belt sander that is an absolute beast removing metal so I needed something that I could use for detail work breaking edges and such and this works perfectly for that. I run 60 grit ceramic belts on the beast and 150 - 220 grit AO on the little guy

This is the beast
Belt sander 032.jpg

Belt sander 034.jpg

This is the little one

Belt sander 051.jpg

Belt sander 055.jpg

Belt sander 052.jpg

Belt sander 053.jpg
 

A_Pmech

Well-known member
Joined
May 8, 2007
Messages
8,002
Location
IL
Jim,

Great work! I love the simple design of your little one especially. Very clean and purposeful. The tensioner detail is excellent.
 
OP
J

Jim Stabe

Well-known member
Joined
Feb 18, 2009
Messages
801
Location
San Diego, Ca
Jim,

Great work! I love the simple design of your little one especially. Very clean and purposeful. The tensioner detail is excellent.
Thanks, this was a one day project that I needed to fill a void. I really was amazed how simple the thing ended up because it was a design as you go kind of project. I call the big one the beast should the little one be the beauty?
 

A_Pmech

Well-known member
Joined
May 8, 2007
Messages
8,002
Location
IL
Thanks, this was a one day project that I needed to fill a void. I really was amazed how simple the thing ended up because it was a design as you go kind of project. I call the big one the beast should the little one be the beauty?

Yep! Know about those one-day filler projects. That's well-executed for a one-day project too.

LOL! I dunno... If you do, I wouldn't let them stay in the same room together. You might end up with a third. :lol_hitti
 
OP
J

Jim Stabe

Well-known member
Joined
Feb 18, 2009
Messages
801
Location
San Diego, Ca
Yep! Know about those one-day filler projects. That's well-executed for a one-day project too.

LOL! I dunno... If you do, I wouldn't let them stay in the same room together. You might end up with a third. :lol_hitti
Maybe I'm crazy for asking but what would a 3rd one do that these wouldn't?
 

rsanter

Well-known member
Joined
Dec 22, 2007
Messages
18,487
Location
visalia ca
the base is made from some 2x2 material I had on hand. the cabinet is made from 16ga material I had on hand that was given to me by a place I used to work.
the sand tank is an old freon tank that I was given and I turned in into a pressure pot tank. when the tank runs out of sand you have to reach in and remove the pipe plug and the sand in the cabinet drains back into the sand tank.
there is enough sand to blas smaller stuff in one shot, bigger items you will have to stop and replenish a couple of times.
the side doors (one on each end) are made from the same 16ga material, the hinges were free (given to me by a friend) and the latches were salvaged off something else and the casters were free (used, given to me by a friend).
the front 'glass' is actually lexan that had a few scratches and was given to me by a place I used to work and there is a piece of the same lexan on the top. on the top is a 4ft shop light like you get at the big box store for $9 that I happened to have sitting around. it is the best lit blast cabinet I have used.
the gloves are replacement blasting gloves like you can get at an industrial supply place and they are held on with hose clamps
there is a port in the back that you hook a shop vac to so you can pull some of the flying dust and stuff out of the cabinet
pressure feed is the way to go, I can blast a distrubutor in about 5 min

I think the cabinet as about 14 or 15 years old now and it has been 'stored' at several friends houses over the years

bob
 
Last edited:

A_Pmech

Well-known member
Joined
May 8, 2007
Messages
8,002
Location
IL
Here's my little entry:

tool2.jpg


tool1.jpg


It's a steel rule cutting die, made specifically to cut out those little cardboard spacers shown in the photo. It's made from three pieces of scrap aluminum and sharpened .007" feeler gauge stock.

The spacers are used in my wood shaper for adjusting the height of stacked cutters. Why cardboard and not brass? I can make minor adjustments to fine-tune the stacking simply by torquing on the spindle nut. Once torqued, they're remarkably stable.

My favorite source of cardboard is high-quality manilla file folders and .015" card stock. I also make shims from standard printer paper, which is about .003" thick.
 
OP
J

Jim Stabe

Well-known member
Joined
Feb 18, 2009
Messages
801
Location
San Diego, Ca
Here's my little entry:

It's a steel rule cutting die, made specifically to cut out those little cardboard spacers shown in the photo. It's made from three pieces of scrap aluminum and sharpened .007" feeler gauge stock.

The spacers are used in my wood shaper for adjusting the height of stacked cutters. Why cardboard and not brass? I can make minor adjustments to fine-tune the stacking simply by torquing on the spindle nut. Once torqued, they're remarkably stable.

My favorite source of cardboard is high-quality manilla file folders and .015" card stock. I also make shims from standard printer paper, which is about .003" thick.
I've thought about making punching dies before but usually just sharpen the edge of a piece of tubing. These are slick! How do you make the circular slit for the .007" feeler gauge stock (and where do you buy feeler gauge stock)? Do you sharpen before or after you insert into the base? Details, details...

Jim
 

A_Pmech

Well-known member
Joined
May 8, 2007
Messages
8,002
Location
IL
I've thought about making punching dies before but usually just sharpen the edge of a piece of tubing. These are slick! How do you make the circular slit for the .007" feeler gauge stock (and where do you buy feeler gauge stock)? Do you sharpen before or after you insert into the base? Details, details...

Jim

Jim,

The die is actually made in four pieces. There's a center circle, an outer ring, a 1/8" 4130 backer that fits inside the cavity in the die body, and the die body. The feeler stock is sharpened and pre-curved before installing into the die body. The die rings are made to provide a snug interference fit to each other and the feeler stock. They must be tapped into place with a wooden stick and a mallet. Standard light press fits apply.

There is a though hole in the back of the die body to permit tapping out the 4130 backer, thus removing the ring, center circle, and feeler stock when the die needs to be sharpened. With practice, you can make many hundreds of pieces with a plastic mallet before the die "folds over" when the feeler stock loses it's edge. Use end grain Maple for best results.

I find leaving about a .02" gap between the ends of each sharpened ring to provide a "hanging chad" helps remove the material from the punch. After punching, simply pull on the little tab to remove your part and the scrap.

The feeler stock I use is .007" thick, available in 25-foot rolls from victornet.com, MSC, etc.

:beer:
 
Last edited:
OP
J

Jim Stabe

Well-known member
Joined
Feb 18, 2009
Messages
801
Location
San Diego, Ca
My daughter's wedding was Saturday so I have some time for some pictures now. This is a ring roller that I made to form a gradual curve in some 1" tubing for the rolled edge of the cowl over the dash in my MG project. The stock car had a padded, leather covered piece that I couldn't use because I widened the car. The tube needed to have a smooth curve in two planes and I wasn't having any luck trying to bend it around large round objects.

The first project was the handwheel for the machine and I have since done other handwheels (the English wheel adjuster) for myself and friends. The 12" diameter E-wheel adjuster wheel only runs out 1/16"It does a good job on square tubing and flat steel stock as well. I made the tops of the gate frames with it out of 3/4" square tubing.
Cowl (1) (Medium).jpg

Ring Roller B 005 (Medium).jpg

Ring Roller 007 (Medium).jpg

Ring Roller 005 (Medium).jpg

New Wheel 015.jpg

New Wheel 019.jpg

Front 059.jpg
 

W-Cummins

Well-known member
Joined
Jan 9, 2006
Messages
1,639
Location
Iowa
How did you turn the nice groves in the dies?

On the rings do you cut the flat part out on the starting end and roll it closed??

BTW the stuff looks great!

William....
 
To avoid these ads, REGISTER NOW!
Top Bottom