

You are using an out of date browser. It may not display this or other websites correctly.
You should upgrade or use an alternative browser.
You should upgrade or use an alternative browser.
Cabinet for Small Parts Storage Cases
- Thread starter soj
- Start date
pgray007
Well-known member
Any idea how the various boxes compare—HF, Bosch, Dewalt, Sortimo T Boxx? Are the T Boxxes worth the cash?
I’d love to see a “box showdown” as well from anyone that tried multiple boxes before building one of these cases.
Sent from my iPhone using Tapatalk
Distephano
Member
From what I've seen, the Bosch and Sortimo are really nice and offer some extra flexibility in terms of the various compartment sizes. But man, that price is too hard to swallow. I would have been looking at hundreds and hundreds of dollars for cases in my setup.Any idea how the various boxes compare—HF, Bosch, Dewalt, Sortimo T Boxx? Are the T Boxxes worth the cash?
In my case, I can afford a couple extra drawers to offset less than perfect use of internal space as limited by fewer bin sizes.
The dewalt and other similar boxes strike me as too robust for a shop based system. For something that is always on the go, I could see using the tougher boxes. For something that is used just in the shop, I'm willing to have a less robust case and be able to fit a few more in the same vertical space.
For the price of the harbor freight boxes (5.99 on sale) I can't beat them for my application.
Sent from my Pixel using Tapatalk
FTWingRiders
Well-known member
^^^^ X2.. i have a couple Stanleys, which are nice, and if it was something I carried from job site to job site than maybe I’d look for something more heavy duty, but just for organizing and have in the shop you can’t beat the price of the HF 5.99 on sale.
nsula_country
Well-known member
Very nice!
You seem to like Grizzly Tools too! they are IMHO high quality.
CT
You seem to like Grizzly Tools too! they are IMHO high quality.
CT
logixjock
Well-known member
Here is my adaptation.. 3/4" shell and 1/2" shelves out of birch plywood. Man, routing all those dados made a lot of sawdust.. had to vacuum the whole shop!

I left the back side shelves removable as I don't have need for that many boxes yet, I'll adjust them to store random cases of hardware and the like..


I'm planning on adding a drop down shelf on the side to place the cases on when I need them.


I'm really liking this setup.

I’d love to see a “box showdown” as well from anyone that tried multiple boxes before building one of these cases.
Sent from my iPhone using Tapatalk
I should do it.
MattDanger
Member
- Joined
- Jan 12, 2018
- Messages
- 18
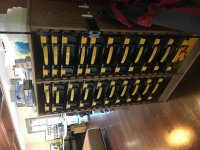
I built a rack a couple years ago for my r&d lab. Accepts Stanley boxes, and will accept either the short or tall cases in any order. Slides are angled down at ~5 degrees so the cases slide in and stay in more securely.
Rack is made from 3/4" oak ply with a pine top. If i were to do it again I'd probably use 1/2" maple or birch ply. I had to make it a little "fancy" to blend in with the office, if it were for the shop it would be a little more utilitarian.
One issue I did have, was that the 3 panels that the slides are fixed to were bowed ~3/16". If they were all oriented in the same direction, like this: ((( it would not have been an issue but I put them together like this: ()) so the left side is a little more loose than the right.
Rack is made from 3/4" oak ply with a pine top. If i were to do it again I'd probably use 1/2" maple or birch ply. I had to make it a little "fancy" to blend in with the office, if it were for the shop it would be a little more utilitarian.
One issue I did have, was that the 3 panels that the slides are fixed to were bowed ~3/16". If they were all oriented in the same direction, like this: ((( it would not have been an issue but I put them together like this: ()) so the left side is a little more loose than the right.
Attachments

Distephano
Member
A quick note on the Harbor Freight medium parts cases that I got burned on this afternoon.
Like many of their products, HF sells these cases under two different part numbers. 93928 and 62778. I had previously ordered all of my cases to date online, using P/N 93928. I've been extremely impressed with the quality of these cases for $5.99.
Recently, a HF opened in my area. The cases are currently on coupon for $5.99, so I stopped in to grab a few more to fill the last few slots in my shelving unit.
They only had 4 on the shelf, so I grabbed those and was on my way, not really paying much attention. When I got home, I found 3 of the cases were 62778s and one was a 93928.
Amazingly, there IS a difference between the two part numbers. The 62778s are noticeably more flimsy than the 93928s. Worse, however, is that the 62778s are approximately 1/8" wider than the 93928s! As a result, they don't fit in my shelf unit.
TLDR: Avoid the 62778s and go for the 93928s if you are using the Harbor Freight medium parts cases for your build.
Like many of their products, HF sells these cases under two different part numbers. 93928 and 62778. I had previously ordered all of my cases to date online, using P/N 93928. I've been extremely impressed with the quality of these cases for $5.99.
Recently, a HF opened in my area. The cases are currently on coupon for $5.99, so I stopped in to grab a few more to fill the last few slots in my shelving unit.
They only had 4 on the shelf, so I grabbed those and was on my way, not really paying much attention. When I got home, I found 3 of the cases were 62778s and one was a 93928.
Amazingly, there IS a difference between the two part numbers. The 62778s are noticeably more flimsy than the 93928s. Worse, however, is that the 62778s are approximately 1/8" wider than the 93928s! As a result, they don't fit in my shelf unit.
TLDR: Avoid the 62778s and go for the 93928s if you are using the Harbor Freight medium parts cases for your build.
sdavis622
Well-known member
A quick note on the Harbor Freight medium parts cases that I got burned on this afternoon.
Like many of their products, HF sells these cases under two different part numbers. 93928 and 62778. I had previously ordered all of my cases to date online, using P/N 93928. I've been extremely impressed with the quality of these cases for $5.99.
Recently, a HF opened in my area. The cases are currently on coupon for $5.99, so I stopped in to grab a few more to fill the last few slots in my shelving unit.
They only had 4 on the shelf, so I grabbed those and was on my way, not really paying much attention. When I got home, I found 3 of the cases were 62778s and one was a 93928.
Amazingly, there IS a difference between the two part numbers. The 62778s are noticeably more flimsy than the 93928s. Worse, however, is that the 62778s are approximately 1/8" wider than the 93928s! As a result, they don't fit in my shelf unit.
TLDR: Avoid the 62778s and go for the 93928s if you are using the Harbor Freight medium parts cases for your build.
Thanks for the info. I noticed some with a difference in the colors of the yellow bins inside. Some were bright yellow while the others were more of an orange yellow. Do you notice that in the two part numbers?
Sent from my iPhone using Tapatalk
Distephano
Member
Yes. My "good" cases have deeper, more vibrant yellow trays, whereas the "bad" ones appear more pale or washed out.Thanks for the info. I noticed some with a difference in the colors of the yellow bins inside. Some were bright yellow while the others were more of an orange yellow. Do you notice that in the two part numbers?
Sent from my iPhone using Tapatalk
As I look at them more, I also notice more of the bins are generally misshapen too. I know it is all Harbor Freight and you get what you pay for, but still disappointing.
Steer clear of the 6xxxx cases!
Sent from my Pixel using Tapatalk
Grumblebum
Well-known member
My 24 tray bench top version. It will support some overhead cabinets that I'm yet to make.
View media item 83055
Cheers GB
View media item 83055
Cheers GB
LifeLongWNYer
Well-known member
A problem that I've noted is that once I find a box that I like and "standardize" on, i am all set until some time, years later, when I go back and try to purchase more of the SAME item. Then I am told "we don't carry that any more." Now I have to find another box, and start all over.
.
.
CirrusDriver
New member
Here is my version.
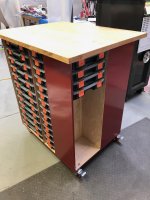
I used parts bins from Home Depot which I like very much. Red Oak top. 1/2" plywood sides. 1 1/2" x 1 1/2" aluminum runners. 3/4" plywood bottom. Swivel casters from Woodcraft. Painted red in a nod to my Craftsman cabinets.

I used parts bins from Home Depot which I like very much. Red Oak top. 1/2" plywood sides. 1 1/2" x 1 1/2" aluminum runners. 3/4" plywood bottom. Swivel casters from Woodcraft. Painted red in a nod to my Craftsman cabinets.
FTWingRiders
Well-known member
That’s really nice!
nsula_country
Well-known member
CirrusDriver,
That is a nice parts system you made there!
CT
That is a nice parts system you made there!
CT
planecrazy
Well-known member
Has it really been almost three and a half years since this thread was started. I knew I was slow.....
SOJ, I don’t know whether to cuss you or hug you. When you posted your parts cabinet, I immediately knew I had to have something similar. What is it they say about imitation?
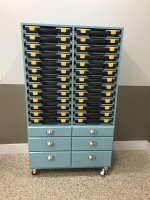
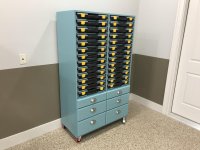
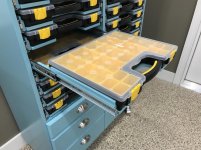
Anyhow, I thought about this project for a while and then I jumped into it, slowly. The descriptions and details provided by the OP were invaluable and I used them. My main change was that I didn’t want to bend clear to the floor to get stuff. This thing is 65” tall and at 6’ 2”, I can just see in the top drawer. The bottom parts drawer is about 2 feet off the floor.
So I bought some plywood. I used 3/4” Russian birch plywood. It is great stuff to work with. All the “drawers” were made out of 1/2” ply.
The slides are 16”, “Probrico” soft close, full extension slides from eBay.
I primed the whole thing with 2 coats of Kilz and then put 2 coats of acrylic color on it.
Moments ago, I put the drawer pulls on it and called it complete. Most of the parts drawers are still empty. I just need to gather up all my stuff. They will be full soon enough.
SOJ, I don’t know whether to cuss you or hug you. When you posted your parts cabinet, I immediately knew I had to have something similar. What is it they say about imitation?
Anyhow, I thought about this project for a while and then I jumped into it, slowly. The descriptions and details provided by the OP were invaluable and I used them. My main change was that I didn’t want to bend clear to the floor to get stuff. This thing is 65” tall and at 6’ 2”, I can just see in the top drawer. The bottom parts drawer is about 2 feet off the floor.
So I bought some plywood. I used 3/4” Russian birch plywood. It is great stuff to work with. All the “drawers” were made out of 1/2” ply.
The slides are 16”, “Probrico” soft close, full extension slides from eBay.
I primed the whole thing with 2 coats of Kilz and then put 2 coats of acrylic color on it.
Moments ago, I put the drawer pulls on it and called it complete. Most of the parts drawers are still empty. I just need to gather up all my stuff. They will be full soon enough.
Attachments

Last edited:
pajibson
Well-known member
Nice job
Sent from my SM-N920P using Tapatalk
Sent from my SM-N920P using Tapatalk
larry4406
Well-known member
planecrazy - you did an excellent job! Can you share some of the paint prep, materials, and process details (brush, roller, spray, etc)?
Grumblebum
Well-known member
That's a beauty planecrazy well done
Dumber than lumber
Well-known member
- Joined
- Dec 19, 2015
- Messages
- 2,033
Has it really been almost three and a half years since this thread was started. I knew I was slow.....
SOJ, I don’t know whether to cuss you or hug you. When you posted your parts cabinet, I immediately knew I had to have something similar. What is it they say about imitation?
Anyhow, I thought about this project for a while and then I jumped into it, slowly. The descriptions and details provided by the OP were invaluable and I used them. My main change was that I didn’t want to bend clear to the floor to get stuff. This thing is 65” tall and at 6’ 2”, I can just see in the top drawer. The bottom parts drawer is about 2 feet off the floor.
So I bought some plywood. I used 3/4” Russian birch plywood. It is great stuff to work with. All the “drawers” were made out of 1/2” ply.
The slides are 16”, “Probrico” soft close, full extension slides from eBay.
I primed the whole thing with 2 coats of Kilz and then put 2 coats of acrylic color on it.
Moments ago, I put the drawer pulls on it and called it complete. Most of the parts drawers are still empty. I just need to gather up all my stuff. They will be full soon enough.
You might have the thread winner. Very nice.
What was the cost for all materials, etc.?
FMC1959
Well-known member
Has it really been almost three and a half years since this thread was started. I knew I was slow.....
SOJ, I don’t know whether to cuss you or hug you. When you posted your parts cabinet, I immediately knew I had to have something similar. What is it they say about imitation?
Anyhow, I thought about this project for a while and then I jumped into it, slowly. The descriptions and details provided by the OP were invaluable and I used them. My main change was that I didn’t want to bend clear to the floor to get stuff. This thing is 65” tall and at 6’ 2”, I can just see in the top drawer. The bottom parts drawer is about 2 feet off the floor.
So I bought some plywood. I used 3/4” Russian birch plywood. It is great stuff to work with. All the “drawers” were made out of 1/2” ply.
The slides are 16”, “Probrico” soft close, full extension slides from eBay.
I primed the whole thing with 2 coats of Kilz and then put 2 coats of acrylic color on it.
Moments ago, I put the drawer pulls on it and called it complete. Most of the parts drawers are still empty. I just need to gather up all my stuff. They will be full soon enough.
The furniture piece you made is beautiful. It looks like a restored antique.
The plastic storage boxes look hideous...this is not a complaint or even anything against the storage cases really. Just the beauty of your piece, including the very nice handles it looks like something that should be is a fancy dining or living room, not a garage.
Stuart in MN
Well-known member
The plastic storage boxes look hideous...this is not a complaint or even anything against the storage cases really. Just the beauty of your piece, including the very nice handles it looks like something that should be is a fancy dining or living room, not a garage.
It would be easy enough to modify his design to include a couple doors to enclose the cases, but then again doors would make it less convenient to use. I wonder if the yellow handles on the cases could be dyed or painted black to make them 'disappear'. Or maybe figure out how to replace them with the same pulls used on the lower drawers.

scruffydog
Member
- Joined
- Jan 30, 2016
- Messages
- 24
Amazing job on this build! Really inspiring.
Sent from my iPhone using The Garage Journal mobile app
Sent from my iPhone using The Garage Journal mobile app
Trey T
Well-known member
that looks phenomenalHas it really been almost three and a half years since this thread was started. I knew I was slow.....
SOJ, I don’t know whether to cuss you or hug you. When you posted your parts cabinet, I immediately knew I had to have something similar. What is it they say about imitation?
Anyhow, I thought about this project for a while and then I jumped into it, slowly. The descriptions and details provided by the OP were invaluable and I used them. My main change was that I didn’t want to bend clear to the floor to get stuff. This thing is 65” tall and at 6’ 2”, I can just see in the top drawer. The bottom parts drawer is about 2 feet off the floor.
So I bought some plywood. I used 3/4” Russian birch plywood. It is great stuff to work with. All the “drawers” were made out of 1/2” ply.
The slides are 16”, “Probrico” soft close, full extension slides from eBay.
I primed the whole thing with 2 coats of Kilz and then put 2 coats of acrylic color on it.
Moments ago, I put the drawer pulls on it and called it complete. Most of the parts drawers are still empty. I just need to gather up all my stuff. They will be full soon enough.
Moments ago, I put the drawer pulls on it and called it complete. Most of the parts drawers are still empty. I just need to gather up all my stuff. They will be full soon enough.
Filling up that piece of art won't take long. Really nice. How much money and low much time to create it?
Stuart in MN
Well-known member
I see Harbor Freight has their parts cases on sale for $5.99 with a coupon: https://www.harborfreight.com/19-bin-portable-parts-storage-case-93928.html
Last edited:
planecrazy
Well-known member
Thanks for the compliments y'all.
Lets see if I can answer some questions.
The paint process. I sanded the wood to a 220 grit finish then rolled and brushed on a Sherwin William version of Kilz (Oil based) as a primer. I put two coats of this on, sanding between coats. Then I sprayed the color (Sherwin Williams Urethane Enamel) on with a Fujispray HVLP sprayer. Again, two coats, no sanding. When I sprayed the color, I didn't have the drawer fronts made yet so when I made them, I used the same paints but rolled everything on. The 6 lower drawers are sprayed with clear lacquer.
The money. No clue. Likely way more than I think. Pretty much the only thing I didn't have to buy was the 6 lower drawer pulls. They were left over from our kitchen.
The time. I worked on this, of and on for three+ years, from a concept in my head to a completed project. I borrowed heavily from the OP of this thread, especially in the design of the drawers. My projects tend to sit for long periods of time as life happens. I need to work on that.
Lets see if I can answer some questions.
The paint process. I sanded the wood to a 220 grit finish then rolled and brushed on a Sherwin William version of Kilz (Oil based) as a primer. I put two coats of this on, sanding between coats. Then I sprayed the color (Sherwin Williams Urethane Enamel) on with a Fujispray HVLP sprayer. Again, two coats, no sanding. When I sprayed the color, I didn't have the drawer fronts made yet so when I made them, I used the same paints but rolled everything on. The 6 lower drawers are sprayed with clear lacquer.
The money. No clue. Likely way more than I think. Pretty much the only thing I didn't have to buy was the 6 lower drawer pulls. They were left over from our kitchen.
The time. I worked on this, of and on for three+ years, from a concept in my head to a completed project. I borrowed heavily from the OP of this thread, especially in the design of the drawers. My projects tend to sit for long periods of time as life happens. I need to work on that.
Grumblebum
Well-known member


Prometheus
Well-known member
- Joined
- May 17, 2006
- Messages
- 104
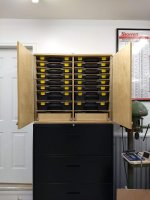
Here's my humble submission. 3/4 inch baltic birch plywood for the case construction and 1/4 for the shelves the cases sit on. I started with a bunch of the HF cases and decided I wanted to put it on top of my 4 drawer lateral file cabinet I use for power tool storage. I also didn't want to empty every 1lb box of fasteners I buy into one of the HF organizers, so I made drawers at the bottom to put the 1lb boxes of stuff in. My garage/shop is primarily a woodshop, and no matter what you can never keep the dust off of everything, so I put doors on the cabinet to keep it cleaner. Yes, it's more work to get stuff out of the cabinet, but I'm willing to make that trade off to keep the storage cases cleaner.


To save some depth I didn't put any drawer pulls on the drawers, I just cut a 45* miter on the front of the drawer to serve as a pull:

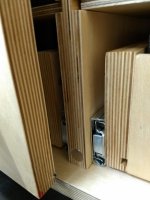
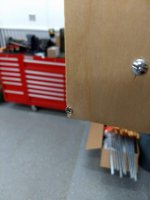
I used piano hinges for the doors figuring they were the least likely to sag and not interfere pulling the organizers. Doors are held shut by a neodymium magnet and a screw in the corner of each door. This works pretty well - not overly strong, but good enough for me. If I slam one of the drawers in the file cabinet very hard the right door will pop open, but under general use it stays closed just fine.


So thanks to everybody who has posted their cabinet up so I could steal ideas. Hopefully mine will inspire somebody else.
To save some depth I didn't put any drawer pulls on the drawers, I just cut a 45* miter on the front of the drawer to serve as a pull:
I used piano hinges for the doors figuring they were the least likely to sag and not interfere pulling the organizers. Doors are held shut by a neodymium magnet and a screw in the corner of each door. This works pretty well - not overly strong, but good enough for me. If I slam one of the drawers in the file cabinet very hard the right door will pop open, but under general use it stays closed just fine.
So thanks to everybody who has posted their cabinet up so I could steal ideas. Hopefully mine will inspire somebody else.
Attachments



cullen
Well-known member

dfiler2
Well-known member
The baking rack is pure genius! They have two sizes. https://www.amazon.com/s/ref=nb_sb_...+on+casters&rh=i:aps,k:baking+rack+on+casters
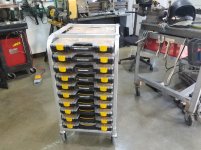
baking rack i bought from amazon and modified:
That looks great. Nice and simple. What modification did you make for it to fit?
Stuart in MN
Well-known member
So has anyone come up with an easy method for removing the sticker off the top lid of those HF parts organizers? I bought some, and am wondering about how to do it with minimal effort. I think my first experiment will be to put one in the bathtub and let it soak in water overnight.
I bought some, and am wondering about how to do it with minimal effort. I think my first experiment will be to put one in the bathtub and let it soak in water overnight.cullen
Well-known member
That looks great. Nice and simple. What modification did you make for it to fit?
I cut 1.25" out of the lateral bars. If you look closely you can see in the pic where the welds are.
bubinga
Well-known member
Awesome Great Job!!!!
nsula_country
Well-known member
These ideas are epic! Once i get my new shelves packed (need to update my thread) I want to build something like this for all the smalls that need organizing.
CT
CT