To avoid these ads, REGISTER NOW!

catwalk

SGKent

Banned
Joined
Feb 12, 2010
Messages
1,959
Location
Citrus Heights CA
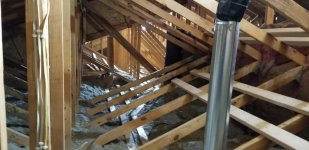
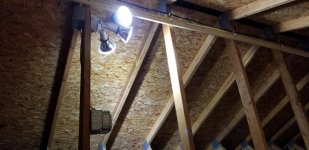
Want to add a catwalk inside the attic rather than having to walk truss to truss. I was thinking of a 14" wide plywood sitting on 2x4's that are nailed between the truss upright and diagonal. Basically nail the 2x4's to the side of each truss uprights and diagonals. Two 3"+/- nails, then lay 1/2" plywood across those 2x4's. The trusses were put in in 1979 and they have lived in a hot attic most of their lives. I can't think of any other way to do this. The reason is that will be adding more insulation and it is already hard to walk between trusses when you can see them let alone thru a deep field of insulation.

Anyone do this? I looked at simpson ties that might work with the 2x4's butted to the upright and cut to lay on the diagonal but did not see anything that seemed appropriate except mend plats.
 
Last edited:
To avoid these ads, REGISTER NOW!

Big Dad

Well-known member
Joined
Sep 8, 2006
Messages
2,287
Location
S.E. South Dakota
I did it with left over material from my build, once it was covered with blown in insulation ..no idea where they are any longer but, no reason to be up there neither ..sure wish my TV antenna was up there but I make due
 

Lynden

Well-known member
Joined
May 23, 2015
Messages
672
Location
Southern California
If your trusses are 24" o.c., the 1/2" plywood will sag quite a bit when you crawl/walk on it. 5/8" or 3/4" plywood would be better.

I would build the walkway a different way. Run a 1x4 from truss to truss attaching it to the side of each vertical member. On the other side of the walkway, run pieces of 1x4 between the trusses attaching them to the sides of each diagonal member with pocket screws. Use 1/2" plywood for the walkway screwing it to the top of the 1x4 on each side. Where you need to splice the walkway sections, use a plywood cleat on the bottom side. The walkway sections will be stronger if you cut them the long way from a 4x8 sheet of plywood. You can get three 16" wide pieces from a sheet of plywood.
 

Innovate1

Well-known member
Joined
Jul 28, 2014
Messages
4,285
Location
Illinois near St. Louis, Missouri
I did exactly what you are thinking of when I built the current place. Nailed 2x4 between two diagonal braces that were about 6 ft apart and put 7/16 (maybe it's 1/2) OSB on top. I don't get up there often and only weight 180 - it flexes a little especially near the edges but not that much. If the panels were narrower it would flex more so thicker might be good. It's very handy to access the TV antenna or run other wires, etc. I have also seen it done with 2x4s run instead of 2x4s as the walking surface. Still much better/safer than walking on the trusses. I had an area I wanted to be able to get to that is off to the side so I ran 2x4 along the truss diagonals between two trusses and put a 24" wide (22.5" to be precise) OSB piece running the other way for that. If you are doing it after the fact you are limited to what you can get in through the access.

I plan to do it on the new house but they are much stricter on rules so they may not approve. If the trusses aren't rated for any live load they require boards around the access hole to restrict entry so it's harder for people to store stuff there. I get it but also it seems a bit strange to make an attic access and then make it hard to use. I got trusses rated for live load in the areas that are a required size (there is a standard load - 20 psf as I recall for anywhere a certain size rectangle will fit above the lower cord). Hope that allows me to do the catwalk.

I put mine a bit above where the insulation would come up to.
 

Innovate1

Well-known member
Joined
Jul 28, 2014
Messages
4,285
Location
Illinois near St. Louis, Missouri
If your trusses are 24" o.c., the 1/2" plywood will sag quite a bit when you crawl/walk on it. 5/8" or 3/4" plywood would be better.

I would build the walkway a different way. Run a 1x4 from truss to truss attaching it to the side of each vertical member. On the other side of the walkway, run pieces of 1x4 between the trusses attaching them to the sides of each diagonal member with pocket screws. Use 1/2" plywood for the walkway screwing it to the top of the 1x4 on each side. Where you need to splice the walkway sections, use a plywood cleat on the bottom side. The walkway sections will be stronger if you cut them the long way from a 4x8 sheet of plywood. You can get three 16" wide pieces from a sheet of plywood.

Seems overly complex and unless I am reading this wrong the direction of plywood (or OSB) is weaker. I think you are suggesting to make 8' long cuts in the plywood to get three pieces 16" x 96". If those were run so that they spanned 4 gaps between trusses and were supported at each truss that would be the best direction. But supported on the sides the plywood grain should run the other direction.
 

strutaeng

Well-known member
Joined
Dec 12, 2011
Messages
2,261
Location
Dallas, TX
I recently put up all of my left over 7/16 OSB roof deck and 15/32 plywood wall sheathing from my addition project into the attic. I used 2x12 @ 24 ceiling joists with R38 fiberglass insulation, so insulation is flush with joists.

Same concept as you, but only narrow.

Joists are at 24" o.c., so feels a bit springy, but no worse than application on roof decking. If you want to go stiffer, use 5/8 or 3/4 material. Perhaps build a "box beam" as high as your insulation, that way the catwalk doesn't get buried below. You can even fill the box with insulation.
 

strutaeng

Well-known member
Joined
Dec 12, 2011
Messages
2,261
Location
Dallas, TX
Yeah, I understand.

My point was that it's the same "bounce" or sag because you are also spanning 24" if you go with 7/16 OSB.
 
OP
S

SGKent

Banned
Joined
Feb 12, 2010
Messages
1,959
Location
Citrus Heights CA
Yeah, I understand.

My point was that it's the same "bounce" or sag because you are also spanning 24" if you go with 7/16 OSB.

that part is figured out. The part I am having trouble with is anchoring that OSB or plywood to the trusses in a flat way without compromising them or adding a lot of weight. I can't get a hold of the guy who did structural engineering for me prior on these trusses. He like many folks who did work on the side are really busy right now. My surveyor friends have structural engineers working for them but they don't do this kind of work.

You know the sign posts that have holes drilled in the bottoms so that if a car hits them they break off? I don't want to accidentally weaken all the vertical or diagonal members at the same spot where they break in a freak wind storm or ground shake. I can just lay plywood or OSB at an angle on the diagonal and put a toe rail at the bottom to stop someone from sliding of but it is not a very good solution.

Like the top truss in this image I borrowed off the web. I am looking for a lite weight and simple solution.

common.gif
 
Last edited:

Bert_

Well-known member
Joined
Dec 24, 2016
Messages
9,709
Location
NW Iowa
I feel like you're going to spend more time working in the attic just to build the catwalk then you ever would in the future doing other things up there.
 

Lynden

Well-known member
Joined
May 23, 2015
Messages
672
Location
Southern California
Seems overly complex and unless I am reading this wrong the direction of plywood (or OSB) is weaker. I think you are suggesting to make 8' long cuts in the plywood to get three pieces 16" x 96". If those were run so that they spanned 4 gaps between trusses and were supported at each truss that would be the best direction. But supported on the sides the plywood grain should run the other direction.

You're correct but since the span is only 16" side-to-side, I don't think it makes much difference which way the plywood is run. I was trying to reduce the number of cleats that would be required. With trusses it's important that the walkway be not only strong but light in weight, which is why I suggested 1/2" plywood supported along both edges with 1x4s.
 
Last edited:
OP
S

SGKent

Banned
Joined
Feb 12, 2010
Messages
1,959
Location
Citrus Heights CA
I'll probably use 2 ea 1 x 6 for each truss (one on either side) between the vertical and the diagonal, and put 2 ea 2 3/4" nails into each truss. That will give me 4 nails for each connection passing almost all the way thru, and then use either 1/2 or 5/8 plywood over the top of those braces across the trusses. If I spread the nail position in each truss different than the last then I don't line up all the nail holes. Anyone see any issue with that???

Alternatively I could cut 3/4" plywood into 6" wide strips and use those with nails and construction adhesive instead of 1 x 6's. I could probably get away with one plywood brace on each truss instead of 2 1 x 6"s since the plywood would not be as prone to splitting like 1x6's can.
 
Last edited:

Innovate1

Well-known member
Joined
Jul 28, 2014
Messages
4,285
Location
Illinois near St. Louis, Missouri
You are overthinking this, IMHO. Big difference between putting a few nails in vs. drilling holes. The nails won't significantly weaken the members even if the nails from both sides are in the same place. The weight of a narrow strip of plywood and some small lumber (2x4 or 1x6) isn't going to add that much weight. As long as you don't start storing stuff there it isn't going to make enough difference to worry about. From what I have seen the additional weight of things like pipes and hung furnaces, etc aren't worried about in load calculations - apparently the safety margins are enough and the additional stresses of those things isn't enough to cause any issues.

Just nail some reasonably decent lumber across the webs, parallel to the bottom cord or perpendicular and put some plywood/osb on it. No need for glue. You can put a couple of 2x4s on your floor at the planned spacing and lay the osb on and step/jump on it to get an idea how much flex it will have. If it really is just for occasional access that should be fine. The normal disclaimers apply of course so you assume the risk - this is just my opinion, YMMV, etc.

Google "attic catwalk" and you will see lots of examples.

http://mindtomachine.blogspot.com/2010/02/attic-catwalk-system.html

http://basementbar.site/attic-truss-walkway/
 
OP
S

SGKent

Banned
Joined
Feb 12, 2010
Messages
1,959
Location
Citrus Heights CA
You're correct but since the span is only 16" side-to-side, I don't think it makes much difference which way the plywood is run. I was trying to reduce the number of cleats that would be required. With trusses it's important that the walkway be not only strong but light in weight, which is why I suggested 1/2" plywood supported along both edges with 1x4s.

nailing into the smaller 1.5" side of 40 year old attic cured 2 x 4's isn't there a chance that might split them? I tried to find a simpson tie for something like that but couldn't.
 

couch67

Well-known member
Joined
Mar 18, 2016
Messages
1,401
Location
Ontario Canada
I have a couple of 2x6 lengths (i think about 4 feet long) that I can move around and position over the rafters . Sometimes I dont need them, but they are handy if you need to work up there in a specific area for any length of time.

Coincidentally I was just up in attic last night pulling new coax cable from the basement. Need to move the satellite dish as the trees have gotten too tall for the area its in now.
 

Innovate1

Well-known member
Joined
Jul 28, 2014
Messages
4,285
Location
Illinois near St. Louis, Missouri
I have a couple of 2x6 lengths (i think about 4 feet long) that I can move around and position over the rafters . Sometimes I dont need them, but they are handy if you need to work up there in a specific area for any length of time.

Coincidentally I was just up in attic last night pulling new coax cable from the basement. Need to move the satellite dish as the trees have gotten too tall for the area its in now.

I have done similar with something like 30" x 16" scrap of plywood. Very handy to not have to balance on the trusses when working in one spot. It can be moved around to where it is needed. It mashes down the insulation but better than mis-stepping and going through the drywall. A bit bigger piece gives somewhere to lay tools as well.
 
To avoid these ads, REGISTER NOW!

Falcon67

Well-known member
Joined
Jun 11, 2009
Messages
18,371
Location
Merkel, TX
OSB is about 1.4 lbs sq/ft. I run OSB in my shop attic over 24" OC rafters without issue or other support bracing. Just rip it into lengths and screw it to the top of the lower cord.
 

Innovate1

Well-known member
Joined
Jul 28, 2014
Messages
4,285
Location
Illinois near St. Louis, Missouri
I would do what you described in your original post. It allows you to use a narrower catwalk than the space between the diagonals if you want so you have more flexibility on height. A narrow strip the 1/2 ply/osb will flex some so you could go to thicker or use 2x lumber. The red in the attachment is the 2x nailed to the side of the truss and the green is the plywood or lumber running the other way as the walking surface.

If the truss wood is so hard it is difficult to drive nails get a nail gun or drill undersize holes so the nails are still a good tight fit. I found a table that lists shear of "16d box (nail gun)" at 95 lbs. Other variations of 16d nails are slightly larger and have higher shear. Two in each end would give 190 lbs capacity at each end and all the load wont be on one end so seems like plenty although I don't know what safety margin is figured in.

Fixed the pic - I think...

Trusscatwalk.jpg
 
Last edited:

Toomanytools?

Well-known member
Joined
Nov 4, 2010
Messages
855
Location
Washington
You are going about this all wrong, you have a tunnel like opening through the webbing of the truss right? Attach a 3/16" or larger wire cable end to end, get yourself a good harness, click in and Mission Impossible it through the attic over the insulation.
 

Lynden

Well-known member
Joined
May 23, 2015
Messages
672
Location
Southern California
nailing into the smaller 1.5" side of 40 year old attic cured 2 x 4's isn't there a chance that might split them? I tried to find a simpson tie for something like that but couldn't.

If you're going to use 1x4s to support the walkway, use 8d sinkers or nail gun nails. If you'd rather use screws, use these 2" construction screws with the self-tapping tip. I don't think either one would split the truss members.

https://www.homedepot.com/p/Grip-Rite-2-in-Construction-Screw-2GCS1/204959257

If you want to use metal hangers, use a Simpson FB bracket mounted vertically on the side of each vertical truss member. The 16" 2x4 walkway support would be cut perpendicular on one end and cut at an angle on the other end to match the angle of the truss member. Attach with 1-1/2" hanger nails on one end and a single 3" construction screw into the top of the angled truss member on the other end. Use decent 5- or 6-ply 5/8" plywood for the 16" walkway.

https://www.homedepot.com/p/Simpson...75311?MERCH=REC-_-pipsem-_-NA-_-100375311-_-N

Tom Silva from TOH has an interesting way to construct a catwalk. He uses 2x blocking attached to the bottom chord of each truss. Each block would be 16" long cut from a length of 2x6, 2x8 or 2x10 depending on the total thickness of your insulation. Instead of attaching the blocks with plywood gussets, I would use pocket screws along the bottom and one edge of each block to attach the blocks to the bottom chords and vertical truss members. All of the blocks could be cut and drilled in your workshop and then taken into the attic and attached to the trusses. Pretty simple. Again, use 5/8" plywood for the walkway.

https://www.thisoldhouse.com/ask-toh/attic-catwalk

Edit -- With the type of trusses you have, the bottom of each block would be attached to the angled truss member instead of the bottom chord. If the existing steel gusset plate interferes with placing the block, you may have to cut off the corner of the block.
 
Last edited:
OP
S

SGKent

Banned
Joined
Feb 12, 2010
Messages
1,959
Location
Citrus Heights CA
Ok - Innovate1. That is the easiest way. I only had one concern with that - weakening all the king posts at the same point. They are only 2x4's

The idea re Tom Silva I read at least 10 times the other night. I cannot visualize what he is doing. The trusses are 24" apart. There are wires and pipes running in some places between trusses so putting blocking in between the bottom chords may not be that easy.

Yes zip lining thru the attic sounds like fun. I am 6' and 325. There would be a lot of ducking going on though.
 

Lynden

Well-known member
Joined
May 23, 2015
Messages
672
Location
Southern California
The idea re Tom Silva I read at least 10 times the other night. I cannot visualize what he is doing. The trusses are 24" apart. There are wires and pipes running in some places between trusses so putting blocking in between the bottom chords may not be that easy.

There is a single block on each truss. There are no blocks between the trusses. The edge of the block is against the 1-1/2" side of the vertical truss member and the bottom of the block sits on the top of the angled truss member. The block is 1-1/2" thick, 16" wide, trapezoidal in shape and as high as the top of the insulation. I suggested attaching the blocks to the vertical and angled truss members with pocket hole screws. The 16" wide, 5/8" thick plywood catwalk is supported on the block at each truss. If your trusses are all the same, the blocks will all be the same so you can cut and drill them in your workshop and then take them into the attic and screw them in place.

Is this method of constructing a catwalk as simple as some of the other methods suggested, probably not, but it does eliminate your concern that truss members will split. The pocket hole screws are short and none of them will be in shear.
 

ItsNemo

Well-known member
Joined
Mar 5, 2016
Messages
4,805
Location
Canada
What in the heck, you people are seriously over thinking this.

Some roughly cut 2x4's between the web, shoot a couple nails in each end in shear, lay some plywood or 2x material on top, call it a day. The weight added is trivial, a couple nails won't weaken anything, and a little sag in the plywood is no big deal, not like you're up there every day.
 

Innovate1

Well-known member
Joined
Jul 28, 2014
Messages
4,285
Location
Illinois near St. Louis, Missouri
If I understand the Silva method it is a very wide (tall since it is run horizontally) block that is between the king post and the angled web. It fills the space between the lower cord and the decking being added. Couple issues I see:
Unless the angled web is close to vertical you need a block that is wide and long. If you need something more than 12" wide thats going to be difficult to find.
The truss connector plates will interfere. The corners where that happens could be cut off so not a big issue.
The angle of the end on the cross brace needs to be cut to the same angle and is across a wide block. Need a sliding miter saw or table saw. Extra work and complicated.
Pocket screws is also extra work.
You still have fasteners going into the truss members. Not an issue as I see it but if you are concerned about nails the screws are similar.

As several have said including ItsNemo cut some 2x4s to rough length (a little long is ok) and nail them to the kingpost and web. Depending on how long the 2x is you could go to 2x6. Then put a couple nails in each end. For your weight I would use at least 3 16d. A 2x6 allows you to spread them out a bit more. A few nails won't weaken it significantly. Perhaps theoretically it will have a very minor effect but essentially nothing. Then put some heavy plywood/osb or lumber on top for a walking surface.

Think about this. When there is a change in height of a roof the framing carpenters will nail other lumber to the truss at the lower level to support the edge of the lower roof. They put in a fair number of nails. Most people don't think twice about this. And cross bracing is required on trusses to keep them from falling over - Nails in the vertical webs. You should have some of these in your attic already. You would be doing the same type of thing.
 

Lynden

Well-known member
Joined
May 23, 2015
Messages
672
Location
Southern California
I don't disagree with anything anyone has said. The Silva method is simply another way to do it. Personally, I think it has some advantages over hanging the walkway supports from the truss members. It's the method I would use but I have a habit of over-designing and over-building projects.
 

JDMopar

Well-known member
Joined
May 6, 2007
Messages
176
Location
Asheville,NC
I would do what you described in your original post. It allows you to use a narrower catwalk than the space between the diagonals if you want so you have more flexibility on height. A narrow strip the 1/2 ply/osb will flex some so you could go to thicker or use 2x lumber. The red in the attachment is the 2x nailed to the side of the truss and the green is the plywood or lumber running the other way as the walking surface.

If the truss wood is so hard it is difficult to drive nails get a nail gun or drill undersize holes so the nails are still a good tight fit. I found a table that lists shear of "16d box (nail gun)" at 95 lbs. Other variations of 16d nails are slightly larger and have higher shear. Two in each end would give 190 lbs capacity at each end and all the load wont be on one end so seems like plenty although I don't know what safety margin is figured in.

Fixed the pic - I think...

Trusscatwalk.jpg

This is exactly what I did, and it works fine. I am rarely up there, but it is nice to be able to walk from one end of the garage to the other without worrying about slipping and falling thru the ceiling!
 

Lassen Forge

Well-known member
Joined
Apr 26, 2014
Messages
15,086
Location
The romantic hills of central Umbria, Italy,
What in the heck, you people are seriously over thinking this.

Some roughly cut 2x4's between the web, shoot a couple nails in each end in shear, lay some plywood or 2x material on top, call it a day. The weight added is trivial, a couple nails won't weaken anything, and a little sag in the plywood is no big deal, not like you're up there every day.

I agree with this 100%. We've had plywood runners in all our attics from my folks place built in the late 1930's to my inlaws place built in the 60's to the old lath and plaster one my ex and I had that was built in the early 1930's so we could use it for storage. IIRC we used whatever we had available - 5/8 that was left over from some job or another, then some 3/4 fleft over from when we had to redo a bathroom floor, I even thnk we used some 1/2 from making doors for some halfassed shelves to turn them into cabinets. Run them between the joists and call it a day.

I think on the house in Texas dad put a few nails into it to keep it from sliding. In all cases the insulation was checked and filled to joist level.

While you're up there, put a couple clamp lights o the roof joists on a common extension cord that runs to the hatch, long enough to reach an outlet.

The wood - was mainly to keep what happened to my uncle from repeating itself - - putting your foot and leg from making vent holes in the ceiling sheet rock. I have yet to see someone step through a 1/2" sheet of plywood.

No need to overengineer it. Keep it simple.
 
OP
S

SGKent

Banned
Joined
Feb 12, 2010
Messages
1,959
Location
Citrus Heights CA
I agree with this 100%. We've had plywood runners in all our attics from my folks place built in the late 1930's to my inlaws place built in the 60's to the old lath and plaster one my ex and I had that was built in the early 1930's so we could use it for storage. IIRC we used whatever we had available - 5/8 that was left over from some job or another, then some 3/4 fleft over from when we had to redo a bathroom floor, I even thnk we used some 1/2 from making doors for some halfassed shelves to turn them into cabinets. Run them between the joists and call it a day.

I think on the house in Texas dad put a few nails into it to keep it from sliding. In all cases the insulation was checked and filled to joist level.

While you're up there, put a couple clamp lights o the roof joists on a common extension cord that runs to the hatch, long enough to reach an outlet.

The wood - was mainly to keep what happened to my uncle from repeating itself - - putting your foot and leg from making vent holes in the ceiling sheet rock. I have yet to see someone step through a 1/2" sheet of plywood.

No need to overengineer it. Keep it simple.


thank you to all. 2x6 between members with 3 16d nails. The Silva method might work if one had a lot a scrap but 21 Silva blocks would have to be fabricated. Just buying the plywood to make 21 blocks that size is over kill. I can cut one 2x6 into 6 16" boards and have a 9" - 10" wide catwalk, or cut 5 and have a foot wide catwalk. Four or five 2x6 should get it done. At $5 each for 96" 2x6 that should do it. I didn't lay the plywood out but I am thinking 12 - 14 Silva blocks per sheet so 2 sheets of 3/4" Silva gussets @ $48 a sheet is way too much. It's a better way of doing it but much more expensive.

Already have 3 lights up there with plastic cages around them on a GFCI circuit, and switch to turn them on right where one crawls up a ladder into the attic opening. Left it on one time and a neighbor came by and said did you know you attic is glowing?
 

Spencer Was Here

Well-known member
Joined
Jan 2, 2006
Messages
327
Location
Western Michigan
I feel like you're going to spend more time working in the attic just to build the catwalk then you ever would in the future doing other things up there.

I may or may not be guilty of this. I added catwalk to both make it easier to get around in the attic and to protect some wiring.

The first set of catwalk I put down was to protect the new service entrance wiring going out to my addition for the subpanel. I kind of expanded it from there.

I've also added three different sets of three LED 100-watt flood lights and added a duplex GFCI protected convenience outlet in the same box as the switches for those lights.

I've cleaned up a bunch of the existing wiring that was run haphazardly around the attic by mounting it to running boards and I've ensured that all new wiring I've added is also mounted on running boards.
 

Attachments

  • 20190930_153313.jpg
    20190930_153313.jpg
    129.2 KB · Views: 48
  • 20190930_153321.jpg
    20190930_153321.jpg
    116 KB · Views: 41
  • 20190930_153328.jpg
    20190930_153328.jpg
    110.4 KB · Views: 40
  • 20190930_153339.jpg
    20190930_153339.jpg
    119.4 KB · Views: 40
  • 20190930_153357.jpg
    20190930_153357.jpg
    136.7 KB · Views: 36

Spencer Was Here

Well-known member
Joined
Jan 2, 2006
Messages
327
Location
Western Michigan
Some additional photos.
 

Attachments

  • 20190930_153503.jpg
    20190930_153503.jpg
    108.5 KB · Views: 24
  • 20190930_153440.jpg
    20190930_153440.jpg
    122.7 KB · Views: 26
  • 20190930_153433.jpg
    20190930_153433.jpg
    128.1 KB · Views: 28
  • 20190930_153427.jpg
    20190930_153427.jpg
    119.8 KB · Views: 26
  • 20190930_153409.jpg
    20190930_153409.jpg
    109.2 KB · Views: 28

Spencer Was Here

Well-known member
Joined
Jan 2, 2006
Messages
327
Location
Western Michigan
The last four photos.
 

Attachments

  • 20190930_153508.jpg
    20190930_153508.jpg
    109.8 KB · Views: 27
  • 20190930_153519.jpg
    20190930_153519.jpg
    117 KB · Views: 23
  • 20190930_153541.jpg
    20190930_153541.jpg
    139.4 KB · Views: 29
  • 20190930_153549.jpg
    20190930_153549.jpg
    115 KB · Views: 26

bottom feeder

Well-known member
Joined
Dec 10, 2012
Messages
331
Location
Utah
What in the heck, you people are seriously over thinking this.

Some roughly cut 2x4's between the web, shoot a couple nails in each end in shear, lay some plywood or 2x material on top, call it a day. The weight added is trivial, a couple nails won't weaken anything, and a little sag in the plywood is no big deal, not like you're up there every day.

I agree, but I'd go even simpler. Lay down a couple of 2x4s spaced a few inches apart to walk on. Your trusses won't even know they're there. If you're worried about nails damaging the old trusses take your drill up there and put in a couple of small diameter pilot holes and zip in a few screws. You only need a few per board - just enough so they stay put. My house is set up this way and it's worked fine for the times I've had to go up in there. The hard part was getting my 6' -1" body in a 4/12 truss space, with a forest of roofing nails trying to stab me in the head...
 

tarmy

Well-known member
Joined
May 28, 2014
Messages
4,665
Location
Nor Cal
As mentioned...run power up there. I have a light switch at the access point, a plug and lights so I can make life easier for future projects...
 
To avoid these ads, REGISTER NOW!
Top Bottom