To avoid these ads, REGISTER NOW!

Cedar Stripped Kayak build

OP
N

niget2002

Well-known member
Joined
Oct 2, 2012
Messages
11,202
Location
Josephine, TX
Just did the deep dive on your thread.

Nice work. 👍

I’m thinking I’ll do a SUP this winter, probably start with the frame kit from Jarvis
A sup is on my list as well.

I want to do a solo sea kayak and a smaller solo kayak first.

I'm still debating a larger skiff in the future. Lost of time for this decision.
 
To avoid these ads, REGISTER NOW!

MoonRise

Well-known member
Joined
Nov 5, 2010
Messages
4,031
Location
NJ
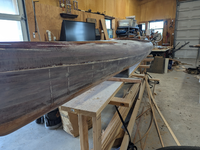
My seam wasn't as good as I thought, so I'll need to apply some dye to this exposed wood to blend it into the rest of the purple on the boat before I do the outer seam.
That's not a seam gap, that's an accent stripe. :beer: Yeah, not a bug it's a feature. :lol2:
 

67CarGuy

Well-known member
Joined
Feb 6, 2008
Messages
764
Location
Outside Boston, MA
Thanks for documenting this! I've been jonesing to build a strip canoe at some point, so seeing this thread (plus your videos) gives me some good nudges and inspiration. :beer:
 
OP
N

niget2002

Well-known member
Joined
Oct 2, 2012
Messages
11,202
Location
Josephine, TX
Thanks for documenting this! I've been jonesing to build a strip canoe at some point, so seeing this thread (plus your videos) gives me some good nudges and inspiration. :beer:
That's what happened to me. Someone else on the forum posted a picture of his in the 'what did you do today'. I spawned my interest again and I finally just said f-it. It's time!

For today's sad news... I started sanding the seam area to clean up the outside in preparation of the outer seam strip. To get the area smooth required sanding down to the cedar in some places. This means I sanded away some of the dyed wood. I'm going to have to go back with the dye and try to re-match the existing wood before gluing on the outer seam strip.

I have a bit more sanding on this side and I need to sand all of the other side so I can do the dye on both sides at the same time. Hoping to be gluing the outer seams this weekend.

kayak_strip.png
 
OP
N

niget2002

Well-known member
Joined
Oct 2, 2012
Messages
11,202
Location
Josephine, TX
I can see it now, you telling the wife, “Honey, we need to drain the pool” lol
I did buy a hand bilge pump. My son submerged our plastic kayak playing with it in the pool. I was able to flip it over and use the pump to get most of the water out. It took forever.
 

Old Man Roger

Well-known member
Joined
Apr 6, 2017
Messages
17,723
Location
Palm Coast Florida
I did buy a hand bilge pump. My son submerged our plastic kayak playing with it in the pool. I was able to flip it over and use the pump to get most of the water out. It took forever.
Decades ago my brother bought a new fiberglass canoe, the first day he took it to a pretty fast moving part of a river. I think it's still there..lol

He swamped it, and the force of the river jammed it between two huge boulders. He would've had to reroute the river to get that thing out, moving water is amazingly powerful.
 
OP
N

niget2002

Well-known member
Joined
Oct 2, 2012
Messages
11,202
Location
Josephine, TX
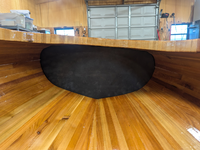
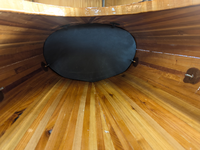
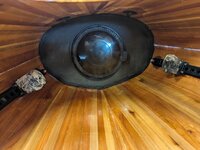
This morning I got out to the shop and cut out the bulkheads. These are cut from 3" closed cell foam. I haven't siliconed them in place yet. I have 2 8" round rubber hatches I'm going to glue into the center of each one. The hatch in the rear will be used for day-trip stuff. The hatch in the front will be difficult to get to. It will probably only be used to open up the bow and let it air out, but it will be available if I ever decide to take this boat on overnight trips and need more gear storage.

For tonights paddle, I'll just wedge them in place in case we get swamped. They won't be fully sealed but should help slow down water getting into the bow and stern.

The bandsaw cut the foam like butter.

Stern:

This one went in pretty easily. The rear of the boat maintained a pretty good shape compared to the frames that were used to build it. I was able to use one of the frames to cut out the shape and then just had to slowly shape it smaller until it slid back as far as I wanted. There's a few degree bevel on the edges to help match the curve of the boat.

one.png


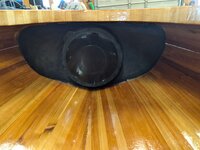
Bow:

This one was much more difficult. The front of the boat widened a bit when I glued the deck to the hull. As such, none of the frames fit the inside curve of the boat anymore. I started with a piece of scrap and got the shape mostly figured out. Then I cut out the final piece. I put a pretty large bevel along the top edge. I have to put the bow piece in at an angle to clear the bolts for the forward foot pegs and then twist it up and into place. There's small gaps around part of the bow piece, but that will be sealed up by silicone.

two.png
 
OP
N

niget2002

Well-known member
Joined
Oct 2, 2012
Messages
11,202
Location
Josephine, TX
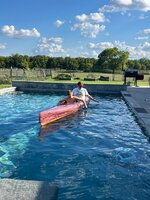
Looking at the pictures of it floating in the pool, it looks like I'll need to make some type of booster seat for my son. Either that, or he'll need to sit on his knees. The sides of the boat go a bit high for him to try to paddle. When we rowed our inflatable kayak, I'd sit in the back of the boat so it'd ride nose high. I might need to try paddling from the front on this one.
 

Bob Heine

ALLIANCE MEMBER
Joined
Oct 24, 2009
Messages
10,707
Location
Boca Raton, Florida
Your kayak is a work of art. Closest I've come was to fiberglass an Old Town cedar canoe we were gifted 50 years ago. It looked nice but nothing like yours.

My brother-in-law retired to Maine and was into kayaking big time. He built 2-man kayak that came in a kit. He assumed I couldn't participate but I suggested there was a way I could handle a paddle. He helped me duct tape the paddle to my forearm and we were off to the races. We paddled about five miles to an island once occupied by a hermit and were the first in the group of 9 or 10 kayakers to arrive. Ductape Bob.JPG
He wrote the event up in his "Crazed Kayaker" newspaper column in the Mount Desert Islander, titled "Duct Tape Bob Meets Big Bird," Big Bird was the name he gave the kayak. When we visited Maine the following year for the 4th of July, people were yelling "It's duct tape Bob" like I was some kind of celebrity. The story was also published in the Atlantic Coastal Kayaker magazine (November 2003 Vol. 12, No. 9).

That was the end of my kayaking career when I realized it would be a challenge to right or escape from a rollover with a paddle attached to my arm.
 
To avoid these ads, REGISTER NOW!
OP
N

niget2002

Well-known member
Joined
Oct 2, 2012
Messages
11,202
Location
Josephine, TX
Im triggered. There needs to be a rubber matt under your drink, or at least a cuzzi. :lol_hitti


I know I know, you said it will get dings and scratches, but it’s just too soon for me.lol
My wife did that. Had no idea she did it until she sent me the picture. I'll give her a spanking.

That has to feel really good after all the work you put into the kayak.

How does it paddle?
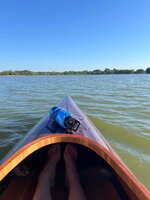
I'm still learning. There's a sweet spot where it wants the weight distributed. Too much weight towards the front and it's hard to steer. I had the wife scoot back 2" and it did better. I need to loosen the straps in the front seat just a tad more to scoot it back another inch or so.

My wife kept sliding forward and I could tell because the boat would start weather vaning when she did. Once she scooted back, it'd paddle better.

I also think I need a tad more padding in the seats. The seat bottom slips on the bottom of the boat so it slides a bit. I saw some foam knee pad things at home depot that I think I want to buy one and cut it up to add some friction between the seat and hull.

Otherwise, it was really stable.

We averaged 3mph this morning on a 3 mile trip with me doing almost all the paddling by myself. The wife was busy site seeing and taking pictures.

IIgnore the 15mph. That's fake news.

Screenshot_20240920-110155.png
Screenshot_20240920-110208.png
 
OP
N

niget2002

Well-known member
Joined
Oct 2, 2012
Messages
11,202
Location
Josephine, TX
I took a long look at the scratches. I didn't like how deep some of them were. The more I thought about it, the more I think the 2k clear, while extremely hard, isn't the best outer layer for the hull. 2k clear is very thin after it's sprayed and I don't think it leaves much in way of abrasion resistance.

This morning, I went out and taped off the hull of the boat just below the waterline. I sanded the entire hull with 120 grit and I put another coat of epoxy on it to help fill any scratches. I ordered some Total Boat Spar varnish. It should be in tomorrow. Next week, I'll put a few coats of the spar varnish on just the hull.

It won't make the hull bullet proof... nothing will. But it should help keep the scratches from getting quite as deep.
 
OP
N

niget2002

Well-known member
Joined
Oct 2, 2012
Messages
11,202
Location
Josephine, TX
You'll need something much tougher than spar varnish to resist scratches.
I don't expect to fully resist the scratches. I'm just hoping to protect it a bit better than what's currently there.

Some cedar strip boat owners will do a light sand/scuff and add a new layer of varnish once every other year or so to 'erase' any scratches that occur. Varnish needs to be sanded and re-coated every 5 years to keep the UV inhibitor working the best for protecting the epoxy.
 
OP
N

niget2002

Well-known member
Joined
Oct 2, 2012
Messages
11,202
Location
Josephine, TX
It changes the look, but some white bottom paint, just up to the water line, hides nearly all sins
I originally bought graphite powder to mix in with the epoxy for the last two coats on the hull, but decided to keep it clear after seeing how the boat looked. The graphite powder is supposed to make the epoxy hard and help keep rocks and sharp objects from digging in to the finish.
 

WillyBoy

Well-known member
Joined
Nov 10, 2021
Messages
641
Location
Genesee valley area of New York state
I've used System Three, clear satin, water reduced linear polyurethane with hardener on my Pigmy kit boat. It's a good UV protector.
Initially 3 coats w/ hardener. It's some pretty tough stuff but there are still scratches even when I'm being/trying to be careful.
 
To avoid these ads, REGISTER NOW!
Top Bottom