truckin-on
Active member
[ I've updated picture links to a local album ]
I thought some might be interested in my experience installing my lift. Late last year, I ordered and took delivery of a Challenger CL10V3-2 (with 2' extensions) from garageautoequipment.com. I had narrowed it down to Challenger or a Bendpak. The Challenger ended up only a bit more expensive, and seemed to me to be worth the premium for a US-built lift. Also, I really liked the Challenger 3-stage front and rear “versymmetric” arm design better than the Bendpak.
In any event, my question from a previous post was how close to the building side wall I could mount the lift. I was originally thinking I would install it right up against the framing for the right side wall so I would have the space to store vehicles in the next bay over. Feedback from folks on the forum convinced me to re-look at that idea for multiple good reasons, so I ended up re-positioning the lift to the left side of the 20’ bay instead. My steel building is 3 20’ bays, the right two with 16’ doors. Overall 60’ wide and 40’ deep, 14’+ inside at the peak.
I had ordered the lift with 2’ extra tall column extensions, as I had a bit over 14’ clearance to the roof rafters, and it would give me more headroom for tall vehicles. That would have worked fine in my original placement, however, that extra height presented a real problem in moving the lift to the left side of the bay. To the left of the bay (between the right bay and the center bay), I have a heavy steel I-beam roof support, unfortunately only 13’ 5” from the floor at the peak. The total height of the lift with the 2’ extra height was 13’ 8”. Argh.
My solution was to lower the column extensions by 3” on each side by drilling new mounting holes. The column extensions are bolted-on during installation, and the 2’ extended height option just changes the length of the extensions by 2’ per side. The problem was that shortening each column by 3” would make the synchronization cables 6” too long. However, the lift is designed to allow for a narrow or wide installation – a difference of 4”, so there was already a cable spacer included to make up 4 1/2” of the 6”. There was plenty of adjustment on each end of each cable to make up the remaining 1”, so no problem. The posts, now at 13’ 5”, clear the roof beam by a good ¼” �� Just right…
I unloaded and installed the lift myself, with a bit of help from my Kubota L48 loader and a fork attachment. Pallet shipping weight was around 2300lbs, just at the limit of what my tractor can handle. Once I pulled the pallet apart, and installed the column extensions, I used the tractor forks and a rigging strap to lift the columns and stand them up. One stood up, they’re actually pretty stable as all the weight is mostly toward the bottom of the columns. I was able to walk the columns into position across the floor without too much trouble. Turns out the column bottoms are not perfectly flat, so a bit of rock and roll and you can actually move them around without too much trouble.
I was able to get it installed without having to call Challenger, but there were a few issues with the instructions… they say to lift the carriages to drill the mounting holes in the concrete under them – but they don’t give you ANY suggestions on how to do it. Any attempt to raise them with a jack or the loader would risk destabilizing and tipping the column. My eventual solution was a come-along hooked to the top of the column, then I was able to raise the carriage far enough to get the Hilti drill in under the carriage, held up by the column safety locks.
Next issue was how to lift the overhead cross-beam into position – 13’ 5” up in the air – by myself. I could have asked for some help, but hey, I got this far on my own… Two tie-down straps bolted to either end of the beam, run up to the top of the column, allowed me to raise and hold it, while I got the mounting bolts in on either side.
The hydraulic filling instructions also left a bit to be desired. They say 3 gals, but the reservoir actually only holds 2 as I found out. You need to fill it with 2, bleed the air out, then fill with the remaining gallon. Not the first oil spill in the shop…
All in all, not bad. I certainly would not have been able to do it myself without the loader, but I’m sure 2 or 3 guys would have been able to stand up the columns without too much trouble. The unload it from the flatbed without forks would have been a real bear however.
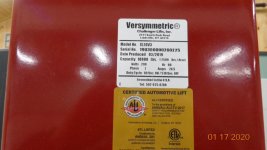
And forgot to mention - as I'm sure some will notice - I installed the lift "backwards", with the power column on the left, rather than the right. It was closer to power that way, and for me the controls were more convenient on the left column than the right. The Challenger is symmetric, so it didn't make any difference, other than the sticker with the name is facing in rather than out...
Thanks for the helpful suggestions, now I’m ready to get to work!
Here are some pics. Lift just off-loaded, ~2300#:
View media item 90626
Some assembly required...
View media item 90627
View media item 90628
Columns standing:
View media item 90630
Clearance challenge:
View media item 90631
Cross-beam going up and in:
View media item 90632
View media item 90638
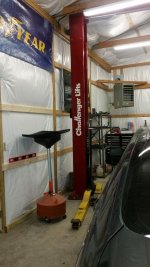
Wiring completed, just clears support beam:
View media item 90633
Here you can see where I re-drilled and lowered extensions 3":
View media item 90637
Done!
View media item 90634
Versymmetric arm design:
View media item 90635
View media item 90636
I thought some might be interested in my experience installing my lift. Late last year, I ordered and took delivery of a Challenger CL10V3-2 (with 2' extensions) from garageautoequipment.com. I had narrowed it down to Challenger or a Bendpak. The Challenger ended up only a bit more expensive, and seemed to me to be worth the premium for a US-built lift. Also, I really liked the Challenger 3-stage front and rear “versymmetric” arm design better than the Bendpak.
In any event, my question from a previous post was how close to the building side wall I could mount the lift. I was originally thinking I would install it right up against the framing for the right side wall so I would have the space to store vehicles in the next bay over. Feedback from folks on the forum convinced me to re-look at that idea for multiple good reasons, so I ended up re-positioning the lift to the left side of the 20’ bay instead. My steel building is 3 20’ bays, the right two with 16’ doors. Overall 60’ wide and 40’ deep, 14’+ inside at the peak.
I had ordered the lift with 2’ extra tall column extensions, as I had a bit over 14’ clearance to the roof rafters, and it would give me more headroom for tall vehicles. That would have worked fine in my original placement, however, that extra height presented a real problem in moving the lift to the left side of the bay. To the left of the bay (between the right bay and the center bay), I have a heavy steel I-beam roof support, unfortunately only 13’ 5” from the floor at the peak. The total height of the lift with the 2’ extra height was 13’ 8”. Argh.
My solution was to lower the column extensions by 3” on each side by drilling new mounting holes. The column extensions are bolted-on during installation, and the 2’ extended height option just changes the length of the extensions by 2’ per side. The problem was that shortening each column by 3” would make the synchronization cables 6” too long. However, the lift is designed to allow for a narrow or wide installation – a difference of 4”, so there was already a cable spacer included to make up 4 1/2” of the 6”. There was plenty of adjustment on each end of each cable to make up the remaining 1”, so no problem. The posts, now at 13’ 5”, clear the roof beam by a good ¼” �� Just right…
I unloaded and installed the lift myself, with a bit of help from my Kubota L48 loader and a fork attachment. Pallet shipping weight was around 2300lbs, just at the limit of what my tractor can handle. Once I pulled the pallet apart, and installed the column extensions, I used the tractor forks and a rigging strap to lift the columns and stand them up. One stood up, they’re actually pretty stable as all the weight is mostly toward the bottom of the columns. I was able to walk the columns into position across the floor without too much trouble. Turns out the column bottoms are not perfectly flat, so a bit of rock and roll and you can actually move them around without too much trouble.
I was able to get it installed without having to call Challenger, but there were a few issues with the instructions… they say to lift the carriages to drill the mounting holes in the concrete under them – but they don’t give you ANY suggestions on how to do it. Any attempt to raise them with a jack or the loader would risk destabilizing and tipping the column. My eventual solution was a come-along hooked to the top of the column, then I was able to raise the carriage far enough to get the Hilti drill in under the carriage, held up by the column safety locks.
Next issue was how to lift the overhead cross-beam into position – 13’ 5” up in the air – by myself. I could have asked for some help, but hey, I got this far on my own… Two tie-down straps bolted to either end of the beam, run up to the top of the column, allowed me to raise and hold it, while I got the mounting bolts in on either side.
The hydraulic filling instructions also left a bit to be desired. They say 3 gals, but the reservoir actually only holds 2 as I found out. You need to fill it with 2, bleed the air out, then fill with the remaining gallon. Not the first oil spill in the shop…
All in all, not bad. I certainly would not have been able to do it myself without the loader, but I’m sure 2 or 3 guys would have been able to stand up the columns without too much trouble. The unload it from the flatbed without forks would have been a real bear however.
And forgot to mention - as I'm sure some will notice - I installed the lift "backwards", with the power column on the left, rather than the right. It was closer to power that way, and for me the controls were more convenient on the left column than the right. The Challenger is symmetric, so it didn't make any difference, other than the sticker with the name is facing in rather than out...
Thanks for the helpful suggestions, now I’m ready to get to work!
Here are some pics. Lift just off-loaded, ~2300#:
View media item 90626
Some assembly required...
View media item 90627
View media item 90628
Columns standing:
View media item 90630
Clearance challenge:
View media item 90631
Cross-beam going up and in:
View media item 90632
View media item 90638
Wiring completed, just clears support beam:
View media item 90633
Here you can see where I re-drilled and lowered extensions 3":
View media item 90637
Done!
View media item 90634
Versymmetric arm design:
View media item 90635
View media item 90636
Last edited: