To avoid these ads, REGISTER NOW!

Chevy 5 Window Truck

Divcod

Well-known member
Joined
Jan 9, 2015
Messages
319
Location
Pacific Northwest
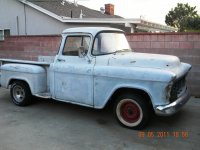
Work started a few months ago in a series of short shop sessions. Getting ready to return to continental US in a week so hopefully will get more time to focus on the truck. Project actually started before the purchase of the Divco but was side lined pending completion of the milk truck restoration.

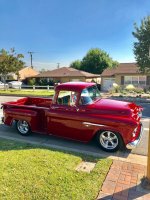
Project goal is to have a truck that handles like a modern truck, or maybe better, with enough power to smoke the tyres while maintaining the ability to make a long distance cruise.

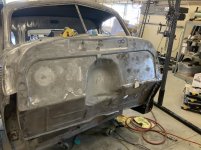
5 Window cab and fenders have most of the metal and paint prep work completed so the current work a has been focused on the frame. Majority of the riveted brackets have been removed from the frame. Nuts were welded inside the frame channels to allow for installation of running board and cab mounting brackets after frame is boxed.
20180627_124151.jpg

20180627_124156.jpg

Frame rails were trimmed to a consistent width prior to tacking of boxing plates.

20180625_100257(1).jpg

20180625_091655.jpg
 
To avoid these ads, REGISTER NOW!
OP
D

Divcod

Well-known member
Joined
Jan 9, 2015
Messages
319
Location
Pacific Northwest
Plan is to box complete frame rails. Trimmed and fit purchased plates and then tac welded into place. Inside of boxing plates painted with SPI epoxy although edges masked off to reduce the amount of fumes when welded. Interior of rails will be painted after all of the welding and fab work completed. Looking for a way to spray inside rails, going to try and feed a plastic tube with a 360 nozzle hook to a garden spraye. Might make a big mess but think it will protect the metal. Any better ideas?

20180627_162916.jpg

20180629_093128.jpg
 
Last edited:
OP
D

Divcod

Well-known member
Joined
Jan 9, 2015
Messages
319
Location
Pacific Northwest
After tacking boxing plates frame was reinforced with heavy beam. Beams were bolted in place with spacer as required and then cross brace in order to deal with the welding heat.


20180821_104744.jpg

20180821_152829.jpg

20180821_152832.jpg
 
OP
D

Divcod

Well-known member
Joined
Jan 9, 2015
Messages
319
Location
Pacific Northwest
Boxing plates welded in place, bracing removed and edge of frame radius while grinding welds. Several areas of the frame had sections cut out for replacement. Rear frame cross brace, installed to pull a trailer, will be replaced in the near future. Overall the frame is with 1/32" of square.

20181101_193439.jpg

Next step will be to start on the suspension Fabrication.
 
OP
D

Divcod

Well-known member
Joined
Jan 9, 2015
Messages
319
Location
Pacific Northwest
Interesting. What are you planning on using for a drivetrain and suspension?
Suspension independent front and 4 bar coil over rear from No Limit Engineering. Quality of their product is excellent and set up of he front in allows setting caster and camber without using shims.
Drive train engine 383 stroker, transmission 700R4 with shift kit and update clutches, 12 bolt gm diff with 373 gearing. Wheels will be 18" so truck should run in 2,000 rpm range at 80mph.
Hope to have a highway cruiser with a little street power
 
OP
D

Divcod

Well-known member
Joined
Jan 9, 2015
Messages
319
Location
Pacific Northwest
53 Chevy 5 Window Truck - Rebuild

Initial suspension install. Will need to set box on frame to allow determination of width of rear end. Mounting brackets tac in place and then builder will fully weld brackets, straighten and cut tubes, and then install gears and axles.

20181102_174714.jpg

20181106_155416.jpg

20181107_180549.jpg

View attachment 837608
 

jackson1701

Well-known member
Joined
Jan 13, 2015
Messages
157
Location
Jarrettsville, MD
View media item 89029
My brother picked up this '50 5 window 3100 last spring. It's pretty much all original and needs some tlc. We plan to do a complete frame off with a possibility of as LS swap with a 6 speed. We would like to use the original frame, straight axle, 9" rear. I'll definitely be following along your build.

Steve
 
OP
D

Divcod

Well-known member
Joined
Jan 9, 2015
Messages
319
Location
Pacific Northwest
View media item 89029
My brother picked up this '50 5 window 3100 last spring. It's pretty much all original and needs some tlc. We plan to do a complete frame off with a possibility of as LS swap with a 6 speed. We would like to use the original frame, straight axle, 9" rear. I'll definitely be following along your build.

Steve
Looks like a great foundation to start your project. Will try to update progress but sometimes end up wishing there were more photos so some steps are missed.
 
OP
D

Divcod

Well-known member
Joined
Jan 9, 2015
Messages
319
Location
Pacific Northwest
Cab and truck bed put into position to allow determination of the differential length. Using a 12 bolt GM with larger Ford bearings, upgraded axles and modified carrier bearings. Should be good for 700+hp but engine will be no where near that range.
20181212_193931.jpg

Rear cross member replaced with a trailer hitch cross bar. Plan to fabricate a roll pan and use the receiver as a license plate holder. Pulling a trailer is not in the plan but wanted the opition in case we do some long distance traveling.

20181212_194441.jpg

Mock up engine and transmission used to place motor mounts. Sitting at an odd angle as the engine was disconnected to avoid burning up the motor mount bushings.

20181212_193948.jpg

Need to work on the rear transmission mount but it will have to wait until next year.

Have a great holiday season with family and friends, I plan to!
 

Robert Haas

Well-known member
Joined
Sep 30, 2010
Messages
1,749
Love what you are doing.

I would suggest flipping the receiver and frenching it through the valance. as it is laid out when the truck is on its wheels that hitch will be pretty low and will make contact with steep driveways and other annoying obstacles. Also with it flipped it will be easier to deal with tongue heights.

I am subscribed. Your work is fun to watch.
 
OP
D

Divcod

Well-known member
Joined
Jan 9, 2015
Messages
319
Location
Pacific Northwest
Love what you are doing.

I would suggest flipping the receiver and frenching it through the valance. as it is laid out when the truck is on its wheels that hitch will be pretty low and will make contact with steep driveways and other annoying obstacles. Also with it flipped it will be easier to deal with tongue heights.

I am subscribed. Your work is fun to watch.
Thks for the suggestion on the receiver location, will look at opition next time in the shop.

Looked at your impressive truck! Have you used it t for highway cruising? I can't seem to get into weekly car shows so am hoping to join some of the vintage cruises.
 

TimeWarpF100

Well-known member
Joined
Aug 21, 2010
Messages
6,784
Location
not here
Will be keeping an eye on this build! Your projects always fun to follow along.
Had this ‘54 with ‘53 front clip here for a couple years. Husband died and family wanted to build it for mom.
I got it running driving started to tear apart for paint/build family members were to help & pay material cost. No family member showed to help and not a dime given. After a couple yrs told them to just come get it. Would have been great builder but now it will rot in weather.

e23f84bf8f3e9f640bf5c9350059a726.jpg


Sent from my iPhone using The Garage Journal mobile app
 

Attachments

  • e23f84bf8f3e9f640bf5c9350059a726.jpg
    e23f84bf8f3e9f640bf5c9350059a726.jpg
    237.9 KB · Views: 145

Flail

Well-known member
Joined
Aug 5, 2016
Messages
412
Location
Kin folk said, “Californias the place you wanna be
Query: I see you've boxed the frame but I have concerns about dumping that V-8 in there with what appears to be a perimeter frame. It would seem it would twist relatively easy. I understand many use S-10 frames to get more modern frames/brakes/suspension. Thoughts on these two approaches?
 
OP
D

Divcod

Well-known member
Joined
Jan 9, 2015
Messages
319
Location
Pacific Northwest
Query: I see you've boxed the frame but I have concerns about dumping that V-8 in there with what appears to be a perimeter frame. It would seem it would twist relatively easy. I understand many use S-10 frames to get more modern frames/brakes/suspension. Thoughts on these two approaches?
Thks for the comments.

As it stands now you are correct V8 power would torque the frame rails. However, Transmission cross member, drive hoop, additional cross member for mounting the gas tank will be added in the near term. Will also evaluate the need for additional bracing. Suspension provided by No Limit Engineering with GM disc brake on all 4 corners. Looking for reliable and easy to get parts as we hope to some of the summer road tours.
I don't have any experience or direct knowledge of the S10 conversion. Maybe others can provide input on the positive and negative aspects.
 

Dan in Pasadena

Well-known member
Joined
Feb 18, 2009
Messages
13,105
Location
Pasadena, CA
I just finished my ‘55.2 with LQ4 and 4l85e trans, Ford 8.8 rearend with 3.73 ratio. Didn’t box the frame except where the FlatOut Engineering cross member for C4 IFS mounts and the rear where I had to C notch it to get a consistent ride height. Frame has plenty of rigidity for the way I will drive it. It was intended to be my retirement daily driver but I ended up overdoing it cosmetically.

Curious why the OP is going with a carbureted SBC instead of an LS but strokes/folks I suppose. Will be watching.

Pic’s are Before-During-After starting in 2011 til now.
 

Attachments

  • 1F2D87AC-15C2-40DE-B51E-F00F98EFC097.jpg
    1F2D87AC-15C2-40DE-B51E-F00F98EFC097.jpg
    147.5 KB · Views: 314
  • AEC8CFB0-1E95-4D25-93C8-4AAF26243A3E.jpeg
    AEC8CFB0-1E95-4D25-93C8-4AAF26243A3E.jpeg
    118.4 KB · Views: 256
  • 647D5A4B-47E2-45DF-BD42-1EEEAEF6ADA6.jpg
    647D5A4B-47E2-45DF-BD42-1EEEAEF6ADA6.jpg
    148.1 KB · Views: 260
To avoid these ads, REGISTER NOW!
OP
D

Divcod

Well-known member
Joined
Jan 9, 2015
Messages
319
Location
Pacific Northwest
Considered a 6l, and LS before deciding on a SB. Biggest reason is I grew up rebuilding carbs for a neighbor mech, $1.25 ea, and moved up to multi carb set ups. First project at 16 was a 53 Chevy with a 283 from a corvette. Loved the sound of the small block with my foot to the floor. Only problem didn't have enough money for a transmission conversion so tended to blow up cluster gear and twist axles. My brother and I could pull, rebuild and install a transmission inunder an hour. Went on dates and came home to rebuild a ******
mid date and then returned to the street later that night. Like you said"strokes".

Love your truck and would like to see more pictures.
 

Dan in Pasadena

Well-known member
Joined
Feb 18, 2009
Messages
13,105
Location
Pasadena, CA
Thanks Divcod! You certainly have the experience to keep a carbureted engine running right! I’ll enjoy watching the process.

I’ll post a few random pics of “During” and “After” just to give some ideas since I don’t know what your plans are. My in-process photos were all rattle can work but I still think it looked good, YMMV.


DSCN0099.jpg

After:
DSCN0536.jpg
 
Last edited:
OP
D

Divcod

Well-known member
Joined
Jan 9, 2015
Messages
319
Location
Pacific Northwest
20190115_190329.jpg

20190115_190346.jpg

20190115_201228.jpg

Installed front motor mounts and modified original cross member for a transmission mount. Like the design and look of the original member. Will mount the brake master cyl, booster and differential to allow fabrication of brake lines.
Also working on the cab metal prep so we can get epoxy applied. Plans is to fully assemble in bare metal and then blow it apart for paint.
 

Jazz1

Well-known member
Joined
Jan 3, 2016
Messages
4,184
Location
Thunder Bay On.
Nice project. I also built a truck and boxed the front 4' for IFS and sprayed Fluid Film in with a wand with 360 nozzle once completed.(Napa Unit) Fluid Film will creep once sprayed inside the boxed areas where paint will only go where it lands.
 
OP
D

Divcod

Well-known member
Joined
Jan 9, 2015
Messages
319
Location
Pacific Northwest
Thanks for the information will check out the NAPA product. Was there any interaction between the fluid film and epoxy paint?
 
OP
D

Divcod

Well-known member
Joined
Jan 9, 2015
Messages
319
Location
Pacific Northwest
Fluid Film has no reaction to paint of any sort.
Thanks, Tired to look at an MSDS which wasn't available on-line. Contacted tech rep who cautioned against trying to apply paint over Fluid Film. Product is a non-drying, non solvent product based on lanolin wool that penetrates the metal. My interpenetration is it a high end was that has some penetrating qualities. Think I will paint the entire frame ,in and out, and then apply fluid film to fill any voids and add some luster. Still awhile before I need to decide so the plan my change.
 

Jazz1

Well-known member
Joined
Jan 3, 2016
Messages
4,184
Location
Thunder Bay On.
I used UTECH epoxy primer. Its a premium quality that resists gas and brake line fluid unlike some of the cheaper epoxies as I had learned on a earlier build. Definitely get what you pay for.
Finished my truck 9 years ago but this thread brings back fond memories of how many friggin' rivets I had to cut out and fill holes and grind and paint to make the frame that only i will ever see look so spectacular:bounce:
 
Last edited:
OP
D

Divcod

Well-known member
Joined
Jan 9, 2015
Messages
319
Location
Pacific Northwest
Mocked rear suspension up to allow fabrication of brake lines evaluation of wheels.

20190213_152509.jpg

20190213_130926.jpg

Running board brace had a few pin holes after sand blasting and planned to weld. Plan changed to fab a section but after removal of section decided remove complete brace. Amazing how rust occurs everywhere.

20190213_125239.jpg

20190213_140215.jpg
 

Burl

Well-known member
Joined
Sep 21, 2007
Messages
790
Location
Where Mountaineers are free
I understand the running board thing. I made 2 good ones out of 4 bad ones. I did it the same way, cut good sections out and replaced the bad ones. Very time consuming.
 

Robert Haas

Well-known member
Joined
Sep 30, 2010
Messages
1,749
That looks very nice.

You look like you are having a nice time. Thank you for posting pictures of the work. I follow everything you post on this.
 
Last edited:
OP
D

Divcod

Well-known member
Joined
Jan 9, 2015
Messages
319
Location
Pacific Northwest
Working on the Chevy 5 window over the next couple weeks. Gas tank fabrication, exhaust completed, brake and fuel lines routed and transmission lines roughed in. Filling holes in firewall then will mount on frame to allow location of the radiator and fender alignment.

3E7BA5E6-75F4-4D4A-80DD-01B509095AF5.jpg

B137E34B-0489-43DF-8B6B-4FA9D5696E2E.jpg

960CD9B3-9E0A-43AF-A09A-01DF23AF3349.jpg

Modified firewall to allow better alignment of the steering column.
 

Attachments

  • 368BDCBC-3FBD-4AAC-A321-95905E2A2950.jpg
    368BDCBC-3FBD-4AAC-A321-95905E2A2950.jpg
    146.3 KB · Views: 169
OP
D

Divcod

Well-known member
Joined
Jan 9, 2015
Messages
319
Location
Pacific Northwest
ATTACH]939890[/ATTACH]

Finished filling firewall holes so are ready to hang sheet metal.

5C18E865-F2E1-4E7D-A0C5-7C855D708545.jpg

76075991-290D-47C3-8C50-76EE2AF202C8.jpg

Decided to avoid the use of the stock hood hinges, better function and appearance with upgraded units.

7F404122-A2D7-44FC-8606-4F7FCE4AC096.jpg

Hood initially set but will be worked after doors are hung.

Nice to se the parts off the wall and hanging off the frame.
 

Attachments

  • EA1AA19B-EE28-4E04-82A0-E9DC68A6B82C.jpg
    EA1AA19B-EE28-4E04-82A0-E9DC68A6B82C.jpg
    151.5 KB · Views: 202
OP
D

Divcod

Well-known member
Joined
Jan 9, 2015
Messages
319
Location
Pacific Northwest
Thks, Time is always an issue. Have another week or so and then will be gone until mid Jan other than being around for the holidays. Probably not much time for the shop.
 
To avoid these ads, REGISTER NOW!
Top Bottom