
You are using an out of date browser. It may not display this or other websites correctly.
You should upgrade or use an alternative browser.
You should upgrade or use an alternative browser.
Chevy 5 Window Truck
- Thread starter Divcod
- Start date


Working on hood alignment, hinges have been located and now sorting out the reveal. Orange tape indicates where we will grind the edge of the hood the increase the reveal.

Gap between cowl and hood prior to marking for grinding.

Opposite side of hood where the gap is too large. Edge will be welded to decrease gap.

Anyone who has been around the 50s truck will know the back edge of the hood is folded over and is very “floppy”. Strip of steel added to the rear edge will add strength and help maintain the correct lines.

As an added note while there are only 4 pictures they represent 20hrs of work for 2 of us. I have no idea how many times the hood has beeen on and off or flipped over to allow access. Estimated another 8 hrs to complete the welding and hammer and dolly work.
Gap between cowl and hood prior to marking for grinding.
Opposite side of hood where the gap is too large. Edge will be welded to decrease gap.
Anyone who has been around the 50s truck will know the back edge of the hood is folded over and is very “floppy”. Strip of steel added to the rear edge will add strength and help maintain the correct lines.
As an added note while there are only 4 pictures they represent 20hrs of work for 2 of us. I have no idea how many times the hood has beeen on and off or flipped over to allow access. Estimated another 8 hrs to complete the welding and hammer and dolly work.
OutlawDrifter
Well-known member
Just made my way through this thread. Nice work so far!
Strange question, but are you planning on keeping the factory seat? Only reason I ask is the seating position is high and forward. Doesn't work out well if you're tall and have long legs. I ended up running 3rd row bench seat out of an Astro/Safari van in my '49 shop pickup.
Strange question, but are you planning on keeping the factory seat? Only reason I ask is the seating position is high and forward. Doesn't work out well if you're tall and have long legs. I ended up running 3rd row bench seat out of an Astro/Safari van in my '49 shop pickup.
Not a strange question as I keep thinking of opinions. 1. Use buckets seats with built in shoulder seat belts. Problem is the height of the seat blocks the corner windows. 2. Use the original bench seat. 3. Split the original bench seat into two sections to allow a center console. 4. Now need to look into a 3rd row seat fro a Astro van.Just made my way through this thread. Nice work so far!
Strange question, but are you planning on keeping the factory seat? Only reason I ask is the seating position is high and forward. Doesn't work out well if you're tall and have long legs. I ended up running 3rd row bench seat out of an Astro/Safari van in my '49 shop pickup.


OutlawDrifter
Well-known member
Not a strange question as I keep thinking of opinions. 1. Use buckets seats with built in shoulder seat belts. Problem is the height of the seat blocks the corner windows. 2. Use the original bench seat. 3. Split the original bench seat into two sections to allow a center console. 4. Now need to look into a 3rd row seat fro a Astro van.
I put in aftermarket 3 point belts, my pickup is a 3 window, so I had more metal to work with. they are attached in multiple places to the body mounts and body.

Some pics of the seat:
Bottom mounting bracket I fab'd up. Had to remove some of the factory stuff to get it to sit right. Then I just used 3"x3"x.25" angle burned in.


The "finished" product:


Keyblazer
Well-known member
Liking it!
Very Inspirational!
Subscribed!
Very Inspirational!
Subscribed!
Not sure about posting this picture, shop looks like a bomb went off. Started this morning with a fully assembled truck and ended the day with the frame completely stripped down and all the unused holes plugged and ground smooth. Taking the frame to the powder coated tomorrow.

Robert Haas
Well-known member
- Joined
- Sep 30, 2010
- Messages
- 1,749
You should finish boxing in the area behind the front bumper before you send it to coat. Also think about all the hangers for fuel lines, brake lines and even your electrical. That stuff sure clutters up all the fine work you have done to date and if you plan it out you can sort and hide a lot of it.
One last thing. look around and make sure you grab every part that you want to match the frame and have it powder coated at the same time. PC varies from batch to batch and it is a piss off if you find yourself bolting it together later on and you notice the discrepancies. (It will only be noticed by you and it will knaw on you)
One last thing. look around and make sure you grab every part that you want to match the frame and have it powder coated at the same time. PC varies from batch to batch and it is a piss off if you find yourself bolting it together later on and you notice the discrepancies. (It will only be noticed by you and it will knaw on you)
bimmer1980
Well-known member
Not sure about posting this picture, shop looks like a bomb went off. Started this morning with a fully assembled truck and ended the day with the frame completely stripped down and all the unused holes plugged and ground smooth. Taking the frame to the powder coated tomorrow.
I actually appreciate pictures of real shop that have a bit of a mess....
My brother and I have a '49 3-window that we tore apart as teenagers and it has never been back together.......
Nice progress on your truck!
Fuel and brake lines ran with mounting clamps in place. Electrical wires will run inside the boxed frame. Considered boxing the frame rails in front of the cross member but decided not to and the frame was already at the powder coated by the time I saw your message. Thks for the suggestion.You should finish boxing in the area behind the front bumper before you send it to coat. Also think about all the hangers for fuel lines, brake lines and even your electrical. That stuff sure clutters up all the fine work you have done to date and if you plan it out you can sort and hide a lot of it.
One last thing. look around and make sure you grab every part that you want to match the frame and have it powder coated at the same time. PC varies from batch to batch and it is a piss off if you find yourself bolting it together later on and you notice the discrepancies. (It will only be noticed by you and it will knaw on you)


larry4406
Well-known member
Nice work! Not sure how I missed this one.
stinkity stoink
Well-known member
Now the fun begins. Nice work
TimeWarpF100
Well-known member
Love watching progress on any/all of your projects! Still following along , ,
Dreamer1975
Well-known member
Just stumbled across this thread. I have a 49 5 window that was restore about 20 years ago now. I’m getting ready to start working it again. Did you use the original frame and box it in? I am in the process of trying to find an S10 from to use but struggling to find the right one. Are you happy with the way you went. I’m really looking for the same thing your doing in the end and that’s a somewhat peppy street truck that I can drive every where if I want to.
Yes, original frame fully boxed with 4 bar rear and independent front suspension. Engine 383 stroker, 473hp, connected to a modified 700r4 tran. Diff 12 bolt GM with Ford bearings and custom axles geared 373. Retaining exterior close to stock. Just doing it my way so going with a light blue.Just stumbled across this thread. I have a 49 5 window that was restore about 20 years ago now. I’m getting ready to start working it again. Did you use the original frame and box it in? I am in the process of trying to find an S10 from to use but struggling to find the right one. Are you happy with the way you went. I’m really looking for the same thing your doing in the end and that’s a somewhat peppy street truck that I can drive every where if I want to.
Dreamer1975
Well-known member
very nice, I plan to go with a 383 striker as well. I bought a 1992 S10 yesterday so I’m starting this journey. I’m new to welding so I have a lot of learning to do. While I’m somewhat handy this will be the first time I try a project of this magnitude. Look forward to following the rest of your project.
Finished installing steering knuckles, not much room with the headers, and then started hanging sheet metal. One error made was using a GM standard block for set up. Just enough difference in dimensions between the 383 stroker that it created some opportunities.
Attachments

Monza Harry
Well-known member
Aren't the 383 kits based on a standard 350 [& 302, 327, etc. 4" bore] block? The 377 is a 400 (4.125" bore) based block actually considered a better choice as the larger bore unshrouds the valves for a better breathing engine. Harry.................... One error made was using a GM standard block for set up. Just enough difference in dimensions between the 383 stroker that it created some opportunities.
404 | AirFlow Research
 www.airflowresearch.com
AL heads on the 383 are a little different than the stock 350, result headers and steering needed to be modified from the original.Aren't the 383 kits based on a standard 350 [& 302, 327, etc. 4" bore] block? The 377 is a 400 (4.125" bore) based block actually considered a better choice as the larger bore unshrouds the valves for a better breathing engine. Harry

404 | AirFlow Research
Monza Harry
Well-known member
Thank You! HarryAL heads on the 383 are a little different than the stock 350, result headers and steering needed to be modified from the original.
OutlawDrifter
Well-known member
Should scoot right along. Mine is around 375hp (stockish 6.0l) and 3600lbs, and it moves just fine.
slodat
ALLIANCE MEMBER
Truck is looking great Dave!


Using one of the spare bedrooms for parts storage!! When I first started dating my wife I had a Model A assembled in the spare bedroom so this is pretty low key.
Panel above the tail gate fabricated to fit under the original dash to hold air conditioning vents, Old radio grill modified to hide the air-conditioning controls.
Panel above the tail gate fabricated to fit under the original dash to hold air conditioning vents, Old radio grill modified to hide the air-conditioning controls.
MP&C
Well-known member
Nice progress Dave!!
e015475
Well-known member
Could you show some more details on the under-dash panel and how you hid your ac controls? I need to do this on my '49. I put two vents in the speaker grill but need to get some under the dash for more airflow
Built a recessed box where the original radio speaker and ashtray occupied. Speaker area will house a/c controls and a USBport while ashtray area will be used to hold a cell phone.
Speaker grill has been modified to open and close in order to hide the controls.
Under dash piece fabricated to hold a/c vents and will be bolted to the bottom of the dash.


Speaker grill has been modified to open and close in order to hide the controls.
Under dash piece fabricated to hold a/c vents and will be bolted to the bottom of the dash.
e015475
Well-known member
Thanks, Looks great!
When you get the valance for the under-dash AC vents installed, a photo would be very much appreciated. Did you make it or is it available somewhere?
I put my center AC vents through the old speaker grill, but this being AZ, I'm going to need some more vents at knee level.


Please keep posting your progress!
When you get the valance for the under-dash AC vents installed, a photo would be very much appreciated. Did you make it or is it available somewhere?
I put my center AC vents through the old speaker grill, but this being AZ, I'm going to need some more vents at knee level.
Please keep posting your progress!
Your truck looks great, think I am using the same classic radio. Where you have the vents I plan to have two down vents out of site behind the a/c control box.Thanks, Looks great!
When you get the valance for the under-dash AC vents installed, a photo would be very much appreciated. Did you make it or is it available somewhere?
I put my center AC vents through the old speaker grill, but this being AZ, I'm going to need some more vents at knee level.
Please keep posting your progress!
Dash piece is something we fabricated, there are plastics one around but wasn’t what I wanted. Liked the addition of the grooves which match the original dash. Would like to see more pictures of your truck.

RivennHewn
Well-known member
e015475
Well-known member
The radio in mine is just a 'dummy' built out of repro parts for a stock radio. I'm planning on using an iphone as a head unit

Progress on mine is down to a few hours a week. I need to get it on the road this spring and work out the bugs before it goes to the upholstery shop
 Mine's an aluminum LS 5.3 with a T5 - I'd like to upgrade to a TKX if I can sell the T5 to one of the straight six guys
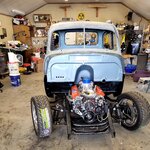
 Shot of the engine bay.............

Progress on mine is down to a few hours a week. I need to get it on the road this spring and work out the bugs before it goes to the upholstery shop
Mine's an aluminum LS 5.3 with a T5 - I'd like to upgrade to a TKX if I can sell the T5 to one of the straight six guysShot of the engine bay.............