nonhog
Well-known member
Even the grinding looks great.
The video is down.
The video is down.

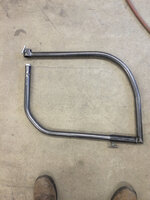
Care to share the construction of your p-hammer frames? A good friend of mine loves my Milwaukee but doesn't want to spend the kind of money they bring. I showed him some pictures of the one you built and would like to build one himself.
What are the specs of the tube?
Thanks


")


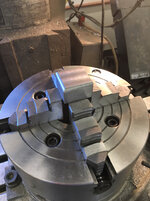
Where did you send your dies to for heat treatment?
How are they holding up? Do you have a set to planish your spot welds prior to knocking them down?
Amazing metalwork. its too bad the video of the hammer in action doesn't work anymore. its hard to understand how the thing works without some description..
is one die rounded and one die flat? are they a matched convex/concave set?
All I know is the photos of the metalwork after you replace the patchwork with one sheet look amazing.
Hey Duke
It was fun visiting with you last week. I hope the Roadster show was a good one for you.
Man, glad to see you back. All your work is great, but I'm kinda hankering for some COE progress.
I took them to a local machine shop for heat treat. They are holding up great. I use whatever die fits the panel best on the spot weld or final weld.
On your home made version, how did you hold your dies in the needle scaler???
Hey Duke
You mentioned that you were working on a version of the party garage
How about a couple shots of your party room.


Hoooleeyyy ****! That new garage looks fanTASTIC!!
Three floors? I have long dreamed of building a multi-level garage like that into a hillside, using suspended concrete for floor joists. If they can build parking structures that way, why not a garage?
Please post more build photos as you go.
Also, I see a '65 F250-ish? grille in one photo, what's going on with that? IIRC, the wrecker truck you obtained was an earlier model.


I have been using 3/4" schedule 40 black pipe for the frames and 1-5/16" schedule 40 black pipe for the yoke that holds the hammer which fits without machining. My goal was quick and inexpensive.
I had a friend drop off his Watervliet to let me try out for a bit so I can now compare to a real unit.
If I had a real one I would still keep my homemade ones around. The Watervliet is a lot more powerful, rigid and heavy. It is way quicker for shaping but was way more temperamental for finish work (likely a non-issue if I had a little more time to figure how it wanted to run). The air needed to be turned way down and with the rigid frame I found the preload between the hammer and lower die needs to be just right or the hammer won't start up. This is not the case with the homemade. Can run quite a bit higher pressure so it always starts up even with a lot of preload.
Also if you are only doing finish work it is quite time consuming so it is nice to have the lite weight frame. The lite weight frame work good if you keep the throats reasonable. The really deep one I made flexes a bunch but still does the job when finishing. I plan to make a 1-5/16 OD frame someday similar to a real unit to see how it will perform.
Last frame I built I added another joint so I can get into many more locations.
I want a name brand one even more now that I have used one but it is nice to be able to make whatever frame you need within an hour or two also.
Sent from my iPhone using Tapatalk
Awesome thread, Royce.
Late to the party but subscribed for updates!