
You are using an out of date browser. It may not display this or other websites correctly.
You should upgrade or use an alternative browser.
You should upgrade or use an alternative browser.
Christian's 36x50
- Thread starter cmoist
- Start date

Seems like it looked bigger when just the flags were in the ground.
I know the feeling. I felt the same about mine when it was going up. I pulled my truck into the marked area and was like, "sum *****!" But then once it's up and under roof the anxiety eases.
")
Hate to sound too picky... but why did you opt to line your shop up with the property line instead of the house? That angle difference would annoy me.
@Jimi - I gave that some thought too. The reason for going parallel to the property line, for me, was that the building is closer to the fence on the property line than it is to the house, and with the fence being a long, straight line, I think it would have looked much more odd to be misaligned with said fence. The fact that it's not aligned with the house is not remotely noticeable from the ground, anyhow. I guess I'd almost need to post a pic from the road to prove the point.
chad741
Active member
 Great looking shop and design. Kind of similar to the design of my garage
My garage build:
http://www.garagejournal.com/forum/showthread.php?t=217643

Got a bit done today and was happy to see the crew come out on a Saturday to beat the weather we're to get tomorrow.
Right now, I'm not close to a solution for the 8x8 opening at the back of the building. It may get a garage door, a roll up door or a set of carriage doors. For now though, I built a wall to close it in, as the wind is typically from that direction.

I also worked a bit more on framing the ellipses above the front garage doors. This seems to be working well so far. Still planning to use 2x6s under the blocking. That's next.

And here's where we are now. The guys did some of the soffit work and started installing the vented cap on the roof. I started installing tarps to keep the snow out. 6-8 inches is what they're calling for. Building in winter has a bunch of challenges.

Right now, I'm not close to a solution for the 8x8 opening at the back of the building. It may get a garage door, a roll up door or a set of carriage doors. For now though, I built a wall to close it in, as the wind is typically from that direction.
I also worked a bit more on framing the ellipses above the front garage doors. This seems to be working well so far. Still planning to use 2x6s under the blocking. That's next.
And here's where we are now. The guys did some of the soffit work and started installing the vented cap on the roof. I started installing tarps to keep the snow out. 6-8 inches is what they're calling for. Building in winter has a bunch of challenges.
ct71rr
Well-known member
Very nice! I like the look of the two gables in the front. I'm kicking myself for not doing arches above my doors...
Well I spent some time working today and got the ellipses done. Instead of relief cutting 2x6s, I used kerf cuts on the bottom side. This resulted in a stronger arrangement, I think. Relief cutting just resulted in this when trying to bend away from the cut.

Anyhow, here's a poor pic of the result on one side. I cut kerfs every 6" at a depth of 1 1/8" on the long door and 3" at a depth of 1 1/4" on the short door, where the ellipse had more of an arc.

I know this is kind of elementary stuff for people with more experience, but for a guy who has done little framing, I'm pretty pumped with the result.
And alas, cars are in! Four cars, a bobcat with several attachments, as well as various remaining wood and barn parts, with room to spare.

Sent from my iPhone using Tapatalk
Anyhow, here's a poor pic of the result on one side. I cut kerfs every 6" at a depth of 1 1/8" on the long door and 3" at a depth of 1 1/4" on the short door, where the ellipse had more of an arc.
I know this is kind of elementary stuff for people with more experience, but for a guy who has done little framing, I'm pretty pumped with the result.
And alas, cars are in! Four cars, a bobcat with several attachments, as well as various remaining wood and barn parts, with room to spare.
Sent from my iPhone using Tapatalk
Sims5
Well-known member
Looking sweet!
gmgrunt
Well-known member
Looks great! The gable end detail and arched doors adds a bunch of style to the looks of you building, keep up the good work. I might just borrow your arched design for my garage!
Thanks @gmgrunt
No huge updates. We're waiting for some supplies that we were shorted from Lester. Originally supposed to be here last week, but were pushed back to this week due to some issues at their plant.
A word of advice, double, triple and quad check your plans. When the builder asked where I wanted the windows, I told him to install according to the plans, which I had remembered as placing them centered between posts. I was out foaming windows and stood back looking at them. "What the hell?" The middle window was one foot off center, making the gap from window one to two 8ft and two to three 6ft. I really don't know how we missed it for so long.

The first step was to check the plans to make sure it wasn't just a miscommunication between the builder and I. If it was, maybe I'd have some recourse. Nope, plans showed it offset for some reason (No idea why, they were evenly spaced on my original illustrations)
 z
z
[$#!+]!
So I thought about whether I could live with it or not. I decided to move window three over 2 feet, which would even everything out a bit more on the side. Out it came. Foamed and taped window out. Framing cut out and everything moved two feet over. (8ft between both now) at least it's done, and done correctly. Too bad it took half a day. The good news is that judging by how difficult it was to remove the existing framing, I've got a new appreciation for the strength and integrity of the building.
All better.

Sent from my iPhone using Tapatalk
No huge updates. We're waiting for some supplies that we were shorted from Lester. Originally supposed to be here last week, but were pushed back to this week due to some issues at their plant.
A word of advice, double, triple and quad check your plans. When the builder asked where I wanted the windows, I told him to install according to the plans, which I had remembered as placing them centered between posts. I was out foaming windows and stood back looking at them. "What the hell?" The middle window was one foot off center, making the gap from window one to two 8ft and two to three 6ft. I really don't know how we missed it for so long.
The first step was to check the plans to make sure it wasn't just a miscommunication between the builder and I. If it was, maybe I'd have some recourse. Nope, plans showed it offset for some reason (No idea why, they were evenly spaced on my original illustrations)
[$#!+]!
So I thought about whether I could live with it or not. I decided to move window three over 2 feet, which would even everything out a bit more on the side. Out it came. Foamed and taped window out. Framing cut out and everything moved two feet over. (8ft between both now) at least it's done, and done correctly. Too bad it took half a day. The good news is that judging by how difficult it was to remove the existing framing, I've got a new appreciation for the strength and integrity of the building.
All better.
Sent from my iPhone using Tapatalk
More details on the kerf cuts?
These were on 2x6s, so the cuts were most of the way through. I used a standard circ saw blade. Not sure what the exact width was, but they could have been thinner, as making the bend didn't close the kerf completely at the bottom.I cut kerfs every 6" at a depth of 1 1/8" on the long door and 3" at a depth of 1 1/4" on the short door, where the ellipse had more of an arc.
Sent from my iPhone using Tapatalk
It's been a while, but the tin work is done. That pretty much concludes the builders portion of the job. We're hoping for site work to be completed in the next week or so, then I can have overhead doors, siding and trim delivered and complete the rest on my schedule.
Starting to look like my original design.

Sent from my iPhone using Tapatalk
Starting to look like my original design.
Sent from my iPhone using Tapatalk
It's been a while, but progress is coming along fairly well. I've got nearly all the trim/frieze boards, etc up and painted. Additionally, both overhead doors are up (first time putting up doors). It all went fairly well.

I do have an ask. I bought PVC trim to do the window in the gable thinking that my contractor had a set of heat blankets. That turned out to not be the case. I tried using a HF heat gun to no avail. Anyone in the southern Ohio are have a set of heat blankets, or a better solution? I'd really rather not cut it out of fiber cement trim, if I have a choice.
I do have an ask. I bought PVC trim to do the window in the gable thinking that my contractor had a set of heat blankets. That turned out to not be the case. I tried using a HF heat gun to no avail. Anyone in the southern Ohio are have a set of heat blankets, or a better solution? I'd really rather not cut it out of fiber cement trim, if I have a choice.
Two weeks ago, we had our concrete guy out to quote us and made a plan to pour the following weekend (last weekend), weather permitting. Because the door pad was to go directly over where the conduit would run, we had to get conduit installed first. We trenched (by hand), installed conduit from the house to the garage, got approved and filled back in within a few days. It actually worked out much better than it could have.
Our pour job is not as fancy as everyone with their radiant solutions, but that's ok. Vapor barrier, 21# mesh and 5" of 4k psi concrete inside and out. This was the first time I'd seen concrete poured. It really is one of those jobs that takes a lot of hard work up front and a lot of finesse to finish. Overall, I'm super happy. Now we're just waiting for everything to cure so we can use it! Here are some pics of the progress.


And as of a few days ago.

Hoping to finish trim and start with fiber cement siding this weekend. We'll see.
As a parting note, I'll leave this. Do yourself a favor and double/triple check your deliveries. Menard's delivery service shorted us 5 of 6 garage door struts and left a nice hole in this pallet of FCB. They've been good about the struts. Not sure what's going to happen with this.

Our pour job is not as fancy as everyone with their radiant solutions, but that's ok. Vapor barrier, 21# mesh and 5" of 4k psi concrete inside and out. This was the first time I'd seen concrete poured. It really is one of those jobs that takes a lot of hard work up front and a lot of finesse to finish. Overall, I'm super happy. Now we're just waiting for everything to cure so we can use it! Here are some pics of the progress.
And as of a few days ago.
Hoping to finish trim and start with fiber cement siding this weekend. We'll see.
As a parting note, I'll leave this. Do yourself a favor and double/triple check your deliveries. Menard's delivery service shorted us 5 of 6 garage door struts and left a nice hole in this pallet of FCB. They've been good about the struts. Not sure what's going to happen with this.
gmgrunt
Well-known member
Looks great! nice building. I'm getting ready myself for a concrete slab next week.....exciting!
I do have an ask. I bought PVC trim to do the window in the gable thinking that my contractor had a set of heat blankets. That turned out to not be the case. I tried using a HF heat gun to no avail. Anyone in the southern Ohio are have a set of heat blankets, or a better solution? I'd really rather not cut it out of fiber cement trim, if I have a choice.
So I had sort of exhausted my options with this. I even took a chance and purchased a $50 piece of pre-shaped urethane trim which ended up not fitting. The last option I had was to rip and laminate the PVC I had (the one I wanted to bend with heat blankets). I still had the form I wanted to use with the heat blankets, so I figured it all may work out.
Form:

I ripped the 4" 5/4 PVC trim into 1/2" strips on the table saw, then laid the first layer around the form. With the help of a heat gun, I formed it and pin nailed it onto the form from the outside-in. This was the most important layer, as the other layers would follow this shape.

Using clear PVC primer and cement, I laminated the rest of the layers, one by one. I pinned each and clamped until each was dry before doing the next. I pinned the last layer with 2" stainless finish nails and counter sunk them.

I lost about 1/2" in thickness from the kerf the blade took when ripping. For that reason, the bottom portion had to be rpiied to match. The ends were mitered and glued/pinned together. Here you can see small gaps between the layers in certain places. Very minor though.

After paint...

And finally, installed...

We've been making good progress on the siding, though it's been trying at times. I used these nails (http://www.amazon.com/gp/product/B00937NH3I/?tag=atomicindus08-20) which were about the only stainless 1 1/2" ring shank roofing nails I could find. Though my math said there were enough, I was worried we'd be short. Turns out there is exactly 3600 nails in the package and we made it!
Here is a pic at about 50% completion, though it's all up now. It seems like every step completed makes it feel twice as "finished".

Here is a pic at about 50% completion, though it's all up now. It seems like every step completed makes it feel twice as "finished".
Sunbimmer
Well-known member
And finally, installed...
Very good job and idea on this
Very nice building you have there!
Skipping a bit from my last post to present, I've got all the siding up and finally painted this weekend. It turned out to be a fairly large undertaking. I bought the HF airless sprayer a couple months ago in preparation for this, but I think I underestimated the amount of prep work that was to be required. I power washed and masked the windows Saturday. Sunday my dad and I masked the soffits on the sides and gable ends. Nothing like spending Father's day laboring with your dad, from dusk til dawn!
This was my first foray into spraying an exterior (or anything with airless), and I learned:
We used Sherwin Williams Emerald exterior paint that we picked up when on sale. We also chose satin over flat (even though our house is flat). The satin looks just fine and should hold up for a long while.
Paint prep. Wifey was a big help from the ground (hiding behind the tree).

We used ladder jacks and a 13' walk plank to reach the top of the sides, but painted off ladders alone on the gable ends.

I've still got to paint the small triangle above the little door, but will do that by hand. Too small of an area to bother with masking. Overall though, I'm pretty satisfied with the end result. Trim needs touched up, which will be done this week. Then caulk.

This was my first foray into spraying an exterior (or anything with airless), and I learned:
- Make sure to keep that thing moving when spraying, and start moving before pulling the trigger.
- Any imperfections in your masking will show in the finished product.
- Using a shield like this helps greatly along any straight lines.
- It's easy to get in a panic the first time spraying, but it gets easier with a little practice. The smaller the tip, the better for your first time. I used a 515 tip.
- Wear a paint suit. The stuff gets everywhere. By the time I was done, it was getting difficult to see through my goggles!
- It seems like we used a bit more paint than I had calculated. We used about 8 gallons, when I calculated around 6.
We used Sherwin Williams Emerald exterior paint that we picked up when on sale. We also chose satin over flat (even though our house is flat). The satin looks just fine and should hold up for a long while.
Paint prep. Wifey was a big help from the ground (hiding behind the tree).
We used ladder jacks and a 13' walk plank to reach the top of the sides, but painted off ladders alone on the gable ends.
I've still got to paint the small triangle above the little door, but will do that by hand. Too small of an area to bother with masking. Overall though, I'm pretty satisfied with the end result. Trim needs touched up, which will be done this week. Then caulk.
INTMD8
Well-known member
Looks awesome! Very nice work.
A lot of the lighting is now done inside. I was a bit apprehensive about being able to afford new lights, and had been looking at CL to find used units, when I came across these at Menards. For $10 a piece, I thought I'd give them a try.
Since I really have no idea about how much light is required for a typical garage, I decided to buy four (theoretically, one row's worth) and temporarily hang them. I simply plugged them into my one outlet (at this point) with extension cords to test things out.

They looked like they provided enough light for general work when the sun went down, so I ran a circuit for a four by three grid of lights and installed them. I'm fairly happy with how they turned out. I believe it will be enough light for now, and if needed, I can supplement with task lighting later.

As for the quality of the $10 lights, they've been up for about three weeks now. One went bad. Not sure if that's a fluke or if that's the norm. Menards replaced with no questions asked. I suppose if they start going bad, I can use the housings and switch to LEDs at some point in the future. At that point I'd only be out about $50-60 per unit anyhow.
Since I really have no idea about how much light is required for a typical garage, I decided to buy four (theoretically, one row's worth) and temporarily hang them. I simply plugged them into my one outlet (at this point) with extension cords to test things out.
They looked like they provided enough light for general work when the sun went down, so I ran a circuit for a four by three grid of lights and installed them. I'm fairly happy with how they turned out. I believe it will be enough light for now, and if needed, I can supplement with task lighting later.
As for the quality of the $10 lights, they've been up for about three weeks now. One went bad. Not sure if that's a fluke or if that's the norm. Menards replaced with no questions asked. I suppose if they start going bad, I can use the housings and switch to LEDs at some point in the future. At that point I'd only be out about $50-60 per unit anyhow.
madoc1
Well-known member
now that is a stout bldg., what with 3/4 " sheathing. I didn't realize metal siding was that expensive-you said the 3/4 was the same as metal. it looks great.
jim
jim
GaleForce
Active member
Sweet garage.
Is that a Caterham in the background?
Is that a Caterham in the background?
Some progress was made in the attached garage. The poor thing was stuffed full since moving to this house. After all, that's what you do when you move in with all your stuff - throw it in the garage and mumble something about tending to it later. At one point, while building the detached garage, it wasn't even passable. Now wifey has a large space in which to park, which makes her a happy camper. Hey, it only took about eight years for it to happen!
There is a bit of work to do still, but it's getting there. I wish I could find a before pic - the below image doesn't illustrate exactly how far it's come.

There is a bit of work to do still, but it's getting there. I wish I could find a before pic - the below image doesn't illustrate exactly how far it's come.
I actually built something in my barn here recently. There has been a lot going on in trying to finish some of our basement. We're putting in an ADA compliant bath down there and couldn't decide on a vanity that would meet all our needs (ADA compliant, right color, right price, etc). So I decided I'd take a shot at building one.
This was a cool unit at Menard's, but it had a shelf on the bottom and was around $470, not including the top.

I "built" it in Sketchup first to refine dimensions and the process. I wanted a beefier look for the legs, like the unit above, and figured I'd use aluminum pipe with threaded rod through it as support for the legs in place of the shelf on the Menard's unit.

My mitering setup skills could use a little bit of work, but I was fairly happy with the results.

Trim was added to the bottom edges of the top rails. After, the wood was finished with satin brown paint and satin clear, while the bars were sanded and painted with pewter spray and satin cleared. (Alum rails needed unmasked in this pic)

Anyhow, there is about $120 in it worth of materials, and it was a fun project to tackle.
This was a cool unit at Menard's, but it had a shelf on the bottom and was around $470, not including the top.
I "built" it in Sketchup first to refine dimensions and the process. I wanted a beefier look for the legs, like the unit above, and figured I'd use aluminum pipe with threaded rod through it as support for the legs in place of the shelf on the Menard's unit.
My mitering setup skills could use a little bit of work, but I was fairly happy with the results.
Trim was added to the bottom edges of the top rails. After, the wood was finished with satin brown paint and satin clear, while the bars were sanded and painted with pewter spray and satin cleared. (Alum rails needed unmasked in this pic)
Anyhow, there is about $120 in it worth of materials, and it was a fun project to tackle.
classicJackets
Well-known member
Awesome garage and build, and cool table! Great look for 1/4 of the price!
While over the winter, the building was more for storage than anything, progress is starting to happen again. I built a proper bench around a flat file cabinet I got off craigslist over the winter. While it's only got a 3/4 MDF top, it seems sturdy. Four 4x posts along the front and four along the back, all connected with 2x4s and screwed together. Even at 12' long - longer than any bench I've had before, it still feels small. The plan is to build a mobile island at the same height that will extend the workspace.

It's been a long time since posting in this thread. Nevertheless, things are happening. I built some doors for the rear of the barn in another thread.

The workbench also got a set of doors to try to keep dust out:
All ripped and ready for assembly (using through mortise and tenon joints for no good reason).

All done:
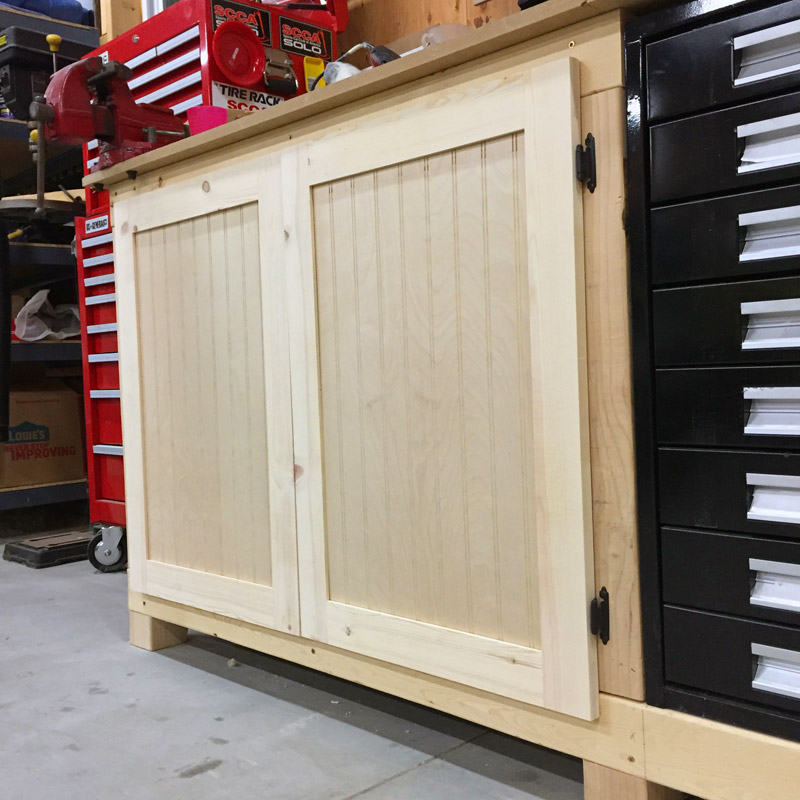

Much better - and stays much cleaner!
The workbench also got a set of doors to try to keep dust out:
All ripped and ready for assembly (using through mortise and tenon joints for no good reason).
All done:
Much better - and stays much cleaner!
1/2 Cup
Member Emeritus
Fantastic work and many thanks for the update.
CodeRedZ
Well-known member
looking good