To avoid these ads, REGISTER NOW!

Clausing 5400 Lathe Restoration

Cahark

Well-known member
Joined
Sep 28, 2016
Messages
340
Location
Dayton,Oh
Hey everyone. long time lurker, first time poster.


I love getting ideas from this forum, and I figured someone may be interested in my Clausing.


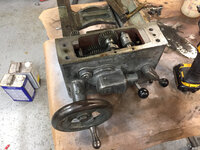
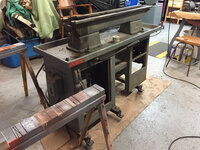
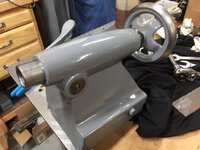
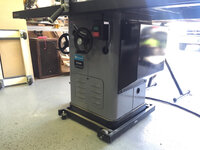
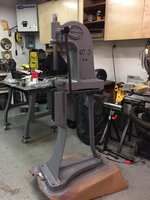
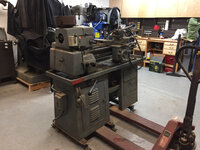
I've had this machine for a few years now. I picked it up from a local transmission shop where it wasn't even hooked up to use. I am a machinist by trade, so I haven't really needed a lathe at home, but I've finally knocked out a few projects around the house that have allowed me to move on to this one.


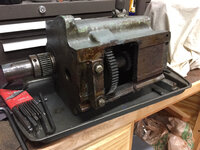
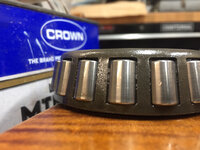
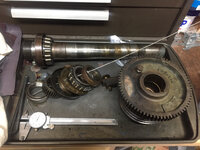
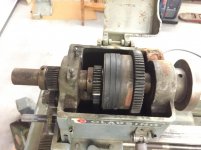
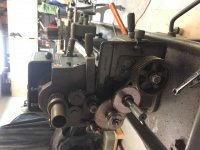
When I first got the machine I rewired the machine for 230v, verified that everything was operational, and changed both of the variable speed belts. The clutch seemed to always want to slip or stay constantly engaged no matter how you adjusted it so I knew that it would be a main part of my teardown. When cutting on this machine, I was able to get OK surface finishes, but not anywhere near what I expected from this machine.


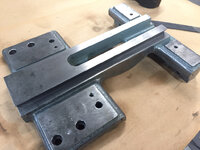
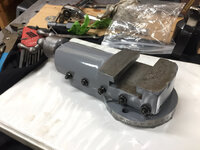
That brings us today. So far I have started cleaning, stoning, rebuilding, and re painting, each individual part/screw on this machine. In the process I'm hoping I solve my operational problems, and to come up with a machine that I will be satisfied with.


This will be a long process but hopefully someone will get something out of my write up.eb98831430d33ce4deb13bbf3afaccf4.jpgfda651ef1c23501362b1a339aedd6cd0.jpg
 

Attachments

  • IMG_4755.jpg
    IMG_4755.jpg
    139 KB · Views: 365
  • IMG_4758.jpg
    IMG_4758.jpg
    140.4 KB · Views: 336
  • IMG_4778.jpg
    IMG_4778.jpg
    129.5 KB · Views: 399
  • IMG_4776.jpg
    IMG_4776.jpg
    133.8 KB · Views: 346
  • IMG_4792.jpg
    IMG_4792.jpg
    129.6 KB · Views: 371
  • eb98831430d33ce4deb13bbf3afaccf4.jpg
    eb98831430d33ce4deb13bbf3afaccf4.jpg
    762.4 KB · Views: 12
  • fda651ef1c23501362b1a339aedd6cd0.jpg
    fda651ef1c23501362b1a339aedd6cd0.jpg
    779.6 KB · Views: 11
Last edited:
To avoid these ads, REGISTER NOW!

matt_i

Well-known member
Joined
Mar 14, 2008
Messages
10,725
Location
SE Michigan
Very nice machine! I had a 5914 some years back, and it had issues with the hydraulically-positioned vari-speed drive. But its a different machine than that one.

Any pics of the bottom cabinet/vari-drive guts?
 

2oolhound

Well-known member
Joined
Dec 18, 2010
Messages
5,918
Location
BC Canada
[Bob Dylan Rainy Day Women]
They'll stone you when you're at the breakfast table
They'll stone you when you are young and able
They'll stone you when you're tryin' to make a buck
Then they'll stone you and then they'll say "good luck"[/QUOTE]

So you say you're going to stone these parts? This I gotta see.;)
The term "stoning" invokes images of honing ways or chuck jaws etc. Things I've never even thought of. As a non machinist (green horn) who's had an old atlas for 3 years or so and slowly learning things on it I'm looking forward to following this thread!
 
OP
C

Cahark

Well-known member
Joined
Sep 28, 2016
Messages
340
Location
Dayton,Oh
Very nice machine! I had a 5914 some years back, and it had issues with the hydraulically-positioned vari-speed drive. But its a different machine than that one.

Any pics of the bottom cabinet/vari-drive guts?


Yes I sure do have some pics! Luckily/unluckily there are no hydraulics on this machine. I haven't ever messed with a clutch mechanism like this one. 3771fac06a44b39b268becf601661056.jpg9d3267e4dc3ed61a9ce443a3421c343c.jpgd7e6eedebc3600d1f53a710bcacd2f2e.jpg2c737f8158f53d2040efd038d5c68a60.jpgI'm hoping all goes well.


Sent from my iPhone using Tapatalk
 

Attachments

  • 2c737f8158f53d2040efd038d5c68a60.jpg
    2c737f8158f53d2040efd038d5c68a60.jpg
    844.1 KB · Views: 11
  • d7e6eedebc3600d1f53a710bcacd2f2e.jpg
    d7e6eedebc3600d1f53a710bcacd2f2e.jpg
    796.7 KB · Views: 15
  • 9d3267e4dc3ed61a9ce443a3421c343c.jpg
    9d3267e4dc3ed61a9ce443a3421c343c.jpg
    800 KB · Views: 11
  • 3771fac06a44b39b268becf601661056.jpg
    3771fac06a44b39b268becf601661056.jpg
    847.8 KB · Views: 12
OP
C

Cahark

Well-known member
Joined
Sep 28, 2016
Messages
340
Location
Dayton,Oh
[Bob Dylan Rainy Day Women]

They'll stone you when you're at the breakfast table

They'll stone you when you are young and able

They'll stone you when you're tryin' to make a buck

Then they'll stone you and then they'll say "good luck"


So you say you're going to stone these parts? This I gotta see.;)

The term "stoning" invokes images of honing ways or chuck jaws etc. Things I've never even thought of. As a non machinist (green horn) who's had an old atlas for 3 years or so and slowly learning things on it I'm looking forward to following this thread![/QUOTE]


It sounds as if you are "Stone Free" as Mr. Hendrix would say haha!

My definition/description of stoning would be to lightly run a GOOD QUALITY, FINE, FLAT stone LIGHTLY across any surface that may have high spots that have been raised by dropped tools, misuse, or accidents. (Not that junky sharpening stone rolling around your bench that has a 1/2" deep groove worn through the center of it lol) Specifically on precision surfaces. I tend to use a Norton orange (India stone??? Not sure) slip stone with a dab of oil. No need to go crazy, just remove the high spots so the mating surfaces will run together as they were intended. Afterwards clean and oil the surfaces for reassembly. I use this method daily in the machine shop and at home.


Sent from my iPhone using Tapatalk
 
OP
C

Cahark

Well-known member
Joined
Sep 28, 2016
Messages
340
Location
Dayton,Oh
So you say you're going to stone these parts? This I gotta see.;)

The term "stoning" invokes images of honing ways or chuck jaws etc. Things I've never even thought of. As a non machinist (green horn) who's had an old atlas for 3 years or so and slowly learning things on it I'm looking forward to following this thread!


It sounds as if you are "Stone Free" as Mr. Hendrix would say haha!

My definition/description of stoning would be to lightly run a GOOD QUALITY, FINE, FLAT stone LIGHTLY across any surface that may have high spots that have been raised by dropped tools, misuse, or accidents. (Not that junky sharpening stone rolling around your bench that has a 1/2" deep groove worn through the center of it lol) Specifically on precision surfaces. I tend to use a Norton orange (India stone??? Not sure) slip stone with a dab of oil. No need to go crazy, just remove the high spots so the mating surfaces will run together as they were intended. Afterwards clean and oil the surfaces for reassembly. I use this method daily in the machine shop and at home.


Sent from my iPhone using Tapatalk[/QUOTE]


And yes I do lightly stone the ways on machines that I have acquired. Not so hard that you alter their shapes and dimensions, but enough that you even out the bad spots. Once I have them cleaned up, I usually don't touch them again unless i do something reckless like drop a tool or part on them hard enough to cause a swedge.
As far as chuck jaws go, I always stone the mating surfaces every single time I take them off or flip them around. You never know if the Bozo that ran the machine before you tightened the mating surfaces together with chips and junk between them. Any impurities can cause the chuck to run out.


Sent from my iPhone using Tapatalk
 
OP
C

Cahark

Well-known member
Joined
Sep 28, 2016
Messages
340
Location
Dayton,Oh
Made a bit of progress over the last few days. As I went through the parts that I had cleaned in the days prior, I realized they had started to rust even though I had lightly oiled them. This prompted an afternoon of painting. The weather has been cold so it has slowed my drying process, but things are looking good so far.

The good side of this is that it will allow me to reassemble some of the sub assemblies such as the compound and the tailstock. (That way it's still fresh in my mind as to how they are reassembled) I'm hoping to have the taper attachment and the carriage cleaned and painted in the next few days.

4e2a556823103b137988e04c0275c49a.jpg


Sent from my iPhone using Tapatalk
 

Attachments

  • 4e2a556823103b137988e04c0275c49a.jpg
    4e2a556823103b137988e04c0275c49a.jpg
    718.8 KB · Views: 11

Monkey Milk

Well-known member
Joined
Nov 18, 2012
Messages
450
Location
Hawaii
looking good, Im in the middle of repairing and restoring a 13in southbend gearhead. Good times.
 
OP
C

Cahark

Well-known member
Joined
Sep 28, 2016
Messages
340
Location
Dayton,Oh
looking good, Im in the middle of repairing and restoring a 13in southbend gearhead. Good times.


My father in law has owned 2 south bends. I really like them a lot. Hope to see some pics of your 13.


Sent from my iPhone using Tapatalk
 
OP
C

Cahark

Well-known member
Joined
Sep 28, 2016
Messages
340
Location
Dayton,Oh
Got the apron cleaned out today. I decided against taking each gear out and cleaning them individually. I understand that it's the proper way to clean the apron, but everything is functioning as it should in that part of the machine.

First, I stopped by the local harbor freight and picked up a needle scaler. I had never used one before, but a friend of mine raved about how helpful they are for removing layers of nasty paint. At 24ish dollars with a 20% coupon, I decided to give it a shot. I'm very glad I did. It pulled of decades of grime and funk in a few short minutes.

366ff17cfcc85b932a7cb4b38cd7e5ab.jpg

After that, I lightly hit the surface with a wire wheel on a die grinder. This smoothed out any irregularities, and flaked off any paint left behind the needle scaler

9c99cf3a5d0eed6c15f0651049a891d4.jpg

Last, I proceeded to flush the apron gearbox with kerosine about 10 times. Everything came out beautiful. The gears look to be in fine shape, and everything seems to mesh as it should.
e2b9eaa1765c7bd31f65fda9e9800377.jpg581b5349b23a2a705e9ceeaff37d60cd.jpg907f4a81e082881e043b97e68474077f.jpg

I am hoping to get some paint on the carriage before the weekend. This will allow me to start on the headstock or the underdrive. Not sure which I will do first.


Sent from my iPhone using Tapatalk
 

Attachments

  • 366ff17cfcc85b932a7cb4b38cd7e5ab.jpg
    366ff17cfcc85b932a7cb4b38cd7e5ab.jpg
    768.9 KB · Views: 8
  • 9c99cf3a5d0eed6c15f0651049a891d4.jpg
    9c99cf3a5d0eed6c15f0651049a891d4.jpg
    823.6 KB · Views: 8
  • e2b9eaa1765c7bd31f65fda9e9800377.jpg
    e2b9eaa1765c7bd31f65fda9e9800377.jpg
    816.9 KB · Views: 8
  • 907f4a81e082881e043b97e68474077f.jpg
    907f4a81e082881e043b97e68474077f.jpg
    660.5 KB · Views: 9
  • 581b5349b23a2a705e9ceeaff37d60cd.jpg
    581b5349b23a2a705e9ceeaff37d60cd.jpg
    837.1 KB · Views: 10
OP
C

Cahark

Well-known member
Joined
Sep 28, 2016
Messages
340
Location
Dayton,Oh
Today's progress included cleaning up the saddle, and looking into the apron a bit more.

I thought I was done with the apron yesterday, but I had a change of heart and decided to swap out the gasket where the lead screw meets the worm gear. I'm glad I did. I found plenty of grit and chips beheind the access panel. Honestly it probably would have been fine due to sitting at the bottom of the casting, but I feel better knowing that it's clean and ready for duty.
3c254108652fb478ae31bd4c889d491e.jpg
After that, I moved on to the saddle. Much to my surprise it seems that the saddle has a bit more wear than I realized. The bed of the lathe is hardened, but the saddle is not. It looks like the lack of oil during the last 50 years or so has taken its toll. At first I called around to a local grind shop that has grinders large enough to do lathe beds, but at 500 bucks just for the bed I decided to opt out. Besides, the lathe only cost 400! Afterwards I called my father and asked his opinion. (Machinist also) after a few disscussions we decided to just leave it be. The wear is even along the saddle. And everything seems to seat as it should even with the wear. One thing that he said that made me smile is "the bed and the saddle are just lapped together now." He's a bit on the sarcastic side haha.

I decided that for now I'm just going to hold off. I'm going to clean and stone the saddle ways, paint, and reassemble. If I change my mind in the future, I can remove the saddle and grind the ways on the 6x18 surface grinder, but truthfully I think I'm making more of a deal about this than I should especially for a home shop lathe.

78f497d6cca357ee7ef2191e423a7103.jpgf4e2ac0c1e4717013669b2fad731d434.jpg54ccdc2c37cc0a515f1dd7882f2dd46d.jpg


Sent from my iPhone using Tapatalk
 

Attachments

  • 54ccdc2c37cc0a515f1dd7882f2dd46d.jpg
    54ccdc2c37cc0a515f1dd7882f2dd46d.jpg
    647.4 KB · Views: 8
  • f4e2ac0c1e4717013669b2fad731d434.jpg
    f4e2ac0c1e4717013669b2fad731d434.jpg
    702.8 KB · Views: 8
  • 78f497d6cca357ee7ef2191e423a7103.jpg
    78f497d6cca357ee7ef2191e423a7103.jpg
    719.2 KB · Views: 8
  • 3c254108652fb478ae31bd4c889d491e.jpg
    3c254108652fb478ae31bd4c889d491e.jpg
    838.4 KB · Views: 11
OP
C

Cahark

Well-known member
Joined
Sep 28, 2016
Messages
340
Location
Dayton,Oh
I made a decent amount of progress today. I was able to strip and clean most of the small parts other than the under Drive unit, The headstock, and the base of the machine.
c035bb0f8bce02c494850204ae78104a.jpg
Unfortunately/fortunately, I also came across a few surprises. I removed the banjo assembly from the Side of the machine. Previously I had realized that the gear that connects to the "sliding out gear" had been cracked and repaired. However I did not realize that the banjo itself had been cracked and repaired. It's an ugly repair, but it seems to be holding up so far. I will most likely let it be for now.
77ac5392b9699bad2aa25b74395422b7.jpg
Another surprise was the headstock. I had always had problems getting a decent surface finish on this machine when I was operating it. In fact I would sometimes steer clear of running it just because it frustrated me so badly. I have access to other lathes so I held off on looking into the matter until I got a chance to tear down the machine. After I remove the banjo the T-nut that was holding the headstock onto the bed stuck out like a sore thumb. The bolts were completely loose. Almost like somebody forgot to tighten them down on the machine. I couldn't believe it, my problem was staring me in the face. The front T-nut was nice and tight so the head wouldn't shift around, however if you were to pry up on the rear of the headstock it was in plain sight that it was not fully attached. I'm pretty upset with myself that I never realized it, but I had never taken the banjo off. With it on there there was no way of telling.
35d4e17ab75321376c1c4fd6d92a1084.jpg
Afterwards I got a chance to look at the precision surfaces between the headstock and the bed. It has become obvious to me that someone removed the headstock prior to me getting to it and did not clean the ways when they reattached it. If they had done this, there would not be such heavy rust and dirt between the two surfaces.
55f0207433773fc092e1e1efc41f37e2.jpge4eb55e0b490f183d8a507576bc4a450.jpg0eda07c7a27bcc60cf23f499ffc57744.jpg
I am hoping that this solves most of my problems, but surely I am not finished and there has to be more to it.
Tomorrow will be a day of painting, and disassembling the headstock/spindle assembly.
fdcdce9cf61f9db3f49e8eb098512975.jpg0fec00122793e18430b11ebf5ec9e24d.jpg


Sent from my iPhone using Tapatalk
 

Attachments

  • 0fec00122793e18430b11ebf5ec9e24d.jpg
    0fec00122793e18430b11ebf5ec9e24d.jpg
    868.9 KB · Views: 9
  • fdcdce9cf61f9db3f49e8eb098512975.jpg
    fdcdce9cf61f9db3f49e8eb098512975.jpg
    809.4 KB · Views: 10
  • 0eda07c7a27bcc60cf23f499ffc57744.jpg
    0eda07c7a27bcc60cf23f499ffc57744.jpg
    776.9 KB · Views: 10
  • e4eb55e0b490f183d8a507576bc4a450.jpg
    e4eb55e0b490f183d8a507576bc4a450.jpg
    1,005.9 KB · Views: 10
  • 55f0207433773fc092e1e1efc41f37e2.jpg
    55f0207433773fc092e1e1efc41f37e2.jpg
    775.5 KB · Views: 10
  • 35d4e17ab75321376c1c4fd6d92a1084.jpg
    35d4e17ab75321376c1c4fd6d92a1084.jpg
    853.7 KB · Views: 9
  • 77ac5392b9699bad2aa25b74395422b7.jpg
    77ac5392b9699bad2aa25b74395422b7.jpg
    758.9 KB · Views: 9
  • c035bb0f8bce02c494850204ae78104a.jpg
    c035bb0f8bce02c494850204ae78104a.jpg
    897.4 KB · Views: 11
Last edited:

DougWil

Well-known member
Joined
Dec 29, 2015
Messages
545
Location
NW Montana
My Logan 14 originally had a sliding sheave arraignment (Reeves drive) to vari the spindle speed.
Somewhere along it's life it was tossed and some past owner chopped a hole in the side of the cabinet, jammed a motor in and made it a single speed..... and then never used it.

I picked it up cheap, and found a 4 speed machinery transmission which I installed,,, worked OK for 10 years until VFD's became available and cheap.

Ripped out all that and installed a 5hp Baldor industrial 3 phase motor with a 2 step pulley on the motor and a VFD about 10 years ago.
With the original back gear intact I have never had to shift the belt to the 2nd pulley.
Anything from about 20 rpm to 2000 are now just a twist of the VFD knob.

I think all those problem prone, sliding sheave contraptions have been made obsolete with cheap VFDs.
 
OP
C

Cahark

Well-known member
Joined
Sep 28, 2016
Messages
340
Location
Dayton,Oh
Thanks for the info dougwil. I'm hoping that I'm able to preserve the under drive unit, but we will see how the following days go. Everything except for the clutch operates as it should. Hopefully I can save it.

Do you have any pics of what you did to your Logan? I haven't had any experience with VFDs yet but they look interesting. I assume you are able to get full power with them?


Sent from my iPhone using Tapatalk
 

justanengineer

Well-known member
Joined
Apr 5, 2011
Messages
7,722
Location
Motor City
Looks good so far! Your 5400 is basically identical to my 6300 aside from the headstock and gearbox, tho mine doesnt have the optional clutch. I cant imagine the clutch is too difficult to unstick and is likely virtually bulletproof as the reeves drive, would be a big step backwards to be rid of either IMHO. I suspect you'll like that lathe once back together, mine is an ex-school machine and very capable for a small machine.
 

DougWil

Well-known member
Joined
Dec 29, 2015
Messages
545
Location
NW Montana
Thanks for the info dougwil. I'm hoping that I'm able to preserve the under drive unit, but we will see how the following days go. Everything except for the clutch operates as it should. Hopefully I can save it.

Do you have any pics of what you did to your Logan? I haven't had any experience with VFDs yet but they look interesting. I assume you are able to get full power with them?

Unfortunately I am working 10 hrs from my home and the shop, so I won't be able to provide any pics for a couple of weeks.

The Logan originally came with a 2-3 hp motor.
Because a VFD doesn't increase or decrease torque with rpm like a mechanical drive you have to go oversize on the motor.
That is why I stepped up to a 5hp.
You have to also be aware that running the motor at low rpms for extended periods can make it overheat. So an external fan may be necessary.

At 60 hz you get the motor rated speed, torque and hp. All that said, I run mine from 10hz to 120hz and it has plenty of torque for even big hogging and big slow drilling with a 1.25" bit in steel (in backgear and running about 30hz). The biggest bit I have.

Being a smaller lathe you probably could get by with a 3hp motor and 3hp VFD. The VFDs are much more costly when you get over 3hp.

A big side benefit is buying 3 phase equipment and being able to run it off the same VFD.
I power my BP clone, table saw and lots of homemade hydraulics, made with dirt cheap used 3 phase motors with the same VFD.
My BP clone is a varihead, but generally I just use the VFD to set the rpm.
 
OP
C

Cahark

Well-known member
Joined
Sep 28, 2016
Messages
340
Location
Dayton,Oh
Looks good so far! Your 5400 is basically identical to my 6300 aside from the headstock and gearbox, tho mine doesnt have the optional clutch. I cant imagine the clutch is too difficult to unstick and is likely virtually bulletproof as the reeves drive, would be a big step backwards to be rid of either IMHO. I suspect you'll like that lathe once back together, mine is an ex-school machine and very capable for a small machine.


Yes, I have high hopes for the machine. My father in law seems to think that the clutch will function as soon as I disassemble and clean it, plus knock the glaze off the plates. I'm hoping to hit that next after the headstock.


Sent from my iPhone using Tapatalk
 
To avoid these ads, REGISTER NOW!
OP
C

Cahark

Well-known member
Joined
Sep 28, 2016
Messages
340
Location
Dayton,Oh
Unfortunately I am working 10 hrs from my home and the shop, so I won't be able to provide any pics for a couple of weeks.


The Logan originally came with a 2-3 hp motor.

Because a VFD doesn't increase or decrease torque with rpm like a mechanical drive you have to go oversize on the motor.

That is why I stepped up to a 5hp.

You have to also be aware that running the motor at low rpms for extended periods can make it overheat. So an external fan may be necessary.


At 60 hz you get the motor rated speed, torque and hp. All that said, I run mine from 10hz to 120hz and it has plenty of torque for even big hogging and big slow drilling with a 1.25" bit in steel (in backgear and running about 30hz). The biggest bit I have.


Being a smaller lathe you probably could get by with a 3hp motor and 3hp VFD. The VFDs are much more costly when you get over 3hp.


A big side benefit is buying 3 phase equipment and being able to run it off the same VFD.

I power my BP clone, table saw and lots of homemade hydraulics, made with dirt cheap used 3 phase motors with the same VFD.

My BP clone is a varihead, but generally I just use the VFD to set the rpm.


I may need to look into it. Currently I'm running a 5 hp rotary phase converter for my Bridgeport,lathe, and table saw. I guess the vfd never really crossed my mind. Definitely looks like something to look into if I can't get this to work.


Sent from my iPhone using Tapatalk
 
OP
C

Cahark

Well-known member
Joined
Sep 28, 2016
Messages
340
Location
Dayton,Oh
The weekend turned out to go pretty well for my lathe. It was nearly 60 degrees here in Ohio, which allowed me to lay down a few coats of paint after a few days of preparation.
06fa25296ae9edc7b6947c57a1ffc18d.jpg
Unfortunatly, I was not ready to paint the bed/cabinet yet. It would have been the perfect day for it.
a32a0c01b17b1ed91548ac3806d04b45.jpg
I took out the quick change gear box and cleaned it thoroughly. It has become obvious that someone with an air hose carelessly blew chips up inside.

Next up is disassembling and cleaning the headstock/spindle.


Sent from my iPhone using Tapatalk
 

Attachments

  • a32a0c01b17b1ed91548ac3806d04b45.jpg
    a32a0c01b17b1ed91548ac3806d04b45.jpg
    869.3 KB · Views: 9
  • 06fa25296ae9edc7b6947c57a1ffc18d.jpg
    06fa25296ae9edc7b6947c57a1ffc18d.jpg
    810.9 KB · Views: 7
OP
C

Cahark

Well-known member
Joined
Sep 28, 2016
Messages
340
Location
Dayton,Oh
Great machine find at a super price point! Keep the progress updates coming, please. Subscribed.


Thanks for the encouragement, sometimes it's hard to get out to the garage after working my day job. But I do love seeing the results after I'm done. Hopefully I will have some progress this evening.


Sent from my iPhone using Tapatalk
 
OP
C

Cahark

Well-known member
Joined
Sep 28, 2016
Messages
340
Location
Dayton,Oh
Another evening of progress! Started the day on the light side, assembling the tailstock and the compound. I had painted them and cleaned/repaired any major nicks a bout a week or so ago. I wanted to get them together before I wrapped my head around tearing down another assembly. Everything went together and adjusted/operated as it should. I'm still debating if I'm going to re grind where the toolpost mounts. I don't like all of the ugly depressions. Of course I stoned it flat and there are no high spots, I just don't like the look of it. Haha
79e66e5104c9c76941b33b48a25f2161.jpg8b0dea781a42810368a7192d68bdd2b3.jpg70e9faf98b06c22c64a18ce0bf7e8226.jpg415fc3017a71727ab55213128862302c.jpg
Next up was the headstock. It was a mess. I needed to get the spindle out so I could clean and paint, but also to check on the condition of the bearings, replace the drive belts, and remove the back gear. Unfortunately this became more of a bear than I expected. Thanks to vintage machinery.com I was able to use the manual with great directions on how to remove the spindle.
23f58b477d3f906149c30d3aaa964ec1.jpg
Even though I followed all of the directions, the spindle did not want to budge with the "taps" of my soft hammer. I only have an arbor press at home, and it isn't large enough to handle the spindle. I ended up using a milling machine stud set to come up with a "spindle puller". it was cumbersome to use, but it allowed me to remove the spindle properly with out slamming on the back with a hammer. All things considered, it worked great.
cafecef46099ce8200d1e054b4000a98.jpga59ec9d74b9a078fc317490b9d355c41.jpg5d3c52343e6b31198de3613b022e45ae.jpg
After everything was out I was able to check out the bearings. Much to my surprise, they are in really good shape. Depending on the cost of new, I will probably clean them up, oil them, and re install.
967dc9e4d3112508842601acb1856c6f.jpg
afdf26c9c32524798fe1a6f377dc6ae8.jpg
Forgive the mess. Things got a bit crazy during the spindle pulling. Haha


Sent from my iPhone using Tapatalk
 

Attachments

  • 79e66e5104c9c76941b33b48a25f2161.jpg
    79e66e5104c9c76941b33b48a25f2161.jpg
    709.9 KB · Views: 8
  • 8b0dea781a42810368a7192d68bdd2b3.jpg
    8b0dea781a42810368a7192d68bdd2b3.jpg
    703.3 KB · Views: 8
  • 70e9faf98b06c22c64a18ce0bf7e8226.jpg
    70e9faf98b06c22c64a18ce0bf7e8226.jpg
    658.3 KB · Views: 8
  • 415fc3017a71727ab55213128862302c.jpg
    415fc3017a71727ab55213128862302c.jpg
    717.9 KB · Views: 8
  • afdf26c9c32524798fe1a6f377dc6ae8.jpg
    afdf26c9c32524798fe1a6f377dc6ae8.jpg
    686.8 KB · Views: 6
  • 967dc9e4d3112508842601acb1856c6f.jpg
    967dc9e4d3112508842601acb1856c6f.jpg
    728.2 KB · Views: 6
  • 5d3c52343e6b31198de3613b022e45ae.jpg
    5d3c52343e6b31198de3613b022e45ae.jpg
    764.4 KB · Views: 8
  • a59ec9d74b9a078fc317490b9d355c41.jpg
    a59ec9d74b9a078fc317490b9d355c41.jpg
    682.9 KB · Views: 6
  • 23f58b477d3f906149c30d3aaa964ec1.jpg
    23f58b477d3f906149c30d3aaa964ec1.jpg
    788.6 KB · Views: 8
  • cafecef46099ce8200d1e054b4000a98.jpg
    cafecef46099ce8200d1e054b4000a98.jpg
    849.3 KB · Views: 7

bp460

Well-known member
Joined
Mar 15, 2011
Messages
281
Location
Chicagoland
Thanks for sharing your project! That is a very creative use of a clamp set and I am glad to see the head stock bearings are in such great shape.

Cheers,
Brad
 
OP
C

Cahark

Well-known member
Joined
Sep 28, 2016
Messages
340
Location
Dayton,Oh
Thanks for sharing your project! That is a very creative use of a clamp set and I am glad to see the head stock bearings are in such great shape.

Cheers,
Brad


I was very happy with the results of the puller. Crude, but it worked. I was able to find some bearings. They look to cost around 50 each. I need two. What do you guys think of the bearings I posted up? Decent condition? Need replaced? Just fine?
They sounded and felt fine before removal. But I'm not an expert on tapered roller bearings. I will add that they look slightly better in person than in the pics. Let me know.


Sent from my iPhone using Tapatalk
 
OP
C

Cahark

Well-known member
Joined
Sep 28, 2016
Messages
340
Location
Dayton,Oh
The guys over at homeshopmachinist and hobby-machinist would love to follow your restoration also.


I'm not on those forums, but maybe I should be. I'm new to this. Any rules on posting the same project on two different sites? Haha


Sent from my iPhone using Tapatalk
 
OP
C

Cahark

Well-known member
Joined
Sep 28, 2016
Messages
340
Location
Dayton,Oh
Today was a pain in the ****. I needed to remove the back gear assembly. I was able to break loose all of the set screws. According to the manual there was supposed to be a roll pin holding the inner shaft to the eccentrics. Unfortunatly someone who owned the lathe prior seems to have had a bad wreck. When they went to replace the roll pin, they installed a solid pin instead. I've removed hundreds of pins in the machine shop, but I've never had this many issues. I tried to use my arbor press, air hammer, and regular pin punches. After about 30 mins of fighting it. I decided to drill out the pin. Surprisingly, it was much softer than expected and it drilled right out......should have just tried that from the beginning.
51db6fef51723fe14cf1686e38a649bd.jpg683ec1567f09775d5cc4fe3c12362058.jpg
I also got a chance to start cleaning the spindle parts. They aren't finished yet but the major funk has been removed.
7ffb9a9ab90b00fbcbb8515fb3ac342a.jpg
After most of the dirt was off, I found out that the gear on the spindle had a major repair. Someone had built up some broken teeth with weld and re machined them. It looks like a decent repair. I'm really just glad that I'm not the one who had to fix it.
828f825f84075ae3d4a08d2e3b81446c.jpg
97449bd5a2a2e4b6dc88c2d7e54ab257.jpg
Hopefully I can get a coat of paint on the headstock by the weekend


Sent from my iPhone using Tapatalk
 

Attachments

  • 683ec1567f09775d5cc4fe3c12362058.jpg
    683ec1567f09775d5cc4fe3c12362058.jpg
    665.3 KB · Views: 6
  • 7ffb9a9ab90b00fbcbb8515fb3ac342a.jpg
    7ffb9a9ab90b00fbcbb8515fb3ac342a.jpg
    758.5 KB · Views: 8
  • 828f825f84075ae3d4a08d2e3b81446c.jpg
    828f825f84075ae3d4a08d2e3b81446c.jpg
    716.7 KB · Views: 7
  • 51db6fef51723fe14cf1686e38a649bd.jpg
    51db6fef51723fe14cf1686e38a649bd.jpg
    767 KB · Views: 7
  • 97449bd5a2a2e4b6dc88c2d7e54ab257.jpg
    97449bd5a2a2e4b6dc88c2d7e54ab257.jpg
    768.9 KB · Views: 6

cgrutt

Well-known member
Joined
Mar 4, 2016
Messages
8,200
Nice project! I just started working on one today (think you may have replied to a question I posted, thanks!). What paint are you using and how are you applying it? Picks up top look like its coming out really nice. Good luck.
 
OP
C

Cahark

Well-known member
Joined
Sep 28, 2016
Messages
340
Location
Dayton,Oh
I'm using rust-oleum industrial enamel with a clear coat. I wanted to use a good quality sherwin Williams product, but I had some trouble with drying issues. After 8 days it still could be easily removed with a fingernail. I've used the industrial enamel for a tool grinder, arbor press and a Rockwell Unisaw. It's held up pretty well so far. We will see how it does on a machine tool. I am currently spraying the coating. Haven't tried rolling it, but I'm sure it would do well. I like it because it dries to the touch in less than an hour in even cold conditions. It helps me to fight the rust from condensation after stripping the part.


Sent from my iPhone using Tapatalk
 
Last edited:

cgrutt

Well-known member
Joined
Mar 4, 2016
Messages
8,200
Thanks. Out of a rattle can? Looks great.

I sprayed a drill press with Tractor Supply (Majik) tractor paint with hardner and reducer and it came out pretty good. Was thinking about using same on my lathe but will look into the Rustoleum. Thanks.
 
OP
C

Cahark

Well-known member
Joined
Sep 28, 2016
Messages
340
Location
Dayton,Oh
Thanks. Out of a rattle can? Looks great.

I sprayed a drill press with Tractor Supply (Majik) tractor paint with hardner and reducer and it came out pretty good. Was thinking about using same on my lathe but will look into the Rustoleum. Thanks.


Yea. I used the can. I initially sprayed the sherwin Williams out of my HVLP but I didn't have any luck with drying. I heard mixed reviews on Majic. I would really like to try it. I assume most of the reviews were due to bad application.


Sent from my iPhone using Tapatalk
 

cgrutt

Well-known member
Joined
Mar 4, 2016
Messages
8,200
I seemed to have good luck with it but I sprayed it in the Spring when weather was fairly warm. No problem curing.

before

26232662340_01bfccaeaf_c.jpg

after

27612135756_2ced09a0ce_c.jpg
 
OP
C

Cahark

Well-known member
Joined
Sep 28, 2016
Messages
340
Location
Dayton,Oh
That's a great looking machine. Feel free to drop it off at my place, I have plenty of uses for a nice machine like that haha


Sent from my iPhone using Tapatalk
 
OP
C

Cahark

Well-known member
Joined
Sep 28, 2016
Messages
340
Location
Dayton,Oh
I seemed to have good luck with it but I sprayed it in the Spring when weather was fairly warm. No problem curing.

before

26232662340_01bfccaeaf_c.jpg

after

27612135756_2ced09a0ce_c.jpg


b54ca8579658099e34b820e2784e1041.jpgc066426f598691f93c6c384d14b91f9b.jpghttps://uploads.tapatalk-cdn.com/20170126/06bd24fe476f8e05d3c65ffe2d48fb06.jpg[/
Here are a few items that I used the rust oleum on in the past. I'm hoping for just as good results.


Sent from my iPhone using Tapatalk[ATTACH=full]1267828[/ATTACH]
 

Attachments

  • c066426f598691f93c6c384d14b91f9b.jpg
    c066426f598691f93c6c384d14b91f9b.jpg
    655.3 KB · Views: 6
  • b54ca8579658099e34b820e2784e1041.jpg
    b54ca8579658099e34b820e2784e1041.jpg
    646.2 KB · Views: 8
  • d3fd8cf4693dd4056a3d1346cd190f7f.jpg
    d3fd8cf4693dd4056a3d1346cd190f7f.jpg
    762 KB · Views: 10

Dr Stan

Well-known member
Joined
Nov 17, 2016
Messages
496
Location
Owensboro, KY
Glad to see someone else who does a complete tear down and proper repairs. At some point I'll post pics of my rebuild of my Fray vertical milling machine.

Actually my avatar is the Fray once finished.
 
OP
C

Cahark

Well-known member
Joined
Sep 28, 2016
Messages
340
Location
Dayton,Oh
Glad to see someone else who does a complete tear down and proper repairs. At some point I'll post pics of my rebuild of my Fray vertical milling machine.

Actually my avatar is the Fray once finished.


There really is no other way to do it. I just wish it would go a little faster!


Sent from my iPhone using Tapatalk
 
To avoid these ads, REGISTER NOW!
Top Bottom