To avoid these ads, REGISTER NOW!

Clausing 5400 Lathe Restoration

OP
C

Cahark

Well-known member
Joined
Sep 28, 2016
Messages
340
Location
Dayton,Oh
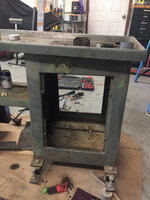
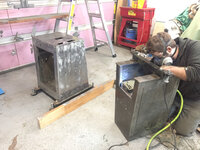
Worked on the lathe tonight. Spent a good 3 hours after work.
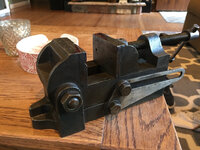
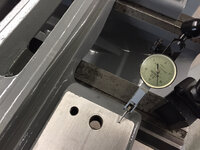
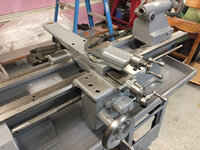
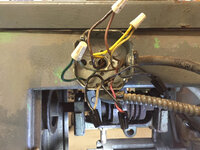
First, I continued to clean the spindle and headstock components. Someone decided it would be a good idea to tighten down set screws on the shaft without the included brass plugs. I was able to stone off all of the bad parts and ended up with a nice piece. I will do a final cleaning before assembly.

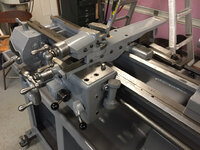
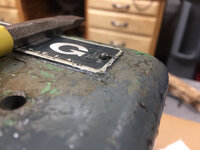
Next up was removing the name plates. At first I tried to slot the rivet screws with a cutoff and twist them out with a screwdriver. I didn't have much luck with that. Next I used a cold chisel to pry the head of the rivett up. Then I was able to get under the head with a set of small dykes. It really worked well.
e8fb4ce153cf25ebd95f3f3b183de2c3.jpg7b23d86e5ae44f68ba1d74d2e23dcc41.jpgf3a477d70ccb1860ddd740e8fd305719.jpg
After I had them out, I opened up the existing holes with a number 43 drill, and tapped the holes with a 4-40 tap. I would love to have brand new rivets to install, but I didn't want to have to buy a bag of them for just a few tags. I have plenty of 4-40 screws in stock.
75ed5569ccfdf6e67043b4920a1c6604.jpg
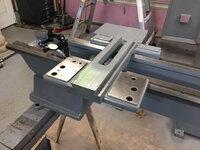
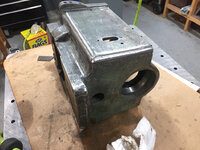
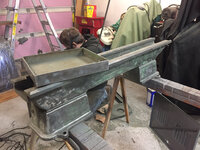
I also got a chance to strip the old paint off of the headstock.
56d12a040f8ba1c80758f5d374d4e34a.jpg
247bb3c8964a03a7aad49d732e34d58d.jpg
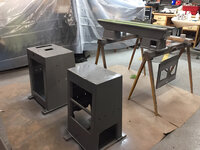
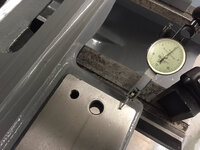
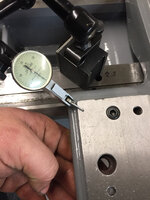
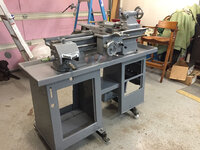
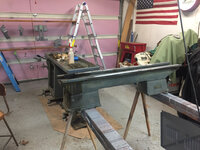
Lastly I was able to remove the bed from the cabinet. There I found where all of the mice in my shop were living.
c7a368e850bd2611c18b45f5b5fd13f8.jpg
65d8e5df0c1882723f6f7592ec0d4b13.jpg
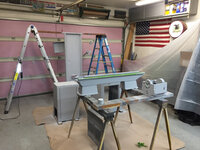
If all goes well I may be able to paint the rest of the machine this weekend.


Sent from my iPhone using Tapatalk
 

Attachments

  • 56d12a040f8ba1c80758f5d374d4e34a.jpg
    56d12a040f8ba1c80758f5d374d4e34a.jpg
    785.6 KB · Views: 3
  • 247bb3c8964a03a7aad49d732e34d58d.jpg
    247bb3c8964a03a7aad49d732e34d58d.jpg
    779.6 KB · Views: 3
  • 65d8e5df0c1882723f6f7592ec0d4b13.jpg
    65d8e5df0c1882723f6f7592ec0d4b13.jpg
    803.7 KB · Views: 3
  • 75ed5569ccfdf6e67043b4920a1c6604.jpg
    75ed5569ccfdf6e67043b4920a1c6604.jpg
    735.7 KB · Views: 3
  • f3a477d70ccb1860ddd740e8fd305719.jpg
    f3a477d70ccb1860ddd740e8fd305719.jpg
    792.1 KB · Views: 3
  • e8fb4ce153cf25ebd95f3f3b183de2c3.jpg
    e8fb4ce153cf25ebd95f3f3b183de2c3.jpg
    663.4 KB · Views: 3
  • 7b23d86e5ae44f68ba1d74d2e23dcc41.jpg
    7b23d86e5ae44f68ba1d74d2e23dcc41.jpg
    724.5 KB · Views: 4
  • c7a368e850bd2611c18b45f5b5fd13f8.jpg
    c7a368e850bd2611c18b45f5b5fd13f8.jpg
    880 KB · Views: 4
To avoid these ads, REGISTER NOW!
OP
C

Cahark

Well-known member
Joined
Sep 28, 2016
Messages
340
Location
Dayton,Oh
Love the write up. I have a 6300 and love it! Clausing 'used to' make some good lathes


This lathe never cut "right" before I went through it. (Im starting to find some of the reasons why. I'm really hoping for an excellent machine after all of this. It's hard to come home from running top notch equipment at work to machines that don't function as they should at the house Haha.


Sent from my iPhone using Tapatalk
 
OP
C

Cahark

Well-known member
Joined
Sep 28, 2016
Messages
340
Location
Dayton,Oh
Got home from work around 4:30. Kicked **** until around 10:30-11.
First, I started to remove the under drive unit. My goal was to remove it as a complete unit, but I did have to remove a few linkages and parts.
97a7fd50b298890c8d771b24be535e98.jpg2219541b828696bb6461cfc5e39e711d.jpg07ee158f7e3354c9731969dbbe7ff083.jpg
My plan is to work on the under drive while the paint on the main cabinet cures over the next week or so.
A friend of mine offered his help to start wire and flap wheeling the cabinet. After about 3 hours, we were able to strip off most of the paint from the bed and the cabinet.
eacdeb4956c8b85a73d9731c09b98d99.jpg6a068738f0dcf41dd3660d2da744b0b8.jpg58fb7bfbd133fe655aace79e7055cade.jpg
The goal for tomarow is to set up a temporary paint area, clean up the prepped metal, tape off the areas needed and spray the rest of the machine. That will allow me to start to clean the underdrive and assemble the sub assemblies through the week.


Sent from my iPhone using Tapatalk
 

Attachments

  • 07ee158f7e3354c9731969dbbe7ff083.jpg
    07ee158f7e3354c9731969dbbe7ff083.jpg
    780.1 KB · Views: 5
  • eacdeb4956c8b85a73d9731c09b98d99.jpg
    eacdeb4956c8b85a73d9731c09b98d99.jpg
    790.6 KB · Views: 4
  • 6a068738f0dcf41dd3660d2da744b0b8.jpg
    6a068738f0dcf41dd3660d2da744b0b8.jpg
    780.5 KB · Views: 4
  • 58fb7bfbd133fe655aace79e7055cade.jpg
    58fb7bfbd133fe655aace79e7055cade.jpg
    815.4 KB · Views: 3
  • 97a7fd50b298890c8d771b24be535e98.jpg
    97a7fd50b298890c8d771b24be535e98.jpg
    809.8 KB · Views: 3
  • 2219541b828696bb6461cfc5e39e711d.jpg
    2219541b828696bb6461cfc5e39e711d.jpg
    831.6 KB · Views: 3
OP
C

Cahark

Well-known member
Joined
Sep 28, 2016
Messages
340
Location
Dayton,Oh
Great project!


Thanks. It's been a busy one! I'll be glad to have a break for a week or two when this ones done. Taping off at the momente53f1e908b590036806bc2aac6138771.jpg


Sent from my iPhone using Tapatalk
 

Attachments

  • e53f1e908b590036806bc2aac6138771.jpg
    e53f1e908b590036806bc2aac6138771.jpg
    820.4 KB · Views: 10

cgrutt

Well-known member
Joined
Mar 4, 2016
Messages
8,200
Coming out great man, one more question, how are you managing moving the heavy parts? Do you have a helper or are you doing this on your own? I took another look at my machine yesterday and had second thoughts about dismantling it on my own, LOL...
 
OP
C

Cahark

Well-known member
Joined
Sep 28, 2016
Messages
340
Location
Dayton,Oh
Coming out great man, one more question, how are you managing moving the heavy parts? Do you have a helper or are you doing this on your own? I took another look at my machine yesterday and had second thoughts about dismantling it on my own, LOL...


A few years ago I made some leveling feet/risers for the Lathe. They allowed me for one to level the machine on my uneven floor, and also to get it just high enough that I can put my pallet jack underneath the machine to move it as one piece. As far as moving the machine when it's dismantled, I have been able to move each piece on my own including the bed. It's definitely great to have a helper around though. It's funny that you ask that, I was thinking to myself today that if I ever moved into a different home and moved my machine shop to the basement, I would have no problem dismantling the lathe and moving it with a helper down a set of stairs. But to answer your question, as long as you are able bodied, you should be able to move everything by yourself. But I would recommend a helper.


Sent from my iPhone using Tapatalk
 

MBfreak

MEMBER EMERITUS
Joined
Dec 10, 2010
Messages
2,301
Location
Linkoping , Sweden
Really great job and good write up.
Thanks a lot, always comforting to see that there are others out there like me who can spend 3 months restoring an old tool!!
And end up with a good lathe, far better than the poor quality machines sold today that can do at least drilling, milling and turning but all at a horrible quality.

Keep it up.
Attach a pic of my affliction. 3 ton soviet era lathe , wonderful quality.

Ola
 

Attachments

  • mini-BoE med Profila på hjul.JPG
    mini-BoE med Profila på hjul.JPG
    102.8 KB · Views: 139
OP
C

Cahark

Well-known member
Joined
Sep 28, 2016
Messages
340
Location
Dayton,Oh
Great work on the lathe, I keep telling myself I want to pick up a lathe some day, not sure I'd want to restore it though.


I was on the fence about going through mine for a few years. The llathe wasn't giving me the results that I was expecting. At that point I felt that there was significant work that needed to be done on the machine to fix the problems that I had. I figured if I was going to get that far into it I might as well put on a coat of paint haha.


Sent from my iPhone using Tapatalk
 

cgrutt

Well-known member
Joined
Mar 4, 2016
Messages
8,200
A few years ago I made some leveling feet/risers for the Lathe. They allowed me for one to level the machine on my uneven floor, and also to get it just high enough that I can put my pallet jack underneath the machine to move it as one piece. As far as moving the machine when it's dismantled, I have been able to move each piece on my own including the bed. It's definitely great to have a helper around though. It's funny that you ask that, I was thinking to myself today that if I ever moved into a different home and moved my machine shop to the basement, I would have no problem dismantling the lathe and moving it with a helper down a set of stairs. But to answer your question, as long as you are able bodied, you should be able to move everything by yourself. But I would recommend a helper.


Sent from my iPhone using Tapatalk

Thanks, my machine is also on a caster platform that allows me to move it within garage. I don't think I'd be able to remove bed even with a helper without some sort of come-a-long or engine hoist. I think my machine is a little bit bigger than yours though. Thanks and good luck with restoration, it's coming out great!
 
OP
C

Cahark

Well-known member
Joined
Sep 28, 2016
Messages
340
Location
Dayton,Oh
Thanks, my machine is also on a caster platform that allows me to move it within garage. I don't think I'd be able to remove bed even with a helper without some sort of come-a-long or engine hoist. I think my machine is a little bit bigger than yours though. Thanks and good luck with restoration, it's coming out great!


I totally recognize the need for portability. My small garage dictates that almost everything must be on casters. I try to leave my lathe rigidly mounted to the floor as much as possible. It needs to be precision leveled and aligned to achieve accuracy and rigidity. But Sometimes you just have to move the darn thing lol


Sent from my iPhone using Tapatalk
 
OP
C

Cahark

Well-known member
Joined
Sep 28, 2016
Messages
340
Location
Dayton,Oh
Making lots of progress tonight. My friend stoped by again to help me get everything prepped. After about five hours of work I was ready for paint. This is where we are at now87c2c6b3666a4e1694955bc595ffab43.jpg2fa9d1353ca7f0db2967d8c497e6f576.jpg3c6ccab4af94ea951cd14e068a778e54.jpg


Sent from my iPhone using Tapatalk
 

Attachments

  • 2fa9d1353ca7f0db2967d8c497e6f576.jpg
    2fa9d1353ca7f0db2967d8c497e6f576.jpg
    777.1 KB · Views: 9
  • 3c6ccab4af94ea951cd14e068a778e54.jpg
    3c6ccab4af94ea951cd14e068a778e54.jpg
    743 KB · Views: 3
  • 87c2c6b3666a4e1694955bc595ffab43.jpg
    87c2c6b3666a4e1694955bc595ffab43.jpg
    808.3 KB · Views: 3
OP
C

Cahark

Well-known member
Joined
Sep 28, 2016
Messages
340
Location
Dayton,Oh
Really great job and good write up.

Thanks a lot, always comforting to see that there are others out there like me who can spend 3 months restoring an old tool!!

And end up with a good lathe, far better than the poor quality machines sold today that can do at least drilling, milling and turning but all at a horrible quality.


Keep it up.

Attach a pic of my affliction. 3 ton soviet era lathe , wonderful quality.


Ola


That looks like a nice machine. It's 5 times heavier than mine ha ha. I get spoiled running heavy duty lathes at work. Someday I am hoping to have a barn big enough to have a big old Monarch.

You are correct about the quality of old steel. I love old machines!


Sent from my iPhone using Tapatalk
 

cgrutt

Well-known member
Joined
Mar 4, 2016
Messages
8,200
I totally recognize the need for portability. My small garage dictates that almost everything must be on casters. I try to leave my lathe rigidly mounted to the floor as much as possible. It needs to be precision leveled and aligned to achieve accuracy and rigidity. But Sometimes you just have to move the darn thing lol


Sent from my iPhone using Tapatalk

This is the way I bought it. Haven't used it yet, LOL... Agree it has to come off casters...
 

cgrutt

Well-known member
Joined
Mar 4, 2016
Messages
8,200
2fa9d1353ca7f0db2967d8c497e6f576.jpg

So, was that the way it was sprayed or lowered just for the picture, because, well... it's awesome :)
 

Attachments

  • 2fa9d1353ca7f0db2967d8c497e6f576.jpg
    2fa9d1353ca7f0db2967d8c497e6f576.jpg
    131.3 KB · Views: 4
OP
C

Cahark

Well-known member
Joined
Sep 28, 2016
Messages
340
Location
Dayton,Oh
Paint is done! So happy!0788b09299a61a6f0ab841dd7c9aa8fa.jpg
Drying, assembly, and a bit of repair is all that's left
 

Attachments

  • 0788b09299a61a6f0ab841dd7c9aa8fa.jpg
    0788b09299a61a6f0ab841dd7c9aa8fa.jpg
    743 KB · Views: 4
OP
C

Cahark

Well-known member
Joined
Sep 28, 2016
Messages
340
Location
Dayton,Oh
2fa9d1353ca7f0db2967d8c497e6f576.jpg

So, was that the way it was sprayed or lowered just for the picture, because, well... it's awesome :)


I'm sorry, I don't follow. Lower?


Sent from my iPhone using Tapatalk
 

Attachments

  • 2fa9d1353ca7f0db2967d8c497e6f576.jpg
    2fa9d1353ca7f0db2967d8c497e6f576.jpg
    131.3 KB · Views: 3

cgrutt

Well-known member
Joined
Mar 4, 2016
Messages
8,200
No, just looks like the plastic was lowered on the flag for pic, which, I think is Awesome, whether it was or wasn't. Love the pic. No worries...
 
To avoid these ads, REGISTER NOW!
OP
C

Cahark

Well-known member
Joined
Sep 28, 2016
Messages
340
Location
Dayton,Oh
No, just looks like the plastic was lowered on the flag for pic, which, I think is Awesome, whether it was or wasn't. Love the pic. No worries...


Oh I see! Sorry, no it was by accident. I do however try to keep the flag clear at all times.


Sent from my iPhone using Tapatalk
 
OP
C

Cahark

Well-known member
Joined
Sep 28, 2016
Messages
340
Location
Dayton,Oh
After two solid days really kicking some **** out in the garage I decided to take yesterday off to spend time with family and friends, and even go to an auction. The auction was the estate of a JVS machining instructor. He had a little bit of everything. Seems like most of his time went into building garden scale trains. He had an index mill, a Bridgeport mill, a small South Bend 9 inch lathe, a large 12 inch unnamed lathe, and a Hammond surface grinder. It seems like he really did some nice work.

I was lucky enough to purchase a drill press vice that he owned. It looks to be a palmgren. I'm sure I will find the exact model when I take it apart and get it cleaned up.
4dafb15e206cf08d79af5b2e4fa814cf.jpg

He had a lot of other nice items that I tried to bid on, but they ended up going higher than I really wanted. Probably a good thing anyways, truly I have most of what I need already. I just hate to see a good deal walk by.
More work in the garage tonight, my wife picked up some bearings for me on her way home from work.


Sent from my iPhone using Tapatalk
 

Attachments

  • 4dafb15e206cf08d79af5b2e4fa814cf.jpg
    4dafb15e206cf08d79af5b2e4fa814cf.jpg
    823.7 KB · Views: 2
OP
C

Cahark

Well-known member
Joined
Sep 28, 2016
Messages
340
Location
Dayton,Oh
Things are going well in the garage. Slow but sure this evening.

Today's task was to tackle the play in the saddle. As I showed in an earlier post, the saddle had a decent amount of wear due to the bed being hardened, and the saddle being soft cast iron. Not to mention 50 years of use didn't help things much either. When I checked everything out in a dry fit, there didn't seem to be any rocking or the saddle so I decided to work with what I had.

I started off with .012" vertical play in the tight areas and .016 in the loose areas. The difference shows roughly .004" wear in the bed between the head and tailstock.
71ec4b1a95c8cd43e83f7317b278233e.jpg
ab391215c576ccf3275deb5de4c2dbd6.jpg
After I figured out how much slack there was, I installed the gib without the .011 shim.
This brought my slack to .003-.006 roughly.
edf33f051b44062131b54a9ac11dec0c.jpg0ec3cc9303685dde60802aea5811a546.jpg865a169e0fb97fecb92ff56d09357900.jpg
After getting this info, I went to the mill. I lined everything up and milled both surfaces of the gib. I also milled an extra .011 off the mounting surface on a .002 taper to account for wear. so I could re install the existing shim and allow for more adjustment in the future.
206b2d826fbd993b03830afa919363d4.jpg16e421069461054c535b231864943f5d.jpg


Afterwards, I reinstalled everything and checked my progress. I was able to bring everything back pretty close. .0012ish in the front, and roughly .004 in the middle.
a737ce5d73f9c1365402f66119498e3f.jpg631a43f1437f3005f2cb096f1597cbcd.jpg
I know it's not the best practice, but I will use the carriage lock to snugg everything up in the worn areas. Gotta do what you gotta do on old equipment.
6ea4627d4be44aadb4efa33b1114bf6c.jpg
Things are looking better already.


Sent from my iPhone using Tapatalk
 

Attachments

  • 0ec3cc9303685dde60802aea5811a546.jpg
    0ec3cc9303685dde60802aea5811a546.jpg
    722 KB · Views: 3
  • ab391215c576ccf3275deb5de4c2dbd6.jpg
    ab391215c576ccf3275deb5de4c2dbd6.jpg
    696.4 KB · Views: 3
  • 71ec4b1a95c8cd43e83f7317b278233e.jpg
    71ec4b1a95c8cd43e83f7317b278233e.jpg
    708.5 KB · Views: 3
  • 865a169e0fb97fecb92ff56d09357900.jpg
    865a169e0fb97fecb92ff56d09357900.jpg
    645.9 KB · Views: 3
  • 206b2d826fbd993b03830afa919363d4.jpg
    206b2d826fbd993b03830afa919363d4.jpg
    704.5 KB · Views: 2
  • 16e421069461054c535b231864943f5d.jpg
    16e421069461054c535b231864943f5d.jpg
    818.7 KB · Views: 2
  • edf33f051b44062131b54a9ac11dec0c.jpg
    edf33f051b44062131b54a9ac11dec0c.jpg
    741.4 KB · Views: 3
  • 6ea4627d4be44aadb4efa33b1114bf6c.jpg
    6ea4627d4be44aadb4efa33b1114bf6c.jpg
    810.9 KB · Views: 3
  • 631a43f1437f3005f2cb096f1597cbcd.jpg
    631a43f1437f3005f2cb096f1597cbcd.jpg
    671.6 KB · Views: 3
  • a737ce5d73f9c1365402f66119498e3f.jpg
    a737ce5d73f9c1365402f66119498e3f.jpg
    719.6 KB · Views: 4
OP
C

Cahark

Well-known member
Joined
Sep 28, 2016
Messages
340
Location
Dayton,Oh
Looking great!

Do you have a model/color # on that rust-oleum industrial enamel and clear you used? I'd like to use that for some equipment now after seeing how well it came out of a can for you, especially in winter!

https://www.amazon.com/dp/B003UNEE7E/?tag=atomicindus08-20

This? (Says high performance not indstural so not sure)


This is what I use. 4.99 a can at menards. Dark machine gray. Afterwards I use the crystal clear enamel by rust oleum.

I do one coat primer, 2 coats color, 2 coats clear.
1 coat per hour when cold, 2 coats per hour above 65.

https://www.amazon.com/dp/B000LNQ9L0/?tag=atomicindus08-20

May not be the scientific way, but it's worked pretty well for the past year or so on my projects.


Sent from my iPhone using Tapatalk
 

ToddW

Well-known member
Joined
Sep 18, 2009
Messages
229
Location
In the snow
Thanks! Always looking for different paint to try.

For reference, your pictures you've posted is that the gloss crystal clear enamel sprayed on already or just the dark machine gray? And which primer do you use?

I got some really expensive self-etching primer that when you touched it with your nail would flake off really pissed me off, it wasn't self etching at all.
 
OP
C

Cahark

Well-known member
Joined
Sep 28, 2016
Messages
340
Location
Dayton,Oh
Everything with the dark gray already has the crystal clear enamel on it. The gloss looks slightly better in person. It's easy to apply, dries fast and is very smooth to the touch.
I recognize that the clear is is a bit overkill, but I like the extra layer of protection and the easy to clean surface.
When I'm cleaning the castings before paint I tend to use a flap wheel instead of a wire wheel in the areas that I want to be nice and smooth. The flap wheel usually doesn't pull out body filler or lead filler that the manufacturer may have used. Plus it smooths out rough casting marks while you are at it.
I use this primer.
fa835a224af61f5b59861e5c2f8d69f9.jpg
I cannot attest to this for the long term, but it's worked well for a year now, and seems to harden well. They also sell it in a gallon if you wish to use an HVLP.


Sent from my iPhone using Tapatalk
 

Attachments

  • fa835a224af61f5b59861e5c2f8d69f9.jpg
    fa835a224af61f5b59861e5c2f8d69f9.jpg
    20.2 KB · Views: 4
OP
C

Cahark

Well-known member
Joined
Sep 28, 2016
Messages
340
Location
Dayton,Oh
Came in the house for dinner, thought I'd give a little bit of an update. I started to install the bearings that hold the cross side screw to the taper attachment. You could tell that they were very worn and "clicked" when you turned the shaft.

As I gathered my things to start installing them, I remembered some tools I made to install arbor bearings on my Unisaw. It turned out to be a perfect fit for this too

bbadfcff5115dad6ae3dca6fc3d37d51.jpg
094c9d65971d12eea6a181adaa96eaa3.jpg
e4a13fa4c6448af886287bf56bea0a47.jpg524d93d54ec22d20de8205fddd0e169c.jpg
After I got the bearings on, I placed everything in the carrier. The brass plug under the set screw was missing, so I took this chance to cut a new one.
450d53190485d425c8f13c8f9a2e88fc.jpg
It feels as good as new now. Hopefully I will have some more progress after dinner.


Sent from my iPhone using Tapatalk
 

Attachments

  • 450d53190485d425c8f13c8f9a2e88fc.jpg
    450d53190485d425c8f13c8f9a2e88fc.jpg
    728.3 KB · Views: 4
  • 524d93d54ec22d20de8205fddd0e169c.jpg
    524d93d54ec22d20de8205fddd0e169c.jpg
    798.6 KB · Views: 4
  • e4a13fa4c6448af886287bf56bea0a47.jpg
    e4a13fa4c6448af886287bf56bea0a47.jpg
    746.1 KB · Views: 2
  • 094c9d65971d12eea6a181adaa96eaa3.jpg
    094c9d65971d12eea6a181adaa96eaa3.jpg
    810.2 KB · Views: 2
  • bbadfcff5115dad6ae3dca6fc3d37d51.jpg
    bbadfcff5115dad6ae3dca6fc3d37d51.jpg
    813.8 KB · Views: 2
OP
C

Cahark

Well-known member
Joined
Sep 28, 2016
Messages
340
Location
Dayton,Oh
Got another hour and a half into it tonight. Taking it easy through the week. I was able to get the cross slide on. It's mostly adjusted, but I still need to get the taper attachment on.
0fcc70f5d50d2606a83ded801595785f.jpg
I also filled the oil in the apron to make sure there were no leaks on my new gasket. Last thing I want is to have to remove it from the lathe and fix a bad gasket.
e2b96eb36406f70a9388410be0f94e9d.jpg
I also picked up a few thumb screws from McMaster Carr. They are a touch big, but I like the extra leverage. I also went ahead and cut some new brass plugs because again, somebody lost them within the last 50 years.
0ff68430d4d99296cd2d85af9e999d6d.jpg
Tomorrow, I have a friend stopping by to help me mount the cabinet, and the bed.


Sent from my iPhone using Tapatalk
 

Attachments

  • 0fcc70f5d50d2606a83ded801595785f.jpg
    0fcc70f5d50d2606a83ded801595785f.jpg
    718.7 KB · Views: 2
  • 0ff68430d4d99296cd2d85af9e999d6d.jpg
    0ff68430d4d99296cd2d85af9e999d6d.jpg
    651.1 KB · Views: 2
  • e2b96eb36406f70a9388410be0f94e9d.jpg
    e2b96eb36406f70a9388410be0f94e9d.jpg
    704.9 KB · Views: 2
OP
C

Cahark

Well-known member
Joined
Sep 28, 2016
Messages
340
Location
Dayton,Oh
Tonight My time for the lathe was short. I started by setting up the idler pulley in the lathe and trued up the grooves that the belts wore into it. It was also slightly out of concentricity with the bearings. If I left it that way, it would cause excessive wear and vibration.
eaba1818aa7bb02a78fd901fdae02111.jpg
eda52de2f4b412efacd208c520213889.jpg
It turned out pretty well, especially after I installed the new bearings.

Next up, I had a friend stop over to help me put the cabinets together, along with the leveling feet. Once the cabinet was roughly level, I was able to install the bed.
b825fb1cc9440052adceee13cde61a48.jpgb0cf414b2fae72b2afd0e8ff774ed5c1.jpg
Last, I put on the compound. Didn't take any pictures of it because I figured it was pretty straight forward.

Tomorrow I'm hoping to have the carriage fully assembled, and possibly move on to the quick change gearbox.


Sent from my iPhone using Tapatalk
 

Attachments

  • b0cf414b2fae72b2afd0e8ff774ed5c1.jpg
    b0cf414b2fae72b2afd0e8ff774ed5c1.jpg
    801.1 KB · Views: 2
  • b825fb1cc9440052adceee13cde61a48.jpg
    b825fb1cc9440052adceee13cde61a48.jpg
    815 KB · Views: 1
  • eda52de2f4b412efacd208c520213889.jpg
    eda52de2f4b412efacd208c520213889.jpg
    725.2 KB · Views: 4
  • eaba1818aa7bb02a78fd901fdae02111.jpg
    eaba1818aa7bb02a78fd901fdae02111.jpg
    832.8 KB · Views: 2
OP
C

Cahark

Well-known member
Joined
Sep 28, 2016
Messages
340
Location
Dayton,Oh
Yet another busy day on the Clausing lathe. I started the day off with mounting the apron on to the Saddle, and then moved on to installing the taper attachment. It truly went beautifully. With everything being cleaned and fitted properly, it went together Like a well oiled machine.
356f573f52053b8cfc3cc138b5960bdb.jpg
After that I proceeded to adjust the taper attachment so there was as little play as possible. I also adjusted the cross slide Gibbs. Everything is very tight, and there is only about .008" backlash in the crossfeed.
I could probably make this number even smaller if I add a Gibb and some set screws to the piece that travels along with taper attachment. I had noticed that this is the way a similar model was made via the assembly drawings. (Maybe in the future)
d6ce44584ae3a731380dcc65d493f1c0.jpg
After that, I decided to install the lead screw and the quickchange gearbox. As I stepped back to take a couple pictures I realized that the lead screw was on a slight angle slanting down towards the tailstock end of the machine. I had remembered seeing that there was supposed to be a shim between the bed and the gearbox in the assembly drawing. When I tore down my machine there was no shim there. Go figure.... at this point, I loosened up the gearbox to drop it down so I could determine how big of a shim I needed to make the lead screw parallel with the bed. Also, to doublecheck myself I measured from the bottom of the bed to the centerline of the lead screw hole in the apron. this gave me a difference of about 1/16". Tomorrow I will cut out a few shims around that size and determine the exact fit that I need.
80e682b5d8b2d0a40f3570351f568e6b.jpg
b9b28fc5db46be7867c2d5fd90ef9dad.jpg
If all goes well I'm really hoping to turn some parts over the weekend or early next week.


Sent from my iPhone using Tapatalk
 

Attachments

  • b9b28fc5db46be7867c2d5fd90ef9dad.jpg
    b9b28fc5db46be7867c2d5fd90ef9dad.jpg
    795 KB · Views: 2
  • 80e682b5d8b2d0a40f3570351f568e6b.jpg
    80e682b5d8b2d0a40f3570351f568e6b.jpg
    783.4 KB · Views: 3
  • d6ce44584ae3a731380dcc65d493f1c0.jpg
    d6ce44584ae3a731380dcc65d493f1c0.jpg
    807.4 KB · Views: 3
  • 356f573f52053b8cfc3cc138b5960bdb.jpg
    356f573f52053b8cfc3cc138b5960bdb.jpg
    769.4 KB · Views: 3
OP
C

Cahark

Well-known member
Joined
Sep 28, 2016
Messages
340
Location
Dayton,Oh
Started the day making shims. The quick change gearbox needed to be lowered about 1/16" to line everything up. Now that it's where it should be, the lead screw is nice and parallel.
8d497fdcb75aa866654af24686af952c.jpg
14ede190fbc470c230fa41c1d675295c.jpg
After I finished the quick change, I moved on to the spindle. I ended up using the same puller setup that I used to remove the spindle, to install it. Worked out great.
720aedab74c73dfc4eb235e6ad1a0c72.jpg
I made sure that everything was spotless before I finished putting it all together. I adjusted the spindle as the manual described "one full spin after a sharp spin by hand". I placed an indicator on the face of the spindle and there was essentially zero movement.
7fd303ccf11a3f31b30991a8dc54c9b4.jpg501cce3b08132d0e486353c169f9f0da.jpg
Now don't get too excited, but I decided to lay the headstock on the ways. I didn't get anything locked down yet, but i should be able to finish it up in the morning.
Done for the night. Electric and under drive Saturday.


Sent from my iPhone using Tapatalk
 

Attachments

  • 501cce3b08132d0e486353c169f9f0da.jpg
    501cce3b08132d0e486353c169f9f0da.jpg
    793.1 KB · Views: 2
  • 7fd303ccf11a3f31b30991a8dc54c9b4.jpg
    7fd303ccf11a3f31b30991a8dc54c9b4.jpg
    787.9 KB · Views: 1
  • 720aedab74c73dfc4eb235e6ad1a0c72.jpg
    720aedab74c73dfc4eb235e6ad1a0c72.jpg
    738.3 KB · Views: 1
  • 14ede190fbc470c230fa41c1d675295c.jpg
    14ede190fbc470c230fa41c1d675295c.jpg
    646.8 KB · Views: 1
  • 8d497fdcb75aa866654af24686af952c.jpg
    8d497fdcb75aa866654af24686af952c.jpg
    770.2 KB · Views: 2
OP
C

Cahark

Well-known member
Joined
Sep 28, 2016
Messages
340
Location
Dayton,Oh
Starting off the day picking up supplies. Number one on my list is a new set of knobs for my machine, and propane. It's going to be 17 today. 9eec9cfc2f6e4edaa6c2b2458230a063.jpg
424a94ffa0db879f2417f65de19a22b8.jpg


Sent from my iPhone using Tapatalk
 

Attachments

  • 424a94ffa0db879f2417f65de19a22b8.jpg
    424a94ffa0db879f2417f65de19a22b8.jpg
    694.1 KB · Views: 3
  • 9eec9cfc2f6e4edaa6c2b2458230a063.jpg
    9eec9cfc2f6e4edaa6c2b2458230a063.jpg
    726.2 KB · Views: 4
OP
C

Cahark

Well-known member
Joined
Sep 28, 2016
Messages
340
Location
Dayton,Oh
Today is going a little bit slower than I had expected, but it looks like I will have everything finished except for the underdrive today. I went ahead and set the mesh on the banjo gears. It's much quieter now that there is no crud down in the grooves of the gears. They glide along just like they should. I also made sure to actually tighten down the headstock this time. In case you missed it, the previous owner missed that important detail.
51ebdcc1b5f4ce0ef287d3de1930ee93.jpg


Sent from my iPhone using Tapatalk
 

Attachments

  • 51ebdcc1b5f4ce0ef287d3de1930ee93.jpg
    51ebdcc1b5f4ce0ef287d3de1930ee93.jpg
    778.6 KB · Views: 4

sanddan

Well-known member
Joined
Jul 7, 2005
Messages
708
Location
Oregon
Just found this build, excellent work done so far. Looking forward to the rest of the updates.

Like the hammer in the last pic.
 
OP
C

Cahark

Well-known member
Joined
Sep 28, 2016
Messages
340
Location
Dayton,Oh
Just found this build, excellent work done so far. Looking forward to the rest of the updates.


Like the hammer in the last pic.


Thanks a lot. It's a lixie. I pretty sure nearly every machinist in the USA has a couple different sizes of them in their roll around. They are my favorite.


Sent from my iPhone using Tapatalk
 
To avoid these ads, REGISTER NOW!
Top Bottom