You are using an out of date browser. It may not display this or other websites correctly.
You should upgrade or use an alternative browser.
You should upgrade or use an alternative browser.
Above 1200 Sq/FT Cleaning Up My Shop
- Thread starter oldironfarmer
- Start date
Wokspaces above 1200 squarefeet.
drivesitfar
Well-known member
Andy: the guys making commercials could learn a thing from you and sell just about anything by showing how much a guy that is well into his 6th decade can get done in a day (ANY DAY).
I'm not sure how hard it is to pop out all your 3D foam molds, but I bet your little computer and 3D printer are working almost as hard as you are.
keep up the great work and always good to see what a guy with a few tools and a lot of energy can get done in a day.
can you really cut an old fire extinguisher in half and make a decent new (slightly used) crucible so you can shelve your slightly used one that you made as your first one?
hope you have some fun and get something done today as i'm hoping to do the same.
i'm not sure if Hershey is scratching her back or just happy, but our daughter's dog does something similar when he's visiting while they are out of the country. the only thing is our cat (CLEO) doesn't like him in her domain so she lays on his bed when he's gone to let him know it's her house.
cheers
Attachments
![WP_20170415_003[30317].jpg](/forum/data/attachments/708/708790-529bd94169b161d41167e176869abeb3.jpg)
OP
oldironfarmer
Well-known member
Andy, I'm amazed!
Can be as a crucible, you can use the case from a carbon dioxide fire extinguisher? In Russia there is such fire extinguishers are called OU-2

Maybe in the US there are similar.
Thank you, Vladimir!
Most fire extinguishers are extruded aluminum. Not a good material to melt aluminum in.
 And the steel ones are very thin. There are lots of videos on YouTube of guys making crucibles from fire extinguishers, but for the most part they are short lived.
I have made a few things on my 3D mill, the printer only uses PLA and ABS plastic, they don't vaporize like foam. However I cut my foam with a hot wire, knife, and sandpaper to make most everything.Andy: the guys making commercials could learn a thing from you and sell just about anything by showing how much a guy that is well into his 6th decade can get done in a day (ANY DAY).
I'm not sure how hard it is to pop out all your 3D foam molds, but I bet your little computer and 3D printer are working almost as hard as you are.
keep up the great work and always good to see what a guy with a few tools and a lot of energy can get done in a day.
can you really cut an old fire extinguisher in half and make a decent new (slightly used) crucible so you can shelve your slightly used one that you made as your first one?
hope you have some fun and get something done today as i'm hoping to do the same.
i'm not sure if Hershey is scratching her back or just happy, but our daughter's dog does something similar when he's visiting while they are out of the country. the only thing is our cat (CLEO) doesn't like him in her domain so she lays on his bed when he's gone to let him know it's her house.
cheers
Hershey was just lying there, doing canineyoga I believe.
Don't cross Cleo.
Craptain
Well-known member
Andy, the fire extinguisher may not make a crucible, but it can be a source of CO2 for curing the mold. I have seen more than one "home shop" using them. Though I think a proper tank of CO2 might be cheaper in the long run.
Sent from my SM-G930T using Tapatalk
Sent from my SM-G930T using Tapatalk
OP
oldironfarmer
Well-known member
Andy, the fire extinguisher may not make a crucible, but it can be a source of CO2 for curing the mold. I have seen more than one "home shop" using them. Though I think a proper tank of CO2 might be cheaper in the long run.
Sent from my SM-G930T using Tapatalk
Maybe if you can buy an old extinguisher at a garage sale for a dollar, with CO2 still in it. However, I can make a lot of CO2 with a dollar's worth of baking soda and a half dollar's worth of vinegar. Plus it never ever leaks out.

jblnut
ALLIANCE MEMBER
Boy if I could figure out how to capture it and send it your way I have 46,000 little CO2 factories in the barn that could supply you with more than you'd ever need
OP
oldironfarmer
Well-known member
Boy if I could figure out how to capture it and send it your way I have 46,000 little CO2 factories in the barn that could supply you with more than you'd ever need
Not a reliable source. When the Green New Deal takes over and we're all walking between home and work any production of methane or CO2 will have to be enclosed (you have a start) and all those unnatural vapors must be captured and sequestered.
Good news is inspectors can't fly between locations so we'll have to rely on neighborhood snitches doing their patriotic duty. We can form groups of workers for the common good...
RickP
Well-known member
I appreciate the kind words.
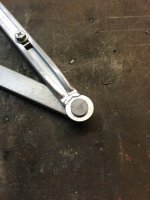
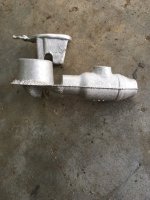
The problem with threading the aluminum is that the angle changes as the arms move. I thought about threading one side with a button head on a bolt pushing on the other side (it could slide) but I couldn't see an easy way to keep it in contact, to keep the clamp from closing on it's own.
Gotcha - now it makes sense to me. I didn't understand how the hinge nuts worked. Thanks for photos and explanation!
The assembled clamp looks really nice, and the threaded bolts should do the trick for adjusting it. I'm also constantly amazed at how long all the little steps take.
The nuclear fire will kill us all first.Not a reliable source. When the Green New Deal takes over and we're all walking between home and work any production of methane or CO2 will have to be enclosed (you have a start) and all those unnatural vapors must be captured and sequestered.
Good news is inspectors can't fly between locations so we'll have to rely on neighborhood snitches doing their patriotic duty. We can form groups of workers for the common good...
Farmall450
Well-known member
Not a reliable source. When the Green New Deal takes over and we're all walking between home and work any production of methane or CO2 will have to be enclosed (you have a start) and all those unnatural vapors must be captured and sequestered.
Good news is inspectors can't fly between locations so we'll have to rely on neighborhood snitches doing their patriotic duty. We can form groups of workers for the common good...
After each household cuts a check for ~$600K for the same patriotic duty.
OP
oldironfarmer
Well-known member
Gotcha - now it makes sense to me. I didn't understand how the hinge nuts worked. Thanks for photos and explanation!
The assembled clamp looks really nice, and the threaded bolts should do the trick for adjusting it. I'm also constantly amazed at how long all the little steps take.
Thanks! I'm clamping a couple of square inches with it each day. Making progress. I do have to make sure it is square to the surface, however. I had it laid over a bit and it twisted on tightening. No damage, though. I did cast two feet for the jaws.
The nuclear fire will kill us all first.
I'll bring weenies.
After each household cuts a check for ~$600K for the same patriotic duty.
Only those who can afford to, of course.
This discussion could turn political so we best let it be. Everyone has done a good job being neutral, however.
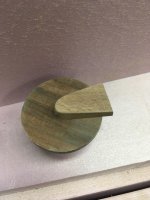
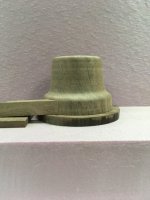
I'm learning new casting techniques. One was I learned the best transition from sprue to runner is a smooth curve, not a settling basin like I've been using:
I came up with a three piece design.
Bottom piece goes in the drag, other two nest in the cope. When the cope and drag are separated the long piece can be pulled up out of the cope and the short piece can be pulled down.
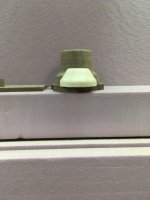
They are small and not doweled so the idea is to hold them with one hand and pack sand around to hold them in place with the other hand. Here's the bottom piece in an empty drag.
When that's filled and flipped over it is flush with the sand and I'm holding the next two pieces ready to hold them in place with sand.
Came out so
Thanks for stopping by!
Attachments


Growlertdi
Well-known member
Wow, that latest Burner head casting looks AMAZING, even in its raw un-machined form, I wish I had a use for one just to add another AWM piece to my collection of Broom and aluminum hammer
gman007
Well-known member
Came out so

!
Andy
I have to correct your last sentence:
"Came out so" GREAT!
Great job!

drivesitfar
Well-known member
Andy: it looks like your new idea (or idea you copied or got from one of your casting friends) worked great!!
so since you are planning on making a new crucible any plans to make it bigger and maybe a bigger forge/furnace or is that size about right for you?
snowing here now so officially weird weather season cause supposed to be mid 40's and low 50's tomorrow.
have a great day and i'm pretty sure i will too.
cheers
don long
Well-known member
just checking in to see what fine things you have have been casting lately
My plans have just changed again and it looks like it will be a couple of weeks before I can come out but for sure I'm coming soon
Don
My plans have just changed again and it looks like it will be a couple of weeks before I can come out but for sure I'm coming soon
Don
Last edited:
OP
oldironfarmer
Well-known member
Wow, that latest Burner head casting looks AMAZING, even in its raw un-machined form, I wish I had a use for one just to add another AWM piece to my collection of Broom and aluminum hammer
Thanks! I'll send yo one if you like.
Andy
I have to correct your last sentence:
"Came out so" GREAT!
Great job!
Thanks!!
Andy: it looks like your new idea (or idea you copied or got from one of your casting friends) worked great!!
so since you are planning on making a new crucible any plans to make it bigger and maybe a bigger forge/furnace or is that size about right for you?
snowing here now so officially weird weather season cause supposed to be mid 40's and low 50's tomorrow.
have a great day and i'm pretty sure i will too.
cheers
Same size crucible for now. Mainly because I have pipe that size and it's tall enough.
Had a great day, almost 70F here today.
just checking in to see what fine things you have have been casting lately
My plans have just changed again and it looks like it will be a couple of weeks before I can come out but for sure I'm coming soon
Don
Trying to cast a sunder.
We're flexible and really looking forward to your visit.
1/2 Cup
Member Emeritus
Andy I am just catching up on your thread.
Great work as always, learning sharing all the time.
Great work as always, learning sharing all the time.
shortykorte
Well-known member
Andy, let me know when Don is coming out to your place so I can go to his and safety check the Vette. Shhh mums the word ok.
Sent from my iPhone using The Garage Journal mobile app
Sent from my iPhone using The Garage Journal mobile app
jimreed2160
Well-known member
Pretty snappy casting for a cow farmer. You are looking good, Andy. Keep it up.
Guster
Well-known member
That is a lot of copper! Big job chopping it up and flattening it all to fit in a crucible. Great job for a flypress methinks. 
Good to see how that crucible stood up. Mine will last a long time if that one survived that many charges. The long reach clamp should work wonders with those feet on it. You can get replacement pads for those Stanley quick clamps that would be easy to make clamp feet for! Otherwise some HDPE furniture ‘feet’ stuck to the alloy would be a great alternative. Knobs like that is another good reason why I want to cast my own stuff.
The new sprue looks like it worked a treat.
Should be easy to add some pins to help hold the pattern parts together. Alternatively use a splitting plate which is just a sheet of metal with a hole in it to hold the full sprue pattern and removed when flipped over. The often use them for patterns that can’t be split, already have a split line it can index on or holds an asymmetric core mold. Moulding table would need clearance too but even that can be a sheet of styrofoam with a hole in it or something. Just ideas...
OP
oldironfarmer
Well-known member
Andy I am just catching up on your thread.
Great work as always, learning sharing all the time.
Thanks, Steve. I hope you're finally on the mend, for real!
Andy, let me know when Don is coming out to your place so I can go to his and safety check the Vette. Shhh mums the word ok.
Sent from my iPhone using The Garage Journal mobile app
Ok, I'll try to help, but when he sees the blood he'll know it was you.
Pretty snappy casting for a cow farmer. You are looking good, Andy. Keep it up.
Thanks, Jim, I'm having a great time melting metal.
That is a lot of copper! Big job chopping it up and flattening it all to fit in a crucible. Great job for a flypress methinks.
I'll probably take the lazy man's way out, and just feed long pieces into the crucible. They just sink away.
Good to see how that crucible stood up. Mine will last a long time if that one survived that many charges. The long reach clamp should work wonders with those feet on it. You can get replacement pads for those Stanley quick clamps that would be easy to make clamp feet for! Otherwise some HDPE furniture ‘feet’ stuck to the alloy would be a great alternative. Knobs like that is another good reason why I want to cast my own stuff.
The crucible has lasted well. I have another four heats on it. No leaks, even though water leaked. I really need to take the time to put another one together.
The new sprue looks like it worked a treat.
Should be easy to add some pins to help hold the pattern parts together. Alternatively use a splitting plate which is just a sheet of metal with a hole in it to hold the full sprue pattern and removed when flipped over. The often use them for patterns that can’t be split, already have a split line it can index on or holds an asymmetric core mold. Moulding table would need clearance too but even that can be a sheet of styrofoam with a hole in it or something. Just ideas...
Great idea, thanks!
Thanks for the visits, guys. I've been busy but haven't taken the time to post much. Maybe it's time.
OP
oldironfarmer
Well-known member
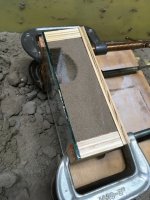
How to make a long tapered cut on a radial arm saw. Start with ten fingers and plan so you keep them.
Without the work in place I bring the saw blade out and line it up with a loose piece of wood, foreground. The blade will lightly touch that piece. Then push the blade back and sight from the loose piece across the work line to the saw blade. With a corner of the work against the fence, push a wedge between the fence and the work. (Does not show in the picture)

While holding the work firmly make the cut

Cut is about 1/32" off on the near end but it will work.
Don't try this at home without adult supervision, kids.
Without the work in place I bring the saw blade out and line it up with a loose piece of wood, foreground. The blade will lightly touch that piece. Then push the blade back and sight from the loose piece across the work line to the saw blade. With a corner of the work against the fence, push a wedge between the fence and the work. (Does not show in the picture)
While holding the work firmly make the cut
Cut is about 1/32" off on the near end but it will work.
Don't try this at home without adult supervision, kids.
Attachments

OP
oldironfarmer
Well-known member
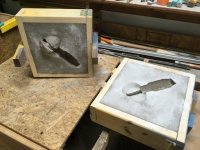
Open ended pour.
Patterns in the flask. This doesn't look good.

That pattern is too close to the edge. The new 90 degree runner is blocked up temporarily to hold it level. After ramming sand in, it was flipped over and sand scooped out to make an offset parting line.

Here is the offset parting line after the cope has been rammed. (pattern in in correct location here)

And a short video...
This was done in order to estimate the fluid flow rate through the sprue and runner system. About 35 inches/sec calculated by timing the video and weighing the amount of aluminum which passed through in that time.
The other pattern poured with the small runner

It had no riser to feed the pattern and had a major shrink defect, which was expected.

But, hey! Look at that nice finish!
Patterns in the flask. This doesn't look good.
That pattern is too close to the edge. The new 90 degree runner is blocked up temporarily to hold it level. After ramming sand in, it was flipped over and sand scooped out to make an offset parting line.
Here is the offset parting line after the cope has been rammed. (pattern in in correct location here)
And a short video...
This was done in order to estimate the fluid flow rate through the sprue and runner system. About 35 inches/sec calculated by timing the video and weighing the amount of aluminum which passed through in that time.
The other pattern poured with the small runner
It had no riser to feed the pattern and had a major shrink defect, which was expected.
But, hey! Look at that nice finish!
Attachments

OP
oldironfarmer
Well-known member
Next pour is the same pattern, same sprue and runner, but with an open riser and large gate going into the pattern. When I saw the metal rise in the riser I quit pouring and let the basin drain into a groove on top of the cope.

Excellent casting, the only shrinkage was at the top of the riser.

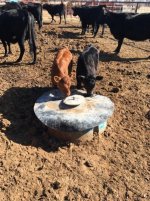
In other news, baby calves are cute and curious

Cut the clamp feet off and faced them

Before and after

Excellent casting, the only shrinkage was at the top of the riser.
In other news, baby calves are cute and curious
Cut the clamp feet off and faced them
Before and after
Attachments


OP
oldironfarmer
Well-known member
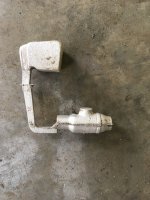
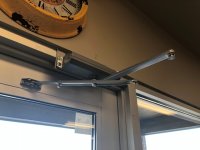
Small job, the pharmacy called looking for a place to buy a new door closure arm. Wind had caught the door.

The eye is broken out on the rod from the door. Stamped sheet metal.
I offered to fix it. Used a 1/4" long piece of 1" sucker rod.

Now we'll find what the second most weak is.
The eye is broken out on the rod from the door. Stamped sheet metal.
I offered to fix it. Used a 1/4" long piece of 1" sucker rod.
Now we'll find what the second most weak is.
Attachments
gman007
Well-known member
Andy
Well done, you are definitely a great student of art and science of continuous improvement. The open riser and large gate was a great idea.
Those calves are cute and curious but now after seeing the photo, I think having an Italian veal Parmesan will be on hold for a while (but not for too long, I like my red meat )
)
Great job on fixing the door closure arm as well
Well done, you are definitely a great student of art and science of continuous improvement
. The open riser and large gate was a great idea.Those calves are cute and curious but now after seeing the photo, I think having an Italian veal Parmesan will be on hold for a while (but not for too long, I like my red meat
)Great job on fixing the door closure arm as well
drivesitfar
Well-known member
ANDY: Nice repair on the door!!
great information on the different style of getting your melted metal into it's desired spots. something you learned from your other forging friends or is this using what they've said with your own knowledge?
your little calves look great and do you name any of them or just call them hamburger or mignon or ??
sawduststeve
Well-known member
Andy, great work all round, I'm learning plenty , thanks, about stuff I never knew I needed to know about. I have some ali I just need to find a fire, although being English, I will have to put the kettle on it first.
I have all ten fingers, but I'm not very good at woodwork,
Have a good week.
Steve
Ps. I have a Briton 121ce if you want it.")
I have all ten fingers, but I'm not very good at woodwork,
Have a good week.
Steve
Ps. I have a Briton 121ce if you want it.
Farmall450
Well-known member
Nice job on the door!
Agreed on next weakest (my guess: where it connects to the door {yikes}).
Agreed on next weakest (my guess: where it connects to the door {yikes}).
OP
oldironfarmer
Well-known member
Andy
Well done, you are definitely a great student of art and science of continuous improvement
Those calves are cute and curious but now after seeing the photo, I think having an Italian veal Parmesan will be on hold for a while (but not for too long, I like my red meat
Great job on fixing the door closure arm as well
I am trying to improve my castings, but I have to admit I learned to hate the term "continuous improvement" in the workplace.
I just keep seeing more little calves in the pasture. Makes me wonder, where do they come from?
ANDY: Nice repair on the door!!
great information on the different style of getting your melted metal into it's desired spots. something you learned from your other forging friends or is this using what they've said with your own knowledge?
your little calves look great and do you name any of them or just call them hamburger or mignon or ??
Thanks, Drives.
The foundry work is a lot of gathering information, then modifying it to fit what you're doing. Some stuff is original.
I started naming all my heifers and cows, and bulls (never the steers) but before I had 100 cows it was too much and went to numbered ear tags. Now I don't care, they live their life, I live mine. I feed them, then I steal their babies and sell them at the auction.
Andy, great work all round, I'm learning plenty , thanks, about stuff I never knew I needed to know about. I have some ali I just need to find a fire, although being English, I will have to put the kettle on it first.
I have all ten fingers, but I'm not very good at woodwork,
Have a good week.
Steve
Ps. I have a Briton 121ce if you want it.
A little fire can sure change the shape of aluminium.
If you still have ten fingers you need more power tools.
I fear this is a different closure
 I have a few in the attic but nothing matched.
Good week!!
Nice job on the door!
Agreed on next weakest (my guess: where it connects to the door {yikes}).
I hope the next weakest isn't the closure itself.

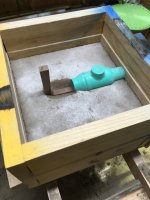
Went a different route in my pouring basin. Made a smaller one.
Rammed up a mold with the sprue and pulled the sprue, then spooned out a hole for the basin.
Drove the basin in with a hammer.
I smoothed and compacted the sand around it. Pulled it out and it looks good.
Cleaned out the sprue hole.
Also put in a blind riser, fed the metal into the riser from the bottom, then back out the bottom, leaving the bottom of the riser (what was left) as a weir to help separate contaminated metal.
That hot riser gave up all the metal required for shrinkage. The top was flat when it started.
Casting is very nice. Here's the bottom of the riser, showing the inlet and outlet.
Now I'm making a glass flask. Look at what this gentleman achieved.
https://www.youtube.com/watch?time_continue=6&v=sCaaADNBozM
WOW!!
Attachments


Guster
Well-known member
I'm impressed with the concepts you are testing. Also wholly under-educated on the bifilm concept that I've added it to my list of things to study up on. (Yes, I have a list for personal development in a drive for continuous improvement) Unfortunately my list is slightly prioritised towards work since that is sometimes urgent. Luckily there isn't many of those right now.
The idea of ramming a casting basin+sprue form into the sand seems almost perfect in it's practical simplicity. At least compared to curing one using waterglass. Is that still in an upper flask? Seems like a tin can or section of box section tubing would suffice well for that.
Keep playing, I'm learning lots!
I also joined the homefoundry forum since it appears friendlier than alloyavenue. I like having access to advice and information but the elitist snobbery of some forums inhibits my contribution.
Plus I wanted to see more photos. Especially the stuff you are not posting here.
PS. You guys make wood work sound like sheet metal work - apparently more likely to have you needing to count to ten using your toes instead of fingers.
Last edited:
Grizz1963
Well-known member
As Guster says....
Impressed
I love what you are doing Andy.
And of course, not only are we learning random stuff from you, but you are keeping your brain both active and amused in what could be retirement.
.
Impressed
I love what you are doing Andy.
And of course, not only are we learning random stuff from you, but you are keeping your brain both active and amused in what could be retirement.
.
BBChevro
Well-known member
Like the term or not, there's a lot of "continuous improvement" going on here.
Not that your castings were ever lacking in quality.
Great work Andy.
[emoji106]
Sent from my SM-G950F using The Garage Journal mobile app
Not that your castings were ever lacking in quality.
Great work Andy.
[emoji106]
Sent from my SM-G950F using The Garage Journal mobile app
OP
oldironfarmer
Well-known member
I'm impressed with the concepts you are testing. Also wholly under-educated on the bifilm concept that I've added it to my list of things to study up on. (Yes, I have a list for personal development in a drive for continuous improvement) Unfortunately my list is slightly prioritised towards work since that is sometimes urgent. Luckily there isn't many of those right now.
The bifilm concept is interesting. It basically says all porosity and casting defects originate from oxide film. If you read through the bifilm thread on TheHomeFoundry there are lots of great links. I like Wade Marquardt's especially.
The idea of ramming a casting basin+sprue form into the sand seems almost perfect in it's practical simplicity. At least compared to curing one using waterglass. Is that still in an upper flask? Seems like a tin can or section of box section tubing would suffice well for that.
Don't know whether you saw the little flask I was using to set a green sand basin on top of the cope. It added height and although lots of people use a cush cup to gain head, the video I posted above shows you need less head, not more, to avoid excess turbulence.
Keep playing, I'm learning lots!
I also joined the homefoundry forum since it appears friendlier than alloyavenue. I like having access to advice and information but the elitist snobbery of some forums inhibits my contribution.
Plus I wanted to see more photos. Especially the stuff you are not posting here.
PS. You guys make wood work sound like sheet metal work - apparently more likely to have you needing to count to ten using your toes instead of fingers.
I just can't wait to make a pour into my glass flask, but we have rain all day and up to 45 mph (large sand) wind forecast for today so I'll likely be in the shed all day.
PSR. Inattentive use of power tools while woodworking can make quick work of excess digits.
As Guster says....
Impressed
I love what you are doing Andy.
And of course, not only are we learning random stuff from you, but you are keeping your brain both active and amused in what could be retirement.
.
Thanks, Rian. I thought all day in the shed was retirement. Am I doing it all wrong?
Like the term or not, there's a lot of "continuous improvement" going on here.
Not that your castings were ever lacking in quality.
Great work Andy.
[emoji106]
Sent from my SM-G950F using The Garage Journal mobile app
Thanks, Mark. The big difference is whether continuous improvement is "required". Even *** is no fun when you are required to perform.
(If you don't believe me, ask your wife)jimreed2160
Well-known member
Andy said: I just keep seeing more little calves in the pasture. Makes me wonder, where do they come from?
Well Andy, I could tell you but it would be a lot of bull.
Well Andy, I could tell you but it would be a lot of bull.
Grizz1963
Well-known member
Laughing here.
Retirement for many is sitting in a corner waiting to die. Not the morbid way but just not doing all the good stuff.
Your retirement is just perfect.
Retirement for many is sitting in a corner waiting to die. Not the morbid way but just not doing all the good stuff.
Your retirement is just perfect.
OP
oldironfarmer
Well-known member
Andy said: I just keep seeing more little calves in the pasture. Makes me wonder, where do they come from?
Well Andy, I could tell you but it would be a lot of bull.
I think there's another one today, but I've lost count.

Laughing here.
Retirement for many is sitting in a corner waiting to die. Not the morbid way but just not doing all the good stuff.
Your retirement is just perfect.
Sitting in a corner waiting to die. I'd rather sit in a corner waiting to dye. At the public laundry.
I'm having too much fun to die. I had a call about going back to work. I told him I'd like to do the work but just can't spare the time to go sit in an office away from my shop. He couldn't understand.
Okay, one of the feed system appurtenances described for bifilm control is a centrifugal separator. What they show is a bell shaped cavity with a tangential feed at the bottom of the bell and metal out the top after it has spun around the bell and hopefully dropped out the heavy aluminum oxide and other contaminants.
I decided I wanted to make one, but for my simple feed systems, I intend to feed tangentially but take the flow out the bottom and use the separator to let bubbles rise and also function as a riser.
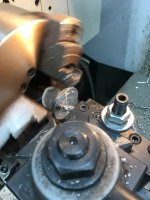
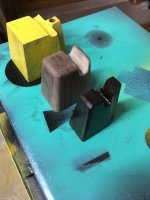
First stop is the lathe.
I've made a cut and thought I'd take a picture of it mostly square. I've seen people trim the corners off a square before turning it, and I did too when I started. I soon learned you can just go for broke with whatever shape you have. It will get round straight away.
I also need a smaller turning and picked up some sycamore off the farm. It is not generally an accepted wood for pattern making like poplar, but this has been in the shop for many years so is well acclimated and should not warp. Quarter sawn grain in sycamore is beautiful.
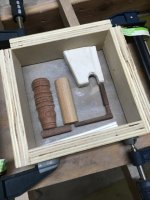
Here's the separator. The bell shape pattern will be hollow, and the pattern for the tangential feed is laying in front of it. Underneath is a disc which will be a bound sand floor for the separator to allow flow out the bottom through a hole.
The little sycamore bell is white, in front of the separator. It will also be bound sand and will fit in the separator to raise the exit hole up off the floor.
With everything upside down, here's the gate which will be on the bottom of the floor disc.
And a plan view of the outlet gate.
Stay tuned for part two.
Attachments


OP
oldironfarmer
Well-known member
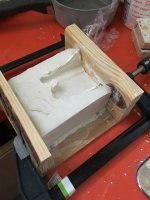
So to make the floor of the separator out of bound sand (sodium silicate and sand like I make cores with) I need a core box. I usually make them out of plaster of paris, it's easier for me to make the part then make a mold of it in plaster, then put the sand mix in the mold. In this case I need to pin the disc floor to the separator body to make the sand mold then put the bound sand floor with internal piece in the opening formed in the sand for the disc. Clear?
Here is the disc and internal piece half buried in plaster.

Put lineup depressions on the parting line when it was almost firm so the next half would get lineup pins cast in it. Waxed the parting line and cast the second half.

I had a little breakage but it is usable. If the concept seems to work I'll make another core box.
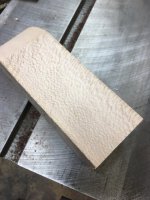
Also made another pouring basin. The first was a little too big, the second was a little too small. I'm expecting this one to be, ummm, in the middle.

Almost done...
Here is the disc and internal piece half buried in plaster.
Put lineup depressions on the parting line when it was almost firm so the next half would get lineup pins cast in it. Waxed the parting line and cast the second half.
I had a little breakage but it is usable. If the concept seems to work I'll make another core box.
Also made another pouring basin. The first was a little too big, the second was a little too small. I'm expecting this one to be, ummm, in the middle.
Almost done...
Attachments

OP
oldironfarmer
Well-known member
While I'm making the separator, I'm also working on a glass flask. The video I posted a while back was incredibly interesting to me. I want to be able to see how the metal flows with different sized components.
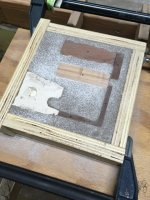
I want to use the small pouring basin (because my piece of glass is too small) but don't want to cut my pouring basin up so I made a partial plaster cast of it, then I can make a plaster positive to use to make the sand mold.

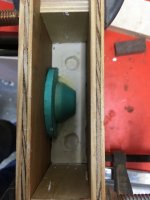
Here's the plaster pouring basin, sprue, runner, riser, gate, and pattern placed and ready for sand.

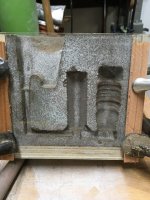
Rammed up and flipped over to remove patterns

Patterns out, channels cleaned up and glass in place, ready to pour.

I scooped out the pouring basin to give a little bigger target for me to hit.

I hope to pour this tomorrow. If all goes well I'll post a video. Maybe post one even if all goes bad.
Thanks for stopping by!
I want to use the small pouring basin (because my piece of glass is too small) but don't want to cut my pouring basin up so I made a partial plaster cast of it, then I can make a plaster positive to use to make the sand mold.
Here's the plaster pouring basin, sprue, runner, riser, gate, and pattern placed and ready for sand.
Rammed up and flipped over to remove patterns
Patterns out, channels cleaned up and glass in place, ready to pour.
I scooped out the pouring basin to give a little bigger target for me to hit.
I hope to pour this tomorrow. If all goes well I'll post a video. Maybe post one even if all goes bad.
Thanks for stopping by!