To avoid these ads, REGISTER NOW!

Above 1200 Sq/FT Cleaning Up My Shop

Wokspaces above 1200 squarefeet.
OP
O

oldironfarmer

Well-known member
Joined
Jun 25, 2016
Messages
6,664
Location
Terlton, Oklahoma
Andy, now that is very clever.:thumbup:

You are rapidly becoming the Vieux of Oklahoma:bowdown:

Regards

A hearty 1/2 thanks, Steve!

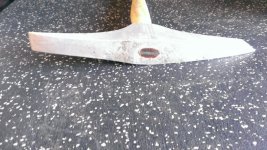
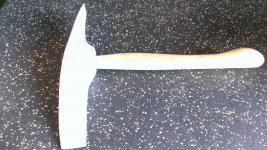
It is very clever, but it's not my idea. The local pattern maker showed me his when I visited. Asked where he got them, my buddy the machinist made them for him. Probably an old pattern makers design, but who knows. His were made from a large round bar, I had to cast mine, and his used wood screws through holes in the aluminium and I thought using the set screws pressed into the wood would hold securely and not require a precise thickness of wood. So far so good.

The great thing is the second, third, and fourth patterns will go much quicker.

Being associated with Vladimir is an honor, thank you!!:bowdown::bowdown:

Andy: So what is the difference between an orthopedist and a podiatrist?

A Podiatrist receives specialized training on foot and ankle problems and is awarded a DPM upon graduation. An Orthopedist is an MD who specializes in musculoskeletal problems. Either one could evaluate foot issues and recommend solutions. My comfort with the orthopedist is because that is what my doctor was.

Thanks for that detail. It seems Podiatrists are similar to chiropractors, I may seek out an MD. However my podiatrist has done well with me.

That is pretty Astounding Andy. I wish my mind worked like that. I will say that some of you guys here on the GJ have made me think of unconventional ways to solve some of life's problems. Always a pleasure to watch you work on a project.

That's no Bull.

Awesome Astounding Aggressive Audacious lAzy Andy. Hmmm, maybe there's a compliment in there somewhere.

It is always good to see how others solve problems. Enough variety and one begins to consider alternate ways to do things. Some methods are better than your old ones and some not as good, we can all learn from each other. But the truly interesting thing is how much better you can approach a totally new problem just by having a variety of experience.

I've just started using nitrile gloves a bit. Learned about them on GJ, by the way. Great way to smooth caulk. And in smoothing caulk with one it became obvious to turn the glove inside out with a finger over the end of the caulk tube nozzle. A little rubber band to hold the glove on and the caulk does not dry out and there are three fresh fingers to smooth caulk with next job. (I've been using a little caulk several times in casting refractory and it's great to be able to put out one squeeze of caulk and not waste the tube)

Thanks for stopping by guys!

It's SATURDAY!!!!:willy_nil:willy_nil:willy_nil
 
To avoid these ads, REGISTER NOW!

dchance

Well-known member
Joined
Oct 3, 2016
Messages
614
Location
OKC
Andy great solution to a problem that I have never had ( never cast anything but a fishing lure ). It is always great to learn new things.

Should be a great Saturday.

Dwight
 
OP
O

oldironfarmer

Well-known member
Joined
Jun 25, 2016
Messages
6,664
Location
Terlton, Oklahoma
Andy great solution to a problem that I have never had ( never cast anything but a fishing lure ). It is always great to learn new things.

Should be a great Saturday.

Dwight

Thanks for stopping by! I might try to cast some lures, but they'd be heavy...

I had a real Saturday today: my granddaughter had invited me to see a play she is in in OKC at 2:00 so I spent a bit of shop time this morning then took my wife for a two hour drive, watched some great high school kids doing tremendous acting. Unlike me, they were trying to be funny and they pulled it off:thumbup:

Then we scurried back home fast enough to make it to a concert at our church.

This morning I laid out my new temperature controller, solid state relay, and found a power supply.

IMG_1609_zpsikb22u0h.jpg


SSR takes a DC signal but the old transformer is AC:sad: I have a 1 amp battery charger which I don't like because it has no taper control so it would make a good supply for the relay, I think.

Connected a thermocouple and 120 v to the controller and powered it up.

IMG_1610_zpsyxcjdgbe.jpg


It registered temperature immediately so I grabbed the thermocouple and the heat from my hand made the indicated temperature (Present Value) go down so I reversed the leads. Got out my thermocouple temperature meter and the controller matches the meter:thumbup: (I was worried that the cheap controller did not have the right metallurgy to read an accurate temperature)

By holding the thermocouple or letting it go I can run the indicated temperature up and down and see and hear the controller switch the output on and off. This little thing has ramp and hold programming (up to 30 steps) but is currently set on Hold 25C (Set Value). You can see the Output light is lit. It has fuzzy logic so it will cycle on and off until it learns how the temperature is going to respond to the output. No instructions with the controller, but there are some on the 'net written with very stilted language. I'll figure it out.

My help showed up today and made a showing. More shelving!

IMG_1611_zpsscnk6mib.jpg


Progress!!:thumbup::thumbup:

Interesting that a 16" wide shelf on a 4 ft walkway seems to take up almost a third of the walkway.:dunno: A handrail might be in order (it was planned, but after the crane is up, it will make a handrail for part, maybe)

IMG_1612_zpsodlxtvgd.jpg


I'll have so much shelving I'll have to save stuff I don't need:willy_nil

Thanks for dropping in!
 
Last edited:

tym

Well-known member
Joined
Mar 5, 2016
Messages
2,433
Location
MA
Unplugged all the ribbon cables and found a bit of green corrosion on a couple of pins. Here's one side of the boards,

IMG_1557_zpsrrdsgyv2.jpg


And the other side

IMG_1558_zpswblafgvr.jpg


Acetone would not dissolve the coating on the board, neither would alcohol, but the alcohol would soften it. I wound up scraping the surface with a knife and the discoloration was hiding the conductors which look OK to me.

IMG_1559_zpszjsgzvg9.jpg


IMG_1561_zpst5yokfqx.jpg


I gave up and put it back together hoping the green pins were the problem and would make contact upon reinsertion. It didn't, still no operation. I'm stumped. On the positive side, there is a gas pipeline leak at the east edge of my property. I'll ask them if they have a pipe thickness gauge.
Fun Fact: my dad's last job before he retired was working for Panametrics. They were based in the old Waltham Watch Company factory building in Waltham MA until they were acquired by GE and moved into a new facility.

I notice the large black cover/shield on the back of the circuit board (for a relay or transformer, perhaps) has some corrosion near it. If you can pop that cover off, there might be more to see/fix.
 
Last edited:
OP
O

oldironfarmer

Well-known member
Joined
Jun 25, 2016
Messages
6,664
Location
Terlton, Oklahoma
Fun Fact: my dad's last job before he retired was working for Panametrics. They were based in the old Waltham Watch Factory building in Waltham MA until they were acquired by GE and moved into a new facility.

I notice the large black cover/shield on the back of the circuit board (for a relay or transformer, perhaps) has some corrosion near it. If you can pop that cover off, there might be more to see/fix.

Good point! I have put it away and told the owner I just was not going to spend any more time on it.

I tried to get the cover off but did not want to break anything. Now you're going to make me get it back out - what does it hurt if I do break something getting it off?

Interesting story about Panametrics, thanks.

And thanks for the advice, I think:willy_nil
 

tym

Well-known member
Joined
Mar 5, 2016
Messages
2,433
Location
MA
I think it might slide off, as I don't see any tabs or clips holding it to the PCB. It might also be glued to whatever's underneath it. Does it budge at all if you wiggle it? Is it plastic or metal?

Also that white connector in the corner of the main PCP (the one that Vieux pointed out) looks questionable. If that is where the battery pack plugs in, the corroded bits may also need a closer inspection. Are there broken traces by that connector?

Hope that helps. It's always possible to spend more time on these sorts of projects. :eyecrazy:
 
Last edited:

Guster

Well-known member
Joined
Mar 11, 2012
Messages
1,543
Location
Auckland, New Zealand
So far behind on this thread. :willy_nil

Shelving... :drool:

Pattern chucks :bowdown:

Bull :rocker:

PID :thumbup:

Did I forget anything?

Oh yeah! Hammerhead pattern. :thumbup: Are you going to incorporate cores for the handle hole? :dunno:
 
OP
O

oldironfarmer

Well-known member
Joined
Jun 25, 2016
Messages
6,664
Location
Terlton, Oklahoma
I think it might slide off, as I don't see any tabs or clips holding it to the PCB. It might also be glued to whatever's underneath it. Does it budge at all if you wiggle it? Is it plastic or metal?

Also that white connector in the corner of the main PCP (the one that Vieux pointed out) looks questionable. If that is where the battery pack plugs in, the corroded bits may also need a closer inspection. Are there broken traces by that connector?

Hope that helps. It's always possible to spend more time on these sorts of projects. :eyecrazy:

The black box (love that term) does not wiggle. I think it is sealed and soldered to the board.

Yes, the white connector is the battery connection. When I plug the battery in I get full voltage on the pins on the far side of the board, so I'm sure the battery is getting connected. I did buy a new battery plug and replaced it first, then bought new batteries and soldered them together. They are holding 6v per specification.

I can see no broken traces. I'm about to give up.

So far behind on this thread. :willy_nil

When we got married, my wife was always a little behind. Now she's a big behind:willy_nil

Maybe that came out wrong...

Use that line at your own peril.:evil:


Shelving... :drool:

Pattern chucks :bowdown:

Bull :rocker:

PID :thumbup:

Did I forget anything?

Oh yeah! Hammerhead pattern. :thumbup: Are you going to incorporate cores for the handle hole? :dunno:

Since the eye should be spread at the top, it is easier to cast than to drill it, and putting in a core helps avoid shrinkage issues.

When I start casting hammer heads what am I going to do with them?

Thanks for stopping in, guys.
 
OP
O

oldironfarmer

Well-known member
Joined
Jun 25, 2016
Messages
6,664
Location
Terlton, Oklahoma
Time to make a core box for the hammer head. Core box is a cavity core sand can be put in to create the core, a pattern which goes in the mold and keeps the metal from occupying the core space. In this case, the core will make an eye in the hammer head. The handle goes in the eye.

Drew dimensions on a piece of walnut and trimmed it off on the bandsaw.

IMG_1613_zpslcrufjr5.jpg


Having the finished faces on the board on each side of the cut makes these cuts easy.

IMG_1614_zps1wjehbr4.jpg


Eye should spread slightly toward the top so when the handle is wedged it cannot come out. I did this by wandering the cut on each side of the line.

IMG_1615_zpswh5qzwzw.jpg


It does not need to spread the opposite direction.

Then I rounded the core pattern but failed to get a picture.

To hold the core, it has to sit in core prints. Round core prints are easy but need a flat to ensure the core is oriented right. Since I'm starting with a rectangular bar I decided to make rectangular core prints. Of course not rectangular exactly, they have to have draft so they can be removed from the sand. I made two half prints for each hammer half. Then ground a flat on the patterns. Also engraved my information on the patterns. Then glued the core prints on. Not a strong glue joint, but it only has to withstand ramming sand.

IMG_1617_zpsutnujix3.jpg


Made a little box to cast the core box in, the core pattern just fits.

IMG_1618_zpsxw3pfllr.jpg


The core box will be made out of plaster of Paris.

Filled the box about half full of plaster of Paris and floated the pattern halfway in the wet plaster.

IMG_1619_zpsr8nyxuwu.jpg


Tomorrow the surface will get oiled as a release agent and pour the other half. Then if the pattern will come out without breaking the plaster I'll have a core box.

Last thing today I noticed I had engraved one pattern upside down:sad:

So I filled it with wood filler and will re-engrave it tomorrow.

IMG_1620_zpsc5m08zsy.jpg


Thanks for looking in!
 
Last edited:

bolensboneyard

Well-known member
Joined
Nov 22, 2013
Messages
3,074
Location
South East
Looking good Andy. Perhaps USA with a phoenix insignia should be put on anything we craftsmen build from now on; to let the world know American ingenuity and quality still exists and has risen from the ashes of the plastic generations?
 
OP
O

oldironfarmer

Well-known member
Joined
Jun 25, 2016
Messages
6,664
Location
Terlton, Oklahoma
Old film on how they did it it in the good old days.Lol https://www.facebook.com/motoparadiso/videos/1764605183804799/

Nice video! No that's not "the good old days", that's higher tech than what I'm doing.:(

Looking good Andy. Perhaps USA with a phoenix insignia should be put on anything we craftsmen build from now on; to let the world know American ingenuity and quality still exists and has risen from the ashes of the plastic generations?

Lettering has been a frustration to me. I've ordered some stick on letter sets but they haven't arrived. And my sand casting does not pick up really fine detail so the characters need to be bigger than I really want. I have thought about carving them, but that is slow and hard to do even this small for me. Live and learn.

Good idea, but it would have to be an exceedingly simple phoenix. Probably look like a turkey on my work.:bounce:

It's finally Saturday!!:thumbup::thumbup::thumbup:

Thanks for the comments!!
 
Last edited:

jbmatth

Well-known member
Joined
Jun 3, 2013
Messages
5,684
Location
Northern Ok.
Finely caught up Andy, and I can't remember what all I wanted to comment on now. Thanks for bringing Bob over for a visit, he made short work of what would have taken me weeks with shovel. Here he is getting started:
View media item 70675
By that afternoon he was done with the rough grading:
View media item 70676
I played around a little before he arrived on Tuesday and smoothed a few things out then pulled a few old stumps while Bob was there to lend a hand, it was much quicker than burning them out. Andy picked Bob up around lunch time then headed out. I spent the rest of that afternoon and Wednesday morning smoothing it out a little more with a rake and shovel. Then a pretty good rain came and dumped 1.25":
View media item 70677
These were taken right after it stopped raining:
View media item 70678
We had another 2" the next day and I'm happy to report the entire area is much smoother now and should mow pretty easy once the grass fills in. Andy is a rock star!

I also wanted to mention the Dakota had 2 "good" tires on the front, but the back tires look like they came off of his spray rig. :lol_hitti

Thanks again Andy, and have a good set of Saturdays
JB
 

getblown5.9

Well-known member
Joined
Jun 12, 2012
Messages
100
Interesting that a 16" wide shelf on a 4 ft walkway seems to take up almost a third of the walkway.:dunno: A handrail might be in order (it was planned, but after the crane is up, it will make a handrail for part, maybe)

IMG_1612_zpsodlxtvgd.jpg


I'll have so much shelving I'll have to save stuff I don't need:willy_nil

Thanks for dropping in!

Just skimming through but this caught my eye and made me :lol:
 

BUGTHUG

Well-known member
Joined
Nov 12, 2010
Messages
2,960
Location
Kansas
You should of turned the shelving to the outside of the walk way then the shelving would take care of the handrail. You just gotta think outside the walk way.
 
OP
O

oldironfarmer

Well-known member
Joined
Jun 25, 2016
Messages
6,664
Location
Terlton, Oklahoma
Finely caught up Andy, and I can't remember what all I wanted to comment on now. Thanks for bringing Bob over for a visit, he made short work of what would have taken me weeks with shovel. Here he is getting started:
View media item 70675
By that afternoon he was done with the rough grading:
View media item 70676
I played around a little before he arrived on Tuesday and smoothed a few things out then pulled a few old stumps while Bob was there to lend a hand, it was much quicker than burning them out. Andy picked Bob up around lunch time then headed out. I spent the rest of that afternoon and Wednesday morning smoothing it out a little more with a rake and shovel. Then a pretty good rain came and dumped 1.25":
View media item 70677
That picture is embarrassing. We ditched across the front of the shop but forgot to finish the ditch to the north, around the corner of the building. The land falls pretty fast there so JB ditched it by hand.

These were taken right after it stopped raining:
View media item 70678
We had another 2" the next day and I'm happy to report the entire area is much smoother now and should mow pretty easy once the grass fills in. Andy is a rock star!

:headscrat I like the term "rock star", but we didn't dig any rock:willy_nil

I also wanted to mention the Dakota had 2 "good" tires on the front, but the back tires look like they came off of his spray rig. :lol_hitti

I haven't looked at the front tires.:sad: I thought the tires would be better on a free truck:willy_nil


Thanks again Andy, and have a good set of Saturdays
JB

It was a great time!

Just skimming through but this caught my eye and made me :lol:

No, really, like a third:dunno:

You should of turned the shelving to the outside of the walk way then the shelving would take care of the handrail. You just gotta think outside the walk way.

But then stuff would fall off when I push it in:willy_nil

And I'd have to add more lights:willy_nil:willy_nil

And I didn't think of it:willy_nil:willy_nil:willy_nil

Actually I had thought of that, but the shelving needs a good wall to stabilize it, and lighting and access are great the way it is.

"Think outside the walkway", now I like that:thumbup::thumbup:

Thanks for each comment!!

I had another good day today!
 
Last edited:
OP
O

oldironfarmer

Well-known member
Joined
Jun 25, 2016
Messages
6,664
Location
Terlton, Oklahoma
Busy day today, I rushed all day.

First thing this morning I poured the second half of the hammer eye core box. But I forgot to put any parting grease on it.:sad:

So I unboxed it before it was fully cured.

IMG_1621_zpsicbs81eb.jpg


I pried it apart hoping it would not be stuck too well. Fortunately it came apart without cracking, although it cracked around the edges where I pried on it. That's ok, it's not part of the form.

IMG_1622_zpsdkrzutlj.jpg


First time I made one of these I worried about putting in alignment pins. In reality, it is hard to get the surface flat so it self aligns.

IMG_1623_zpsmnnjmofe.jpg


The pattern shows the profile that will eventually be in the hammer eye.

Then I shifted gears and cut the opening for a window unit in my main shop room. I liked the picture it made on the wall:lol:

IMG_1624_zps7cjiv2az.jpg


Put a drip rail on top

IMG_1625_zpsditvxbpg.jpg


And formed a pan for the bottom with lips to go up behind the side metal

IMG_1626_zpsi1aw4vv3.jpg


Caulked it and trimmed it out.

Stuck an old unit in that tenants left when they moved. The filter was so plugged they thought it had quit working. And it had. But it works fine with a clean filter. 11.1 SEER.

IMG_1627_zpswwiscgls.jpg


I think it is weather proof.

IMG_1628_zpsxkzvpsxp.jpg


Then we had to go to town, and with Zumba tonight that about makes it a day.

Thanks for stopping by!!
 
Last edited:
OP
O

oldironfarmer

Well-known member
Joined
Jun 25, 2016
Messages
6,664
Location
Terlton, Oklahoma
Got back from town and had an hour and a half before I had to leave and I thought i had everything ready to I decided to hustle and try to pour my first hammer. The good thing about casting is when you mess one up you still have the pattern and can try another one.

I recut the lettering on the upside down pattern then rammed up the pattern.

Here's the drag

IMG_1629_zps4ynatzbj.jpg


And the sprue, gate, and top half of the pattern in the cope.

IMG_1630_zpsqlq2gqaj.jpg


When I pulled the flask apart and removed the patterns I lit the furnace and made the core while the aluminum melted. Then mayhem broke loose. To make the core you mix water glass with sand, ram it in the core box, then cure it with CO2. I make CO2 with vinegar and soda. A cup of vinegar will cure several batches by just adding more soda. I made a core and cured it and could not get it out of the box. I finally broke it out and added more draft to the box, shaving it with my pocket knife. I made another core and it did not cure. Being cheap, I had used up the vinegar and only had water in the cup. Now the metal is about melted so I hurriedly mixed another batch of core sand. Fresh vinegar and I made a hole down the middle with a wire to help CO2 get in the middle. It cures this time and the first half comes off but the core won't come out. I pry it out and break it.:sad::sad::sad:

Metal is melted, I turn off the furnace and set the core in the sand. It's broken just right of center. Maybe it will hold. If not I at least get to see how the hammer casts.

IMG_1631_zps6kv7tbmx.jpg


I pour it but miss the hole and pour some into the riser hole. Oh well, at least it's poured and I still have time to open it before Zumba.

IMG_1632_zpspcnv3qzo.jpg


I'm a lucky duck.:rocker:

IMG_1633_zpsodxbbxbq.jpg


The casting looks good! You can read the text! Core ends look OK!!

IMG_1634_zpsvp3mgc1q.jpg


Drag impression looks OK!

IMG_1635_zpsr1kmwufg.jpg


Initials are OK, but "OIF" needs to be deeper. I had carved out "AWM" with my knife. All straight lines:) This side was on the bottom.

IMG_1636_zps6qb3stux.jpg


And, my first core, installed broken, did it's job!!

IMG_1637_zpsz4nljyrh.jpg


Now I can make a few adjustments (like making cores ahead of time) and try to improve the results. However this will make a hammer I can use. They are so expensive. This one was practically free, if you ignore the cost of propane, equipment I've bought, and my time. Hmmmm, maybe I can sell it to NASA at cost:lol:

Thanks for sharing my ride!!:rocker:
 
Last edited:

drivesitfar

Well-known member
Joined
Oct 23, 2013
Messages
36,017
Location
Pacific Northwest
Andy: since i can't buy a 50 Studebaker when i come down maybe i'll be able to buy a HAMMER AND BROOM.

looks great and i know your hammers will get better as you fine tune your efforts.

speaking of multiple molds can you do more than one hammer head in each pour?

you know that hole through your shop for the AC did have sort of an oil painting look to it.

cheers and hope you survived ZUMBA.

nice work over at JB's and must be nice to be able to do that without having to get a permit.
 

dlcwent

Member Emeritus
Joined
Feb 24, 2014
Messages
8,427
Location
coastal maine
IMG_1637_zpsz4nljyrh.jpg

"Now I can make a few adjustments (like making cores ahead of time) and try to improve the results. However this will make a hammer I can use. They are so expensive. This one was practically free, if you ignore the cost of propane, equipment I've bought, and my time. Hmmmm, maybe I can sell it to NASA at cost"

:lol_hitti:lol_hitti:lol_hitti
 
To avoid these ads, REGISTER NOW!

jbmatth

Well-known member
Joined
Jun 3, 2013
Messages
5,684
Location
Northern Ok.
Hammer turned out just fine, I'm sure it'll do its job and I'm sure you won't loose sleep over some of the imperfections. As for the ditch in the front of my shop, I shoveled it out after taking the photos. I wanted to know where the high and low spots were in case I couldn't get the job done before the water disappeared.
JB
 

BUGTHUG

Well-known member
Joined
Nov 12, 2010
Messages
2,960
Location
Kansas
Hammer turned out just fine, I'm sure it'll do its job and I'm sure you won't loose sleep over some of the imperfections. As for the ditch in the front of my shop, I shoveled it out after taking the photos. I wanted to know where the high and low spots were in case I couldn't get the job done before the water disappeared.
JB
JB, hope all is well. I think with the new landscalping, you could plant RICE. RICE RICE, baby.:rocker:
 
OP
O

oldironfarmer

Well-known member
Joined
Jun 25, 2016
Messages
6,664
Location
Terlton, Oklahoma
Andy: since i can't buy a 50 Studebaker when i come down maybe i'll be able to buy a HAMMER AND BROOM.

Great idea! I plan to forge some sickles, curved ones just like the old time for cutting wheat. You could buy one of each and send them to Vladimir.

looks great and i know your hammers will get better as you fine tune your efforts.

I hope so! Thanks.

speaking of multiple molds can you do more than one hammer head in each pour?

In order to have two heads in one flask you need two patterns. If I were doing lost wax method casting where you cast a wax pattern which is then burnt out of the mold, multiple wax patterns is easy. In this case I would have to make an additional wooden pattern. One option is to make additional flasks and pour two to three depending on molten metal available. Also am planning on making at least two additional size hammer heads so those patterns could be rammed into the same flask. I suppose I could cast each half of the first head and use that for a pattern. Hmmm... You do ask good questions!

you know that hole through your shop for the AC did have sort of an oil painting look to it.

And the subject was a 1950 Studebaker in it's original patina:rocker:

cheers and hope you survived ZUMBA.

I always survive Zumba, but I was sore from straining earlier to pick a lady up off the floor, so last night was painful:sad: The teacher has invited me to go to a Refit class with her tonight. Not sure I'll be ready;) She may add some variety to her routines. I try to add variety: last night a guy and his wife who hadn't been there in over a year showed up. He and I like to stick our bellys out, hold our arms up and run and hit each other while yelling, and bounce off. It makes the girls so jealous...

nice work over at JB's and must be nice to be able to do that without having to get a permit.

:lol_hitti:lol_hitti:lol_hitti A permit? That's a hoot:rocker::rocker:

Why would we want to live somewhere where we have to ask somebody else what we can do on our own property? That's like renting!!:lol_hitti:lol_hitti:lol_hitti What if they didn't approve of 50 tractors in the yard? Or trip hammers pounding at night? With a coal forge going? Or stinky cows? Or a foundry?:lol_hitti:lol_hitti:lol_hitti

Ummmm, I didn't come on too strong, did I?:sad:

Janice Joplin sang "freedom's just another word for nothing left to lose", I didn't understand that either.:headscrat


IMG_1637_zpsz4nljyrh.jpg

"Now I can make a few adjustments (like making cores ahead of time) and try to improve the results. However this will make a hammer I can use. They are so expensive. This one was practically free, if you ignore the cost of propane, equipment I've bought, and my time. Hmmmm, maybe I can sell it to NASA at cost"

:lol_hitti:lol_hitti:lol_hitti

Well NOW you're making fun of me.:sad: That's not very nice.:sad::sad: I think NASA could afford to pay my cost for a hammer, even if it was a bit high for what they normally spend.:scared:

P.S. I hope to MAKE IT UP IN VOLUME.


Cool stuff as always Andy. Worst part about working away sitting in a hotel room is I can't even go to my garage and ponder :(

Happy Saturday's.

GB

Thank you!

And don't I know it. I've had many "free" nights from hotel reward points, that means lots of life in a hotel. My boss never understood when I told him a night out of town costs me an additional eight hours of my life I'm not being compensated for. His response: you get everything paid for. My response: My home mortgage is paid up for that night. I don't think he had a shop.:sad:

But hopefully you can get some uninterrupted GJ time. My 5 months in a hotel in Jakarta pre-internet was probably the worst for me. Stressful job and no tools. Nigeria was not as bad because there was no expectation of a normal reality there.

But I digress...


Hammer turned out just fine, I'm sure it'll do its job and I'm sure you won't loose sleep over some of the imperfections. As for the ditch in the front of my shop, I shoveled it out after taking the photos. I wanted to know where the high and low spots were in case I couldn't get the job done before the water disappeared.
JB

Thank you!

Good plan on knowing where to trim. If you're not getting any runoff into the shop we were successful!

Note to everybody else: Since there were two engineers on this project and JB's wife was away, it is astounding anything worked.:willy_nil

We were on our own:3gears:

Had a permit been required we could have handled that part.:lol:

Thanks for the great comments!:bowdown::bowdown:

It's Saturday!!
 

y'sguy

Well-known member
Joined
May 1, 2010
Messages
1,319
Location
Tulsa, Oklahoma
Ok, I know I've missed something somewhere. Is that an aluminum hammerhead? And if so, why? I have seen them for special purpose jobs I guess. Or maybe it's not aluminum and I'm just way behind on my reading.
 

madoc1

Well-known member
Joined
Dec 11, 2012
Messages
1,242
Location
spicewood, tx
great job of explaining the casting process. i used to buy castings for TI and my fil was a sculptor that used the lost wax process. most of the castings i bought were die cast, and we still had qc problems with some of them. when is the brass hammer coming up?:rocker:

jim
 

Farmall450

Well-known member
Joined
Dec 23, 2011
Messages
13,367
Location
Marengo, Illinois
I think the doors would make a good roof for protection to keep the weather off of the COE, or some implement. Maybe put the two together in an A shape to put the mow deck under, or to cover something out in the yard!
Just my opinion, and I'm sticking to it.

That is a phenomenal idea, and I'm sure Andy will have pictures of that in action by the time I make it to the last page of this thread. :rocker:
 
OP
O

oldironfarmer

Well-known member
Joined
Jun 25, 2016
Messages
6,664
Location
Terlton, Oklahoma
JB, hope all is well. I think with the new landscalping, you could plant RICE. RICE RICE, baby.:rocker:

Interesting you should say that. When we moved to the farm in 1985 we had so much rain I seriously considered putting some rice in. Kind of seriously. I did think about it. Until it stopped raining.


So I guess it is "Hammer Time" at the Iron Farm every Saturday.

I just have nothing better to do :)

What is this permit you speak of? :confused:

:p

:beer:

Did somebody say permit? I don't think so...

Ok, I know I've missed something somewhere. Is that an aluminum hammerhead? And if so, why? I have seen them for special purpose jobs I guess. Or maybe it's not aluminum and I'm just way behind on my reading.

It's an aluminum hammer head.

Why? I'm learning and currently casting aluminum. One of my goals is to make brass hammers, so I made a pattern and cast it in aluminum. It iwll make a good hammer for several light duty purposes where you could use a brass or rawhide hammer. It's practice.


great job of explaining the casting process. i used to buy castings for TI and my fil was a sculptor that used the lost wax process. most of the castings i bought were die cast, and we still had qc problems with some of them. when is the brass hammer coming up?:rocker:

jim

That's interesting information. I want to try investment casting, later.

I've got a fair amount of aluminum work I need to do first. I also need to get my new furnace complete before melting brass. In due time.


LAzy Andy is stepping up his game with the lightweight aluminum hammers, the steel steel ones get heavy after awhile

Too old to swing a real hammer:bounce:

That is a phenomenal idea, and I'm sure Andy will have pictures of that in action by the time I make it to the last page of this thread. :rocker:

I'm not sure the doors will be used. I just don't have an immediate need and they're in the way:eyecrazy:

Thanks for the comments, they keep life interesting!!
 

y'sguy

Well-known member
Joined
May 1, 2010
Messages
1,319
Location
Tulsa, Oklahoma
Ok Andy, aluminum it is. And practice makes perfect, so I get that. I am in for a brass hammer too if that is in the works it would go well with a broom which I don't have ordered yet!
 
OP
O

oldironfarmer

Well-known member
Joined
Jun 25, 2016
Messages
6,664
Location
Terlton, Oklahoma
Another Saturday!

Boy I like Saturday!!

I sawed off the gate and filed down the flashing and extra material from the core prints.

IMG_1640_zps5uqbsm3p.jpg


Found this piece of bois d'arc. (pronounced Bow Dark)

IMG_1642_zpsl4igvp5q.jpg


Split it freehand on a band saw. No line.

IMG_1644_zpskdjrylt7.jpg


It came out fairly straight. This is after about five passes on the jointer.

IMG_1645_zps9xf23qrd.jpg


Trimmed it to length, ripped it, and marked out for the hammer eye.

IMG_1650_zps3zhwopoc.jpg


Sawed two lines then flipped 90 degrees and finished sawing the other two lines. This let me use the original board for support.

IMG_1654_zpssewehuob.jpg


Then finished the first two cuts. Then cut the cheeks. I like a narrow shaft on a hammer, it keeps vibration from stinging your hand. There was a knot on one side of the handle and I hoped it would trim out. Almost:rocker:

IMG_1655_zpsrt1pmhrn.jpg


Then I took it to the shaving horse to trim the handle and fit the head.

IMG_1659_zpsh27ffruj.jpg


I'm slow, and it was a great day to sit on the horse on the porch and trim wood on the porch.

Fit the head and we have a handle.

IMG_1661_zpsl78uqpar.jpg


Put an oak wedge in it (I like to use dissimilar wood for the wedge, and usually use bois d'arc wedges in hickory handles) and shellacked it. Shellac makes a good finish for me.

IMG_1662_zps2icljheq.jpg


Then took my own advice and made a new core. Here it is in an ice cream bucket. Baking soda in the cup, then I pour in a little vinegar and put the lid on. That floods the bucket with CO2 and sets the Sodium Silicate in the sand.

IMG_1663_zpsl60jyvgn.jpg


Fail!

IMG_1664_zpsr0qwamp1.jpg


Maybe I didn't let it cure long enough. I think the sand is sticking to the plaster. I tried talc this time as a release agent. Going to try lacquering (or shellacking) the core box next time. I think it has enough draft.

IMG_1665_zpscpcthnzn.jpg


I may have to make another core box if I can't figure out how to get this one to release.

While the core was curing I cut the OIF in the pattern with a home made gouge. It cut too well, I slipped and gave the F a long point on it's head. So out comes the wood filler.

IMG_1667_zpsijf1ltyu.jpg


Then I picked up my new aluminum hammer and used it to tap the gouge and finished the work uneventfully. The little aluminum hammer worked well.

That was it for today!

Thanks for the visits!
 
Last edited:

jbmatth

Well-known member
Joined
Jun 3, 2013
Messages
5,684
Location
Northern Ok.
I like the look of the hammer handle Andy, and even better that it works. It is quite nice to not have to worry about permits or pesky things like that. I did a bit of mowing last night before we get hit by rain again and found a few high spots I need to smooth out more but otherwise it was pretty uneventful. The ride was a bit rough over Bob's tracks though. :)

Herb,
I suppose I could plant some rice, but then how would I get into the shop?
JB
 
OP
O

oldironfarmer

Well-known member
Joined
Jun 25, 2016
Messages
6,664
Location
Terlton, Oklahoma
Andy, I can't say it enough, you do some fantastic work..:bowdown:

Regards

Thanks for your kind words! :bowdown:

Having lots of Saturdays is rewarding:bounce:

I like the look of the hammer handle Andy, and even better that it works. It is quite nice to not have to worry about permits or pesky things like that. I did a bit of mowing last night before we get hit by rain again and found a few high spots I need to smooth out more but otherwise it was pretty uneventful. The ride was a bit rough over Bob's tracks though. :)

Herb,
I suppose I could plant some rice, but then how would I get into the shop?
JB

Thank you, sir! I thought the handle was a little funky but I know I'll never grab it by mistake:lol:

So you can see why I don't joy ride Bob around my yard:spit: Rain will fix the tracks. Eventually.

I keep looking for updates on your thread:headscrat
 

y'sguy

Well-known member
Joined
May 1, 2010
Messages
1,319
Location
Tulsa, Oklahoma
Tulsa is close enough you might want to drive out, just the other side of Mannford.

Ah, ok! Your location of NE Oklahoma had me guessing you were up by Pawhuska or something. You're not far from me at all. I'll start thinking about a trip over. One of these saturdays ;)

The hammer turned out nice!
 

drivesitfar

Well-known member
Joined
Oct 23, 2013
Messages
36,017
Location
Pacific Northwest
Andy: great idea for the handle on your little aluminum CUSTOM MADE IN THE USA hammer.

not that you might need a hammer like this one i found in my travels i thought i'd post up a few pictures just in case you might want to try something bigger. i'm not exactly sure what it was made or designed for, but the quality is way better than average.

I haven't head any BULL stories in a while so is he still getting to know the COWS and maybe teaching the young calves who's BOSS?

i personally like your mezzanine and shelving and even though it might become a catch all it will maybe give you more floor space to work on or keep some of your stuff inside to slow down the rusting.

cheers and have a great SATURDAY while most of us enjoy our HUMP DAY.
 

Attachments

  • WP_20160818_016.jpg
    WP_20160818_016.jpg
    153.8 KB · Views: 50
  • WP_20160818_015.jpg
    WP_20160818_015.jpg
    160.2 KB · Views: 41
  • WP_20160818_013.jpg
    WP_20160818_013.jpg
    157.2 KB · Views: 40
  • WP_20160818_014.jpg
    WP_20160818_014.jpg
    157.9 KB · Views: 40
  • WP_20160818_012.jpg
    WP_20160818_012.jpg
    158.8 KB · Views: 36
To avoid these ads, REGISTER NOW!
Top Bottom