To avoid these ads, REGISTER NOW!

Clear epoxy over VCT or just polish?

bwilder10h

Member
Joined
Feb 28, 2006
Messages
18
Location
Cincinnasty, O
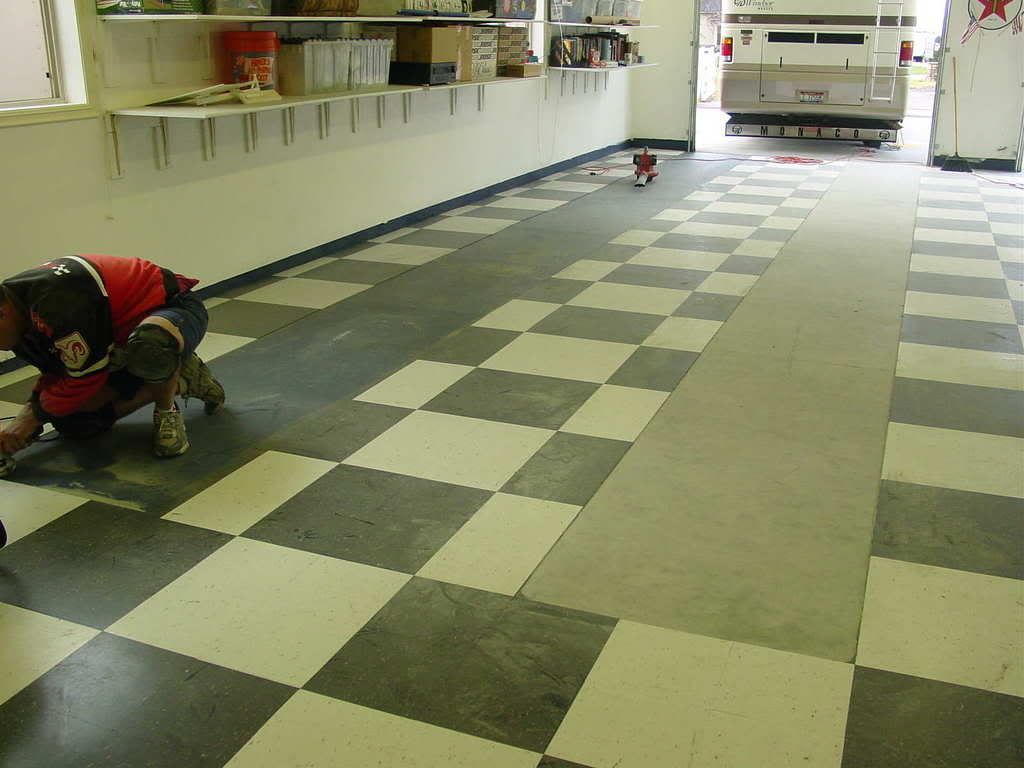
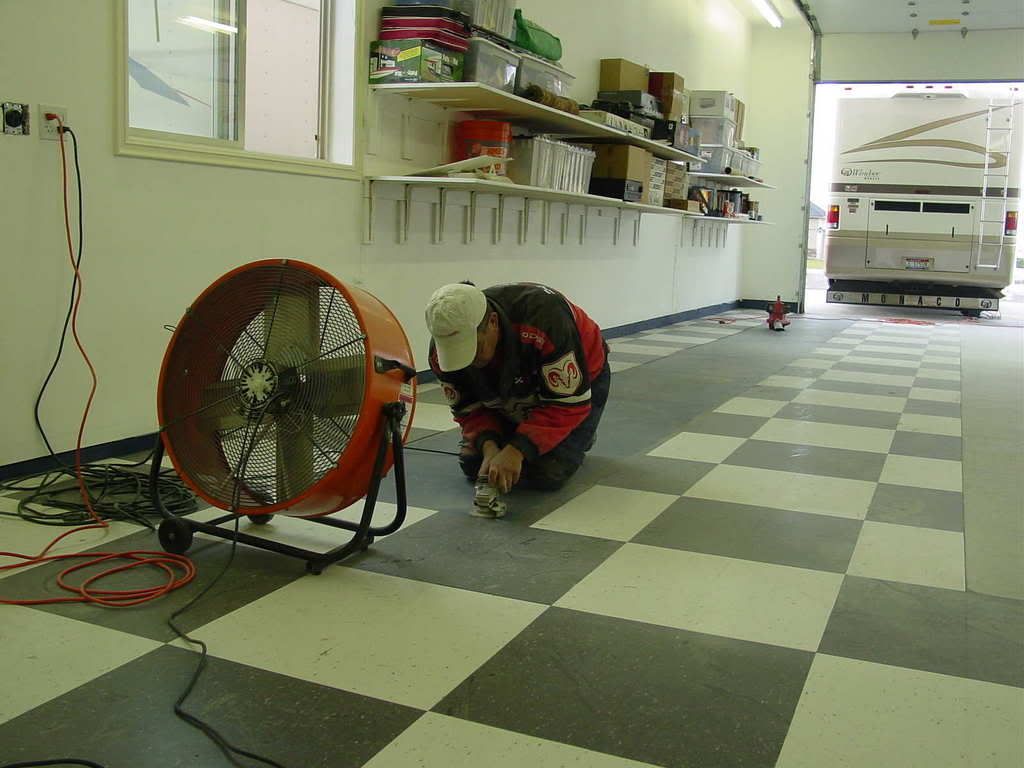
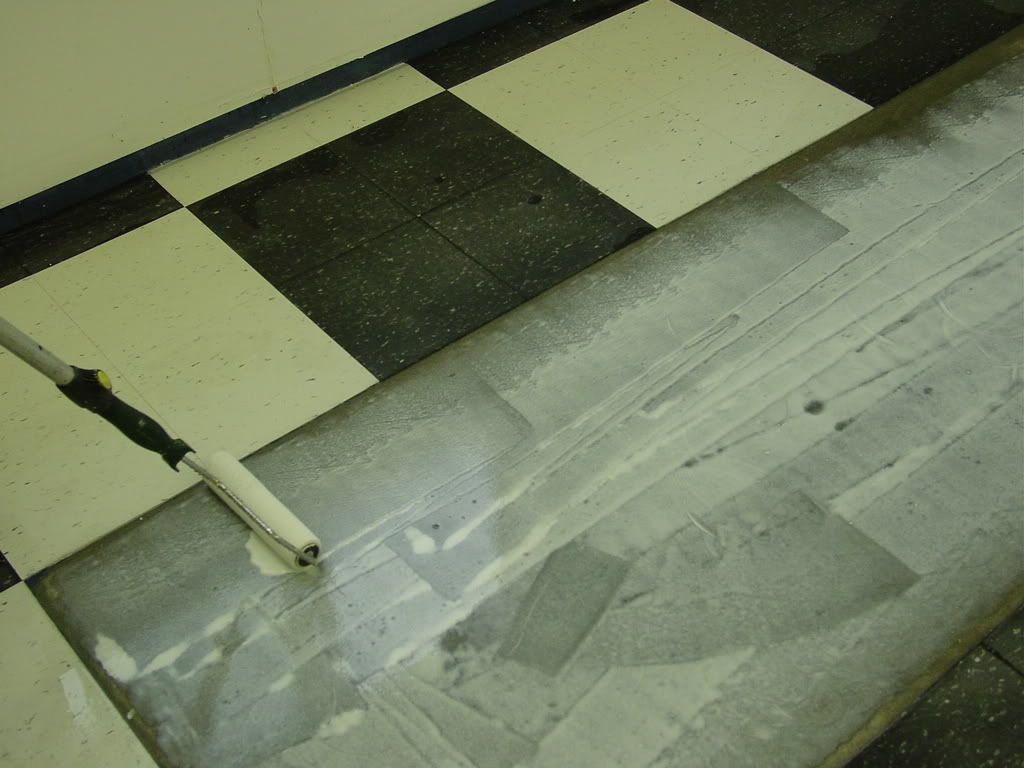
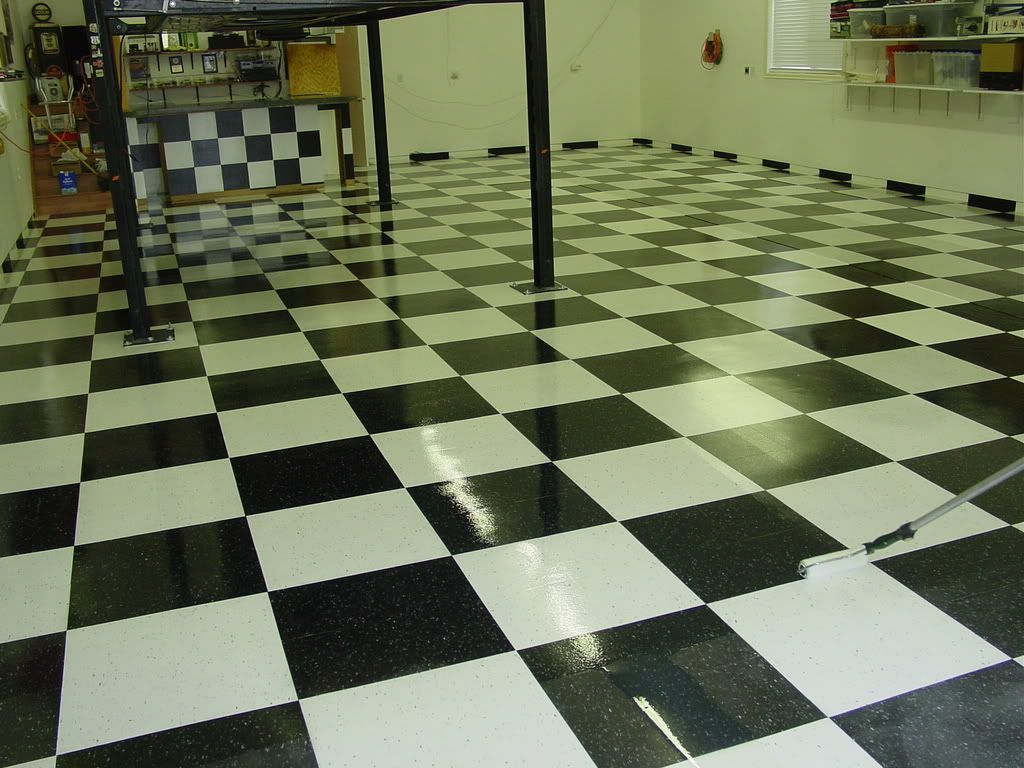
I finally (long story) got my 3 car garage VCT project completed and wanted to know if anyone has put a clear epoxy over the VCT to 'seal' it.

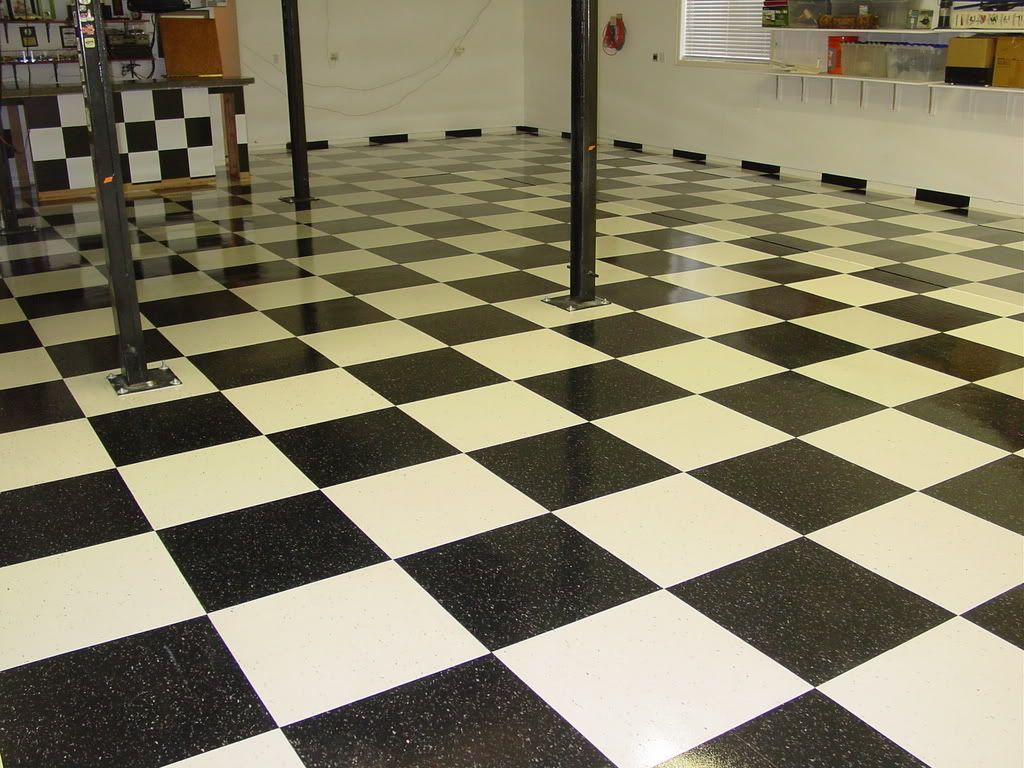
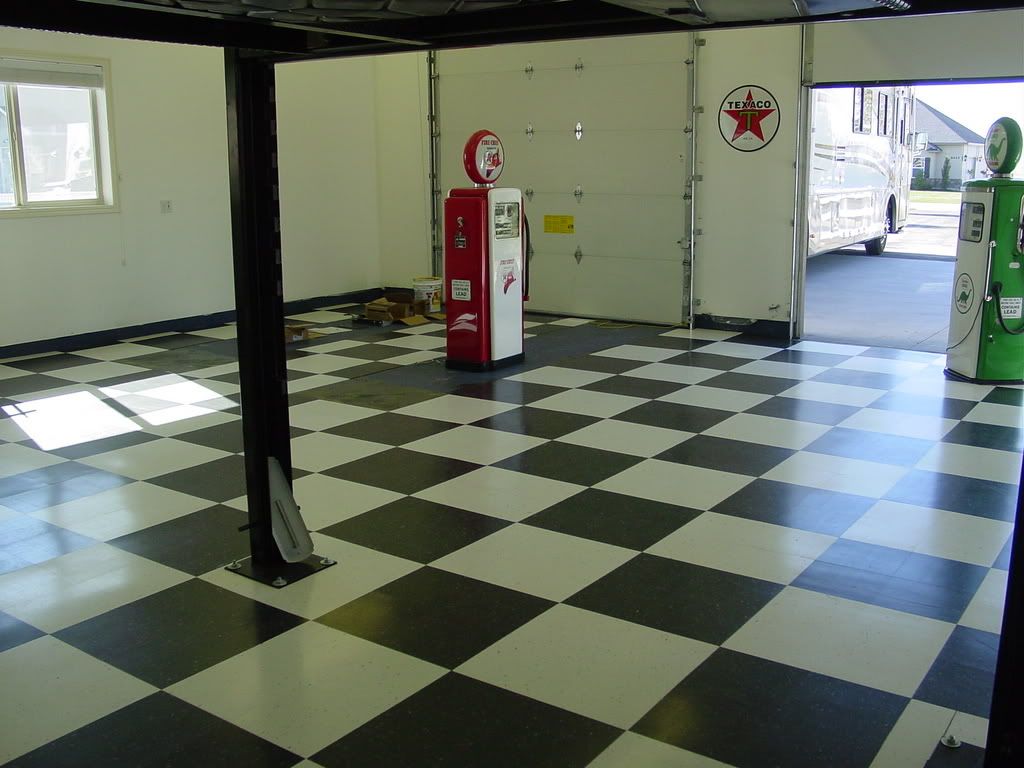
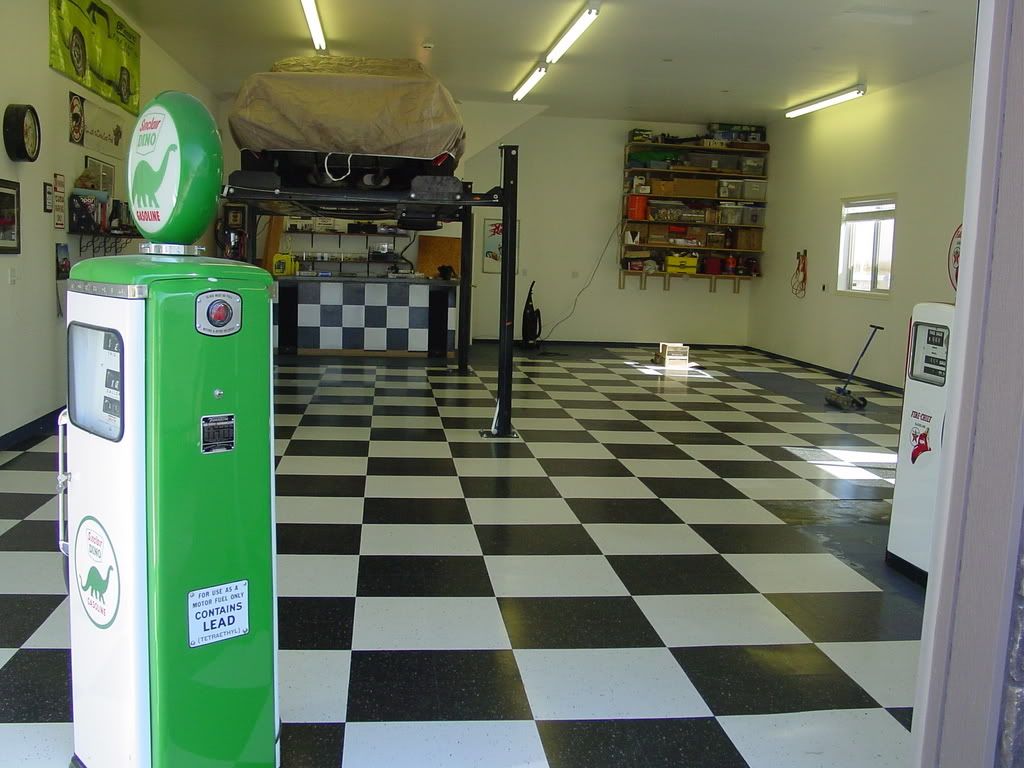
The two car side of my garage has been completed for a couple months but I just finished the 3rd car section and the work area behind it. The two car had the exelon polish put on and I wanted to strip the entire floor and reapply the polish or better yet.... seal it with a clear epoxy and be done for good.
 
To avoid these ads, REGISTER NOW!

Winmon

Well-known member
Joined
May 14, 2006
Messages
350
Location
Sequim, Wa
I would think that the VCT would be way to smooth to get the epoxy to stick to it. It has to have something to "bite" into. Be cool if it did work though......
 

gb70

Active member
Joined
Sep 15, 2005
Messages
34
Location
Idaho
I am doing 1,500 sf of black and white checkerboard look with 2' sqaures or 4 x 1' same color and 4 x 1' other color using Arstrong's VCT tiles. I am goint to rough it up with 100 grit sand paper using a machine then lay 2 coats 8 mills each of clear epoxy. The rough surface from the sanding will give it a good bight while being layed. The product goes down wet and looks wet afterwards. It is a good solution IMHO as compared to nothing and or just polish. The epoxy will also create another solid layer of protection which will help clean up from spills and such. I will post some pics soon as I am almost done with the flooring (tiles) part of the job but will have to wait a while for it to cure before the epoxy.

Greg
 

Winding Road

Member
Joined
Sep 2, 2006
Messages
20
that's a great idea to seal the tiles afterwards. How will you prep the floor before laying the VCTs? Are you going with pure black and white tiles, or with some speckles in it? I saw Lowes have them for like $0.68 each.

Thanks,
 

JohnHenrys48

Well-known member
Joined
Jan 27, 2005
Messages
199
Location
Arizona
Check with the VCT manufacturer. I think the VCT expands/contracts with temperature which may.may not have an effect on the epoxy top coat.
 

gb70

Active member
Joined
Sep 15, 2005
Messages
34
Location
Idaho
During this project I called Armstrong and spoke with the tech dept regarding concerns I have. What I learned is that they will warrenty their product if it is in a controled tempature enviroment at or above 55 degrees. Like most of you I live in 4 season country, and even though my detached garage does have insulation it will still go below 55 in the winter. I am going to add two wall heaters in there and keep it at 55 degrees or slighly more. Not sure if any of you have done this without heating? If so, what have you experienced?

The other thing is I have a class A diesel pusher that weighs 38,000 pounds and was told by tech dept at Armstrong that it would damage the tiles. I am going to create tires tracks that will not have the VCT tiles but will lay down epoxy paint in place.

As for the "prep work" before laying down the tiles:

I followed the directions from the adheisive manufacture (glue), which is to clean the substrate (floor) well using a degreaser to remove any stains from the surface. What I did was used my gas blower to get all the dust out first, then I used my buddies gas powered high pressure water pressure maachine. I then rented at Home Depot a buffer machine that I also got the scrubber pad for. I used 100% degreaser over stains after letting it sit for a while while using the scrubber, followed by a mixture of 50/50 water degreaser and the scrubber for the rest of the concrete. I did this twice and power washed off the mix twice. The floor needs to be dry before moving forward.

I am using the black and white tile with the specs or flakes on them as they were MUCH less than the solid black and white ones. I got lucky when I bought mine at Home Depot. When I got them they had 20% the product and I also had a 10% off for opening a Home Depot credit card. The cool thing was not only was it 30%, but it was 6 months same sa cash. I payed 530.00 with 5% tax (Idaho) and that comes to .35 cents a tile! I have 1,500 sf ( 30'x 50' ) detached and that is not bad $. I have also spent 3 x 29.00 for the adhiesive ( 5 gallon each ) and a few bucks for the number three trow that NEEDS to be used so that you gat the right amount of glue down, and a few more bucks on some Jasco adheisive remover. Yes, this glue is stickey and will stick to you like, well, glue LOL.
 
Last edited:

gb70

Active member
Joined
Sep 15, 2005
Messages
34
Location
Idaho
RavinJetta said:
Did you then roll the floor and seal it?

I rented (from Home Depot) the 100 pound roller which you need to do after you lay down the tiles, right away, as to get out the air bubbles and get it flat.

I am going to later scuff up the tiles using 100 grit pad while on a buffer so that the clear coat epoxy has something to bite at.

Here are todays pictures.

greg_s_new_floor_2.jpg


greg_s_new_floor_4.jpg
 

Winding Road

Member
Joined
Sep 2, 2006
Messages
20
gb70 said:
I rented (from Home Depot) the 100 pound roller which you need to do after you lay down the tiles, right away, as to get out the air bubbles and get it flat.

I am going to later scuff up the tiles using 100 grit pad while on a buffer so that the clear coat epoxy has something to bite at.

Here are todays pictures.

greg_s_new_floor_2.jpg


greg_s_new_floor_4.jpg


Beautiful floor! How did you finish the tiles at the bottom of the walls? Did you leave a little gap and paint the baseboard? I can't tell if you have baseboards or not. Also, what kind of lift is that? And I'm assuming you tiled around the lift, and not put the lift on top of the tiles?

Thanks!
 

gb70

Active member
Joined
Sep 15, 2005
Messages
34
Location
Idaho
Winding Road said:
Beautiful floor! How did you finish the tiles at the bottom of the walls? Did you leave a little gap and paint the baseboard? I can't tell if you have baseboards or not. Also, what kind of lift is that? And I'm assuming you tiled around the lift, and not put the lift on top of the tiles?

Thanks!

I purchased a tile cutter from Home Depot. It was located next to the VCT tiles. I simply measured and cut. This is why you need to start from the center out IMO. I am going to re-paint the area of the wall that is blue just below the white walls. I am going to use the same color of paint as my motorhome color.

The lift I have owned for about 5 years. It is a Eagle Lift model 7000 XLT, which means that it can lift up to 7,000 pounds, and the XLT allows a taller person ( I am 6'2" ) under the car without leaning down. It lifts higher than other models. I thought this issue out before I bought mine. Saves the back :)

I cut the tiles to fit around the lift. That is correct.
 

ssleepingbeauty

Well-known member
Joined
Jan 17, 2006
Messages
106
Location
Washington
gb70 said:
I rented (from Home Depot) the 100 pound roller which you need to do after you lay down the tiles, right away, as to get out the air bubbles and get it flat.

:headscrat I see Home Depot misinformed you. You DO NOT need a 100lb roller for VCT. Or any weight size roller for VCT. VCT (Vinyl Composition Tile) adheres to the adhesive over a 72 hour period, via a chemical reaction between the adhesive and tile where as the tile actually melts to the glue. Try chipping up a tile, it will come up in tiny pieces and won't want to break loose from the glue. But if you heat the tile with heat (propane torch, heat gun etc) the heat will reactivate the adhesive and you can peel up the tile in one full peice.

I have 24 years experience in commercial flooring, and have laid just about every aspect of VCT. (Grocery stores, Basketball courts, Hospital's, Custom pattern's etc.)

You did do a nice job :beer:
 

joecaver

Well-known member
Joined
Sep 22, 2005
Messages
212
Location
Dallas, GA
ssleepingbeauty said:
gb70 said:
I rented (from Home Depot) the 100 pound roller which you need to do after you lay down the tiles, right away, as to get out the air bubbles and get it flat.

:headscrat I see Home Depot misinformed you. You DO NOT need a 100lb roller for VCT. Or any weight size roller for VCT. VCT (Vinyl Composition Tile) adheres to the adhesive over a 72 hour period, via a chemical reaction between the adhesive and tile where as the tile actually melts to the glue. Try chipping up a tile, it will come up in tiny pieces and won't want to break loose from the glue. But if you heat the tile with heat (propane torch, heat gun etc) the heat will reactivate the adhesive and you can peel up the tile in one full peice.

I have 24 years experience in commercial flooring, and have laid just about every aspect of VCT. (Grocery stores, Basketball courts, Hospital's, Custom pattern's etc.)

You did do a nice job :beer:


I rolled mine too and I got the information from Armstrong's installation instructions http://www.armstrong.com/pdbupimages/159190.pdf which says


5. Roll all residential tile and SAFETY ZONE in both directions within the
adhesive working time using a 100-lb. roller.
 

gb70

Active member
Joined
Sep 15, 2005
Messages
34
Location
Idaho
ssleepingbeauty said:
gb70 said:
I rented (from Home Depot) the 100 pound roller which you need to do after you lay down the tiles, right away, as to get out the air bubbles and get it flat.

:headscrat I see Home Depot misinformed you. You DO NOT need a 100lb roller for VCT. Or any weight size roller for VCT. VCT (Vinyl Composition Tile) adheres to the adhesive over a 72 hour period, via a chemical reaction between the adhesive and tile where as the tile actually melts to the glue. Try chipping up a tile, it will come up in tiny pieces and won't want to break loose from the glue. But if you heat the tile with heat (propane torch, heat gun etc) the heat will reactivate the adhesive and you can peel up the tile in one full peice.

I have 24 years experience in commercial flooring, and have laid just about every aspect of VCT. (Grocery stores, Basketball courts, Hospital's, Custom pattern's etc.)

You did do a nice job :beer:

I read this from the recommended adhiesives instructions. It said to use the 100 pound roller and roll diagonally both directions shortly after laying down the tiles.

I appriciate your advice as to the heater gun. I am in the middle of having to remove tiles where my 38,000 pound motorhome tires would ride on. What a pain in the ***. I have been using a scraper, getting under the tiles, breaking them into pieces while the glue sticks to everything. I will try the heater gun. I am getting closer to finishing this issue and will lay down epoxy in the tire tracks. I will paint white epoxy first, then mask off and paint black epoxy squares so that the look is the same. After that dries, I will scuff up the tiles with 100 grit and lay down clear epoxy on all of it.

Can I borrow your heat gun :D
 

ssleepingbeauty

Well-known member
Joined
Jan 17, 2006
Messages
106
Location
Washington
Yeah, Armstong does that just to cover themselves. I have proven more than one Rep wrong out in the field before. Most don't have a clue when it comes out to the field work, out in the real world. Because Armstrong knows it lost it's quality control, when they stopped making there VCT in the good ole USA, and moved there manufacturing to our good ole neighbors down South. :lol2: The best Quality VCT is now Mannington.

Just remember. VCT is very durable. As an example look at a grocery store. They are walked on, spilled on, broken glass dropped on them, cart wheels, pallet jacks, high heel shoes, etc. 24/7 and they still last for years with the proper care. Just be careful of wetness (Very Slick).
 

ssleepingbeauty

Well-known member
Joined
Jan 17, 2006
Messages
106
Location
Washington
ssleepingbeauty said:
Yeah, Armstong does that just to cover themselves. I have proven more than one Rep wrong out in the field before. Most don't have a clue when it comes out to the field work, out in the real world. Because Armstrong knows it lost it's quality control, when they stopped making there VCT in the good ole USA, and moved there manufacturing to our good ole neighbors down South. :lol2: The best Quality VCT is now Mannington.

Just remember. VCT is very durable. As an example look at a grocery store. They are walked on, spilled on, broken glass dropped on them, cart wheels, pallet jacks, high heel shoes, etc. 24/7 and they still last for years with the proper care. Just be careful of wetness (Very Slick).


Another tip, after spreading the glue, put a fan on it. The more AIR (not necessarly heat) the faster the glue dries. 20 to 30 minutes and should be ready to go.
 

gb70

Active member
Joined
Sep 15, 2005
Messages
34
Location
Idaho
ssleepingbeauty said:
Another tip, after spreading the glue, put a fan on it. The more AIR (not necessarly heat) the faster the glue dries. 20 to 30 minutes and should be ready to go.

Funny, that is what I did. I did have to be careful how much I layed out (glue with fan on), if I took too long to lay down in four different areas, the glue in the last area was getting close to the end of the window time.

I have a question for you. I live in Idaho and as an example outside temps tonight will get to 30 degress. My detatch is well insulated but as we get into the Winter months it will get below 55 degress inside my garage where the tiles are. Will this effect the tiles?

I have ordered 2 wall mounted heaters and will use my ceiling fans (blowing down) to force the heat down and around, but what is your take on this claim by Armstrong on keeping it above 55 degrees?
 

ssleepingbeauty

Well-known member
Joined
Jan 17, 2006
Messages
106
Location
Washington
The heat is only crucial the first 72 hours. Once the VCT is bonded and cured you shouldn't have any problems with the cold. The reason you don't want to install in the cold is you will have a crackling and popping sounds from the floor as you walk on it. Because it doesn't completely bond in the cold.

Also if you install in too hot of a condition you will have problems. The tiles will be expanded and softer. And as soon as they cool from the cold concrete and air temps. They will contract, and you will have gaps everywhere in all of your joints in both directions. Ideally try not to install in temps over the low 70's, and no colder than 55*. Then when it does get cold you shouldn't have any problems.

So you should be OK with the low temps, as long as you are within the temp guidelines 48 hours before install, and approx. 72 hours after. :thumbup:
 
To avoid these ads, REGISTER NOW!

gb70

Active member
Joined
Sep 15, 2005
Messages
34
Location
Idaho
I took your advice and used a heat gun. What a difference that made. I got up the tiles that I needed so that I can drive the 38,000 pound motorhome inside not driving onto the tiles. Thanks again for the advice.:thumbup:
 

gb70

Active member
Joined
Sep 15, 2005
Messages
34
Location
Idaho
toms73novass said:
Did the motor home crush the vct? :headscrat :headscrat

No, that is why I removed the tiles where the motorhome tires would be coming in and out. I plan on laying down white epoxy in the "tire tracks" (where there is no tiles), and mask off and then paint black epoxy thus making a checkerboard look but it will be epoxy not tiles. 38,000 pounds is a lot of weight and I did not want to risk it as I am going to add clear epoxy over the tiles and epoxy later. In this post I mentioned this issue as I was concerned about it.
 

ssleepingbeauty

Well-known member
Joined
Jan 17, 2006
Messages
106
Location
Washington
gb70 said:
I took your advice and used a heat gun. What a difference that made. I got up the tiles that I needed so that I can drive the 38,000 pound motorhome inside not driving onto the tiles. Thanks again for the advice.:thumbup:

Glad it worked out:D
 

rbcsaver

Member
Joined
Oct 8, 2006
Messages
6
Location
North East PA
I sincerely doubt the MH would damage the tiles, as long as they are adhered properly to a flat floor without voids in concrete or adhesive under the tile.
regards,
Steve
 

gb70

Active member
Joined
Sep 15, 2005
Messages
34
Location
Idaho
rbcsaver said:
I sincerely doubt the MH would damage the tiles, as long as they are adhered properly to a flat floor without voids in concrete or adhesive under the tile.
regards,
Steve

Did I mention that I have a class A diesel pusher that is 38' long and weighs over 38,000 pounds. Because I am going to lay down clear epoxy over my VCT flooring I did not want to risk it. Belive me I thought long and hard about it. I thought that since I was pulling in forwards perhaps that front tires would not crack them, but the back tires is where the heavy axles and diesel engine are. I just could not risk it. Kept thinking about what a pain in the you know what if they did crack after the epoxy was down. You may be right but we will never know now.
 

carguy123

Well-known member
Joined
Oct 6, 2006
Messages
308
Location
DFW
Did you ever apply the clear epoxy?

What brand did you use?

I want to stain my concrete and then clear coat it but with all the tales of the epoxy lifting I want to be sure I use the right product.
 

gb70

Active member
Joined
Sep 15, 2005
Messages
34
Location
Idaho
carguy123 said:
Did you ever apply the clear epoxy?

What brand did you use?

I want to stain my concrete and then clear coat it but with all the tales of the epoxy lifting I want to be sure I use the right product.

Been busy removing the old paint in what is the rv tire tracks. I need to do this before I acid etch the concrete prior to the first step, the primer. Then followed by the white epoxy, maskin of squares (like the VCT size), and using then black epoxy creating the same checker board look, but epoxy in the rv tire tracks. After all that will I add the clear coat of epoxy.

Here are some pics of todays work. I have already scuffed up the VCT tiles with 80 grit so that when I do add the clear epoxy to the vct tiles it will have a bite and stick. I also caulked at the ends to the stem walls, black and white.

Greg

twomhtracks.jpg


mhtrack.jpg


gregworkingingarage.jpg


119511826107_0_BG.jpg
 

gb70

Active member
Joined
Sep 15, 2005
Messages
34
Location
Idaho
RavinJetta said:
Wow removing that paint must take you forever with the hand grinder

Yes it did.

This morning I pouerd muratic acid deluted with water and placed it on the concrete to open up the pours

Picture001.jpg


While that sat I used the buffer and stiff pad to clean the VCT tiles with some water and amonua product

Picture003.jpg


Picture004.jpg


After I spayed it off with water, used the squeezy, and got it dry enough, I added a vapor locking/barrier water base primer. The vaper locking/barrier water base primer will not let moisture escape back up.

Picture005.jpg


Rolled on

Picture006.jpg


When it is dry tomorrow I will mask off around the tiles and then use the white epoxy.

Picture011.jpg


As you can see this is labor intensive.

Greg
 

gb70

Active member
Joined
Sep 15, 2005
Messages
34
Location
Idaho
Picture016.jpg


I painted the stem walls also.

Picture015.jpg


I painted the tire tracks (still have masking material on it), with the white epoxy, and then the black epoxy. Monday is the day I lay down the final product, clear Poly Urathane over every thing. :thumbup:
 

gb70

Active member
Joined
Sep 15, 2005
Messages
34
Location
Idaho
Well, I still have one more coat to apply on Weds. It is a VCT tile and I added a top coat of polyurathane.


Picture036.jpg


Picture041.jpg


Greg
 

tommya

Member
Joined
Mar 26, 2006
Messages
23
Location
Washington Township, NJ
gb70 said:
Well, I still have one more coat to apply on Weds. It is a VCT tile and I added a top coat of polyurathane.


Greg-
Which Armstrong adhesive did you use? I'm thinking that the S-230 epoxy adhesive is a better choice for a garage with melting snow falling on it than the other water based adhesives but Armstrong doesn't list standard Excelon tiles with the S-230.

Also, for making the floor not slippery if wet is a clear polyurethane or clear epoxy better, or just leave it bare-an even better argument for the S-230.

Thanks
Tom
 

gb70

Active member
Joined
Sep 15, 2005
Messages
34
Location
Idaho
adding an office at the end of the shop on the right of the bar. Will post pics when finished. Floor is done and looks amazing.:thumbup:
 
To avoid these ads, REGISTER NOW!
Top Bottom