To avoid these ads, REGISTER NOW!

Cluck Cluck Save a Buck Garage

nterry1957

Well-known member
Joined
Apr 3, 2014
Messages
118
Location
SW Missouri the garden spot of the USA
Cluck Cluck Save a Buck 40x40 DIY Garage

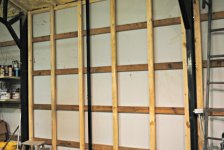
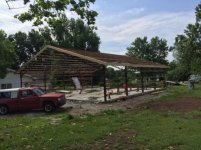
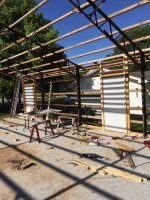
I've spent 25 years dreaming and waiting for my chance to build a shop. My youngest just graduated high school and I decided that it's not going to build itself and I can't afford to just hire one done complete so here is the story of a cheapskate getting the most bang for his buck on a 40x40 insulated shop.

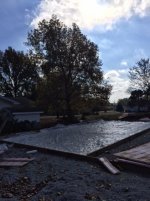
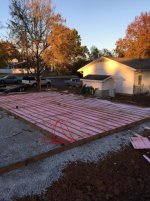
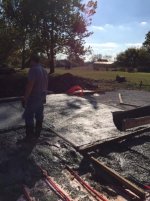
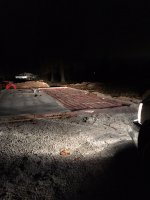
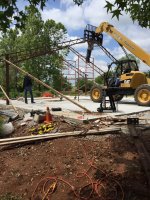
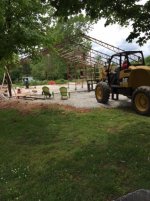
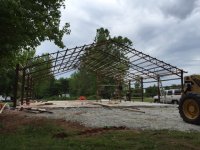
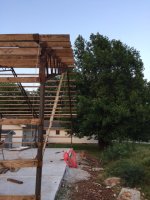
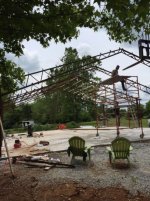
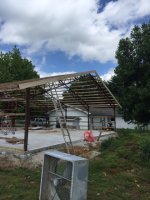
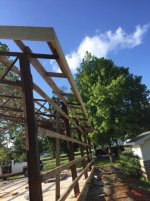
Last fall we did the dirt work and the pad, we just recently put up the frame.

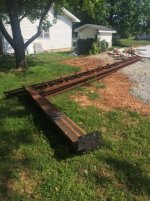
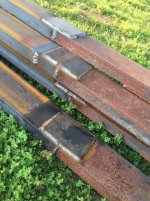
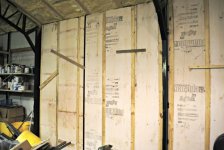
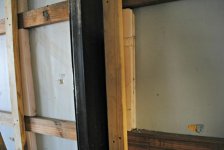
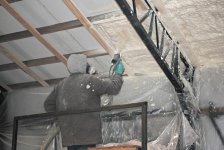
I researched and researched and the best deal I could get on a pole barn was a 30x50 for around $14,000 complete except dirt work (decided against it). I finally decided the best deal for me would be to buy recycled chicken house steel trusses, lumber and insulation. These are plentiful in my area and for sale on Craigslist constantly. $1900 for 5 trusses, lumber and 1-1/2" board insulation. I ended up having to bring in 20 loads of fill into what I thought was a reasonably flat piece of my modest 1-3/4 acres.

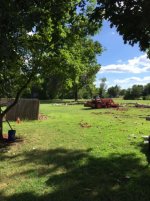
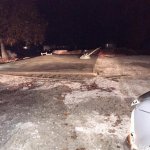
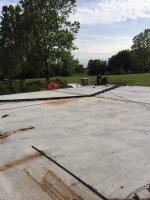
Here is the building site. I removed 2 30 year old giant sycamore trees that were a pain in the neck. Cost was about $600.

http://i1178.photobucket.com/albums/x362/nterry1957/IMG_1623_zpso7ksxoph.jpg
 

Attachments

  • IMG_1623.jpg
    IMG_1623.jpg
    61.4 KB · Views: 340
Last edited:
To avoid these ads, REGISTER NOW!
OP
N

nterry1957

Well-known member
Joined
Apr 3, 2014
Messages
118
Location
SW Missouri the garden spot of the USA
The building will be 40x40 but I didn't dare pour that much concrete at once with my limited knowledge, experience and crew so we formed up a 20x40 section for the first pour.
 

Attachments

  • IMG_1957.jpg
    IMG_1957.jpg
    50.2 KB · Views: 265
OP
N

nterry1957

Well-known member
Joined
Apr 3, 2014
Messages
118
Location
SW Missouri the garden spot of the USA
My youngest son, brother, dad, father-in-law and some of my son's friends all chipped in when the concrete arrived. After a hard day and lots of help from the truck driver (which earned him a $100 tip) we got the first pour done and decided 20x40 was a little much to tackle. We would attempt the second half of the floor in 2 10x40' pours so it would be easier to screed.
 

Attachments

  • IMG_1963.jpg
    IMG_1963.jpg
    50.9 KB · Views: 272
  • IMG_1965.jpg
    IMG_1965.jpg
    54.6 KB · Views: 241
  • IMG_1966.jpg
    IMG_1966.jpg
    58.1 KB · Views: 245
OP
N

nterry1957

Well-known member
Joined
Apr 3, 2014
Messages
118
Location
SW Missouri the garden spot of the USA
And the last 10x40 section.

In retrospect, the finish turned out ok, it's just a shop so I can live with it. But The seams aren't that great.. in fact, they are terrible. I'm going to be cussing myself every time I try to roll over that center seam on a creeper.
 

Attachments

  • IMG_2031.jpg
    IMG_2031.jpg
    48.7 KB · Views: 236
  • IMG_2029.JPG
    IMG_2029.JPG
    117.6 KB · Views: 207
OP
N

nterry1957

Well-known member
Joined
Apr 3, 2014
Messages
118
Location
SW Missouri the garden spot of the USA
We got the floor done late last fall and my oldest son had some medical issues and lots of unexpected expenses popped up. Christmas was also approaching so I decided to shelve the shop until spring. the pad sat there lonely all winter until we recently got back on the project.

The chicken barn trusses have a 4/12 pitch but the side walls are only 6'. My son was taking welding his senior year of high school so we loaded all 10 sections (2 halves of 5 trusses) and he welded 3' extensions (for a 9' side wall) and bolt plates on them at school. He barely got them done before graduation!
 

Attachments

  • IMG_2523.jpg
    IMG_2523.jpg
    64.7 KB · Views: 360
  • IMG_2525.jpg
    IMG_2525.jpg
    67.3 KB · Views: 399
  • IMG_2522.jpg
    IMG_2522.jpg
    151.7 KB · Views: 353
Last edited:
OP
N

nterry1957

Well-known member
Joined
Apr 3, 2014
Messages
118
Location
SW Missouri the garden spot of the USA
This spring when I started taking a good look at where we were at, I realized that the guy I bought the material from had shorted me lumber AND insulation. I was supposed to get enough of both to do the building plus 40 extra 2x4's and 1600 square ft of insulation for the floor. As it stood, I was almost out of insulation already and only had 40 2x4's. I called the guy and text repeatedly. Bottom line, he got me 40 2x4's but didn't have any insulation. I should have taken better inventory when I picked the stuff up and it was 8 months ago so I think I'm going to have to live with what I have and come up with insulation for the building.

When I picked up the lumber I also got a couple of walk doors ($10 each) and a giant fan for the shop!
 

Attachments

  • IMG_2529.JPG
    IMG_2529.JPG
    127.5 KB · Views: 194
OP
N

nterry1957

Well-known member
Joined
Apr 3, 2014
Messages
118
Location
SW Missouri the garden spot of the USA
DO NOT try to bolt these together then lift them up!!

The way to do it is raise each side up and then bolt them together at the top. These are designed to hold a load straight down but not sideways.
 

Attachments

  • IMG_2543.jpg
    IMG_2543.jpg
    147.9 KB · Views: 318
  • IMG_2540.jpg
    IMG_2540.jpg
    155.6 KB · Views: 318
  • IMG_2538.jpg
    IMG_2538.jpg
    152.9 KB · Views: 284
  • IMG_2537.jpg
    IMG_2537.jpg
    151.5 KB · Views: 326
OP
N

nterry1957

Well-known member
Joined
Apr 3, 2014
Messages
118
Location
SW Missouri the garden spot of the USA
Finished up the frame this week.

My wife's uncle is going to help me frame the end walls with the door openings. I figure that's pretty important and would be better with someone experienced leading the way.

Plans call for 5 overhead doors. 3 on the front (12x10, 9x8 and 9x8) and 2 on the rear (9x7).

This brings this thread up to date and I will try to keep it current.

Happy hot rodding!!
 

Attachments

  • IMG_2540.jpg
    IMG_2540.jpg
    155.6 KB · Views: 250
  • IMG_2543.jpg
    IMG_2543.jpg
    147.9 KB · Views: 232
  • IMG_2545.jpg
    IMG_2545.jpg
    66.7 KB · Views: 242
  • IMG_2546.jpg
    IMG_2546.jpg
    60.1 KB · Views: 197
  • IMG_2549.jpg
    IMG_2549.jpg
    56.1 KB · Views: 203
  • IMG_2550.JPG
    IMG_2550.JPG
    144.9 KB · Views: 362
To avoid these ads, REGISTER NOW!
OP
N

nterry1957

Well-known member
Joined
Apr 3, 2014
Messages
118
Location
SW Missouri the garden spot of the USA
The wife said she wanted eaves on this building..... So I'm putting eaves on this building.
 

Attachments

  • IMG_2571.JPG
    IMG_2571.JPG
    145.6 KB · Views: 252
  • IMG_2572.JPG
    IMG_2572.JPG
    143.3 KB · Views: 232
  • IMG_2573.JPG
    IMG_2573.JPG
    136.8 KB · Views: 224
  • IMG_2574.JPG
    IMG_2574.JPG
    143.1 KB · Views: 230

Bib Overalls

Well-known member
Joined
Dec 4, 2006
Messages
3,318
Location
Jonesboro, Arkansas
Looks a lot like the "Adam's Truss" package I put up. Should, they started out making chicken houses.

The foam board insulation I used in my shop came out of decommissioned chicken houses in SEMO. Paid $10 each for boards that were 1.5" x 4' x 16'. While I was picking up the foam I looked at the web steel posts and trusses. They were eaten up by ammonia (I was told) from the chicken waste. Hopefully yours were more substantially made and held up better.
 
OP
N

nterry1957

Well-known member
Joined
Apr 3, 2014
Messages
118
Location
SW Missouri the garden spot of the USA
Mr. Overalls, thanks for the reply.. I am going with chicken house insulation as well. My trusses have surface rust on them but are sturdy and structurally sound. The legs are heavy 6" channel.

Marty, My son and I have spent tons of time together lately both anticipating and dreaming about what we will do inside this shop. It's been great!
 
OP
N

nterry1957

Well-known member
Joined
Apr 3, 2014
Messages
118
Location
SW Missouri the garden spot of the USA
I put a down payment and ordered most of the metal sheeting yesterday. it will be here Tuesday so... No rest for me this long weekend! I've got to get the fascia and some other odds and ends done as well as picking up the insulation for the roof.
 

65cayne

Well-known member
Joined
Sep 26, 2010
Messages
216
Location
Oklahoma
I put a down payment and ordered most of the metal sheeting yesterday. it will be here Tuesday so... No rest for me this long weekend! I've got to get the fascia and some other odds and ends done as well as picking up the insulation for the roof.

That looks great the way it is coming together. The steel trusses give you quite a bit of clearance inside. So can you answer a question for someone who's never worked with steel?

Is using clear span steel trusses like that any cheaper than wood trusses? How do you affix the wood to the truss? Do you have to drill a hole for every screw or do self tappers run through it fairly easy?

Thanks,
-Kevin
 
OP
N

nterry1957

Well-known member
Joined
Apr 3, 2014
Messages
118
Location
SW Missouri the garden spot of the USA
Hey Kevin..

After a lot of research I decided to go with the steel trusses for the ceiling room. And they were cheap. I would have to look back at my notes and try to find my price comparison to know the difference but around here, you can get steel chicken house trusses for around $100 each. I used 5 so I only have $500 in Trusses. I also bought the 2x4's for the girts and purlins from the same place. They are usually around $2 for a 20 footer. In retrospect, I would probably buy new lumber if I was to do it again. The 2x4's aren't the greatest but they really aren't structural.

Each truss has steel tabs at each location with pre-drilled holes for the lumber. So you just put it in place and zip some construction screws in. (Here are a couple of pics where you can see these tabs) I added some tabs to the side walls for extra lumber on the sides.

The main draw back on these trusses is that the sidewalls are usually only 6' (chickens are short). I had my son extend them 3' for a 9' sidewall.

It's 15' and change to the bottom of the truss at the center!! Perfect for a future lift!
 

Attachments

  • IMG_2522.jpg
    IMG_2522.jpg
    151.7 KB · Views: 183
  • IMG_2545.jpg
    IMG_2545.jpg
    66.7 KB · Views: 176
Last edited:

Bib Overalls

Well-known member
Joined
Dec 4, 2006
Messages
3,318
Location
Jonesboro, Arkansas
When I ordered my building from Adam's Truss I specified their 1" "AgBoard" insulation. This goes on over the purlins and girts and under the metal skin.

When I decided to add heat and air I put 1.5" foam boards between the girts and then I nailed vertical 2x4s on approximately 16" centers. Between these vertical straps I put another layer of 1.5" foam. The foam was then covered with OSB for protection and appearance.

The ceiling was sprayed with closed cell foam.
 

Attachments

  • Shop Remodel 102s.jpg
    Shop Remodel 102s.jpg
    136 KB · Views: 179
  • Shop Remodel 100s.jpg
    Shop Remodel 100s.jpg
    69.7 KB · Views: 173
  • Shop Remodel 099s.jpg
    Shop Remodel 099s.jpg
    58.6 KB · Views: 180
  • Shop Remodel 097s.jpg
    Shop Remodel 097s.jpg
    36.4 KB · Views: 170
  • Shop Remodel 095s.jpg
    Shop Remodel 095s.jpg
    51.6 KB · Views: 179
  • Shop Remodel 70s.jpg
    Shop Remodel 70s.jpg
    68.9 KB · Views: 207

65cayne

Well-known member
Joined
Sep 26, 2010
Messages
216
Location
Oklahoma
When I ordered my building from Adam's Truss I specified their 1" "AgBoard" insulation. This goes on over the purlins and girts and under the metal skin.

When I decided to add heat and air I put 1.5" foam boards between the girts and then I nailed vertical 2x4s on approximately 16" centers. Between these vertical straps I put another layer of 1.5" foam. The foam was then covered with OSB for protection and appearance.

The ceiling was sprayed with closed cell foam.

That is a lot of foam. I assume it works awesome?
 

65cayne

Well-known member
Joined
Sep 26, 2010
Messages
216
Location
Oklahoma
...Each truss has steel tabs at each location with pre-drilled holes for the lumber. So you just put it in place and zip some construction screws in. (Here are a couple of pics where you can see these tabs) I added some tabs to the side walls for extra lumber on the sides...

Appreciate the info. Looking forward to more progress.
 
OP
N

nterry1957

Well-known member
Joined
Apr 3, 2014
Messages
118
Location
SW Missouri the garden spot of the USA
Ok, the eaves are a little more of a pain than what I thought but I'm slowly making progress. Remember, I'm a turd herder by trade and although I consider myself mechanically inclined, I AM NOT a carpenter.

It's memorial day weekend and I planned on getting a ton done on the shop but my help ran off to the lake with his girlfriend... So it's slowing me down. Tin starts showing up tomorrow!
 

Attachments

  • IMG_2582.JPG
    IMG_2582.JPG
    145.1 KB · Views: 188
  • IMG_2585.jpg
    IMG_2585.jpg
    144.8 KB · Views: 201
  • IMG_2588.jpg
    IMG_2588.jpg
    51 KB · Views: 182
  • IMG_2590.jpg
    IMG_2590.jpg
    52.3 KB · Views: 174
OP
N

nterry1957

Well-known member
Joined
Apr 3, 2014
Messages
118
Location
SW Missouri the garden spot of the USA
Eaves are finished and we are on to the tedious work of bracing. These trusses are designed to have x bracing between them between the end 2. In the chicken houses that are 300 to 500 feet long, they put the bracing on at several points along the building.

These trusses did not all have brackets for the bracing so we had to fab and add several. The bracing is not something I thought or knew about when I bought them, but after erecting them and doing some research. I believe they have to be there to insure a sturdy building.

I also picked up the first of the exterior sheet metal. I hope to start putting it on next week as we have a clear forecast!
 

Attachments

  • IMG_2605.jpg
    IMG_2605.jpg
    54.6 KB · Views: 148
  • IMG_2604.JPG
    IMG_2604.JPG
    122.4 KB · Views: 154
  • IMG_2603.JPG
    IMG_2603.JPG
    125.8 KB · Views: 161
  • IMG_2601.jpg
    IMG_2601.jpg
    53.9 KB · Views: 160
OP
N

nterry1957

Well-known member
Joined
Apr 3, 2014
Messages
118
Location
SW Missouri the garden spot of the USA
Progress is slow just being able to work a couple hours now and then between the heat and work.
We did get some sheeting up though.
 

Attachments

  • IMG_2637.jpg
    IMG_2637.jpg
    152.5 KB · Views: 154
  • IMG_2636.jpg
    IMG_2636.jpg
    156 KB · Views: 143
  • IMG_2634.jpg
    IMG_2634.jpg
    148.6 KB · Views: 135
OP
N

nterry1957

Well-known member
Joined
Apr 3, 2014
Messages
118
Location
SW Missouri the garden spot of the USA
Got some super sweaty work done over the weekend and sold my Harley to finance my last metal siding purchase.

Roof goes on tomorrow!
 

Attachments

  • IMG_2649.jpg
    IMG_2649.jpg
    61 KB · Views: 167
  • IMG_2650.jpg
    IMG_2650.jpg
    52.6 KB · Views: 158
  • IMG_2653.jpg
    IMG_2653.jpg
    56.4 KB · Views: 157
  • IMG_2654.jpg
    IMG_2654.jpg
    52.2 KB · Views: 209
To avoid these ads, REGISTER NOW!
Top Bottom