
You are using an out of date browser. It may not display this or other websites correctly.
You should upgrade or use an alternative browser.
You should upgrade or use an alternative browser.
CNC Plasma Table Build - Precision, CandCNC etc
- Thread starter ovrrdrive
- Start date
Racerx1194
Member
- Joined
- Jan 4, 2013
- Messages
- 9
have a chance to play with it any more
steel 35
Well-known member
Good looking table, Ovrrdrive!
Is there anyway you could post a few pics of how the gear rails attach under the CRS?
Thanks in advance!
3M Tape.
3M Tape.
3M VHB Tape, Half Inch wide gray....
Sorry for the lack of updates... Things have been really busy at work.
I had another motor giving me problems that put me in the dirt for a few weeks too. Rather than take it all apart (it was the Y on the other side of the gantry) I just waited until I had some time to ease some wire out and checked the splices they made when they assembled it and sure enough the directional control wire slipped right out of the crimp when I cut the boot off. That makes 2 out of the 4 motors I got from them that had the same issue. Without connection in that wire the motor randomly goes in different directions each time you energize it. The last one I sent back but after reading up on it I decided to check this one first before I did. Whoever was working the line that day crimped like they were a 12YO girl. Just barely tapped it. Kind of aggravating but it is what it is. If I get the issue with the other two I know right where to go.
I got some 45 amp nozzles to make cutting the thin gauge I've been practicing with a little cleaner. The machine works great but the cut height looks more like 3/4" instead of the .06" I have it set at, and for some reason even though it's cutting high it seems to crash into the material after a few minutes even with DTHC turned off. With DTHC on it crashes almost immediately but I am assuming I just haven't gotten it setup correctly yet so that isn't a huge issue. I've been trying to work the issues out on my own without bothering the people over at CandCNC but I think it's about time to start pestering them. I'm starting to think it might even be a noise issue. I'll try grounding the table better and see if it improves.
I ran a test file last weekend on it and shot video after the crash and it made it all the way to the end of the file without issue. First time it hit the table on the 'U'. You can tell it's cutting high in the video but it's running really smooth...
Good looking table, Ovrrdrive!
Is there anyway you could post a few pics of how the gear rails attach under the CRS?
Thanks in advance!
As mentioned they're mounted with the 3M VHB tape. Just clean everything with acetone or alcohol first and clamp it for 24 hours. It's really strong stuff.
Attachments

tractordude
Well-known member
I'm taking baby steps on my build.
The machine torch head for a powermax 45 is spendy.
The machine torch head for a powermax 45 is spendy.
As mentioned they're mounted with the 3M VHB tape. Just clean everything with acetone or alcohol first and clamp it for 24 hours. It's really strong stuff.
Thanks! I may be hitting you with some more questions down the line. We are building a 5' x 10' table for a school project. Just finished the frame and now working on getting the rails in place.
steel 35
Well-known member
Really? DS tape? That's it?
It can handle the directional changes?
Everything around here made out of foam or rubber seems to break down after a bit when exposed to temperature changes or humidity.
Yep but they don't tell you the rail is 4' pieces and you weld it together.
kazlx
Well-known member
Yep but they don't tell you the rail is 4' pieces and you weld it together.
And you really need to tig it IMO. No problems here with the tape. It's been years and I've never had any issues. The gantry moves in the direction that the tape would have the most area. It's really not a problem when you see how everything goes together.
Jason Lister
Well-known member
Mine has been through 4 years of rough use too... Almost all the mechanical fasteners have been tightened though!
Farmall450
Well-known member
OP, that's badass. That hypertherm is the way to go, too. Consumables will last a long time if you don't crank it up to cut 1/4".
Sorry for the lack of updates. I got reminded in another thread that I've neglected these build posts...
I think I finally figured everything out this past weekend. My torch crashing problem ended up being the cutting surface I made was warped a little. The torch cuts at 1/16" over the metal and I was about 1/8" out in the middle of the table. A few clamps to straighten that out and it is tracking good now.
The G38 probe error I was getting I ended up finding a few posts Tom made in his forum talking about the plunge height safety clearance setting in sheetcam that ended up being the culprit for that one. It defaults at I think .02" in sheetcam and it was basically slamming into the table at the same time the ohmic sensor was going off which was throwing the error. I put that to the recommended .5" setting and it seems to be running really good now. Still needs a little better tuning/understanding of the DTHC but it is cutting really well now. I got some 45amp nozzles a few months ago and cut some 1/8" liek butter with DTHC last weekend and didn't have any issues.
I ran the same file on some 1/2" and it looked a little rough in a few spots but I think that's just me needing to work out the best rules and settings to make it work. I did manage some really good quality on the cut for most of it. I don't thin kI'm that far away.
I think I'm finally ready to start buying some bulk sheet and working out my CAD and Inkscape skills.")
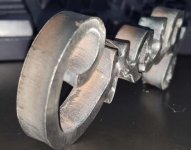
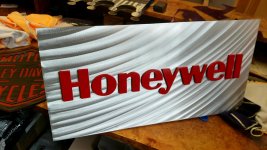
Here's a quick vid of the 1/8th" cut. And yes, it was my name again for you fans. I like cutting stuff out to take to work and put on my desk to show off as examples. Sue me.
I think I finally figured everything out this past weekend. My torch crashing problem ended up being the cutting surface I made was warped a little. The torch cuts at 1/16" over the metal and I was about 1/8" out in the middle of the table. A few clamps to straighten that out and it is tracking good now.
The G38 probe error I was getting I ended up finding a few posts Tom made in his forum talking about the plunge height safety clearance setting in sheetcam that ended up being the culprit for that one. It defaults at I think .02" in sheetcam and it was basically slamming into the table at the same time the ohmic sensor was going off which was throwing the error. I put that to the recommended .5" setting and it seems to be running really good now. Still needs a little better tuning/understanding of the DTHC but it is cutting really well now. I got some 45amp nozzles a few months ago and cut some 1/8" liek butter with DTHC last weekend and didn't have any issues.
I ran the same file on some 1/2" and it looked a little rough in a few spots but I think that's just me needing to work out the best rules and settings to make it work. I did manage some really good quality on the cut for most of it. I don't thin kI'm that far away.
I think I'm finally ready to start buying some bulk sheet and working out my CAD and Inkscape skills.
Here's a quick vid of the 1/8th" cut. And yes, it was my name again for you fans. I like cutting stuff out to take to work and put on my desk to show off as examples. Sue me.
Last edited:
A little update..
The DTHC problem I was having is finally worked out. the machine is working beautifully now. Turns out that problem was solved by unchecking the tip saver and enabling VAD in Command CNC. Everything fell into place after I got that little tidbit of advice from the support forums at CandCNC.
I also got a hookup for steel at a big local fab shop. Still not getting it at cost but in my area just getting it is a huge advancement. It's been a huge ordeal just to get steel here. This place has it all sitting on the shelf. And I'm saving about 20% on what I was able to find previously. Hopefully after I work up a relationship with them I'll be able to get some of the small stuff they pass on. It pays to have connections...
We sent in for our LLC last week and am going to file our tax ID this coming week after the LLC is approved. We're going to do everything legit and above board. The company is going to be called Round2Fab. I'm going to try to post a lot of content and video to the facebook for it. Check it out if you get bored. I didn't want to make it public until I had more content but hell this is family here. https://www.facebook.com/round2fab/
Oh and the continued support from Precision Plasma and CandCNC has been amazing. Anyone considering doing this themselves should be seriously considering these companies.
Attachments

Gizmosity
Well-known member
Nice build. I know I'm not the only one who appreciates your effort to inform/enlighten and let us tag along and learn from your successes and mistakes. I'm sure I'm not the only one taking notes......
I am in the very, very early stages of a router build and am already looking at a plasma table build. My router is/will be a Mechmate. If it goes relatively smoothly I was going to follow the same route for the Plasma table: Mach 3, Gecko's, PMDX BOB, etc. Your build and a few others have me doing a bit more looking into pre-configured kits as apposed to the random piles of bits that I'm currently dealing with.
I am in the very, very early stages of a router build and am already looking at a plasma table build. My router is/will be a Mechmate. If it goes relatively smoothly I was going to follow the same route for the Plasma table: Mach 3, Gecko's, PMDX BOB, etc. Your build and a few others have me doing a bit more looking into pre-configured kits as apposed to the random piles of bits that I'm currently dealing with.
Thanks man. I can tell you that with my level of knowledge in these tables the suppport from PPllc and CandCNC was invaluable. Give me 6 months and some more experience under my belt and I might be able to build another table without them but just starting out their assistance in the few times I called on them was invaluable. I really couldn't have gotten through it without Ron and Tom. It was well worth the extra money I spent buying the kits from Precision Plasma and CandCNC.
If I can help on your build let me know.
If I can help on your build let me know.
Thanks for the update, Ovrrdrive. Your build has definitely helped my students and me in our 5 x 10 build. I agree with you that the help from Tom has been invaluable. At his recommendation, we are going with the "Fully Automated" kit and will order our plasma from Hypertherm with the RS485 connection already installed. We finally got the gantry welded up, and are now just waiting to get the water table back from getting broke. Cannot wait to get the electronics installed.
It cost us $216 for materials, and were able to get it broke for free. We are using 6' x 12' x 10 gauge sheet for a finished table size of 64" x 126" x 4" deep. We will add a drain pipe with ball valve and water hose fitting, as well.
The water table makes a world of difference on cutting down smoke and slag. Practically eliminates the smoke when the water is filled up to the bottom of the sheet of metal. If you do go with a water table, make sure to use a rust inhibitor water treatment, as the water gets nasty quick. Also, be careful cutting certain aluminum alloys over water, as they can create a hydrogen explosion.
The water table makes a world of difference on cutting down smoke and slag. Practically eliminates the smoke when the water is filled up to the bottom of the sheet of metal. If you do go with a water table, make sure to use a rust inhibitor water treatment, as the water gets nasty quick. Also, be careful cutting certain aluminum alloys over water, as they can create a hydrogen explosion.
Jason Lister
Well-known member
I believe my water table for my 4x8 was about $600 total. I just tig welded the corners up. I've read about the aluminum and hydrogen issues, but I've cut quite a bit of 5052 and 6061 and never had a problem.
steel 35
Well-known member
It cost us $216 for materials, and were able to get it broke for free. We are using 6' x 12' x 10 gauge sheet for a finished table size of 64" x 126" x 4" deep. We will add a drain pipe with ball valve and water hose fitting, as well.
The water table makes a world of difference on cutting down smoke and slag. Practically eliminates the smoke when the water is filled up to the bottom of the sheet of metal. If you do go with a water table, make sure to use a rust inhibitor water treatment, as the water gets nasty quick. Also, be careful cutting certain aluminum alloys over water, as they can create a hydrogen explosion.
If it's not too late I strongly suggest putting the slats 1/2" or so down below the top sides. Wish I did I will be adding angle to mine someday.
If it's not too late I strongly suggest putting the slats 1/2" or so down below the top sides. Wish I did I will be adding angle to mine someday.
I think the way that we are planning on putting the slats, we should have a 1/2" or so of clearance, but may I ask why you suggest that? Just curious.
homebuilt burner
Well-known member
How deep do you have the water pan? and how close to the water do you run the steel being cut??
steel 35
Well-known member
I think the way that we are planning on putting the slats, we should have a 1/2" or so of clearance, but may I ask why you suggest that? Just curious.
If you fill to the bottom of the plate to use the advantage of the water for filtering, the air moves the water over the top, all over the table, electronics that are exposed; should not be any! and the floor. it makes a mess and it would be a very simple thing to do if done the first time, not so easy after the slats are set.

If you fill to the bottom of the plate to use the advantage of the water for filtering, the air moves the water over the top, all over the table, electronics that are exposed; should not be any! and the floor. it makes a mess and it would be a very simple thing to do if done the first time, not so easy after the slats are set.
Makes sense to me. I will definitely account for it when we get to the slats.
Homebuilt Burner,
Our water table that we are building is 4" deep. I originally wanted it 5" deep, but had to compromise to get it as wide as I possibly could without having to do any extensive welding. We had a 6' x 12' x 10 gauge piece of mild steel to work with. We will run the water up to the bottom of the plate, which is what we do on our other table. Works great for eliminating smoke and for reducing warping on thinner gauge materials.
bloomingtonmike
Well-known member
Which mount did you order from velox for the pm65's machine torch. Looks like they have two sizes. I ordered a pm65 last night. I went with the dual machine and hand torch combo. I need to read your thread more to check out your thc. I assume that is a velox za650p z axis too?
Which mount did you order from velox for the pm65's machine torch. Looks like they have two sizes. I ordered a pm65 last night. I went with the dual machine and hand torch combo. I need to read your thread more to check out your thc. I assume that is a velox za650p z axis too?
I did get the ZA650P Z axis from velox but the magnetic torch holder came from precision Plasma. All my invoice says is that it is a Maglok velox - Magnetic Breakaway machine Torch Mount for Velox Z Axis. Honestly it was probably the best $250 I spent on the whole project. When you're getting everything setup and learning how the machine works the torch crashes a lot. It's about a $350 repair if it is able to be repaired so the magnetic holder just about pays for itself the first time. It holds the Duramax torch perfectly too.
My THC is the DTHC 4 from CandCNC. It works really well but it takes some time to learn how to set everything up and get it to do what you want it to do.
Terrain Twister
New member
- Joined
- Apr 2, 2017
- Messages
- 3
Hi ovrrdrive. Can you post a picture of the back of your Gantry? I'm building mine now (4'x8') and curious how others have ran the track.
I keep pretty busy last month we Grossed Over $100k Running Two Tables now and upgraded Powder Coating facilities, we keep upgrading equipment and we are getting ready to tear out our offices and upgrade, we have a Salesman full time, Myself, My Cohort, a Grunt and an Admin, a shop Super, an IT guy... we are doing pretty good. Ran my first part on my table in June 2014, now it is my entire job...
Attachments

Hi ovrrdrive. Can you post a picture of the back of your Gantry? I'm building mine now (4'x8') and curious how others have ran the track.
Sorry forgot to get you a pic last night. I'll try to get you one this weekend. I had the same issue. I asked Ron for a few pics and the answer I got back was he didn't have any. It's pretty simple when you look at it. I'll get you a pic.
kkroger, what do you use to texture the background?
rolocs?
Your work is so nice. You're one of my inspirations.