To avoid these ads, REGISTER NOW!

Between 705 & 1200 SQ/FT Colorado Suburbs 22' x 44' detached

Workspaces between 705 and 1200 squarefeet.

grant00

Well-known member
Joined
Feb 12, 2011
Messages
205
Location
Littleton, CO
Finally starting on my own garage after watching so many other build theirs. I live in Littleton, south-west of Denver, Colorado. We moved here in 2020 for a job relocation for my wife and this being our second house, my stipulation was the space for an additional garage if it didn't have one already.

Size will be 22' wide by 44' deep (exterior dimensions) with 12' tall walls. There will be a 6"x6" curb under the 2x6 walls. A good amount of rebar specified by the engineer as well as what I told him I wanted in the rear half of the garage for the future 2-post lift. I matched the Bendpak concrete specs for the floor specs for thickness, strength, and rebar.

I plan to have 2" foam around the perimeter of the foundation that will be covered and protected. No foam under the slab. I also want to add 1" rigid foam to the exterior of the walls underneath the siding but over the OSB sheathing.

Here's the front view with an 18' x 10' garage door:
IMG_7979.JPEG
And with an 18'x9' door:
IMG_7978.JPEG
Leaning towards the 10' partially because it's bigger but mostly the space above the door doesn't look so large. The top row of the door will have obscure glass windows in it as well so not all totally black. House colors are wrong, existing house is more the white color that is on the garage.

Site Plan:
site_plan.jpg

Floor Plan & Foundation details:
Screenshot 2023-03-20 085527.jpg
Screenshot 2023-03-20 163302.jpg
Screenshot 2023-03-20 161513.jpg

I'll have a big 6'x8' double entrance door off the side that will be my main in and out from the back of the house as well as being able to open it up to the back patio to hang out/bbq/party/whatever!
Screenshot 2023-03-20 161431.jpg

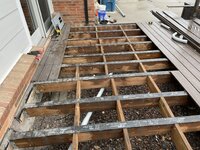
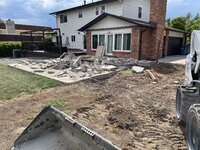
Started moving some rocks and tearing down an unpermitted "pergola" the county wanted me to demolish (I was going to anyways).
IMG_7568.JPEG
IMG_7569.JPEG
IMG_7570.JPEG

Should be hopefully starting construction towards the end of April!
 
To avoid these ads, REGISTER NOW!
OP
G

grant00

Well-known member
Joined
Feb 12, 2011
Messages
205
Location
Littleton, CO
Pergola removed. The wall on the right which serves as more of a gate will also be removed along with the whole concrete patio here for a new one to be poured. There 3 levels of concrete over here between the driveway, lower patio and upper patio and I want it all to be flat.
B257C239-D4D5-4295-86D4-D6116787A092.jpeg
 

jb3

Well-known member
Joined
May 2, 2014
Messages
14,945
Location
Rhode Island, USA
Looks like a great design for useful space! The front of the future garage will be a little forward of the current fence?

Those double doors will be great opening right onto a new patio like that
 
OP
G

grant00

Well-known member
Joined
Feb 12, 2011
Messages
205
Location
Littleton, CO
Looks like a great design for useful space! The front of the future garage will be a little forward of the current fence?

Those double doors will be great opening right onto a new patio like that
Yes the front of the garage will be at the front of the chimney on the house. Roughly 6-8’ forward of the current fence line.

Thanks! It seems like a good idea for the extra cost. The patio we plan to extend the roof of the house to cover it as well soon after the garage. Another reason the patio needs to come out is to pour footings for that later on.
 

FJ 432

Well-known member
Joined
Aug 2, 2010
Messages
3,734
Location
Littleton Colorado
Howdy Neighbor.

I built an attached garage to my tri-level in 2009. Because of space constraints mine is only 22' by 24'. I built it with a 10' door and I am glad I went in that direction. I went with 14' height and I regret I didn't do 16'. The cost would have been negotiable and I might have been able to build a loft. I had a hard time with a 6' by 8' rear door so I went with a small garage door in lieu of a double door.
 
OP
G

grant00

Well-known member
Joined
Feb 12, 2011
Messages
205
Location
Littleton, CO
Hey there neighbor. I didn’t want to go higher so it still looks reasonable next to the house. Fair point that bigger is better!

I can see that for a rear door if I wanted to drive things through but the 6x8 door is my only normal man-entrance type door so can’t switch it to a garage door.
 
OP
G

grant00

Well-known member
Joined
Feb 12, 2011
Messages
205
Location
Littleton, CO
Couple updates to the final plans sent off to the contractor doing the foundation and framing. My two side windows are 4'x4' instead of 4'x3'. The tops of them will be high up about level with the top of the 8' entrance door. I did this so that I can run workbenches and outlets below these while still letting in a ton of light. Bottom of these big windows will be 4' from the floor inside so I should have 12" above workbenches to have outlets on the wall under the windows.

Also added two 3'x2' windows along the top of the back wall. I could slide them open for cross breeze in the summer and let in some more light without taking up valuable wall space that might just get blocked by toolboxes. The sill of those will be about 9' from the floor.

Screenshot 2023-03-31 103916.jpg

Also another rendering showing how we want to cover the patio next to the garage after it's done. Big square thing represents the dream for a hot tub!
Screenshot 2023-03-31 104307.jpg

Also a better view of how it sits next to the house and existing garage door.
Screenshot 2023-03-31 104728.jpg
 

ovscrider

Well-known member
Joined
Oct 1, 2008
Messages
2,348
Location
NH
why 22 setbacks? even 24 i find a little narrow with 2 rucks/suvs although it is roiomy when my sons or daughters small ehicles in there.
 
OP
G

grant00

Well-known member
Joined
Feb 12, 2011
Messages
205
Location
Littleton, CO
why 22 setbacks? even 24 i find a little narrow with 2 rucks/suvs although it is roiomy when my sons or daughters small ehicles in there.
22' wide is what fits on the side of the house while maintaining the 5' setback to the property line. HOA (and my wife) want it up next to the house and not taking up the whole backyard space. My wife will have parking in the attached garage and this one will be all mine. Truck parked in the front half and room enough for my other car and one more easy.
 
OP
G

grant00

Well-known member
Joined
Feb 12, 2011
Messages
205
Location
Littleton, CO
My feeder wire showed up, ground is on a separate roll. 1/0 Aluminum USE-2/RHH/RHW-2 so I can run it in conduit under the deck, then switch to direct burial, then end up at the interior sub panel in the garage.

It's been rainy and the ground is saturated so no progress on digging the foundation or more demo just yet. Need some sun to show up for a week or so and dry things out.

Despite the rain, a buddy came over this morning and we got the conduit roughed in from the main panel to where it will turn down and be buried until it comes up in the garage 40' away or so. Pretty happy with how our PVC bending came out using two heat guns at the same time. The piece that jogs around the brick and then turns 90 degrees under the deck is all from one straight piece. No sweep elbows! Last pick is the finished look with all the deck boards temporarily set back in place.
 

Attachments

  • IMG_8181.JPEG
    IMG_8181.JPEG
    1,008.6 KB · Views: 87
  • IMG_8182.JPEG
    IMG_8182.JPEG
    1.4 MB · Views: 83
  • IMG_8183.JPEG
    IMG_8183.JPEG
    1.3 MB · Views: 84
  • IMG_8185.JPEG
    IMG_8185.JPEG
    1,021.6 KB · Views: 93

LXCam

ALLIANCE MEMBER
Joined
Apr 23, 2013
Messages
19,149
Location
AZ
That's going to be pretty nice OP. I'd offer up maybe one suggestion since you kind of landlocked the back yard. Yes I know you have the side entrance but if you ever found a need to get a tractor or other large piece of equipment in the backyard you're limited. I'd frame the back wall to accept a 10/10 door. So if the day ever came it'd be an easy retrofit.

Good luck and I'll be following along.
 

Copymutt

Well-known member
Joined
Sep 3, 2016
Messages
3,392
Location
Colorado
Rendering of Covered patio and garage dump both roofs of snow into a nightmare pile as well as blocking the man door?
 
OP
G

grant00

Well-known member
Joined
Feb 12, 2011
Messages
205
Location
Littleton, CO
That's going to be pretty nice OP. I'd offer up maybe one suggestion since you kind of landlocked the back yard. Yes I know you have the side entrance but if you ever found a need to get a tractor or other large piece of equipment in the backyard you're limited. I'd frame the back wall to accept a 10/10 door. So if the day ever came it'd be an easy retrofit.

Good luck and I'll be following along.
This is a good point. The back wall should be able to be converted if the need arises. Otherwise I’ll just be limited to driving around the north of the garage with smaller mini excavators and skid loaders. The smaller sizes should fit over there. 5’ or so to the property line and fence.
 
OP
G

grant00

Well-known member
Joined
Feb 12, 2011
Messages
205
Location
Littleton, CO
Rendering of Covered patio and garage dump both roofs of snow into a nightmare pile as well as blocking the man door?
Gutters will handle any water runoff and direct it away from here. Some rain will get through, yes. We’ve never had snow slide or dump off our roof in the 3 years we’ve been here nor seen it in the neighborhood anywhere. 4/12 pitch with asphalt shingles and this being Denver means snow generally doesn’t accumulate over 8” for more than 24 hours.
 

Copymutt

Well-known member
Joined
Sep 3, 2016
Messages
3,392
Location
Colorado
Just searched record snows in Denver area. Not uncommon to get 2-3 feet in a month or from one storm. We get somewhat more down here in Durango. Might review snow load for the garage roof. Patio roofs usually are typically poorly rated. Wouldn't care to try to snow rake that combo. I try to design, build for the worst case.
 
OP
G

grant00

Well-known member
Joined
Feb 12, 2011
Messages
205
Location
Littleton, CO
Just searched record snows in Denver area. Not uncommon to get 2-3 feet in a month or from one storm. We get somewhat more down here in Durango. Might review snow load for the garage roof. Patio roofs usually are typically poorly rated. Wouldn't care to try to snow rake that combo. I try to design, build for the worst case.
2-3 feet over a month yes, but I’ve never seen 2-3 feet of sustained accumulation. Most roof snow (and the garage roof facing south towards the house) melts in under 48 hours after a storm. All snow loads used and trusses are designed for our area per local building codes. If the house has stood since 1972 with these snow loads I see no reason to go above and beyond those now. The future patio roof will have full engineered plans as well so I’m not worried about cutting corners and things collapsing.
 
OP
G

grant00

Well-known member
Joined
Feb 12, 2011
Messages
205
Location
Littleton, CO
Garage door was delivered on Tuesday. They'll come back to do the install once we're ready. Pretty funny to see the 18' wide door take up the entire depth of the garage attached to the house. I always forget how small the existing garage is...

Also in the background I've been storing the 6' x 8' double entry door. Anxious to get building!
 

Attachments

  • IMG_8186.jpeg
    IMG_8186.jpeg
    947.8 KB · Views: 84
OP
G

grant00

Well-known member
Joined
Feb 12, 2011
Messages
205
Location
Littleton, CO
Day 1 (finally)

Weather has been extremely wet for our area this year so no progress until now. It’s been storm after storm after storm. Last two brought some decent hail and a rare tornado to the area.
IMG_8358.jpeg

Contractor came today with all the goodies to drop off so we should be making some progress now! He has a plate compactor attachment for the mini-ex which will be pretty sweet for working in the foundation. Never seen one but pretty cool attachment!
IMG_8362.jpeg

Also picked up a new saw for a project. So far only minor adjustments to get square good enough for now.
IMG_8243.jpeg
 
OP
G

grant00

Well-known member
Joined
Feb 12, 2011
Messages
205
Location
Littleton, CO
Got started on Tuesday with a saw cut in the driveway and started breaking concrete today (Thursday). Didn’t make it as far into demo by lunch as we’d thought… the old patio started looking a little thicker than expected..
IMG_8426.jpeg
IMG_8427.jpeg

Made it farther by the end of the day but found THREE layers of concrete under half of the patio. The bottom layer about 6” thick. No wonder it was taking so long!
IMG_8430.jpeg
 

Attachments

  • IMG_8428.jpeg
    IMG_8428.jpeg
    1.4 MB · Views: 56
To avoid these ads, REGISTER NOW!
OP
G

grant00

Well-known member
Joined
Feb 12, 2011
Messages
205
Location
Littleton, CO
Got all of the concrete demo’d and hauled off. Took two full loads in the end dump.
IMG_8433.jpeg
IMG_8446.jpeg
Rain came back yesterday with a big storm and made everything muddy again… fantastic. Guys showed up today and ended up pulling a bunch of nuisance plants along the fence for us in the meantime.

IMG_8451.jpeg
 
OP
G

grant00

Well-known member
Joined
Feb 12, 2011
Messages
205
Location
Littleton, CO
This week should be a major excavation week and prepping for concrete. Contractor came on Friday and Saturday to set some layout stakes and dig away some dirt from the house where the water lines and drain will be running through.

Drilled a 5” hole for the 4” PVC sleeve going through the foundation wall of the house. Will be running a 2” drain line through the sleeve for the utility sink in the garage that connects back to a 3” inside the crawl space. Total horizontal run of the 2” line is roughly 20’ before it connects into the 3” then another 6’ or so before that runs into one of the risers in the basement.

This 5” hole took us just over 4 hours with the wet core drill. I was beyond frustrated but turns out we hit not one but 4 pieces of rebar. Go figure. But we got it done either way.
IMG_8472.jpeg
IMG_8473.jpeg
IMG_8474.jpeg

After this I decided it would better to tunnel under the foundation for the hot and cold water sleeves as well as the extra conduit sleeve for low voltage, Ethernet,
or whatever I decide.

Water lines will be Uponor inside the PVC conduit sleeves. The top of the sleeves is at 46” below grade (below the 36” frost line) so should be save but being sleeved the whole way I can always just pull and replace if needed!
IMG_8479.jpeg
IMG_8477.jpeg

How the three 1-1/2” sleeves will come up inside the crawl space. I’ll add some vertical pieces when they go in.
IMG_8485.jpeg
 
OP
G

grant00

Well-known member
Joined
Feb 12, 2011
Messages
205
Location
Littleton, CO
Not much progress this week until today, we talked elevations, where I wanted the floor, footing depth, and they got some new stakes put in. Also went back to the structural engineer and we’re switching from the monolithic pour back to footings, stem walls, and slab. Should be just overall easier for foundation insulation and better backfill and compaction for the slab in the long run.

GC came today (Saturday) and asked if I wanted to run the excavator digging the footings. OF COURSE I did so he gave me some pointers and let me dig about 50% of what we got done today. Trading off running the ex and grade stick was a good Saturday afternoon! Got a lot of seat time myself. Felt good doing a lot of digging for my own footings. Front of the trench is 4’ deep to make the lowest grade a minimum of 3’ deep. Footings will be 16” wide and 12” tall. We were running the 3’ wide bucket so we moved a lot of dirt!

image000008.jpeg
image000006.jpeg
image000000.jpeg
 
OP
G

grant00

Well-known member
Joined
Feb 12, 2011
Messages
205
Location
Littleton, CO
Boy it’s been a roller coaster but we’ve got the footings and foundation wall as of today.

I got the sleeves for water lines and spare/internet/low voltage underneath the footings before they set the rebar.
IMG_8632.jpeg
IMG_8640.jpeg

Footings got poured last Wednesday 9/20
IMG_8657.jpeg
IMG_8659.jpeg

They set the rest of the rebar and wall forms this week and poured the walls today, 9/27. I really liked the turnbuckle braces they used as they went around with a string line after the concrete was in and corrected any major bows in the walls.
IMG_8722.jpeg
IMG_8730.jpeg
IMG_8735.jpeg
IMG_8736.jpeg

They’ll strip the forms tomorrow and I can get to work on running the sink drain, electrical, and foundation perimeter foam.

Any thoughts on foundation waterproofing before I put the foam on? Concrete guy asked me about it today. Thinking it might be a good idea to keep the backfill dry.
 
OP
G

grant00

Well-known member
Joined
Feb 12, 2011
Messages
205
Location
Littleton, CO
Forms stripped and the sleeves we set in the wall turned out great.
-Sleeve in the back wall for the interior trench drain (2nd picture)
-left sleeve is for the sink drain and right one is for the electrical feed (3rd picture)

Got some damp proofing/foundation coating I’m going to roll on later this weekend before putting the foam on the outside.

IMG_8741.jpeg
IMG_8745.jpeg
IMG_8748.jpeg
 
OP
G

grant00

Well-known member
Joined
Feb 12, 2011
Messages
205
Location
Littleton, CO
Got the foundation coating on this afternoon. Maybe a tad too soon with the fresh concrete, I got a few small bubbles that seem like moisture bubbles but I think overall it went on well.

From what I’ve been reading it seems like this might be overkill for the garage but better safe than sorry I guess. I ended up only using 4.5 gallons for the whole thing from one bucket so for a total cost of $70 plus a brush and a roller seems like cheap insurance!!
IMG_8765.jpeg
IMG_8768.jpeg
 

HogDude

Well-known member
Joined
Dec 25, 2020
Messages
229
Location
Nebraska
Got the foundation coating on this afternoon. Maybe a tad too soon with the fresh concrete, I got a few small bubbles that seem like moisture bubbles but I think overall it went on well.

From what I’ve been reading it seems like this might be overkill for the garage but better safe than sorry I guess. I ended up only using 4.5 gallons for the whole thing from one bucket so for a total cost of $70 plus a brush and a roller seems like cheap insurance!!
IMG_8765.jpeg
IMG_8768.jpeg
Don't just build something. Over build it! Of course the budget is a major force and you've met and exceeded that challenge!
 
OP
G

grant00

Well-known member
Joined
Feb 12, 2011
Messages
205
Location
Littleton, CO
Got the foundation foam started today after work. One long side and 2 pieces on the other one. I’ll start at the front tomorrow. 3 Tapcon’s at the top of each board and some adhesive beads toward the bottom. The walls aren’t perfectly flat so I think the adhesive is kind of a waste and not really doing much. I’ll just throw another anchor lower down on each one. The backfill should hold everything in place either way.


Gotta pick up some more conduit for the water sleeves. I underestimated how short the cutoff pieces I had so I didn’t get started on those today.

IMG_8771.jpeg
IMG_8772.jpeg
 
OP
G

grant00

Well-known member
Joined
Feb 12, 2011
Messages
205
Location
Littleton, CO
Thanks everyone!

Yes we do have some great weather right now. Trying to take advantage and get this thing up!

Finished the rest of the foam today. Will be finishing the sleeves tomorrow before they start backfilling.

IMG_8774.jpeg
IMG_8776.jpeg
 
OP
G

grant00

Well-known member
Joined
Feb 12, 2011
Messages
205
Location
Littleton, CO
Four sleeves set in place and bent over to hug the wall a bit so they aren’t in the middle of the floor.

From left to right in this picture:
- 2” for subpanel feed
- 1-1/2” spare/internet/low voltage
- 1-1/2” hot water pex sleeve
- 1-1/2” cold water pex sleeve

Sink drain sleeve can be spotted down low to the right. I’ll get the drain line set once they partially backfill that area for me so I can bed the drain in dirt for the inspection.

Backfilling starts tomorrow!

IMG_8777.jpeg
 
OP
G

grant00

Well-known member
Joined
Feb 12, 2011
Messages
205
Location
Littleton, CO
The guys came and backfilled Thursday and got the inside about right and did a lot around the outside. The contractor took his larger machines now that most of the big digging was done and brought 2 smaller machines for me to use over the weekend for plumbing and trenching the electrical. I’m extremely grateful he left these here and gave me the OK to use them. Definitely not the normal.

After work I promptly messed up their work and got the sink drain roughed in and backfilled some for support and scheduled the inspection for this morning (Friday).

IMG_8780.jpeg

Passed my underground plumbing inspection first thing this morning. The inspector just shook the pipe so some water came out and signed off. Didn’t even check fall or look inside. Works for me. Did some grading and smoothing where the patio used to be then got to work backfilling the drain and sealing up the penetrations. I used some flashing boots and Sika waterproof construction adhesive and a few tapcons for each flange.

IMG_8790.jpeg
IMG_8789.jpeg

Backfilled over the drain and up to just below the electrical conduit then started the trench for the wire run just after lunch.
IMG_8793.jpeg
IMG_8795.jpegIMG_8796.jpeg

After that dug the trench for the floor drain the rest of the afternoon. Busy Friday!
IMG_8798.jpegIMG_8799.jpeg
 
OP
G

grant00

Well-known member
Joined
Feb 12, 2011
Messages
205
Location
Littleton, CO
My buddy came over Saturday morning to help me pull the wire through the conduit under the deck and get it in the trench. I’m only putting in a 100A subpanel but I ran 1/0 aluminum with a #4 aluminum ground. The 1/0 was cheaper and easier to find for the type of wire I needed for direct burial and interior entrance into the detached building. I paid $300 delivered for 275 feet of 1/0 aluminum RHH/RHW/USE. Depending who you ask and how the derating calc is done I could be good for 125A. Underground electrical inspection on Monday.

IMG_8803.jpegIMG_8802.jpeg

We got the trench drain set in place then I set the drain pipe elevations and slope and started gluing then backfilling around the pipe. I just have a small spot of backfill at the back wall to finish today. I’m also going to pull a little more dirt away from around the drain so I don’t get a thin corner spot in the slab.
IMG_8800.jpegIMG_8810.jpegIMG_8811.jpeg
 
OP
G

grant00

Well-known member
Joined
Feb 12, 2011
Messages
205
Location
Littleton, CO
Failed the underground electrical this morning. Inspector wants me to swap out the L-box under the step on the deck because it won’t be accessible unless I put an access panel in the step and also a visible label to show where the box is. I also need to add insulating bushings to prevent rubbing at the ends of the conduit even underground.

So plan is to remove the access box so it can be covered. Cut out the L-box and put in a sweep 90 back to back with the lower one. Total angle for this section of conduit would end up the same ending at 360 degrees after the L-box that’s at the main panel.

I got the wire pulled out of the trench and the garage side entrance, cut out box and conduit up to just behind the top step. I’ll work on getting the new stuff put in tomorrow morning and see how far I get.

IMG_8817.jpeg
 
OP
G

grant00

Well-known member
Joined
Feb 12, 2011
Messages
205
Location
Littleton, CO
I did some fine grading checks and moved a bunch of road base out of the floor area early for a couple hours. It was a little high relative to where I set the drain which would result in a thinner floor than I wanted. Sounds like slab pour is scheduled for Friday.

Electrical inspector passed me via the pictures and email I sent him so that worked out well. Got it all glued up and bedded and covered the wires with sand after work. Not much time today to work and a little bit of rain.

IMG_8835.jpeg
img_8819-jpeg.1970814
 

Attachments

  • IMG_8819.jpeg
    IMG_8819.jpeg
    683.4 KB · Views: 720

aqr81

Well-known member
Joined
Jul 20, 2010
Messages
1,127
Location
Central Valley, Ca.
The guys came and backfilled Thursday and got the inside about right and did a lot around the outside. The contractor took his larger machines now that most of the big digging was done and brought 2 smaller machines for me to use over the weekend for plumbing and trenching the electrical. I’m extremely grateful he left these here and gave me the OK to use them. Definitely not the normal.

After work I promptly messed up their work and got the sink drain roughed in and backfilled some for support and scheduled the inspection for this morning (Friday).

IMG_8780.jpeg


The guys came and backfilled Thursday and got the inside about right and did a lot around the outside. The contractor took his larger machines now that most of the big digging was done and brought 2 smaller machines for me to use over the weekend for plumbing and trenching the electrical. I’m extremely grateful he left these here and gave me the OK to use them. Definitely not the normal.
Grant, just saw this and am reading through it now. Got a chuckle out of this comment - when I build the shop over at my son's my concrete contractor left his bobcat and attachments and gave me the green light to use. My son and I had a lot of fun breaking out the driveway that needed removal and also did some needed dirt work and moving grape vines as we had to take over some of the chicken yard. It's pretty cool when they know you and trust you enough to leave their stuff and give you the green light like that (y)
 
To avoid these ads, REGISTER NOW!
Top Bottom