EOC_Jason
Well-known member
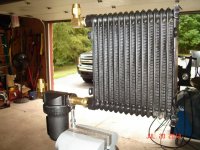
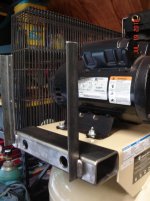
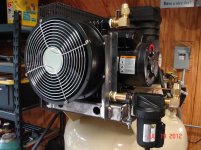
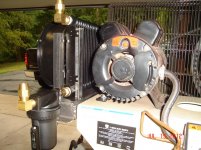
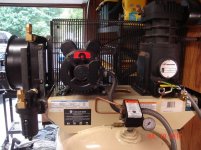
Transmission cooler and 240V fan (and an auto-drain):
It looks like you just wired the fan in the motor housing? Do you recall where you found the fan and how much it cost?

Transmission cooler and 240V fan (and an auto-drain):
Transmission cooler and 240V fan (and an auto-drain):
.jpg)
One note, the after cooler is normally followed up with a centrifugal water separator to remove the condensed water from the air. You could probably get away with a filter seperator to remove the water, but with reduced effectiveness. The automatic drain will remove the water if it's dripping out of the condenser, but will do nothing to remove the entrained water droplets in the air as it whizzes by the fitting to the drain. The main idea is to keep the bulk of the water OUT of the air tank.
William....
It looks like you just wired the fan in the motor housing? Do you recall where you found the fan and how much it cost?
 .
.I agree with most of what you are saying, but i think that the main idea is to keep the water out of the shop air lines, that is my main goal. Right now my air coming out of the tank is well over 100 degrees F. The air is saturated with moisture. All I have right now is a regulator and a 5 micron air filter/water separator. When I sandblast for over 30min the entire tank is very warm to the touch and the air lines are full of moisture. I want the tank to stay cool. I don't really want the tank to be the water trap, but i would rather have water there than in the air lines. I worked on large water cooled Atlas Copco's for over 10 years. After the after cooler they just had a simple trap catch the water. Obviously the air entered a dryer after that, but this trap collected an amazing amount of water.
I do agree that a better water separator after the cooler would be nice.
") So I have gone to the over kill route of using all the common removal methods, an after cooler, separator, particulate filter, coalescing filter/s, refrigerated drier, and a regenerative desiccant drier.... Of course all this hardware comes a cost, if purchased new my water removal setup would be well north of $7000.
So I have gone to the over kill route of using all the common removal methods, an after cooler, separator, particulate filter, coalescing filter/s, refrigerated drier, and a regenerative desiccant drier.... Of course all this hardware comes a cost, if purchased new my water removal setup would be well north of $7000. Transmission cooler and 240V fan (and an auto-drain):
His looks identical to mine. I got mine on eBay. It's a cooling fan for electrical components and some other things I think. Just search ebm papst. They come in a variety of sizes and voltages. I got just the one I wanted used for
$30
Yep, wired in parallel with the motor. So when the motor runs, the fan runs. Got the fan off ebay for $15 + $12 shipping.It looks like you just wired the fan in the motor housing? Do you recall where you found the fan and how much it cost?
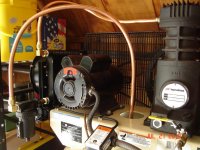
Compression fittings. It's what was already used from the factory.Are your copper lines connected with compression fittings or Inverted Flare like most of the OEM's do.
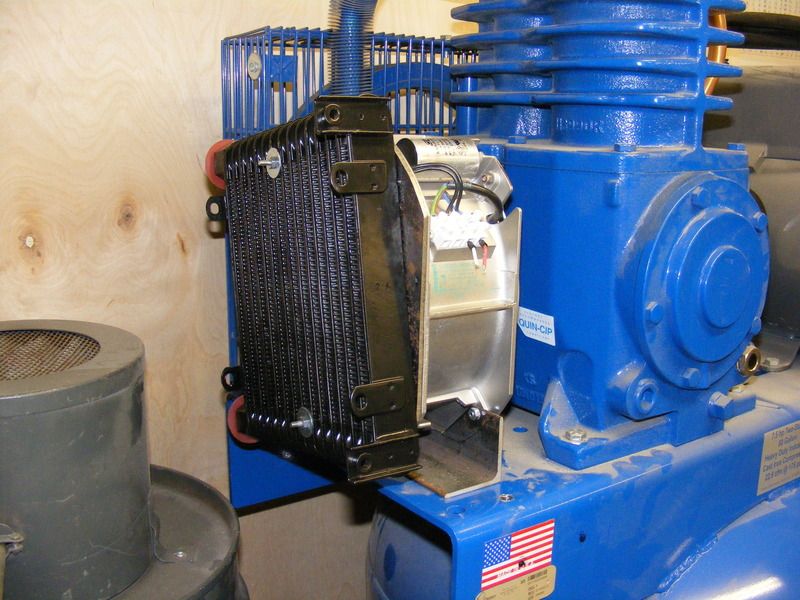
Because I don't have a filter/separator, except a MotorGuard filter for the plasma cutter/sand blaster. The rest of the air tools get unfiltered/undried air. With that said, I don't get any water out of the blow guns anymore, but did before the aftercooler install.That looks like a great way to cool the air but why didn't you run the output through the filter then into the tank? Seems like a waste. You probably get some larger droplets out from the way you have run it but certainly not nearly as much as you could be getting.

Alan, double check the fitting type on that CX racing cooler. If it is AN, you will need an AN to NPT adapter (not commonly found at your local hardware store!)
It was advertised as 3/4" NPT female. UPS tracking shows it will be here tomorrow.
Maybe if Brian see's this he can comment if it is NPT. I ordered from the same link.
Thanks for posting

This post is a little off subject but here is the rest of the project.
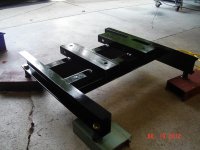
When i first started this cooler I had some space problems with a rack next to the left side of the compressor which would not let me fit a cooler. Decided i wanted to make the compressor a little easier to move, so i built a metal skid for the compressor to live on. Now i can move it with my homemade Kubota forklift attachment. The idea is to no longer anchor the compressor to the floor. Hope this works ot ok. The new base is 31" x 31".
Note: The picture shows some scrap c-channel under the legs which will not be used, they are for lifting the skid for paint.
Now while the paint is drying on the cooler mount I will work on putting the compressor on the skid.
My next step will be to assemble the cooler to the mount and run the new copper lines.
Finally I will have to wire the fan from the pressure switch and hook the main compressor power up to the disconnect.
You'll still want some industrial hard rubber blocks underneath the mounts. It will keep things a little quieter and also save your tank from cracking near the motor mount.
Were are you recommending the rubber mounts? The reason I built the skid out of c- channel was to help absorb the vibrations. It is amazing the amount of flex you can get with it.
My compressor was solidly anchored to the floor for the last 10 years with no problems.
I do plan to put some rubber under the 4 skid feet, mostly to protect the concrete.
I got the dripleg put together and the brackets for the after cooler setup. Just need to fab the dripleg bracket then plumbing and electrical.
Here is the new compressor base. Ended up putting rubber under the tank mounts and the base feet. Thanks for the recommendations.
Now I can drain the tank without getting water all over the place. Still need to find a small bucket though.
Are you getting any moisture out of the filter? That is the key question here IMO.

So still getting a lot of water in the tank. The aftercooler certainly reduced the temp (but not by much). This is good info. Either the aftercooler needs to be made much bigger or there really is no water being condensed out after going through it.
 Now down here in Houston where it's always crazy high humidity levels... drain tank daily, if not several times a day!
Which way is your fan blowing? Towards the cooler?
Let's see, before it was 211F going into the tank. Now it is 96F at the same spot? That's tremendous! You can't complain about a 100 degree drop for what that radiator is doing... You're only a few degrees above ambient!
Relative humidity is also important. If there's little moisture in the air, then your compressor isn't going to make water magically...