To avoid these ads, REGISTER NOW!

Compressor after cooler

To avoid these ads, REGISTER NOW!

alan camby

Well-known member
Joined
Dec 3, 2011
Messages
1,566
Location
South of Indianapolis, Indiana
I am starting to get all the parts for my After cooler Project.
So far I have
-10' roll of 5/8" copper.
-Assortment of compression fittings for the cooler connections.

Also have a few parts on order that should be here by the end of the week.
-CX racing 15 row cooler from Ebay that others have posted.
-Double flaring tool for the connections on the compressor outlet and the check valve (tank inlet)

Was unable to find a great deal on ebay for the muffin / cooling fan. Ended up buying new from Mcmaster Carr, part #1976K99, and fan guard 19155k99

Also ordered a 3404-00 water separator from TP tools.

Right now I am working on moving the compressor. The left side, looking from the front, is to close to some metal racking. I need some space on this side for the new cooler. I am going to mount it on the same side as Lametec and Brianpgriset.

cj8lvr,
The post in quotes has most of my parts information. I am not good at computer stuff and providing links for everything to this post. For some reason I have never been able to link to Items on Mcmaster-Carr's web site. Anyone else have this problem??

If you go to their web site you can input the part #'s above that i provided.

All the other items i had around the garage. The main mount is made out of 2"x3" rectangle tube with a wall of 3/16". I think it is major over kill, but I had it on the shelf. The uprights for the fan and cooler are 1"x1"x 1/8" angle steel and are plenty strong. The wiring is 18/3 SJO cable. The 2"x3" is bolted to the side of the compressor with two 3/8" bolts, you can see the 2 access holes i drilled to allow a socket to tighten them.

I was never able to get a clean double flare on my 5/8" OD type L copper. So, the connections to the pump and tank check valve are common 45 degree single flares that use the stock fittings. The cooler Fittings are basic 5/8" 90 degree compression fittings.

The only problem I ran into with my parts was the Cooling fan has quick disconnects instead of wire leads. The QD's are not the common .250" ones you find at all hardware stores. They are closer to the uncommon .110" QD's. I ended up soldering the wire to the QD's on the fan. Or, You can order Mcmaster-Carr plug with leads for the fan, Part #19155k81.

Thanks for the complement on my project:) If you have any questions feel free to ask.
 
Last edited:

alan camby

Well-known member
Joined
Dec 3, 2011
Messages
1,566
Location
South of Indianapolis, Indiana
I have some bad news, the cooler failed.
The temperature in my area is 98 degrees and Indianapolis, about 20 miles north, is showing 102 degrees on the weather channel. So, thought it would be fun to do some more testing on the after cooler. Started my stop watch and was monitoring the cooler as it ran 100% loaded, pressure stayed consistent around 90 thru 95 psi. After about 13 minutes I was starting to over heat. So, I went in to get a drink of water. About 2 min later I came out to check on the compressor. Heard a loud air hissing noise. The top of the after cooler was leaking. Found a few places where the cooler was leaking at the sections where the plates are soldered/brazed together. The max temp i recorded with my thermometer was 330 degrees F. Since the cooler failed after only 15 min of running, I am going to assume that this cooler just can't take the temperatures that my compressor is putting out.

Don't know what my next step will be but this cooler project was a failure. I need to either find a cooler that is rated to be a after cooler or do some kind of homemade coiled up copper cooler.

Just thought I would pass this on. For some who only run their compressor for short amounts of time this CX racing cooler might hold up. I need a cooler that will hold up for hour long runs since I use my compressor for sandblasting. Remember, the pressure in the cooler never went over 100 psi during this test. I would be really conserned If someone chose this cooler for a 2 stage 175 psi compressor.

It was a fun project but now it is back to the drawing board.
 
Last edited:

brianpgriset

Well-known member
Joined
Sep 29, 2006
Messages
1,036
Location
Beaumont, TX
I've been doing some eBay searching during the course of this project and had bookmarked this cooler just I case this issue came up or it was undersized:

http://www.ebay.com/itm/37062738723...AX:IT&_trksid=p3984.m1438.l2649#ht_2120wt_940

Looks more like the after coolers on compressors, is larger, reasonably priced, and uses copper tubes instead of plate and frame o should hold the pressure and temp easily. Also his guy sells new ones all he time so you don't have to hunt on eBay.

Will be interesting to see if mine fails.
 

EOC_Jason

Well-known member
Joined
Jun 25, 2012
Messages
11,388
Location
Bentonville, AR
Hmmm, that's something I didn't think about the intake temp being so high that it could actually melt some of the lower temp solders...

Another semi-solution would be to run the copper pipe in a few loops between your pump output and the intake of the after-cooler. Also, you could set them up like the OEMs do where the entire setup is mounted against the belt-guard in front of the flywheel. That way the piping also gets some air-cooling and probably helps keep the temp down.

Out of habit from my father (whom was an A/C contractor all his life) I like the higher % silver solder. You need an acetylene torch to heat things up hot enough, but you know you won't have failure from heat like you would using a regular propane blowtorch with a lower-temp and probably lead/tin based solder.
 

pipsters

Well-known member
Joined
Sep 1, 2010
Messages
4,899
Location
USA
I've been doing some eBay searching during the course of this project and had bookmarked this cooler just I case this issue came up or it was undersized:

http://www.ebay.com/itm/37062738723...AX:IT&_trksid=p3984.m1438.l2649#ht_2120wt_940

Looks more like the after coolers on compressors, is larger, reasonably priced, and uses copper tubes instead of plate and frame o should hold the pressure and temp easily. Also his guy sells new ones all he time so you don't have to hunt on eBay.

Will be interesting to see if mine fails.
Why did you buy the CX cooler over the B&M one?
 

rlitman

Well-known member
Joined
Oct 18, 2010
Messages
24,579
Location
Long Island
Out of habit from my father (whom was an A/C contractor all his life) I like the higher % silver solder. You need an acetylene torch to heat things up hot enough, but you know you won't have failure from heat like you would using a regular propane blowtorch with a lower-temp and probably lead/tin based solder.

The silver brazing alloys are great for repairs, but must be used with flux.
If you're building something from scratch, with new clean copper, the CuP (zero silver) brazing alloys are actually best, and require no flux. They're no good on brass parts though. Just copper.
They can be melted with a mapp torch, but it really isn't worth trying (it'll take forever). This is really just O/A territory, as they need more heat than the alloys containing silver.
 

brianpgriset

Well-known member
Joined
Sep 29, 2006
Messages
1,036
Location
Beaumont, TX
So I got my setup all done. I ran it just enough to fill up the tank last night but it is definatly effective. I got a good bit of water out of the drip leg. Once i get a chance to run it in more I'll post up the results. Hopefully it doesnt break.

DSCF1992.jpg


DSCF1991.jpg
 

alan camby

Well-known member
Joined
Dec 3, 2011
Messages
1,566
Location
South of Indianapolis, Indiana
Looks good!
That is a very nice compressor. wish I would have bought something like that over my IR.
Did yours come with the starter or did you add it?
Also, you said at one point that you were waiting on a tube bender. Where did you get it from? I looked for a tube bender for 5/8" tube and they were all well over $150.
Best of luck with your cooler. I took my broken one off the other night and pressure tested it to find the leak. It was cracked one section in from the air inlet port. Starting to think the crack was from vibration rather than heat. I did not have any stress on the joint and the tubing is very lite. Think I had plenty of bracing for the cooler. If anything you might try to brace the inlet line right before the inlet and right after the outlet. Seems like a excessive step but it might save yours.
 

brianpgriset

Well-known member
Joined
Sep 29, 2006
Messages
1,036
Location
Beaumont, TX
Looks good!
That is a very nice compressor. wish I would have bought something like that over my IR.
Did yours come with the starter or did you add it?
Also, you said at one point that you were waiting on a tube bender. Where did you get it from? I looked for a tube bender for 5/8" tube and they were all well over $150.
Best of luck with your cooler. I took my broken one off the other night and pressure tested it to find the leak. It was cracked one section in from the air inlet port. Starting to think the crack was from vibration rather than heat. I did not have any stress on the joint and the tubing is very lite. Think I had plenty of bracing for the cooler. If anything you might try to brace the inlet line right before the inlet and right after the outlet. Seems like a excessive step but it might save yours.

Thanks for the kind remarks. The compressor came with the starter pre-wired. I added the local switch so I can turn it off at night and not use the breaker. As for the tube bender I actually got it off eBay. Here is an auction from the same seller and same style bender as what I bought but in 5/8".

http://www.ebay.com/itm/CBI-CT364A1...064521?pt=BI_Pipe_Benders&hash=item35be7c0149

Considering the price and free shipping it was worth it. Mine made pretty nice bends.
 

brianpgriset

Well-known member
Joined
Sep 29, 2006
Messages
1,036
Location
Beaumont, TX
So I ran my compressor for a good 6 to 8 minutes last night sandblasting. I am, at this point, pleased with the results. Discharge temps right off the compressor pump were in the 230 to 240 range wall temp. The wall temp on the copper tube just before the tank never got above 107. Ambient air temp was about 90. I let everything cool off and then drained the drip leg and tank. I got about 10 times more water from the drip leg, so this is defiantly dropping out the bulk of the moisture.

I just hope it can last.

I'll do a good blasting session soon again and drain both the drip leg and the tank into cups so ican compare the volume condensed and report back to make it more quantitative.

Also one other thing is to remember we are in he hottest part of the year so the effectiveness of this thing should only improve (assuming it doesn't break):D.
 

alan camby

Well-known member
Joined
Dec 3, 2011
Messages
1,566
Location
South of Indianapolis, Indiana
This is my second attempt at the after cooler. This time I went all out and bought the largest belt guard style cooler i could find. It is a AKG all aluminum After cooler. It is rated for 100cfm and the max pressure is 250psi and 400 degrees F. I did not weight the unit but it is a very heavy chunk of aluminum. Very industrial looking.
Bought it from Grainger, part #4UJG5 http://www.grainger.com/Grainger/AKG-Air-Cooled-Aftercooler-4UJG5?Pid=search

I just finished all of the cooler mounts tonight and took it all apart and painted the brackets.
 

Attachments

  • Air aftercooler 003.jpg
    Air aftercooler 003.jpg
    102.2 KB · Views: 545
  • Air aftercooler 006.jpg
    Air aftercooler 006.jpg
    129.8 KB · Views: 627
  • Air aftercooler 009.jpg
    Air aftercooler 009.jpg
    138.2 KB · Views: 592
  • Air aftercooler 014.jpg
    Air aftercooler 014.jpg
    140.5 KB · Views: 593

alan camby

Well-known member
Joined
Dec 3, 2011
Messages
1,566
Location
South of Indianapolis, Indiana
Here are a few cell phone pictures I have of the cooler.
The inlet and outlet are 1" NPT. I used bushings to get them to 3/4"
 

Attachments

  • 8-4-12 056.jpg
    8-4-12 056.jpg
    142.2 KB · Views: 526
  • 8-4-12 055.jpg
    8-4-12 055.jpg
    139.6 KB · Views: 536
  • 8-4-12 051.jpg
    8-4-12 051.jpg
    126.6 KB · Views: 479
  • 8-4-12 050.jpg
    8-4-12 050.jpg
    133.2 KB · Views: 520

alan camby

Well-known member
Joined
Dec 3, 2011
Messages
1,566
Location
South of Indianapolis, Indiana
Assembled the main frame tonight, so I am almost done with the cooler. Just have to run the copper lines. tried to take a few pictures but the lighting is not very good. I will try to get some better pictures, with the garage door up and the sun shining in, when it is finished
 

Attachments

  • aftercooler2 002.jpg
    aftercooler2 002.jpg
    103.4 KB · Views: 407
  • aftercooler 002.jpg
    aftercooler 002.jpg
    143.2 KB · Views: 457
  • aftercooler 006.jpg
    aftercooler 006.jpg
    109.2 KB · Views: 415
  • aftercooler 011.jpg
    aftercooler 011.jpg
    128.5 KB · Views: 433
Last edited:

alan camby

Well-known member
Joined
Dec 3, 2011
Messages
1,566
Location
South of Indianapolis, Indiana
Should be interesting to see if this one is any more or less effective than the other. Looking good so far!

I would think that it will cool better if any change at all. The core is 1.77" thick, where the CX racing cooler is close to 1.25" thick. Plus the cooling face is larger. I feel really good about the strength with this one. The aluminum end tanks are very thick extruded pieces welded to the cross tubes. There is a 1/8" thick x 1.75" wide aluminum ******** top and bottom of the cooler that connects the two tanks together. Seems like this one is built very well. I am going to keep a close eye on the inlet and outlet temps as well as the air temp at the tank inlet check valve.

Think I better move the cat litter bucket and box of rags. This time the air will be blowing away from the compressor. :D
 

PT Doc

Well-known member
Joined
Nov 12, 2010
Messages
3,197
I would think that it will cool better if any change at all. The core is 1.77" thick, where the CX racing cooler is close to 1.25" thick. Plus the cooling face is larger. I feel really good about the strength with this one. The aluminum end tanks are very thick extruded pieces welded to the cross tubes. There is a 1/8" thick x 1.75" wide aluminum ******** top and bottom of the cooler that connects the two tanks together. Seems like this one is built very well. I am going to keep a close eye on the inlet and outlet temps as well as the air temp at the tank inlet check valve.

Think I better move the cat litter bucket and box of rags. This time the air will be blowing away from the compressor. :D

Do you think it would work better with a larger fan? You could try with the cypurrent one then shut that put and put a 20" fan up against it. Just a thought. That cooler is stout.
 

alan camby

Well-known member
Joined
Dec 3, 2011
Messages
1,566
Location
South of Indianapolis, Indiana
Do you think it would work better with a larger fan? You could try with the cypurrent one then shut that put and put a 20" fan up against it. Just a thought. That cooler is stout.

I think that the best way to get this setup as efficient as possible would be to build a custom shroud for the fan. This way 100% of the cooler face would be getting some amount of air movement. Best example I can give is a vehicles factory radiator. On a car there is a large molded plastic shroud that assures that the entire core has air movement from the fan. I would like to have built something like this out of sheet metal but i lack the motivation and time to take on this project. I used to have a 4' 12gauge sheet metal brake but sold it due to space constraints, 23'x23' garage. It would be nice to have it back if I decide to tackle a shroud.

To answer the question, No, i think i will keep the current fan. Already have way to much money in this project and I have been having comp drive motor issues that are going to be expensive to fix. I really wish that years ago I would have started out with a better compressor(2 stage pump, mag starter, Baldor motor)
 

Provincial

Well-known member
Joined
Sep 21, 2011
Messages
6,855
Location
Near Salem, OR
To answer the question, No, i think i will keep the current fan. Already have way to much money in this project and I have been having comp drive motor issues that are going to be expensive to fix. I really wish that years ago I would have started out with a better compressor(2 stage pump, mag starter, Baldor motor)

This is my experience. I have always tried to make do with what was available, and ended up working around limitations like single stage compressors. I finally have a compressor setup that works well: Ingersoll Rand T30 7.5hp 3 phase with magnetic starter, aftercooler, automatic tank drain, and intake air silencer all installed as a factory package. The compressor came from a Goodyear tire store that closed after nine months. There were two of these units, one of which I installed at a business since sold, and the other came home. I paid $1,200.00 for the pair, and consider it money well spent. :thumbup: Of course, I have 3 phase power here, and most people don't.
 
To avoid these ads, REGISTER NOW!

PT Doc

Well-known member
Joined
Nov 12, 2010
Messages
3,197
So I got my setup all done. I ran it just enough to fill up the tank last night but it is definatly effective. I got a good bit of water out of the drip leg. Once i get a chance to run it in more I'll post up the results. Hopefully it doesnt break.

DSCF1992.jpg


DSCF1991.jpg

Great job on the tubing bending
 

alan camby

Well-known member
Joined
Dec 3, 2011
Messages
1,566
Location
South of Indianapolis, Indiana
Here is the temperatures I came up with this time.

The temp in my garage was 90 degrees F.

Started the test with a full tank of air.
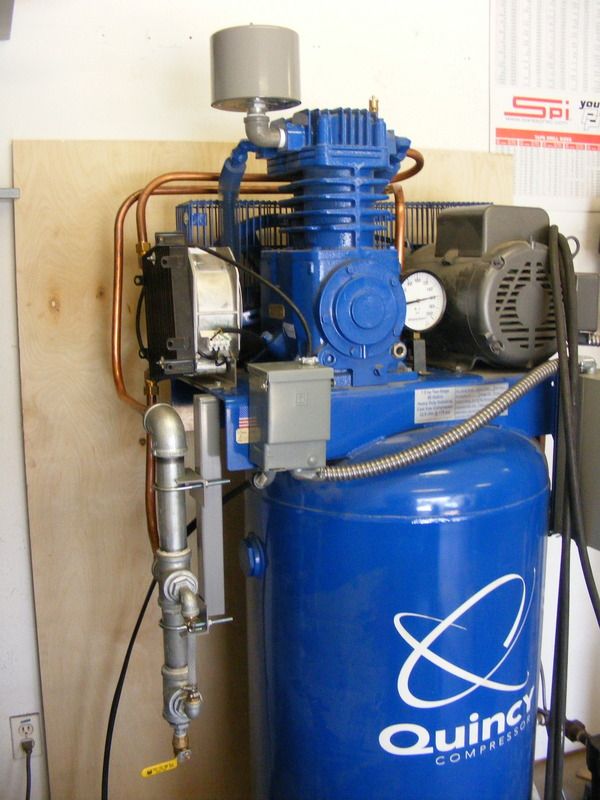
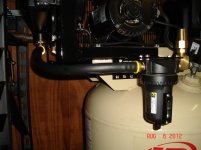
Unhooked the sand feed line in the blast cabinet and put a bucket on the foot air valve, just like i did the last time. pressure stayed around 90-95 the entire test and the compressor ran 100% of the time. All temps are in fahrenheit. All temps are the highest recorded for the area tested. Temps are surface temps.

One minute of running
198.9 degrees at the inlet of the cooler
98.8 degrees at the outlet of the cooler
96 degrees at the inlet of the tank check valve

six minutes
285 degrees at the inlet of the cooler
111.2 degrees at the outlet of cooler
103 degrees at tank check valve
Also checked the compressor pump head temp. at 331 degrees

ten minutes
305 degrees inlet of cooler
111.9 outlet of cooler
107 degrees at tank check valve.
356 degrees head temp.

outlet of the water trap just felt warm to the touch. Could easily hold onto it for as long as i wanted. Cooler then the temperature of the water i wash my hands with. I would never intentionally touch that pump outlet pipe:eyecrazy:

aftercooler3002.jpg
 

PT Doc

Well-known member
Joined
Nov 12, 2010
Messages
3,197
Seems like a great solution. Keep us posted. 10 minutes run time is pretty good.
 

Provincial

Well-known member
Joined
Sep 21, 2011
Messages
6,855
Location
Near Salem, OR
3 phase power at your house? How did you do that?

I live in a rural area and a three phase supply line for a municipal water pumping station runs through my yard about 250 feet from my house. When I built my "home-in-a-shop" it cost me a a couple of thousand extra to get three phase. I'll never get it all back, even though my heat pump is three phase, but then sometimes you just have to go for it. ;)

Warren Buffet owns my power company, so there are not bargains to be had here. :mad:
 

EOC_Jason

Well-known member
Joined
Jun 25, 2012
Messages
11,388
Location
Bentonville, AR
I'm assuming your fan on the after cooler is blowing on the motor & pump? While having it blow through the after-cooler would probably be better just taking account the cooler only, I would think all the extra airflow over your other parts would be more beneficial overall.
 

PT Doc

Well-known member
Joined
Nov 12, 2010
Messages
3,197
I think that you have to blow air at the cooler. I think it's also beneficial to have good airflow at the pump, possibly from above the pump.
 

alan camby

Well-known member
Joined
Dec 3, 2011
Messages
1,566
Location
South of Indianapolis, Indiana
I think that you have to blow air at the cooler. I think it's also beneficial to have good airflow at the pump, possibly from above the pump.

Wow, you are a genius, or you think like me:bounce:

The pump cooling is what i am working on now. First I am going to do some testing to see what more airflow over the pump head does for the air inlet temp to the after cooler. If the test has worthwhile results, the head will be getting a permanent cooler.
 

alan camby

Well-known member
Joined
Dec 3, 2011
Messages
1,566
Location
South of Indianapolis, Indiana
I'm assuming your fan on the after cooler is blowing on the motor & pump? While having it blow through the after-cooler would probably be better just taking account the cooler only, I would think all the extra airflow over your other parts would be more beneficial overall.

the airflow from the after cooler fan is away from the motor and pump. The fan is used for the cooler only. I think that the cooler disrupts the airflow to much to benefit anything after it. The only thing you can feel on the other side of the cooler is very hot air radiating up.
 

pipsters

Well-known member
Joined
Sep 1, 2010
Messages
4,899
Location
USA
The other question is, are you getting any moisture out of the filter? Or is it all going into the tank? Half the reason for making an aftercooler would be to allow the water to condense out and be filtered out before the tank.

BTW is that the 18 CFM 60 gal IR compressor? I saw it at TSC for $900, w/ coupon it would be only $810. Was kinda thinking about picking it up.

Also that is a very pro looking setup, looks like it was bought. Nice.
 
Last edited:

alan camby

Well-known member
Joined
Dec 3, 2011
Messages
1,566
Location
South of Indianapolis, Indiana
The other question is, are you getting any moisture out of the filter? Or is it all going into the tank? Half the reason for making an aftercooler would be to allow the water to condense out and be filtered out before the tank.

BTW is that the 18 CFM 60 gal IR compressor? I saw it at TSC for $900, w/ coupon it would be only $810. Was kinda thinking about picking it up.

Also that is a very pro looking setup, looks like it was bought. Nice.

Thanks for the complement:thumbup:

Yes, it is a 18.1cfm at 90psi TSC unit with ss5 pump. My tank is 80 gal though. I would definitely consider a 2 stage pump thought in order to get cooler air. I would never buy a large single stage again.

Yes I am getting moisture out of the filter and very little to no water in the tank, but this is just day 2 of the completed project.
 

brianpgriset

Well-known member
Joined
Sep 29, 2006
Messages
1,036
Location
Beaumont, TX
Here are some pics that will attest to the effectiveness of the after cooler. Pics below show the amount of water knocked out in the drip leg after about 8min run time.

DSCF1997.jpg


Compared to what came out of the tank

DSCF1994.jpg


I let the tank sit overnight to allow any more moisture to condense and only got this much more out
DSCF1999.jpg


I would say 90% or better of the condensate came out of the drip leg.

So far I'm pleased. I wonder how much of a difference the drip makes compared to just a water separator.
 
Last edited:

pipsters

Well-known member
Joined
Sep 1, 2010
Messages
4,899
Location
USA
Logically I would think you'd get more with a 5 micron filter. Reason being if there is enough moisture that it is condensing in a drip leg like you have the water would already be condensed out enough to be filtered out. Just a guess though. That is a huge amount of water though. If you have a filter you'd need an auto drain for sure.
 

EOC_Jason

Well-known member
Joined
Jun 25, 2012
Messages
11,388
Location
Bentonville, AR
What is the largest benefit to using an after cooler? Worth the effort and money?

It cools the air to allow the moisture in the air to condensate sooner (either in a filter trap or in your tank) vs what usually happens is that the air will cool further down the line and you get water spraying out of your tools / equipment.

It's just a way to help control water problems, the sooner you can get the air temp down to ambient (or lower) the better off you are.
 

brianpgriset

Well-known member
Joined
Sep 29, 2006
Messages
1,036
Location
Beaumont, TX
For me my main driver was two fold. One, prevent clumping of sand while sandblasting and two, to help reduce moisture content while doing automotive paint work.

I have two of the hf dessicant dryers to install downstream of the tank with a block and bypass so I can use it only when painting. This plus the after cooler should yield some pretty dry air.

The side benefits as mentioned are increased tool like due to less moisture in tools and less water in the tank thanks to it being condensed out beforehand.
 

brianpgriset

Well-known member
Joined
Sep 29, 2006
Messages
1,036
Location
Beaumont, TX
Great job on the tubing bending

Haha, what you don't see in that picture is the three feet of scrap sitting on the ground after I screwed up the piece from the pump to dripleg the first time :lol_hitti
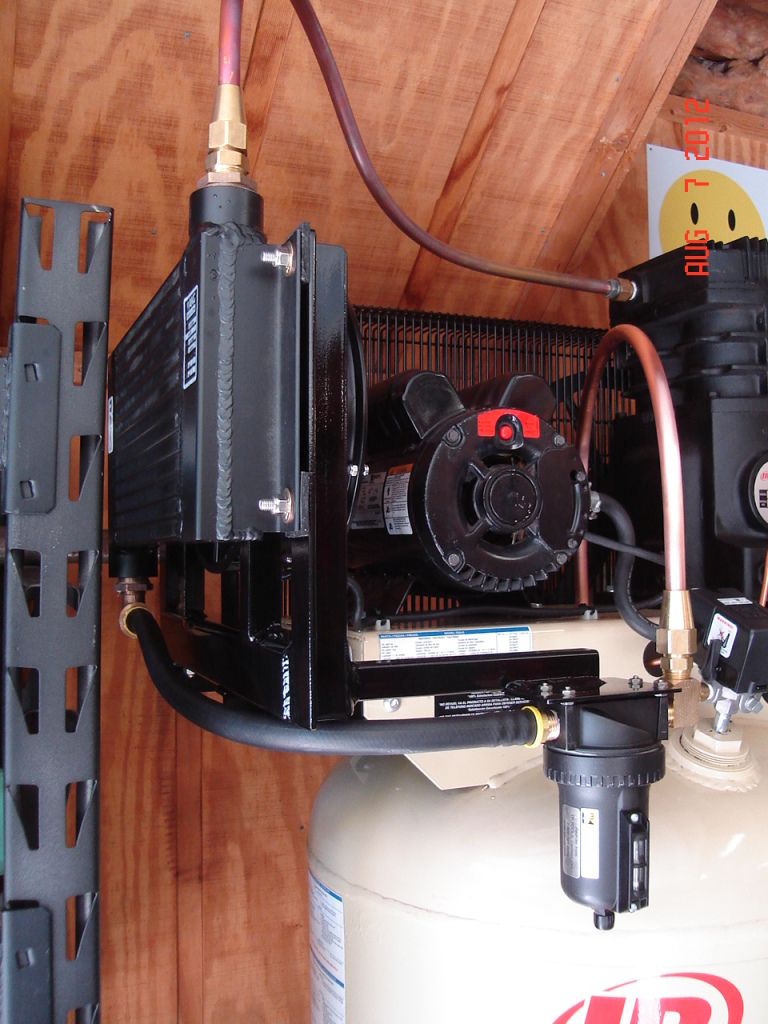
. After wasting that ~$10 of soft copper tube I made damn sure the rest were spot on.
 
To avoid these ads, REGISTER NOW!
Top Bottom