To avoid these ads, REGISTER NOW!

Compressor after cooler

UltimatE

Active member
Joined
Jan 7, 2011
Messages
31
Just got mine done a week or so ago.

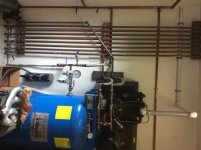
The compressor is a Eaton Polar Air 5HP. Bought it on CL for 800.

The cooler itself is a Thermal Transfer Systems DH-205. Got it from work in the scrap bin. It was a hydraulic pump cooler that got a tiny hole punched in the side tank. 10 minutes braze time fixed that.

The fan is the ever popular EBM-Pabst 220V muffin fan from eBay for 40. It is the 160 watt version and 1200CFM.

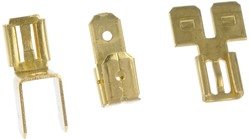
The water filter is also from eBay and is from UPE Group (Asian) 3/4" with auto-drain for 50 bucks: http://www.ebay.com/itm/201449479155?_trksid=p2057872.m2749.l2649&ssPageName=STRK:MEBIDX:IT

In my installation, I couldn't go wider or deeper on the compressor. The width is limited due to being between two garage doors and the depth is due to being all the way back against the wall. I toyed wit the idea of a fan guard mounted cooler but many compressors are purposely slow running and therefore move relatively little air. Saylor-Beall recognizes this and therefore mounts a fan on the motor shaft to power air across its guard mounted cooler:
http://www.saylor-beall.com/base-mounted/

So with all this, I made a couple of angle iron mounts and mounted it to the top of the fan guard above the motor. The fan guard on the Eaton Compressor is pretty heavy duty so mounting it was easy. I also had to make a custom aluminum manifold block on the exit port of the compressor. The fan is wired in parallel with the motor. bent some copper pipe and added ~25 in fittings and it was done. Total investment was ~125.00.

To verify effectiveness, I took some thermographic images using a FLIR camera. It seems to work really well. The temp of the entry pipe into the tank never goes above +5 ambient. The first picture is at startup with an ambient garage temp of 57F. The last is at 10 minutes with ~250F into the cooler and 76 midpoint and 60F at the exit. i think the performance may drop some in the summer at 90F, but we'll see. In about an hours run time at ~50% humidity it produced about a cup of water.

Do you have a link or model number for the fan? Only ones I seem to find are equipment cooling fans (Computer sized) or huge ones for well over $100.
 
To avoid these ads, REGISTER NOW!

BCreekDave

Well-known member
Joined
Dec 17, 2015
Messages
206
Location
Dayton, OH
Do you have a link or model number for the fan? Only ones I seem to find are equipment cooling fans (Computer sized) or huge ones for well over $100.


Here is the pn for the fan:
W2E250-HJ28-01 Electric Axial Fan 230V~50/60Hz 115w/160w ac

They are pricey new, but easy to find on eBay if you aren't in a hurry.


Sent from my iPhone using Tapatalk
 

UltimatE

Active member
Joined
Jan 7, 2011
Messages
31
Here is the pn for the fan:
W2E250-HJ28-01 Electric Axial Fan 230V~50/60Hz 115w/160w ac

They are pricey new, but easy to find on eBay if you aren't in a hurry.


Sent from my iPhone using Tapatalk

Thanks for the info. Judging by the thermal images you posted earlier, 1,200 CFM looks to be pretty overkill since all the heat is removed within a few inches into the cooler.

I'm leaning towards a pair of W2E142, which are readily available and would be about 460 CFM. I purchased a Hayden OC-1236 (8-1/2" x 18") so a pair of 6" fans would fit nicely.
 

BCreekDave

Well-known member
Joined
Dec 17, 2015
Messages
206
Location
Dayton, OH
Possibly. But keep in mind it was operating in pretty ideal conditions with a 57F ambient. It will get worse at 90F. It depends on your shop conditions. Here is a good read on the overall subject of drying air and the importance of aftercoolers: http://www.parker.com/literature/balston filter/IND/IND technical articles/dryingcompressedairguide.pdf

I typed that link in but google it. It pretty well explains that you have to have an aftercooler as the first stage in air drying.


Sent from my iPhone using Tapatalk
 

BCreekDave

Well-known member
Joined
Dec 17, 2015
Messages
206
Location
Dayton, OH
Also, if you look real careful at the thermal image on the right the aftercooler tube is slightly hotter than the rest. This is due to the position of the fan on the cooler. I got the 250mm cooler to try and cover it evenly. I may have been able to use a smaller fan with a shroud or two fans spaced apart but it just ended up being easier to go with one large, high cfm fan to get the job done with the least fuss.


Sent from my iPhone using Tapatalk
 

UltimatE

Active member
Joined
Jan 7, 2011
Messages
31
Possibly. But keep in mind it was operating in pretty ideal conditions with a 57F ambient. It will get worse at 90F. It depends on your shop conditions. Here is a good read on the overall subject of drying air and the importance of aftercoolers: http://www.parker.com/literature/balston filter/IND/IND technical articles/dryingcompressedairguide.pdf

I typed that link in but google it. It pretty well explains that you have to have an aftercooler as the first stage in air drying.


Sent from my iPhone using Tapatalk

Good point. I found a pair of 230v W2E200's on eBay for $50, 600CFM each. I hope they're single phase and not 3 phase.

I also made a mistake on my auto drain. I picked up an SMC NAD402-N04 to use at the bottom of the cooler, but didn't realize it has a minimum pressure requirement of 14.5PSI, which won't work between the compressor & tank since pressure continuously fluctuates between 0psi and 160psi. Does your mist separator with auto drain work down to 0 psi?
 

BCreekDave

Well-known member
Joined
Dec 17, 2015
Messages
206
Location
Dayton, OH
I'm pretty sure the auto drains will work when the compressor is actually cycling, meaning it fills with water, the float inside rises until it reaches the set discharge level and then when there is pressure it will discharge. If the compressor is not running and it is zero pressure, it will just wait until the next cycle and has pressure to discharge. At least that is what I have observed in mine.


Sent from my iPhone using Tapatalk
 

dipan

Well-known member
Joined
May 24, 2012
Messages
178
Location
South Texas
Thought I would share my aftercooler setup inspired by this thread. Just finished it and measured temps with an IR gun after one full cycle. Surprisingly, without the three 220mm DC fans installed yet, inlet temps at the Hayden cooler are 300 degrees F. Outlet temps on the bottom are 100F. Ambient is 75F. Impressive results indeed. I am very pleased. Now ready to start using it finally. Got some painting tasks lined up ....

7MaQrDsB3xg36rae7


Hmm, neither Google nor Imgur picture links working....

And GJ uploads are not posting in correct orientation. Grrr now I remember why I don't post more photos.
 

Attachments

  • IMG_3141.jpg
    IMG_3141.jpg
    133.8 KB · Views: 415
  • IMG_3145.jpg
    IMG_3145.jpg
    132.3 KB · Views: 353
Last edited:

dipan

Well-known member
Joined
May 24, 2012
Messages
178
Location
South Texas
dipan,

what hayden cooler part number are you using with your compressor? Nicely done!

Thanks... Hayden 1260 Heavy Duty Oil Cooler

While the cooler works seemingly well for a single cycle, during actual use a fan would probably be needed. I had a small-medium sized spray project for which the compressor probably cycled 5-6 times. Some moisture must have gotten through as there was a small amount of water in the tank he next day after the tank had cooled. The coalescing filter also had a small amount but not enough to trigger auto drain. I will put the fans on soon....
 

Paul R. Haller

New member
Joined
Apr 16, 2017
Messages
3
Hello all, here is my home made after air cooler for my compressor. It works great and has stopped all my water issues. It took about 3 hours to buy all pipe and fittings and another day to solder it all. It's all made from 3/4 copper pipe. Then another week to assemble and install the delivery system loop around the shop, again with 3/4 Copper, with all air drops up the wall from the 3/4 T loop and then down the wall with 1/2 copper drops and quick release fittings and a drip leg with a valve to drain any water. Before installation, I just spit water out the drops and my automatic tank drain poured water all over the shop no matter what I did. Now, even my tank has O water and there is no water in the air. I can paint my cars now without any water at all. It all cost about 300$ and a lot of work but it solves all my air/water issues.

My air exiting the air compressor would often hit over 300 degrees after running a while measured by an IR thermometer. Now, it enters the tank at room temperature no matter how long the compressor runs rather then over 300. A drop of over 200 degrees. Pretty cool! I just open the valves at the bottom of the air cooler once a day befor beginning paint work.
 

Attachments

  • IMG_0336.jpg
    IMG_0336.jpg
    137.7 KB · Views: 365
Last edited:

kapster

Well-known member
Joined
Dec 14, 2011
Messages
517
Location
Wooster, Ohio
I bought an AKG C-70100BG aftercooler from Zoro, currently working on mounting.

How important is the type of water separator used after the cooler? Does it have to be a low micron (5 or 10) to separate the water or would a 40 micron work? I like the looks of the smc amg but think I'd rather go with something with a smaller bowl to minimize bleed off time. Found a made in usa milton locally but its 40 micron.
 

kapster

Well-known member
Joined
Dec 14, 2011
Messages
517
Location
Wooster, Ohio
I got my akg cooler mounted, had to get a little abstract to make it fit on this compressor.

Got a couple questions. You guys just used regular copper coil correct? I got a roll of 1/2" but its about half the thickness of the original line, will it be ok? Doesnt have any psi numbers but says its ok for compressed air.

How much water are you guys getting out of your water seperators after the cooler? I got a milton with a 6 oz bowl, it has a autodrain but its not a float. Drains when pressure is released, so it would drain every time the compressor fills. Is this going to be big enough?

I had asked above about the 40 micron or less tradition water separators vs the SMC amg separators, any input on this?

ImageUploadedByTapatalk1494700247.251318.jpg


Sent from my iPhone using Tapatalk
 

Z2V

Well-known member
Joined
Jul 19, 2016
Messages
418
Location
Cedar Park (Austin) Texas
kapster, what will you be using the compressor for? High air flow like media blasting or occasionally using some air tools tinkering around in the garage? You have the Milton already I'd say use it and see if that will be satisfactory with your heat exchanger installed. You can always add to it if it isn't enough. Could you have mounted the heat exchanger in front of the pump flywheel to pull air through it? I think mine is a 40 micron now but at this point in time I'm not painting or blasting so it is fine.
 

kapster

Well-known member
Joined
Dec 14, 2011
Messages
517
Location
Wooster, Ohio
Little bit of everything. I have a trico sandblast cabinet, with the smallest nozzle they make and its still to big for compressor. Recently got an hvlp paint gun for a project, dont want to even try it until i get the moisture under control. Other than that, general air tools.

Ive always had water trouble with this compressor, hoping this takes care of it. One of these days I'll get a Quincy to replace it and move this to it.

I looked at mounting it by the compressor fan but the fan on this really doesn't move much air and its a cheap plastic cover, would have to make a new belt guard. I plan to add a fan at some point.


Sent from my iPhone using Tapatalk
 

Z2V

Well-known member
Joined
Jul 19, 2016
Messages
418
Location
Cedar Park (Austin) Texas
I'm interested to know how much improvement you see with that heat exchanger. I'm looking to add the same one to my setup. Please keep us posted.
 

motofool33

Well-known member
Joined
Feb 2, 2013
Messages
1,634
Location
Currently North of Houston
I'm interested to know how much improvement you see with that heat exchanger. I'm looking to add the same one to my setup. Please keep us posted.

in texas(im in Houston) the benefits are huge, i put one on my 5hp 60 gallon tank and pre after cooler i would shoot water out my sand blaster nozzle after a couple cycles, after the hayden cooler it would keep the air separated from the water and my pneumatic drain valve emptied the compressor

i used the 1260 hayden cooler and a 1500cfm pabst ebdm 240volt fan wired in parallel with the motor.
 
Last edited:
To avoid these ads, REGISTER NOW!

BCreekDave

Well-known member
Joined
Dec 17, 2015
Messages
206
Location
Dayton, OH
in texas(im in Houston) the benefits are huge, i put one on my 5hp 60 gallon tank and pre after cooler i would shoot water out my sand blaster nozzle after a couple cycles, after the hayden cooler it would keep the air separated from the water and my pneumatic drain valve emptied the compressor


i used the 1260 hayden cooler and a 1500cfm pabst ebdm 240volt fan wired inseries with the motor.


I hope you mean in parallel with the motor! In series means all of the compressor motor power is going through the fans windings. That wouldn't last very long I think.


Sent from my iPhone using Tapatalk
 

pcmeiners

Well-known member
Joined
Aug 13, 2009
Messages
7,825
Location
In the only town in Pennsylvania, Bloomsburg.
Anyone using/spending anything more then a 1260 for a 5 hp compressor or a 1290 for 7.54 to 10 HP compressors is throwing money away...

1260...
http://www.ebay.com/itm/Hayden-Cool...ash=item1a2697889a:g:bIQAAOSwSlBYsuAg&vxp=mtr

1290....
http://www.ebay.com/itm/Hayden-1290...ash=item3d378ad488:g:HPgAAOSwjMJXDE5k&vxp=mtr

"in texas(im in Houston) the benefits are huge"
Been there in the summer, I can imagine how much water drops out. I am in NYC, similar brutal humidly in the peak of the summer.

"Could you have mounted the heat exchanger in front of the pump flywheel to pull air through it?"
That is how I mounted all Haydens I have installed , I don't see any reason to use an add-on fan, there is plenty of air flow off the flywheel. Air flow temperature over the compressor only increases slightly over ambient .
 

BCreekDave

Well-known member
Joined
Dec 17, 2015
Messages
206
Location
Dayton, OH
Anyone using/spending anything more then a 1260 for a 5 hp compressor or a 1290 for 7.54 to 10 HP compressors is throwing money away...


1260...

http://www.ebay.com/itm/Hayden-Cool...ash=item1a2697889a:g:bIQAAOSwSlBYsuAg&vxp=mtr


1290....

http://www.ebay.com/itm/Hayden-1290...ash=item3d378ad488:g:HPgAAOSwjMJXDE5k&vxp=mtr


"in texas(im in Houston) the benefits are huge"

Been there in the summer, I can imagine how much water drops out. I am in NYC, similar brutal humidly in the peak of the summer.


"Could you have mounted the heat exchanger in front of the pump flywheel to pull air through it?"

That is how I mounted all Haydens I have installed , I don't see any reason to use an add-on fan, there is plenty of air flow off the flywheel. Air flow temperature over the compressor only increases slightly over ambient .


I think this can depend on the particular compressor. My compressor spins the flywheel-fan relatively slow so it really moves a low volume of air. Too low for the cooler. If your motor is a 1700rpm and the pulley diameters are 2:1 or less you may not move enough air. You may be able to improve this by blocking off all areas around the cooler to make sure 100% is going through the cooler


Sent from my iPhone using Tapatalk
 

kapster

Well-known member
Joined
Dec 14, 2011
Messages
517
Location
Wooster, Ohio
Anyone using/spending anything more then a 1260 for a 5 hp compressor or a 1290 for 7.54 to 10 HP compressors is throwing money away...


I couldn't find anywhere that said it was ok for that much psi, I even called and I forget what they said but it was really low, 60 psi maybe? Maybe those are ok but a few people had their B&M's fail. If you have to buy a second because the first one blew, your to the price of what I paid.

You can do whatever you want, that was just my take on it.


Sent from my iPhone using Tapatalk
 

kapster

Well-known member
Joined
Dec 14, 2011
Messages
517
Location
Wooster, Ohio
I think this can depend on the particular compressor. My compressor spins the flywheel-fan relatively slow so it really moves a low volume of air. Too low for the cooler. If your motor is a 1700rpm and the pulley diameters are 2:1 or less you may not move enough air. You may be able to improve this by blocking off all areas around the cooler to make sure 100% is going through the cooler


Sent from my iPhone using Tapatalk


Thank you, I agree:) mine has a dinky little pulley and moves next to nothing for air, I didn't want to decrease the little bit of cooling the pump is getting for very little after cooler cooling. Some compressor it might be a significant amount of air, not this one.

My thought was, going with such an overkill cooler it may not need a fan. If it does, no did deal I'll add one.


Sent from my iPhone using Tapatalk
 

BCreekDave

Well-known member
Joined
Dec 17, 2015
Messages
206
Location
Dayton, OH
Thank you, I agree:) mine has a dinky little pulley and moves next to nothing for air, I didn't want to decrease the little bit of cooling the pump is getting for very little after cooler cooling. Some compressor it might be a significant amount of air, not this one.

My thought was, going with such an overkill cooler it may not need a fan. If it does, no did deal I'll add one.


Sent from my iPhone using Tapatalk


Yeah. Some of the high end compressor manufacturers even go so far as to put a fan on the motor pulley to move more air in their kits:

http://www.saylor-beall.com/base-mounted/


Sent from my iPhone using Tapatalk
 

Ferrino

Well-known member
Joined
Mar 30, 2011
Messages
254
Location
San Diego, CA
I'm part way through my install and am seeking advice on how to wire up my aftercooler fan correctly, please.

The fan is 230V and so is my Kobalt compressor. I have 2 line terminals on the fan and then a separate lug for earthing. I would like the fan to be synchronized with the motor - what is the cleanest way to tap into the motor wiring, please? Do I need to uncrimp the terminals on the motor itself and add the fan wires? Or is there a gizmo I can use to tap the lines without interfering with the factory crimps?

Also, the fan is rated at 0.14A current: presumably I should put a small fuse on one of the line wires? What size?

Thanks!
 

EOC_Jason

Well-known member
Joined
Jun 25, 2012
Messages
11,388
Location
Bentonville, AR
I would not bother with a fuse on the fan for that low of current. If it doesn't spin I'm sure you will notice eventually...

I would not recommend using vampire taps for the electrical. Either parallel the fan in on the pressure switch or inside the motor housing.
 

Ferrino

Well-known member
Joined
Mar 30, 2011
Messages
254
Location
San Diego, CA
I would not bother with a fuse on the fan for that low of current. If it doesn't spin I'm sure you will notice eventually...

I would not recommend using vampire taps for the electrical. Either parallel the fan in on the pressure switch or inside the motor housing.

Thanks. Isn't the fuse there to protect the fan (and wiring)?

What's the best way to splice the fan wires with the motor wires? I think I am going to do this inside the motor housing. Should I join them at the terminal by crimping a new one?
 

BCreekDave

Well-known member
Joined
Dec 17, 2015
Messages
206
Location
Dayton, OH
Motor housing or at the pressure switch, wherever you have the most room. Does the motor have a pecker head?


Sent from my iPhone using Tapatalk
 

Ferrino

Well-known member
Joined
Mar 30, 2011
Messages
254
Location
San Diego, CA
No idea what a pecker head is (sounds like a slur!), but this photo shows a similar layout to my motor - there is a little plate secured by a couple of screws and underneath there are spade terminals. I have more room here at the motor than at the pressure switch.

compressor-005-2-jpg.124193
 

BCreekDave

Well-known member
Joined
Dec 17, 2015
Messages
206
Location
Dayton, OH
Sorry. Didn't mean to offend with some electrical slang. I've done this for so long it's easy to forget that not all have. A pecker head is a metal junction box that mounts on the motor at the point where the wires enter the motor. You can get different sizes to allow for more wires.


Sent from my iPhone using Tapatalk
 

EOC_Jason

Well-known member
Joined
Jun 25, 2012
Messages
11,388
Location
Bentonville, AR
If the terminal doesn't have a screw to add more wires with a ring connection, and all you have is the one spade connection coming out, you could either re-do the connection joining the two wire with a new spade, or they sell little spade Y connectors in all different configurations so you can connect multiple wires to that one existing spade (which is what I would do). Usually NAPA has them and possibly other auto-parts stores, (I had no luck at Lowes/HD).

Edit, here's some At O'Reilly

If you really want I suppose you could add a .5A fuse (if you can find them) in-line with one of the fan leads... It's not going to hurt anything.
 

Attachments

  • 85412-007.jpg
    85412-007.jpg
    7.8 KB · Views: 106
Last edited:

Ferrino

Well-known member
Joined
Mar 30, 2011
Messages
254
Location
San Diego, CA
Thanks! Think I'm all set now. It does look like you can get the tiny glass fuses in 0.5A.


Sent from my iPhone using Tapatalk
 

kapster

Well-known member
Joined
Dec 14, 2011
Messages
517
Location
Wooster, Ohio
ImageUploadedByTapatalk1495314733.831677.jpg

Got my AKG aftercooler plumbed in. Think I'll probably redo the copper, had a heck of a time bending it. Its half the thickness of the factory tube, I'll either find heavier stuff or just use rubber hose after the cooler.

I drained compressor after install and did a full cycle. Tank started at 72 degrees and was 85 when finished. Inlet of cooler was 250 degrees, outlet 110. My infrared thermometer doesnt seem to pickup the copper tube temp but I can easily hold onto outlet, wouldnt dare touch inlet. So without a fan I'm happy with that. I'll probably add a fan when one pops on ebay cheap but no rush.


Sent from my iPhone using Tapatalk
 

BCreekDave

Well-known member
Joined
Dec 17, 2015
Messages
206
Location
Dayton, OH
Thanks! Think I'm all set now. It does look like you can get the tiny glass fuses in 0.5A.


Sent from my iPhone using Tapatalk


Might want to see if you can get the fuss in a "slo-blo" version. The startup current for a fan or any motor is usually double of the run rating for a second or two at startup. That's why they make the slow blow type of fuse.


Sent from my iPhone using Tapatalk
 
To avoid these ads, REGISTER NOW!
Top Bottom