To avoid these ads, REGISTER NOW!

Craftsman Drill Press

Bacon!

Well-known member
Joined
Jul 16, 2016
Messages
402
It's definitely ~6.35mm, measured the chuck pilot hole as well (all measurements using a digital caliper). I saw some generics 6mm/13mm chuck on Amazon but in addition to the size difference, didn't have an expectation of quality.

Currently wondering if a Jacobs K32 would work, then saw someone mentioned a Northern Tool # 962248 for a Craftsman drill press, but not which one, lol !
 
To avoid these ads, REGISTER NOW!

Bacon!

Well-known member
Joined
Jul 16, 2016
Messages
402
I don't want the spring loaded safety pin because that means the whole body tube is hollow and weaker, and in the case of mine, after (granted not a short period of time) 18 years of use, the back end split apart. Even so, I'd have bought the same if I had found one.

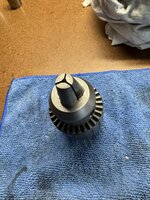
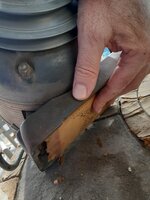
I got tired of looking. Seemed like in order to get 12 teeth, I might need to step up to a 5/8" chuck key. Bought this one with a 0.31" pilot and ground it down to 1/4". However it is not exactly as pictured:

Figured what the heck, it's only $3.39 and does have 12 teeth. It does feel like a quality key. Next I put the teeth at an angle against a bench grinder and reduced the gear teeth diameter, but that left the top edge of the teeth too wide. My *plan* was to next use a triangular shaped file to re-profile the teeth, but reaching into my file drawer, I discovered that the file I had in mind, is pretty worn out and rusty so not up to the job.

I can now use it but it's real notchy and does not seat completely. I'll either buy a new triangular file that I need for other uses anyway, or proceed with the more tedious task of using some little fine tooth file that takes a long time to get enough material off the teeth for the right profile.
 
Last edited:

1982fxr

Well-known member
Joined
Jan 7, 2012
Messages
9,997
Location
Phoenix
Frank, or anybody, I lost the plastic plate that goes on here for my old cman drill press. What's it called so I can look it up on ebay, and/or does anybody have one for sale?
 

Attachments

  • 20240111_110831.jpg
    20240111_110831.jpg
    1 MB · Views: 77
  • 20240111_110846.jpg
    20240111_110846.jpg
    573 KB · Views: 50

11b30b4

Well-known member
Joined
Jul 16, 2020
Messages
1,029
Location
GA
If you are refereeing to the plate that goes on the bottom of the motor, that is the capacitor cover and they were made from sheet steel. Should be easy enough to grab some 16 gage steel plate from Home depot and fabricate a replacement. Should look like the item on the left in this pic.
full
 
OP
F

FrankLee

Well-known member
Joined
Sep 13, 2010
Messages
3,552
Location
seMI, 48317
There are actually two styles.

Jeff shows one version that I believe is used when capacitors do not have the cardboard envelope. That one has a cardboard liner.

The other version is just a flat rectangle piece shorter than above but the same width.
Here's one in the upper right of the picture.

IMG_3065.JPG
 
Last edited:

Nicos

New member
Joined
Dec 19, 2020
Messages
3
Location
Home
Help please!

I have a Craftsman Model 80 (103.23100), that I’m trying to refinish. I’m unsure how to disassemble the front pulley without damaging it. I loosened the Allen screws holding the pulley to the bushing, but it’s still very secure. There is a washer that prevents the pulley from coming out the top. I’m unsure if I should use a wooden dowel and if so do I go from the top down or bottom up? Or is a gear puller the better option?

Thanks in advance!


IMG_5772.jpeg
IMG_5773.jpeg
IMG_5813.jpeg

IMG_5811.jpeg
 
OP
F

FrankLee

Well-known member
Joined
Sep 13, 2010
Messages
3,552
Location
seMI, 48317
Help please!

I have a Craftsman Model 80 (103.23100), that I’m trying to refinish. I’m unsure how to disassemble the front pulley without damaging it. I loosened the Allen screws holding the pulley to the bushing, but it’s still very secure. There is a washer that prevents the pulley from coming out the top. I’m unsure if I should use a wooden dowel and if so do I go from the top down or bottom up? Or is a gear puller the better option?

Thanks in advance!
  1. Remove both pulley set screws completely.
  2. Reinsert the spindle with chuck.
  3. Insert and tighten the short arm of an allen wrench in the chuck.
  4. Partially insert a long 5/16-18 bolt in one of the set screw holes on the pulley.
  5. Twist the two against each other to loosen the pulley.
  6. It should then pull off.
  7. A few seconds of a torch in the top of the pulley shaft may help.
IMG_2507.JPG IMG_2512.JPG IMG_2516.JPG IMG_2518.JPG IMG_2527.JPG

If that doesn't work, it's likely that the set screws loosened long ago and scored the pulley shaft all the way around and burred the shaft. In that case, a dowel may be necessary to tap the shaft down through the bushing. HOWEVER, that may/will damage the bushing.
It's best to remove the pulley first. Then address any issues on the shaft before pushing it through the bushing.
 
Last edited:

BrianHayes

Well-known member
Joined
Aug 11, 2023
Messages
53
Location
North Carolina
This 103.23140 followed me home from an auction today, and had a notable custom feature: the previous owner installed the motor 90 degrees to the side, thereby taking up a little less floor space, and possibly reducing the speed?PXL_20240309_004630970_copy_1024x771.jpgPXL_20240309_004728855_copy_1024x771.jpg
 

nadogail

Well-known member
Joined
Jan 23, 2009
Messages
31,909
Location
Coronado, CA
Moving the motor to the side should not change the ratio of the pulleys; adding a jackshaft and an additional cone pulley will give you more options to raise or lower the quill speed in relation to the motor speed.
 

Shiftless

Well-known member
Joined
Mar 9, 2014
Messages
14,479
Location
East Bay SFO
Moving the motor to the side should not change the ratio of the pulleys; adding a jackshaft and an additional cone pulley will give you more options to raise or lower the quill speed in relation to the motor speed.
That is exactly right. Moving the motor to the side has absolutely no influence on the ratio fo the speed.
 

BrianHayes

Well-known member
Joined
Aug 11, 2023
Messages
53
Location
North Carolina
OP
F

FrankLee

Well-known member
Joined
Sep 13, 2010
Messages
3,552
Location
seMI, 48317
Holy Crud Frank! How slow with that one go?
I got that machine eight years ago. I didn't know and didn't care. I ripped all that off and went back to stock.

The large pulley was 10", the motor pulley was 1.5", and the motor rpm was 1725. That calculates to ~259 rpm just on the jack shaft.
 
Last edited:

BrianHayes

Well-known member
Joined
Aug 11, 2023
Messages
53
Location
North Carolina
... that arrangement should drop the RPM at the spindle from 525 to 210.

I was guessing on the pulley sizes. I just measured them and recalculated: that arrangement would produce 181 RPM at the quill with a 1725 RPM motor. Unfortunately, the PO used a 3450 motor, so he was getting 362 at the quill.

Still, a clever and relatively inexpensive speed reducer.

Anyone looking to trade a 1725 motor for a 3450?
 
To avoid these ads, REGISTER NOW!

Nicos

New member
Joined
Dec 19, 2020
Messages
3
Location
Home
  1. Remove both pulley set screws completely.
  2. Reinsert the spindle with chuck.
  3. Insert and tighten the short arm of an allen wrench in the chuck.
  4. Partially insert a long 5/16-18 bolt in one of the set screw holes on the pulley.
  5. Twist the two against each other to loosen the pulley.
  6. It should then pull off.
  7. A few seconds of a torch in the top of the pulley shaft may help.
IMG_2507.JPG IMG_2512.JPG IMG_2516.JPG IMG_2518.JPG IMG_2527.JPG

If that doesn't work, it's likely that the set screws loosened long ago and scored the pulley shaft all the way around and burred the shaft. In that case, a dowel may be necessary to tap the shaft down through the bushing. HOWEVER, that may/will damage the bushing.
It's best to remove the pulley first. Then address any issues on the shaft before pushing it through the bushing.
This worked like a charm. I didn’t have the bolt but my pulley had a hole in it that aligned with a hole in the head. I was able to use a punch to lock the pulley to the head and break it free with the rest of the steps you outlined. Thank You!


IMG_5815.jpeg
 
OP
F

FrankLee

Well-known member
Joined
Sep 13, 2010
Messages
3,552
Location
seMI, 48317
This worked like a charm.
Good news!
I didn’t have the bolt but my pulley had a hole in it that aligned with a hole in the head. I was able to use a punch to lock the pulley to the head and break it free with the rest of the steps you outlined. Thank You!
Those holes are for oil to lube the bushing.
IMG_3274 (2023-11-27T14_16_36.177).JPG


@Nicos What are your refurb plans? Paint? If so, what color?
 
Last edited:

Nicos

New member
Joined
Dec 19, 2020
Messages
3
Location
Home
Good news!

Those holes are for oil to lube the bushing.
IMG_3274 (2023-11-27T14_16_36.177).JPG


@Nicos What are your refurb plans? Paint? If so, what color?

The DP was already in decent condition. I initially just wanted to clean it up and start using it, then I stumbled on this thread and now I'm doing a full refurb. I've purchased more in refurb supplies than I did on the DP. It's definitely a fun project, but I only have a couple of hours on weekends to work on it. At the current pace, I probably won't be done with it until summer.

For the color, I picked up some ACE Hardware Machinery Grey and although I'm a big fan of simple colors like grey, I'm really starting to lean towards a Teal (Rustoleum Gloss Lagoon). It looks like a Makita color which gives me some hesitation applying it to a Craftsman. However, I saw Pasks Makes restored a drill press in a similar color and it looks perfect for that era.

 
OP
F

FrankLee

Well-known member
Joined
Sep 13, 2010
Messages
3,552
Location
seMI, 48317
The DP was already in decent condition. I initially just wanted to clean it up and start using it, then I stumbled on this thread and now I'm doing a full refurb. I've purchased more in refurb supplies than I did on the DP. It's definitely a fun project, but I only have a couple of hours on weekends to work on it. At the current pace, I probably won't be done with it until summer.

For the color, I picked up some ACE Hardware Machinery Grey and although I'm a big fan of simple colors like grey, I'm really starting to lean towards a Teal (Rustoleum Gloss Lagoon). It looks like a Makita color which gives me some hesitation applying it to a Craftsman. However, I saw Pasks Makes restored a drill press in a similar color and it looks perfect for that era.
I really like Pasks paint choice. The color is very nice, but I mostly like it for the matte finish (It looks matte anyway).
IMO, gloss is too much. I recently used Rustoleum Dead Flat Clear over Rustoleum Champaigne Mist to tone it down.
 
Last edited:

paulm12

Well-known member
Joined
Apr 29, 2015
Messages
584
Location
NW Chicago 'burbs
I recently picked up what I figured was a parts donor 80 series. I have 2 of this series already, and one of them needs a column and a spindle, and would be dedicated to metal work. This recent FBM posting looked promising, plus it looked to have the slow speed pulley in the posted pics. Well, it is very used, lots of grease/dirt buildup, and worst of all, the slow speed pulley casting is shot. Ugh.

A quick runout measurement at the drill bit was around 3 thou, so that can probably be improved with a good cleaning and setup. So the spindle should be good.

My question is if anything can be done with the slow-speed setup. thanks

IMG_20240317_113254835.jpgIMG_20240317_113326739.jpgIMG_20240317_113338034_HDR.jpgIMG_20240317_113608898_HDR.jpg
 
OP
F

FrankLee

Well-known member
Joined
Sep 13, 2010
Messages
3,552
Location
seMI, 48317
My question is if anything can be done with the slow-speed setup.
You likely won't be able to salvage that MSA mount, but that should be the easiest part to make or have made.
However, it also looks like that mount has some wear around the bearing shaft bore. That indicates that the bottom sheave of the cone pulley is also worn. That's not good and may render that step unusable.
52218674750_6669fb4d77_o.jpg

With a new mount and the front belt moved up one step, you could still achieve speed reduction to roughly 375 rpm from the standard 610 rpm for an 80.


Please post a photo of the underside of the pulley.
 
Last edited:

paulm12

Well-known member
Joined
Apr 29, 2015
Messages
584
Location
NW Chicago 'burbs
thanks for the reply Jim. I think the whole center pulley setup is shot on this machine. It looks like the mount was spinning in the column shaft.

Ugh. Now I have 2 machines that still need parts. For now I'll focus on just using the motor to spindle belt setup, and go as slow as that will allow.


IMG_20240317_121953114.jpg
 
OP
F

FrankLee

Well-known member
Joined
Sep 13, 2010
Messages
3,552
Location
seMI, 48317
That actually doesn't look too bad to me.

With the bearing shaft off center on the mount, that machine would have been shaking violently if the mount was spinning in the column.
 

paulm12

Well-known member
Joined
Apr 29, 2015
Messages
584
Location
NW Chicago 'burbs
good. I am just disappointed. I have been looking recently at JZiggy's setup. Would be nice, trying to justify it to myself. Thanks again for the reply. Time now for a long overdue cleaning on this machine.
 

aalligood

Member
Joined
Feb 27, 2024
Messages
11
Location
GA
I’m working on restoring a 1953 Craftsman King Seely and so far everything has gone smoothly with the help from this forum.

I disassembled my Jacobs 633C chuck this weekend and cleaned it. I’m stumped on this issue that I’ve run into on reassembly. The jaws mate perfectly with the sleeve uninstalled but after everything is put back together, they are either slightly misaligned or don’t completely close. I checked and double checked my jaw order. Am I missing something?
 

Attachments

  • IMG_3339.jpeg
    IMG_3339.jpeg
    742.6 KB · Views: 18
  • IMG_3340.jpeg
    IMG_3340.jpeg
    823.1 KB · Views: 14
  • IMG_3332.jpeg
    IMG_3332.jpeg
    1,023.1 KB · Views: 15
  • IMG_3337.jpeg
    IMG_3337.jpeg
    1.3 MB · Views: 16
  • IMG_3336.jpeg
    IMG_3336.jpeg
    1.5 MB · Views: 16
  • IMG_3335.jpeg
    IMG_3335.jpeg
    1.2 MB · Views: 12
  • IMG_3338.jpeg
    IMG_3338.jpeg
    1 MB · Views: 29
OP
F

FrankLee

Well-known member
Joined
Sep 13, 2010
Messages
3,552
Location
seMI, 48317
I’m working on restoring a 1953 Craftsman King Seely and so far everything has gone smoothly with the help from this forum.

I disassembled my Jacobs 633C chuck this weekend and cleaned it. I’m stumped on this issue that I’ve run into on reassembly. The jaws mate perfectly with the sleeve uninstalled but after everything is put back together, they are either slightly misaligned or don’t completely close. I checked and double checked my jaw order. Am I missing something?
Are the jaws in the same relative positions as they were before disassembly?
Do the split nut halves mate together properly?
In photo 3337, the middle jaw, is that grease on the far right tooth or is that a defect on the tooth?
Have you tried tightening with the key?
 
Last edited:

paulm12

Well-known member
Joined
Apr 29, 2015
Messages
584
Location
NW Chicago 'burbs
so what size arbor press is needed to remove the collar from Jacobs 33 chucks? I had access to a 3 or 4 ton previously, but not anymore. Thanks
 
OP
F

FrankLee

Well-known member
Joined
Sep 13, 2010
Messages
3,552
Location
seMI, 48317
It could probably be done with the arbor of your drill press? :dunno:
Please don't use your drill press as an arbor press. If you do, I'd love to sell you a replacement pinion gear shaft.

so what size arbor press is needed to remove the collar from Jacobs 33 chucks? I had access to a 3 or 4 ton previously, but not anymore. Thanks
I've never used an arbor press. I use a two arm puller. That spare sleeve makes it easier to dismantle, but I've used just the puller jaws on the chuck sleeve plenty of times.
52332129906_022df7f90a_k.jpg 52332129561_c6ab28e80f_k.jpg
 

paulm12

Well-known member
Joined
Apr 29, 2015
Messages
584
Location
NW Chicago 'burbs
Yeah, I won't be using the drill press itself as an arbor press. Simple idea on the 2-arm, but of course, I never thought of that. Thanks.

and a look of a machine that may have missed a preventative maintenance along the way ...

IMG_20240317_185158025_HDR.jpg
 
To avoid these ads, REGISTER NOW!
Top Bottom