Outlawmws
Well-known member
Also does the spindle spin freely? if not that may be part of the motors prob. if it's just a start up issue is there a capacitor in the base? If so that is now ancient and needs replaced.

A buddy's Father passed away, and he had some tools in his garage he was looking to sell. He had this drill press, and I said I would buy it from him...we loaded it up in my car and he said once I checked it out to let him know if I still wanted to give $100 for it. After getting it home, I see it's more rough than I thought. With the belt on, the motor hums, then trips the breaker. It spins ok with the belt off, but seems "tired". I wanted to do a cosmetic resto on this so it fit in with the rest of my vintage Craftsman woodshop tools...but how easy is it to rebuild the stock motor? I really don't want to invest in a modern motor for it. The model number badge is gone, so I'm not even sure what it is.
True, I've paid as little as $15.00 for an old table saw.Mercman, keep an eye on eBay and CL. Every once in awhile, a real clean motor will show up at an affordable price. On CL, don't be afraid to grab a table saw or band saw just to rob the motor off it.
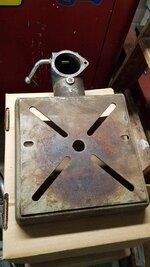
I noticed the "48". Figured that, thanks. Here is the table. It needs some work too.Well the motor has a date code for 1948. I suspect the DP is a model 100, likely of the same vintage as the motor. What is the diameter of the column? And can you shoot a pic of the table?

I do that. I even have email alerts set up, lol.Mercman, keep an eye on eBay and CL. Every once in awhile, a real clean motor will show up at an affordable price. On CL, don't be afraid to grab a table saw or band saw just to rob the motor off it.
I had the same symptoms on the motor from DP #29... hum, no start. I removed it from the mount and tried again. This time I spun the pulley by hand while it was humming and it slowly accelerated up to speed after a few seconds. I believe this is a classic symptom of a bad start capacitor.
The capacitors on these motors are sardine-can shaped and mounted in the base. They are no longer available. You can get a cylindrical capacitor replacement and rig it somehow. I believe they are fairly inexpensive. I've never done it, but others have. Where in MI are you located? There are motor repair shops around. The specs may be printed on the old capacitor.
The bench model numbers of that era are either 103.23130 or 23131. The "2313" is the catalog number. I'm not sure what the last digit means.
Yes, it turns free. When I got it running, I put the belt on the smallest pulley. It actually ran pretty quietly. It wouldn't turn with the belt slipped onto a larger pully though. I was expecting bearing noises but it was not bad.Also does the spindle spin freely? if not that may be part of the motors prob. if it's just a start up issue is there a capacitor in the base? If so that is now ancient and needs replaced.
DOH! Sorry. I always scored poorly on reading comprehension. LoL!
What did you find out?
Hello Frank. I'm a new member and have been gleaning quite a bit of useful information from this thread over the last few weeks. I very much appreciate the detail included in your posts and of course your willingness to share your experience.
I have a question about the process of installing new bearings for the spindle/quill assembly of the Craftsman 150 drill press (103.24511.) I'm finding that maybe the best technique for assembling the bearings to the spindle would be to freeze the spindle and warm the bearings. What I'm not finding is the order or necessity of heating or cooling the quill in this process. Should I freeze both the spindle and quill while heating the bearings or should I assemble the bearings into the quill and then heat that assembly to install onto the spindle from the freezer? Or maybe something in between?
I'll be sharing more after I get this thing back together. In the meantime, here's what I started with.
https://www.dropbox.com/sh/lv0q6ioikavym0g/AAD645Ya0YsiJd4jj_fe0DGWa?dl=0
Thanks to anyone who might have experience to share.
Andy
IIRC, here's what I did (or would do):
- freeze the spindle, heat and install the lower bearing
- freeze the spindle and lower bearing, heat and install the lower end of the quill
- freeze spindle, lower bearing and quill, heat and install the upper bearing
- be prepared to press on the upper until fully seated into the quill
 ).
).
As others have said these machines do seem to breed when left alone, I am just starting a teardown of three floor models that have spent the winter in my garage. (Pics will be coming - yesterday I took about 20 before I realized I didn't have a memory card in my camera
Frank - wanted to thank you for your patented method of removing the bases. I had one that was really rusty. Soaked them with PB Blaster all morning and then used your BFH and 2x4 trick and it worked like a charm on all of them!
Frank - two questions as I revisit this whole thread prior to tearing into my three DPs. One - I never thought to ask this before - what are the T-slots on the base useful for?
Second - you have a DP table in post #130 - do you know where that came from? One of the DPs I picked up had an extra table and it is the exact same one. . . .wondering if these had anything to do with these presses or if it's just a coincidence since it fits the column.


- freeze the spindle, heat and install the lower bearing
- freeze the spindle and lower bearing, heat and install the lower end of the quill
- freeze spindle, lower bearing and quill, heat and install the upper bearing
- be prepared to press on the upper until fully seated into the quill
I've turned the freezer down to -6 now (as low as it will go) and will try again in a couple of hours. Any recommendations on how to go about heating the bearing?Well, my first attempt has failed -
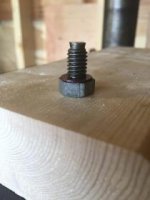
I left the spindle in the freezer overnight at 0 degrees and heated the bearing on a 150 watt bulb for 30 minutes. With that, the bearing would barely start over the splines
At room temperature the bearing ID is .622 and the spindle OD is .625. I had also checked for burrs on the spindle before putting it in the freezer last night.
Andy
Hmmm. Where did you order bearings? What bearing number? What were the specs? What do the old bearings measure?
I don't think any lower freezer temp or time is going to help. Ten minutes of heating the bearing should be plenty.
Maybe measure the very end of the spindle on each spline pair.


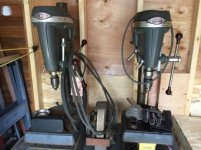
Frank, I can't keep up with you but here are presses 3, 4, and 5 for me.
L-R are 103.23141 "100", 103.24511 "150" with original 1/2 HP motor, Emmerson "150" 113.24511
At this stage I am going over them and trying to determine a plan of attack. Your thread helps tremendously and I have learned a lot. I would love to keep one for wood and one for metal but I don't have the room . . .so two of them will get sold.
Frank I had started a thread of my own on these presses last summer and got sidetracked - but I'm at it again. I don't want to hijack yours!
On the 150 that I have had forever, the head is larger and dimension from the column centerline to the quill centerline is bigger than the head that I found on CL (withOUT) the rapid-adjust. I thought that all of these were what is called “15 inch” drill presses. So, I now realize that I do not understand how the “15 inch” designation is measured. Can you explain this to me and tell me the CL distances on the different sizes?
I was the guy that asked Franklee the size question.
Thank you very much for the awesome answer!
One more question: Are all parts interchangeable between the 15 1/2 and the 13 1/2?
Indexmill.
Frank picking up #6 in the am this one is a 150 with a slow speed pulley. Question for you as I break four machines down: what is the easiest way to check the spindle runout?
To look for run-out without a dial indicator, (while on a buying run) you can:
- find or bring some straight drillrod stock (maybe keep on in your rig?) and chuck it. (if nothing else use a straight drill upside down?)
- use a block of wood and something as a pointer and get it close to the rod
- turn the top pulley by hand (maybe loosen the belt?)
- Watch for apparent wobble as you turn the pulley
It is amazing how good the naked eye is at spotting a wobble with a point of reference. While its not measured, you can get a quick idea and feel for how bad it is..
If the rod wobbles, try again on the round parts of the chuck and upwards if possible to try to pin down if it's a bad chuck or if its the spindle.
Maybe measure the very end of the spindle on each spline pair.

The very ends of the spline were the culprit. Once I got them honed back into shape the warmed bearing just fell onto the frozen spindle.
Thanks for everyone's input!
Andy
Good morning, based on the size of this thread, I am sure this has been discussed but I am a little pressed for time and hoping for a little help. I happened upon a Craftsman 150 that I am going to look at during lunch today.
It appears to be in great shape but I'm curious to know what I should be looking for prior to purchase.
I see the discussion about checking for excessive Run Out (a few posts ago). Are there any other big things to look for?
I am hoping this one is a good buy because they aren't for sale often in my Neck of the woods.
Thanks.
Sent from my iPhone using Tapatalk
I think the over-all condition tells a lot about a used machine. If it's relatively clean, it was probably taken care of. A neglected machine is likely ok too... some rust is ok. Look for signs of abuse such as broken or missing parts, many holes in the table.
Regardless of the appearance, a quick check for run-out is very important. Even the nicest looking machine can have a bent spindle.
The sound of the motor, quill and spindle pulley is a tell-tale sign. If loud, bearings need attention.
Check this post for how I move a drill press:
http://www.garagejournal.com/forum/showthread.php?p=5362688&post5362688
Frank,
Thank you for the response. I will check all those things today when I see it and will likely post up a picture, if I buy it.
So . . .? Buy it?