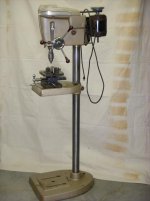
I've already gone through 2 brand new wire wheels just trying to sling the crud off. I swear its gonna weigh 10 lbs less after it's cleaned up. The main table alone had an 1/8" thick rock hard grease "patina" all around. It was so bad I thought it was actually painted black.
I had one like that recently, but maybe not as bad as you're describing. It was a huge pita with bits of drilled out metal curls and shavings embedded in the dried cutting oil. I tried heat, lacquer thinner, and even resorted to using a scraper for some of it.
As for hub and pinion shaft. The PO looks like they just drill the same size holes (clocked 90 degrees out) and used the same pinon hole with no modifications. Holds pretty good but if I ever get the itch to make it perfect I'll try to locate a hub and handles with the larger threads for more strength.
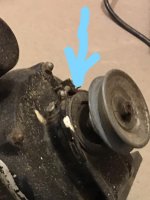
Spindle pulley did have the retaining snap ring around the shaft (also had the one in the headstock for the bearing to bottom out at) and it had the two screws in the sides. I got one of the screws on the sides out easy but the other one broke off in headstock. Using a trick an old timer taught me years ago, I drilled it and extracted it pretty easily. Just grabbed a bit the same size as the recessed hole and drilled into it. Since the bit was the same size as the recess it self centered and the tip put a divot in the broken screw at center. Using this divot I center punched it and drilled it enough for an EZ out extractor.
A snap ring was added to the lower quill on later models that eliminates the messed-up screw. Check this post:
https://www.garagejournal.com/forum/showthread.php?p=4880745&post4880745
Went to the hardware store and got a 4" section of 1" galvanized pipe. Seems after I cut the length down to 1" it will be a good replacement.
Pulley is in good condition but I may add a shim to one of the faces of the splines. I had another drill that was worn out this way and the "knock knock knock" with no load drives me nuts. I figured just cut a shim and adhere it to one of the side faces of the spline. Since the drill only goes CW, the shim would go on the side of spline that doesn't receive the torque, so all it would be doing is preventing the bounce back of the spindle with no load.
That sounds like a great idea! If you go that route, please post your results.
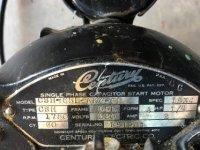
Some where in my research I saw that the model number was for drill only, wasn't actually on the plate.
Good notice on those lock levers. That actually had me scratching my head when I first looked at and based on everyone else's pictures of the 100 and 150s. It's in a good 3/8-1/2" past where it should be.
Picked up a 1/4 HP 1750 motor today for $10 (Marathon Electric, made in good ol Wausau, WI), so that should get me by, until I do a treadmill motor or find another Craftsman motor of this vintage.