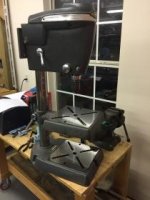
Well I picked up my 2nd drill press yesterday. Set an alert on FB market place and pulled the trigger as soon as I got the alert. Person was an hour 1/2 away but was on the way to my in laws house for Thanksgiving. Perfect Luck.
I'm trying to figure out the year on this one, but I'm confused on some of the characteristics:
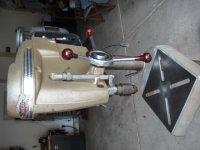
It has a 6 3/4 throat (13 1/2).
Has machine screws on the engine turned band.
Has the nut/alloy locks.
Closed loop depth stop collar (bore isn't all the way through and has shoulder for quill to stop in).
Has threaded lock collar chuck.
Doesn't have rib on motor mount.
Model number 103.23640.
Table was in perfect shape (no holes or dimples).
Splines of spindle pulley were great with no radial slop between quill splines and pulley.
I personally like the straight handle better than the 3 handle version.
That is a very nice drill press and every bit as capable as it's 15-1/2" big brother.
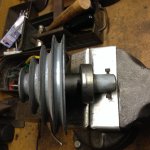
- The spindle and quill are the same diameters as 100/150 only shorter.
- The spindle pulley bearings and the quill bearings are identical to the 100/150.
- The spindle pulley is the same diameter as the 100/150 only the shaft is shorter.
- The castings are just as heavy duty as the 100/150 only smaller.
That two-knob handle and pinion assembly will transfer to your 100.
Determining the model year
It's often very difficult to pin-point a specific year on these machines. Using the owners manuals, I've been able to identify when a change was made. However, there are a couple problems relying on the owners manuals. First, not all owners manuals were dated, and second, the date on those that are dated is likely a publication or copyright date, which may or may not correspond to the model year or catalog date.
I've also had to make the assumption that changes across the 80 and 100 model lines occurred in the same year.
For example, this owners manual for a 13-1/2" machine dated October, 1946, has all the features you listed above.
This owners manual for a 15-1/2" machine is dated December 1947. It MAY have all the features you listed above, but the scan is somewhat blurry.
I did not find any scans from 1948 or 1949.
This owners manual for a 15-1/2" machine is dated January 1950 . It also may have all the featuresyou listed above.
This owners manual for a 15-1/2" machine is dated January 1951. It has only two features you listedabove; the bracket and the locks.
This owners manual for a 13-1/2" machine has only two features you listed above; the bracket andthe locks.
There is no copyright date on this manual. Whoever scanned and submitted this decided it was from1952. So the 1952 date can be discounted.
Therefore, I think it can only be determined that your machine was made between 1946 and 1950.And that is using the publication dates. The actual model year could be later.
Using catalogs to date machines is likely more difficult. Catalogs of the time used illustrations and notphotographs.
10/1/2018
In conjunction with owners manuals and catalogs, advertising can sometimes be used to date feature upgrades. For instance, the
1952 Craftsman Power Tool Catalog is the first catalog to tout the new Jacob's Safe-Lock chuck. This advertisement from the May 1951 edition of Popular Mechanics publicized the new design.
2/6/2020
More About Determining the Model Year
There are several things that can be used to estimate model years. Most of these are guesstimates. It is very difficult to be absolutely precise.
catalogs
Catalogs are a great research resource for determining when items were available.
A couple problems though... items were illustrated, not photographed. Illustrations were not always updated, so subtle exterior changes were not always documented.
There are several years where catalogs were not produced.
There were several years where catalogs spanned two years.
owners manuals
It seems that not all owners manuals were date stamped and not all years are represented on VM. Even if they were dated, what does the date mean? Copyright date? Publication date? Catalog date? Model year date? Comparing manuals with different dates can help identify when changes were introduced.
There are four unique early Craftsman 100 owners manuals on VM that have dates printed:
1946
1947
1950
1951
I could not tell any differences between the '46, '47 and '50 versions. The '51 version has changes from the earlier versions. There is also another early Craftsman 100 owners manual on VM that was rubber-stamped with a 1955 date. Because the date was rubber-stamped, it may or may not be reliable. This one has more changes from previous versions.
motor tags
Motor information tags often have a date code stamped onto them. I believe this is the date of manufacture. This can be a good clue to the model year of the drill press, but it's only circumstantial. Motors were optional, so they may not have been bought with the machine.
advertising
Advertisements are a very good resource to help date machines. In conjunction with owners manuals and catalogs, advertising can sometimes be used to date feature upgrades. For instance, the 1952 Craftsman Power Tool Catalog is the first catalog to tout the new Jacob's Safe-Lock chuck. This advertisement from the
March 1951 edition of Popular Mechanics publicized the new design.
Unfortunately, there's not a lot of advertising specific to drill presses.
receipts
Original dated receipts are gold. However, there are rarely found or included with machines.
patents
Patents are not too much help in dating machines, but they are interesting to peruse when found.
So, using owners manuals and catalogs, I believe Craftsman 100 drill presses can be fairly easily categorized into one of the following time period windows. Motor tags may also suggest a mores specific date.
'46-'50
'51
'52-'53
'54
'56
'57