
You are using an out of date browser. It may not display this or other websites correctly.
You should upgrade or use an alternative browser.
You should upgrade or use an alternative browser.
Craftsman Drill Press
- Thread starter FrankLee
- Start date
so you are buying all the local cool stuff!
I need to find one of the speed reduction kits for my Atlas 1020.
Not quite all of it. Here's one in Ypsi with the pulley.
https://www.facebook.com/marketplace/item/216611855551254
Need any other parts?
Last edited:
Not quite all of it. Here's one in Ypsi with the pulley.
https://www.facebook.com/marketplace/item/216611855551254
Need any other parts?
Thanks for the link. I am not on FB, so I only see craigslist stuff.
I ultimately want to upgrade to a floor stand model. Craftsman, walker turner, etc..you know the drill [pun intended]. Keep me in mind if you see a seal that you do not want.
Thanks for the link. I am not on FB, so I only see craigslist stuff.
I ultimately want to upgrade to a floor stand model. Craftsman, walker turner, etc..you know the drill [pun intended]. Keep me in mind if you see a seal that you do not want.
I went to see this King-Seeley-made bench model this morning. It's a '52 or '53 model with no trim panel and painted hub and feed stop bracket.
https://us.letgo.com/en/i/gray-and-black-drill-press_a92e3467-e4a2-45e8-8cee-f0513ba7b01e
It's not a steal by any means, but it is a solid, albeit neglected machine. No noticeable spindle wobble, minimal play between the spindle and spindle pulley, decent original paint on the head frame, non-Craftsman motor. He was willing to come down to $110 and declined $80. If you need a machine, it's not bad.
At the moment, I have three floor-standing bases and columns, and a couple appropriate Craftsman motors, for a floor-standing conversion.
Here's the FB machine. He's asking $300.

Last edited:
At the moment, I have three floor-standing bases and columns, and a couple appropriate Craftsman motors, for a floor-standing conversion.
I don't 'need' a machine by any means. But who doesn't like an upgrade?
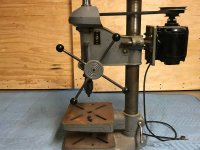
This is mine. It works well, has some wobble but its manageable [any pointers how to correct that? I have tried to persuade the chuck with a mallet and made improvements] Spindle runs almost dead true, it seems to be an issue w/ the chuck and taper.
I may eventually try and make a speed reducer, since I only deal with metal fab I never use anything except current lowest speed.
Attachments

ZBear
Well-known member
I got my assortment of wire wheels and the Dremel and die grinder out this morning and hit all the remaining cubby holes to remove old paint & rust. The knob that holds the handles is in rough shape. Pitted and peeling. Do I want to knock out the pin that holds it onto the shaft so I can get an and clean it up? I don't want to jeopardize the spring..
Attachments

ZBear
Well-known member
I sprayed primer on the inside of the head unit this morning after going over it again with wire wheels. I will primer the outside tomorrow. I didn't have the shed as warm today (64). Primer sagged on the base. I will clean it up tomorrow with steel wool and touch it up.
Attachments
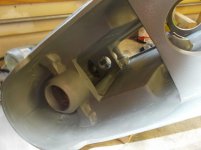


The knob that holds the handles is in rough shape. Pitted and peeling. Do I want to knock out the pin that holds it onto the shaft so I can get an and clean it up? I don't want to jeopardize the spring..
It wouldn't hurt.
There is a pin in the hub that passes through pinion shaft. That pin holds the hub to the shaft and also passes through the loop on the spring. One end of that pin is knurled.

You should be able to see some witness marks on the edge of the hole on the hub from the knurling. You want to identify that end and drive the pin out from the non-knurled end. Otherwise, you'll be driving the knurl through the other end and compressing the knurls even more. It may not hold as well when re-assembling.


Sometimes, the pin is shorter than the diameter of the hub sleeve. When installed from the factory, the knurled end is flush the the hub sleeve and recessed on the non-knurled end. You can normally drive it out from the recessed side.

Also check this post:
https://www.garagejournal.com/forum/showthread.php?p=6347465#post6347465
.
Last edited:
I don't 'need' a machine by any means. But who doesn't like an upgrade?
This is mine. It works well, has some wobble but its manageable [any pointers how to correct that? I have tried to persuade the chuck with a mallet and made improvements] Spindle runs almost dead true, it seems to be an issue w/ the chuck and taper.
I may eventually try and make a speed reducer, since I only deal with metal fab I never use anything except current lowest speed.
Do you have a dial indicator to measure runout?
If it is the chuck, I believe you can get a rebuild kit or I have some spares.
ZBear
Well-known member
Thanks Frank.It wouldn't hurt.
There is a pin in the hub that passes through pinion shaft. That pin holds the hub to the shaft and also passes through the loop on the spring. One end of that pin is knurled.
You should be able to see some witness marks on the edge of the hole on the hub from the knurling. You want to identify that end and drive the pin out from the non-knurled end. Otherwise, you'll be driving the knurl through the other end and compressing the knurls even more. It may not hold as well when re-assembling.

Sometimes, the pin is shorter than the diameter of the hub sleeve. When installed from the factory, the knurled end is flush the the hub sleeve and recessed on the non-knurled end. You can normally drive it out from the recessed side.
Also check this post:
https://www.garagejournal.com/forum/showthread.php?p=6347465#post6347465
.
Outlawmws
Well-known member
I don't 'need' a machine by any means. But who doesn't like an upgrade?
This is mine. It works well, has some wobble but its manageable [any pointers how to correct that? I have tried to persuade the chuck with a mallet and made improvements] Spindle runs almost dead true, it seems to be an issue w/ the chuck and taper.
I may eventually try and make a speed reducer, since I only deal with metal fab I never use anything except current lowest speed.
Another option is a Treadmill motor. Fully variable, Lots of power. That,s What I did.
ZBear
Well-known member
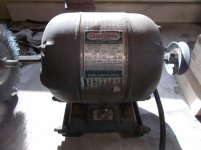
My brother stopped by today and dropped off a 3450 rpm motor off a table saw he scrapped out. It will work well to replace my grinder so I can use that 1725 rpm motor on my DP press. The date code on the 3450 motor looks like either 8 53 or B53. My 1725 rpm motor is H4 56. Heading over to Harbor Freight so not much getting done on them today.
Attachments

I don't 'need' a machine by any means. But who doesn't like an upgrade?
This is mine. It works well, has some wobble but its manageable [any pointers how to correct that? I have tried to persuade the chuck with a mallet and made improvements] Spindle runs almost dead true, it seems to be an issue w/ the chuck and taper.
.
That Atlas is a beauty! Is that original paint?
I recently picked up an Atlas-made CM drill press, and hope it cleans up as nice as yours.
Attachments

My brother stopped by today and dropped off a 3450 rpm motor off a table saw he scrapped out. It will work well to replace my grinder so I can use that 1725 rpm motor on my DP press. The date code on the 3450 motor looks like either 8 53 or B53. My 1725 rpm motor is H4 56. Heading over to Harbor Freight so not much getting done on them today.
Nice! I think you'll be happy with both in their new roles..
Last edited:
I just got home with this 8" Craftsman table saw... 50% off on the last day of an estate sale. I was mainly interested in its 1750 rpm motor. I'm not really a fan of the 8" saws, but this is actually the nicest one I've ever seen. The paint and the table top are in excellent condition and the tilt gear is in very good shape. The motor is noisy, but that's typical and an easy fix.

Last edited:
ZBear
Well-known member
]Thanks for the info sir. Like everything else on this DP, the pin came out easily. It was greasy and that kept if from any corrosion. I was also surprised at the condition of the spring. Pretty much greasy and like new. I got the motors switched out on the bench grinder. I had to switch yellow wires so it would run the right direction. It squealed a little when I first started it up. Someday a rebuild project. I took the saw mounting bracket off and see the base of the motor from my brother is cracked if anyone has one for sale. Primered the head unit today and started polishing handles. Glad I could sit down in front of the polisher. Thanks for the guidence FrankLee![/B]
Outlawmws
Well-known member
So lesson there; put some good dissimilar metal anti seize on when reassembling...
ZBear
Well-known member
So lesson there; put some good dissimilar metal anti seize on when reassembling...
Yes sir. Thanks for the thought. I have some Harleys, use lots of anti-seize and loc-tite. This critter came apart much easier than I expected for a 60 year old machine.
]Thanks for the info sir. Like everything else on this DP, the pin came out easily. It was greasy and that kept if from any corrosion. I was also surprised at the condition of the spring. Pretty much greasy and like new. I got the motors switched out on the bench grinder. I had to switch yellow wires so it would run the right direction. It squealed a little when I first started it up. Someday a rebuild project. I took the saw mounting bracket off and see the base of the motor from my brother is cracked if anyone has one for sale. Primered the head unit today and started polishing handles. Glad I could sit down in front of the polisher. Thanks for the guidence FrankLee![/B]
The first thing I do for noisy motors is to remove the bearing covers, clean out some of the grease with a cotton swab, and apply a few drops of oil to the bearings. That usually works well to quiet them. I have to do this to the motor from the table saw above.

How badly is the 3450 rpm motor base cracked? Please post a photo.
paulm12
Well-known member

Outlawmws
Well-known member
The column looks small in dia to me, so probably the 100/150's little brother (80?) an inch shorter throat; other than that, perfectly capable machine. Looks clean too.
I've been following this thread for a while, looking locally for a DP to pick up. Will use for woodworking. I saw this one nearby, could not get the model. Can you tell what it is? Any opinions on functionality? Thanks
That is a 12¼" bronze bearing model. It first appeared in the 1964 catalog and replaced the Dunlap 12¼" model. It was not listed in the 1966 catalog, so it was a short run. There is no 1965 catalogs available online, afaik, so it can't be determined exactly how short.
The feed handle hub is not original, but it looks clean and well cared for. I think I'd pick it up if it were reasonably priced. Check this post for another photo of that model:
https://www.garagejournal.com/forum/showthread.php?p=6500642&post6500642
Last edited:
That Atlas is a beauty! Is that original paint?
I recently picked up an Atlas-made CM drill press, and hope it cleans up as nice as yours.
Yes, original paint.
Some serious elbow grease is all I put into this one.
paulm12
Well-known member
thanks Outlaw and Frank. I have bookmarked that page for future reference. They are asking $125, we'll see how much they'll come down.
Craptain
Well-known member
Don't wait too long at that price. If it runs true it's worth every penny.thanks Outlaw and Frank. I have bookmarked that page for future reference. They are asking $125, we'll see how much they'll come down.
Sent from my SM-G930T using Tapatalk
ZBear
Well-known member
The first thing I do for noisy motors is to remove the bearing covers, clean out some of the grease with a cotton swab, and apply a few drops of oil to the bearings. That usually works well to quiet them. I have to do this to the motor from the table saw above.
How badly is the 3450 rpm motor base cracked? Please post a photo.
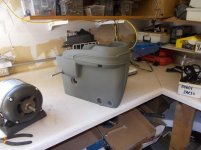
Here is a picture of the crack in the base. It bolted down even on the bench. Take into consideration what I think is good shape and what my younger brother thinks is good shape are 2 different subjects. At some point I will restore the new grinder after the drill press. Also a couple pictures of the head unit primered. What do I want to get similar to the factory gold/bronze? Is it the Rustoleum "Hammered Bronze"?
Thanks to you guys for leading me down the right path. If I hadn't found this forum, the restoration wouldn't of happened. Bear
Attachments

CrotalusAtrox
Well-known member
Here is a picture of the crack in the base. It bolted down even on the bench. Take into consideration what I think is good shape and what my younger brother thinks is good shape are 2 different subjects. At some point I will restore the new grinder after the drill press. Also a couple pictures of the head unit primered. What do I want to get similar to the factory gold/bronze? Is it the Rustoleum "Hammered Bronze"?
Thanks to you guys for leading me down the right path. If I hadn't found this forum, the restoration wouldn't of happened. Bear
Rustoleum Hammered Rosemary is the closest I have found.
Here is a picture of the crack in the base. It bolted down even on the bench. Take into consideration what I think is good shape and what my younger brother thinks is good shape are 2 different subjects. At some point I will restore the new grinder after the drill press. Also a couple pictures of the head unit primered. What do I want to get similar to the factory gold/bronze? Is it the Rustoleum "Hammered Bronze"?
Thanks to you guys for leading me down the right path. If I hadn't found this forum, the restoration wouldn't of happened. Bear
You're very welcome!
Yeah, that is a significant crack. I've had a couple that were cracked. One was similar to yours and the other was minor. When you're ready to work on that motor, let me know. I have a spare base that may work.


I'm not sure about paint matching the power bronze, but there is a wiki page on VM with lots of info including Craftsman paint matching. http://wiki.vintagemachinery.org/
Last edited:
The first thing I do for noisy motors is to remove the bearing covers, clean out some of the grease with a cotton swab, and apply a few drops of oil to the bearings. That usually works well to quiet them. I have to do this to the motor from the table saw above.
Here is the motor from that table saw.

I uploaded a couple videos to youtube. The first is before I added oil to the bearings and the second is after. The reduction of noise is noticeable, but the difference in the run-down time between before and after is remarkable.
Before
After
Last edited:
lafester
Well-known member
Re: DP #16, Multi-Speed Attachment
FYI getting 404 error on the link to the instructions.
Do you happen to have a guide for taking this thing apart?
Also a little lost on how it stays tight in the column.
Thanks!
FYI getting 404 error on the link to the instructions.
Do you happen to have a guide for taking this thing apart?
Also a little lost on how it stays tight in the column.
Thanks!
Multi-Speed Attachment Installation
Installation is fairly straight-forward following the Installation and Operating Instructions, but here's my procedure:
- Verify that the middle pulley is fully seated in the column. Do not tighten the pulley lock screw yet.
- Place a straight edge on top of the middle pulley. The straight edge should be long enough to span all three pulleys.
- Adjust the head-frame on the column so the spindle pulley lines-up with the straight edge.
- Adjust either the motor on the motor mount, or the pulley on the motor shaft so the motor pulley aligns with the straight edge.
- Install the belts loosely; front belt first, rear second.
On 15½" machines, the 29" belt in the front position and the 27" belt in the rear position.
On 13½" machines, the 27" belt in the front position and the 29" belt in the rear position.- Tighten the belts by adjusting the motor mount. Use a wrench on the flats of the middle pulley shaft to help tighten to front belt.
- Lock in the motor mount
- After a while of drill press use, retighten the belts and then tighten the set-screw on the middle pulley.
10-4 on the 404. Thanks for letting me know.
Here's a good link to the instructions: http://vintagemachinery.org/pubs/222/7313.pdf
Dismantle
The bearings are tightly pressed onto the shaft. They can be removed with a press. I usually just soak the bearings with shaft in ATF.
There is a hex socket screw in the base on an angle. That is used to tighten the assembly into the column. Do not over tighten and on your model, do not tighten without the large snap rings in place. Otherwise the outer sleeve will crack in two.
Here's a good link to the instructions: http://vintagemachinery.org/pubs/222/7313.pdf
Dismantle
- Remove the outer sleeve.
- Loosen the set screw in the base for the bearing shaft.
- Lift the pulley with shaft out of the base.
- Back out the three screws above the bearings only until they clear the bearing's outer race.
- Press the shaft with bearings up through the pulley.
The bearings are tightly pressed onto the shaft. They can be removed with a press. I usually just soak the bearings with shaft in ATF.
There is a hex socket screw in the base on an angle. That is used to tighten the assembly into the column. Do not over tighten and on your model, do not tighten without the large snap rings in place. Otherwise the outer sleeve will crack in two.
Last edited:
lafester
Well-known member
Yikes I would hate to ruin the outer sleeve.
Thanks again for the info. Hard to believe this will enable 17500 rpm. Freaking parts would be flying everywhere.
Thanks again for the info. Hard to believe this will enable 17500 rpm. Freaking parts would be flying everywhere.
10-4 on the 404. Thanks for letting me know.
Here's a good link to the instructions: http://vintagemachinery.org/pubs/222/7313.pdf
Dismantle
- Remove the outer sleeve.
- Loosen the set screw in the base for the bearing shaft.
- Lift the pulley with shaft out of the base.
- Back out the three screws above the bearings only until they clear the bearing's outer race.
- Press the shaft with bearings up through the pulley.
The bearings are tightly pressed onto the shaft. They can be removed with a press. I usually just soak the bearings with shaft in ATF.
There is a hex socket screw in the base on an angle. That is used to tighten the assembly into the column. Do not over tighten and on your model, do not tighten without the large snap rings in place. Otherwise the outer sleeve will crack in two.
ZBear
Well-known member

lafester
Well-known member
Re: Linked Belts, Custom Chuck Key Handle
Curious why you didn't include these part numbers in the v belt replacement post. Autozone search ***** and was about to give up finding them locally. I found a store with both in stock (hopefully, it would not let me order one for some reason) and should have them in a few.
Update: Picked up the belts today. They had the 29" in stock even though it would not let me order it. Funny thing is it rang up at $2.99 when it showed $3.99 online. Wonder if the 27" would have been cheaper in store as well (it was $4.99). So $8 for two belts. Little cheaper then ebay and much cheaper then ones listed in the v belt replacement guide and I got them right away.
The Duralast 15xxx belts I mentioned above were incorrect. Those were 3/8" wide; too narrow and they bottomed-out in the pulleys. Duralast part numbers 17270 and 17290 would work, but I opted for the HF Accu-Link. A little more expensive, but a good choice.
Curious why you didn't include these part numbers in the v belt replacement post. Autozone search ***** and was about to give up finding them locally. I found a store with both in stock (hopefully, it would not let me order one for some reason) and should have them in a few.
Update: Picked up the belts today. They had the 29" in stock even though it would not let me order it. Funny thing is it rang up at $2.99 when it showed $3.99 online. Wonder if the 27" would have been cheaper in store as well (it was $4.99). So $8 for two belts. Little cheaper then ebay and much cheaper then ones listed in the v belt replacement guide and I got them right away.
Last edited:
lafester
Well-known member
Hi Frank. I have a lead on this DP about 2 hours from me for $30. I sent them a message. The head band looks good and I do need a new spindle pulley. Hope they call me back. Bear
Nice!
ZBear
Well-known member
Originally Posted by ZBear View Post
Hi Frank. I have a lead on this DP about 2 hours from me for $30. I sent them a message. The head band looks good and I do need a new spindle pulley. Hope they call me back. Bear
THAT is a good deal! I hope it works out.
Overwhelming response. I was ready to drive the two hours to fetch. Spoken for in the first 20 minutes. I guess at that price I should of expected that. I still would like to acquire a new spindle pulley, headband, and electric motor base. I went over to Menards this morning and got a can of Rustoleum "Hammered Bronze" to put some underneath and see if that is the color I need. Thanks for your thoughts.
lafester
Well-known member


lafester
Well-known member
Not going to start posting every cl listing I find but this thing is mint and just posted.
$190 for a basically new 150. I've seen several others posted today for under $150.
Ok maybe not mint looks repainted? Just going by the headband. Still nice!
https://philadelphia.craigslist.org/tls/d/craftsmandrill-press/6482441287.html
$190 for a basically new 150. I've seen several others posted today for under $150.
Ok maybe not mint looks repainted? Just going by the headband. Still nice!
https://philadelphia.craigslist.org/tls/d/craftsmandrill-press/6482441287.html
Last edited:
smalltown
Well-known member
lafester that sure is a nice looking drill press.