Outlawmws
Well-known member
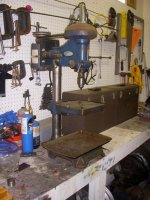
Solid Steel post? what does that sucker weigh?
Nice find!
Nice find!

Always nice to see one with a lift. Is that a rotary table with it too?
I am at the stage where I just don't know what way to go.. Do I use the head that is on my tall drill press (150) that was manufactured prior to 1967 when I originally purchased it used (painted grey from the factory), or the one that I just picked up, painted gold with the later improvements (???) to the head. Either way, both heads should be taken apart, cleaned and new bearings installed. I had disassembled and painted my original one about 10 years ago, but the information in this thread wasn't available, and I never took the quill apart. It had a wobble in it then, and after painting and reassembly, I haven't used it because of the wobble in the quill.
I was thinking that I could swap the heads, and keep them both, or sell the bench model (with either head) as is, and let the next buyer put new bearings into the quill.
My question is, which would be the better one to keep, the grey one (pre 1967) or the gold one, which I don't know its age. My tall press is missing its data plate. I removed it when I painted the base, and misplaced it. The numbers on the data plate (gold one) are 103.24521

From what I can gather, the gold machine has the external spring tension knob and the grey one doesn't.(?)
My preference is the Craftsman 100 casting, but I upgraded every sub-assembly with later improved parts; quill with snap ring, feed handle hub with 1/2-13 threads, pivot motor mount, rapid adjust feed stop. I guess you could say it's a Craftsman 125.
I've also found that the King-Seeley castings seem to be better than the Emerson castings.
What differences have you seen in the castings? Is there some design changes or is it more in the quality of the cast?
. It had a wobble in it then, and after painting and reassembly, I haven't used it because of the wobble in the quill.
.........
My question is, which would be the better one to keep
These jam nuts normally carry the weight of the drill press table. The bottom surface of this nut is badly worn from wearing against the cast iron gear housing. This is why I strongly recommend moving the thrust bearing from inside of the housing to the outside.


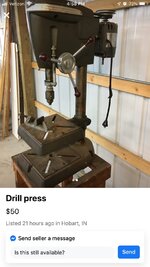
And why isn't it in your shop/garage?This one looks really good.
On facebook market place for $50
Sent from my iPhone using Tapatalk Pro
On a piece of equipment that also has 120v for controls and such the high leg location matters, but on a simple motor it does not
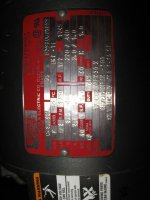
Here is a very good decription of how to determine motor wiring, towards the bottom of the thread:
**I don't have enough posts here to share a link, I will PM it to you, will add it to this post when able**
This should be marked on your motor, but if it is missing this shows how to determine it.
On a piece of equipment that also has 120v for controls and such the high leg location matters, but on a simple motor it does not
Here is a very good decription of how to determine motor wiring, towards the bottom of the thread:
**I don't have enough posts here to share a link, I will PM it to you, will add it to this post when able**
This should be marked on your motor, but if it is missing this shows how to determine it.
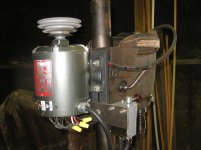
So...I used the Practical Machinist guidance and deduced from the continuities that the motor is wired delta. The diagram on the inside of the wiring access plate of the motor directs me to supply power as though it is Wye wired...L1 to 1 and 7; L2 to 2 and 8; L3 to 3 and 9; and 4,5 and 6 together. Based on the continuities I wired for delta...L1 to 1,6,7; L2 to 2,4,8; and L3 to 3,5,9. Next I revisited the switch diagram and got that straight, as per the pic previously posted. Result was that the motor ran like a top in both directions, sans smoke. Called it a day.
Subsequently, I ran the motor for a couple of minutes to ScotchBrite the chuck. On stopping the motor I noted that it was too hot to touch...sort of like bad bearings on an axle after a run. Only thing I can think of is to try re-wiring L1 - L3 in the wye configuration, now that I have the switch wiring straight. Any thought on this? More and more confused.
Doesn't make a whole lot of sense. I would wire as the diagram on the access plate. If you discovered you had an error in the switch wiring that could have been the issue. I would also try running it with the belt disconnected to remove any other possible causes for overheating (belt alignment, spindle bearings)
The motor is a new, 1/2 hp, Lincoln 3-phase, so I am assuming that the bearings therein are good. As I noted earlier, wired delta it ran well in both directions but heated up, excessively to my mind. Today I changed the wiring to match the wye diagram provided: L1 to 1-7; L2 to 2-8; and L3 to 3-9. It started and ran very slowly without load, and soon gave off a bit of smoke. This suggests to me a couple of things.
1-That the provided diagram is incorrect and that, based on the check of engine-lead continuities, the motor is indeed wired delta.
2-There is a problem in how I wired the switch. The wiring diagram therein does not label the leads, so I assumed that I could start at one side of the three leads and call that one L1, then proceed through the other two, with L2 being the 240-volt leg. I'll revisit the diagram yet again tomorrow and check continuities and potentials coming out of the switch.
Beyond the above, I am at a loss as to why the motor seems to be running hot. I'll try to get in touch with the manufacturer to see if they can elucidate a solution.
Re-visited the dp once again. Cords, switch, and delta connections in order; high leg [L2] connection in the switch was loose. Tightened the connection. Started and measured current in the 3 legs into the motor leads: L1[blk] 8.2a; L2[red] 9.5a; L3[wht] 9.8a. I have no idea how close currents in the individual legs should be.
And why isn't it in your shop/garage?
Sent from my SM-G930T using Tapatalk
Your switch wiring appears correct, but your current readings are 4 times higher than they should be. Something is not right.
Stellar observation. So, might there be an issue with the power coming out of the outlet? It's 120v, 240v, and 120v at a, b, and c...V = i x R. I'll check current entering the switch. Where else to look? Sounds kinda like a trip to the motor shop. I am still quite puzzled about the low-voltage wye wiring diagram on the inside of the wiring plate...L1 to 1,7 L2 to 2,8, L3 to 3,9. Maybe the Leeson folks can shed some light on that.
I'm just a simple geochemist, not a physics major.
Just had a thought: motor ambient temperature per the tag is 65 degrees Celsius. I don't think that I can hold my hand against that for more that few seconds based on time in a hot tub at 108 F. Might this be some sort of resolution [althought it does NOT explain the amperage issue]?
Measure the voltages at the line terminals at the switch, you should have 240 between any two pairs.
That temperature rating is the max environmental temperature (the air surrounding the motor) that the motor can be operated in.
240v present between all pairs. I'm going to take it to the shop.


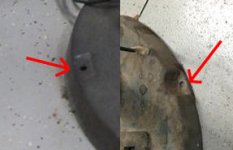
Found this (late?) 150 for sale on the net; seller states it needs a new power cord (cracked) and belt. I've asked for pic of the table and the other side of the DP. Seller said it'd be tonight before he can send pics, which is reasonable. This might be my 1st DP. It's a 2 hour drive (in each direction).
Is there anything else I need to ask about before I go buy this thing? Any obvious warning signs in these pictures? Or should I just squat and hold till something closer comes along? Price is reasonable.
Thanks!
FrankLee do you know when the floor model base changed from the recessed to the through the base mounting holes?
Unsure, but because the late 100 post above by gpw_42 has the newer base, I suspect the change occurred in the '56 or '57 model year. It first showed up in a 1960 catalog illustration.
https://www.garagejournal.com/forum/showthread.php?p=4325791&post4325791
Yeah, seems to be hard to pin down. 1957 catalog shows older style, but it was probably printed in 1956. Not sure, but I think that on occasion they just used the same artwork from a previous year if there were no major changes. Also possible older bases got broken and replaced with a newer one.
It's actually a late 100, but that's good. It looks rough, but complete. If you're up to a complete refurb with re-painting, it will be a great machine.
If the motor runs, that's pretty much all the seller can say. Most issues are discovered upon personal inspection and tear-down.
I've done several two hour trips for these machines.
FrankLee, thanks for the quick and informative follow-up. 24 hours later and seller still hasn't responded with the requested pic, so I guess he sold it otherwise. I'm not into the idea of a complete restoration project for $100 entry point, so it's probably just as well. Minor work (cord replacement) and rust removal, I'd probably have gone after it this morning.
There's a ton of detailed info on this thread, which I'm just starting to scratch the surface of.
Glad to help.
You'll find one. If you see one in that condition, at that price, at that distance with an optional feature, it's likely well worth the time and effort.