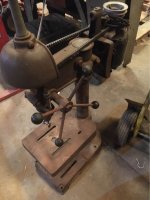
To avoid these ads, REGISTER NOW!

Craftsman Drill Press

OP
F

FrankLee

Well-known member
Joined
Sep 13, 2010
Messages
3,554
Location
seMI, 48317
Thanks Frank for the welcome. I believe(or hope) it is the latter. The drill works but just wobbles a tiny bit(less than 1/16 inch?, I don' have the runout gauge). Here is photo of spindle assembly (attached).

The quill is stuck in the wrong location, presumable because the lower bearing cannot get passed the pin through hole in the spindle.

Just want to point out that I get one of the possible problems you summarized for the spindle, a point set screw that comes from the upper collar:beer:
OK, that picture helps a lot. Thanks.

First, that spindle collar should easily slide off. If it sticks, there is likely a burr from the set screw. It's also possible that the end of the splines could be mushroomed which may prevent the collar from sliding off. Get that collar off and file off any burrs.

Next, hold the quill with one hand and, with a rubber mallet, strike the splined end to see if the spindle moves. If it does, the lower bearing may stay attached to the spindle and detach from the quill. That's ok. Use caution. The spindle could become a projectile if the spindle is looser on the upper bearing.

Then, after the spindle with lower bearing is couple inches removed, tap the chuck with the rubber mallet to free the upper bearing from the quill. Make sure the chuck jaws are fully retracted. The quill should be loose between the bearings.

At this point, you should be able to remove the upper bearing with a standard puller. Hopefully, you have one.

It's also possible that the bearing is stuck on a bend in the spindle.

I'll check my parts supply to see if I have what you're missing.
 
Last edited:
To avoid these ads, REGISTER NOW!

xlj1000

Member
Joined
May 21, 2020
Messages
8
Location
NJ
OK, that picture helps a lot. Thanks.

First, that spindle collar should easily slide off. If it sticks, there is likely a burr from the set screw. It's also possible that the end of the splines could be mushroomed which may prevent the collar from sliding off. Get that collar off and file off any burrs.

Next, hold the quill with one hand and, with a rubber mallet, strike the splined end to see if the spindle moves. If it does, the lower bearing may stay attached to the spindle and detach from the quill. That's ok. Use caution. The spindle could become a projectile if the spindle is looser on the upper bearing.

Then, after the spindle with lower bearing is couple inches removed, tap the chuck with the rubber mallet to free the upper bearing from the quill. Make sure the chuck jaws are fully retracted. The quill should be loose between the bearings.

At this point, you should be able to remove the upper bearing with a standard puller. Hopefully, you have one.

It's also possible that the bearing is stuck on a bend in the spindle.

I'll check my parts supply to see if I have what you're missing.

The collar is sliding fine. Quill is stuck and I have tried to hit the splined end with rubber mallet and it doesn't budge guess I will try harder.

Thanks for the help.
 
OP
F

FrankLee

Well-known member
Joined
Sep 13, 2010
Messages
3,554
Location
seMI, 48317
Hmmm.
You could also try to hold the quill and carefully pound the splined end on a soft-wood board. You may ultimately need a press to get the spindle out.
 

whateg01

Well-known member
Joined
Mar 13, 2006
Messages
11,205
Location
doo dah, kansas, usa
Man, I hate seeing advice for disassembly that centers around beating on stuff! A press is, IMHO, a far better option for applying measured force to objects that are stuck.

Dave
 

xlj1000

Member
Joined
May 21, 2020
Messages
8
Location
NJ
Update: I hit it pretty hard and it starts to move a bit now. But it is the spindle along the inner race bearing movement, not the quill side:-(
 

cclfn

Well-known member
Joined
Jul 31, 2012
Messages
308
Location
NW
Man, I hate seeing advice for disassembly that centers around beating on stuff! A press is, IMHO, a far better option for applying measured force to objects that are stuck.

Dave


Dave,

I think holding a piece in your hand and using a rubber hammer does not constitute the negative connotations that "beating on stuff" does. I have a press and if i need straight even pressure thats the place to go. If I want some quick non aggressive shock type force a few blows with a rubber mallet is a lot quicker than setting up fixtures on the press. Just my thoughts.
Wes
 
OP
F

FrankLee

Well-known member
Joined
Sep 13, 2010
Messages
3,554
Location
seMI, 48317
Update: I hit it pretty hard and it starts to move a bit now. But it is the spindle along the inner race bearing movement, not the quill side:-(

That should be ok. I expected you'd have an easier time getting the spindle to move. If you can get the spindle to move about an inch then tap on the chuck to see if the upper bearing will slide out of the quill.

Removing the chuck is also going to be a challenge without the thrust collar. BTW, I do have a spare collar.

Once you get the assembly apart, your next challenge will be to address the 1/16" runout. That's a lot.


Man, I hate seeing advice for disassembly that centers around beating on stuff! A press is, IMHO, a far better option for applying measured force to objects that are stuck.

Dave

Dave,

I think holding a piece in your hand and using a rubber hammer does not constitute the negative connotations that "beating on stuff" does. I have a press and if i need straight even pressure thats the place to go. If I want some quick non aggressive shock type force a few blows with a rubber mallet is a lot quicker than setting up fixtures on the press. Just my thoughts.
Wes


Dave and Wes, Thank you both for your comments.
 
Last edited:

xlj1000

Member
Joined
May 21, 2020
Messages
8
Location
NJ
That should be ok. I expected you'd have an easier time getting the spindle to move. If you can get the spindle to move about an inch then tap on the chuck to see if the upper bearing will slide out of the quill.

Removing the chuck is also going to be a challenge without the thrust collar. BTW, I do have a spare collar.

Once you get the assembly apart, your next challenge will be to address the 1/16" runout. That's a lot.

This is a great news that you have the collar available.

So far no luck to make the bearings to slide out from either side, and the process of hammering it out is real slow so I will spend some more time tomorrow.

Thanks
 
OP
F

FrankLee

Well-known member
Joined
Sep 13, 2010
Messages
3,554
Location
seMI, 48317
This is a great news that you have the collar available.

So far no luck to make the bearings to slide out from either side, and the process of hammering it out is real slow so I will spend some more time tomorrow.

Thanks
If it’s been that difficult, you might consider having it pressed out. I’ve never had to work that hard to remove a spindle.
 

xlj1000

Member
Joined
May 21, 2020
Messages
8
Location
NJ
If it’s been that difficult, you might consider having it pressed out. I’ve never had to work that hard to remove a spindle.

I got it all apart now except the chuck now. Yes I drive it to a point I can fit in my largest puller to push the spindle out, then using a slide hammer to take out the bearings (all from harbor freight).

Question regarding the bearings, they are labelled as Norma xf121pp made in USA. Are those the original bearings? I think they might be too tightly fit for driver press. What model of replacement bearings you would recommend?

Please let me know how I can get the collar. The drill press also misses the depth stop assy, but that is something I am less concerned as I can make one myself. But if you also happens to have it I will consider it also. Please PM me.

Thank for your help.
 
OP
F

FrankLee

Well-known member
Joined
Sep 13, 2010
Messages
3,554
Location
seMI, 48317
Ok, good.

Yes, I believe those are the original bearings. There is a link or two in my first post TOC regarding bearings. IMO, Japanese and Taiwanese bearings are decent. The important thing is to get the 5/8" special bore. If you buy them locally, take an old one with you.

Yes, we can do PM's, but I suggest that you verify that spindle runout is acceptable and other parts are good before buying new parts.... spring, pinion gear, spindle pulley, etc.

I don't have any feed stop parts.
 

xlj1000

Member
Joined
May 21, 2020
Messages
8
Location
NJ
Ok, good.

Yes, I believe those are the original bearings. There is a link or two in my first post TOC regarding bearings. IMO, Japanese and Taiwanese bearings are decent. The important thing is to get the 5/8" special bore. If you buy them locally, take an old one with you.

Yes, we can do PM's, but I suggest that you verify that spindle runout is acceptable and other parts are good before buying new parts.... spring, pinion gear, spindle pulley, etc.

I don't have any feed stop parts.
Hi Frank, this is extremely well said suggestion. so I go ahead and use this setup to measure the runout(attached). the tapered area does has around 0.1mm(.039inch) run out, vs <.01mm around the middle section. Does this mean this spindle is hosed and I need to look for new one?

Thanks
 

Attachments

  • IMG_20200523_150249529.jpg
    IMG_20200523_150249529.jpg
    163 KB · Views: 40
Last edited:
OP
F

FrankLee

Well-known member
Joined
Sep 13, 2010
Messages
3,554
Location
seMI, 48317
Hi Frank, this is extremely well said suggestion. so I go ahead and use this setup to measure the runout(attached). the tapered area does has around 0.1mm(.0039inch) run out, vs <.01mm around the middle section. Does this mean this spindle is hosed and I need to look for new one?

Thanks

It depends. 0.0039 MAY be acceptable for boring wood, but is nearing an annoying amount for metal. The chuck may increase that measurement too.

A press would likely be needed to improve that runout.

Also, is the length of that taper ~13/16"?
And the distance from the small end of the taper to the edge of the through-hole for the thrust collar ~1-5/8"?

I'm trying to figure out why the PO removed the collar in the first place. I never have on a refurb.
 
Last edited:

howlr

Member
Joined
May 22, 2020
Messages
6
Location
NJ
Hi, just wanted to thank FrankLee and the other contributors to this thread. I picked up a gold Craftsman 150 and have it torn down. I see you all like photos, so I've attached some. Head is cleaned up. Paint isn't great but I like the patina and dislike painting, so I'm going to leave it. Worst problem so far is the motor pulley spins on shaft but won't come off. Will try some of the suggestions above... Not sure how badly stuck the post is in the base. Have been squirting Kroil in daily.
 

Attachments

  • 8420B048-41C4-44E7-9B5B-368F508FDABC.jpg
    8420B048-41C4-44E7-9B5B-368F508FDABC.jpg
    132.9 KB · Views: 32
  • 961B223C-7E1B-4DAC-BA90-248A4E7662D4.jpg
    961B223C-7E1B-4DAC-BA90-248A4E7662D4.jpg
    95.6 KB · Views: 34
  • DD045A00-18FF-4DE0-9966-5793C196DB21.jpg
    DD045A00-18FF-4DE0-9966-5793C196DB21.jpg
    150.6 KB · Views: 37
  • B86BFE54-B9A4-47CF-A089-B50B6E3B92B2.jpg
    B86BFE54-B9A4-47CF-A089-B50B6E3B92B2.jpg
    97 KB · Views: 31
Last edited:
OP
F

FrankLee

Well-known member
Joined
Sep 13, 2010
Messages
3,554
Location
seMI, 48317
Hi, just wanted to thank FrankLee and the other contributors to this thread. I picked up a gold Craftsman 150 and have it torn down. I see you all like photos, so I've attached some. Head is cleaned up. Paint isn't great but I like the patina and dislike painting, so I'm going to leave it. Worst problem so far is the motor pulley spins on shaft but won't come off. Will try some of the suggestions above... Not sure how badly stuck the post is in the base. Have been squirting Kroil in daily.

Welcome to The Garage Journal and the Craftsman Drill Press thread! Thanks for your comments.

That pulley issue is a very common problem. The set screw backs out and scars the motor shaft. The burr scores the bore of the pulley and prevents it from sliding off. You will need a bearing splitter/pulley puller to safely remove the pulley.

Your motor shaft will look similar to this:


Hi, just wanted to thank FrankLee and the other contributors to this thread. I picked up a gold Craftsman 150 and have it torn down. I see you all like photos, so I've attached some. Head is cleaned up. Paint isn't great but I like the patina and dislike painting, so I'm going to leave it. Worst problem so far is the motor pulley spins on shaft but won't come off. Will try some of the suggestions above... Not sure how badly stuck the post is in the base. Have been squirting Kroil in daily.

DITTO!


.
 

GreyEyes

Well-known member
Joined
Mar 25, 2019
Messages
54
Location
Florida
I'm trying to figure out why the PO removed the collar in the first place. I never have on a refurb.

Yeah, only a couple of reasons that I can think of. One, spindle was bent and he took it off to be able to straighten it with a press. Two, he mangled it trying to remove a stubborn chuck (seen this on several dp's).

xlj1000, make sure there are no burrs on the spindle around the hole for the collar pin and try rolling the spindle on a smooth hard surface (granite counter top, piece of glass etc.). If it rolls smoothly without going "thump thump thump" it's probably serviceable enough for a drill press.
 
OP
F

FrankLee

Well-known member
Joined
Sep 13, 2010
Messages
3,554
Location
seMI, 48317
Yeah, only a couple of reasons that I can think of. One, spindle was bent and he took it off to be able to straighten it with a press. Two, he mangled it trying to remove a stubborn chuck (seen this on several dp's).

Yeah. I was wondering if the taper was re-turned on a lathe. At first, it looked shorter to me.

xlj1000, make sure there are no burrs on the spindle around the hole for the collar pin and try rolling the spindle on a smooth hard surface (granite counter top, piece of glass etc.). If it rolls smoothly without going "thump thump thump" it's probably serviceable enough for a drill press.

That's a good idea.
 

xlj1000

Member
Joined
May 21, 2020
Messages
8
Location
NJ
Yeah. I was wondering if the taper was re-turned on a lathe. At first, it looked shorter to me.


That's a good idea.

Frank/Greyeyes

The tapered area is smooth and has roughly the same spec frank give. The reason there is no enough space for collar is because he didn't drive the spindle all way down(the 1st picture of mine shows the upper collar has about 1.5" from the quill end.

I would guess, by doing so, it will minify the effect of bending a bit, making it acceptable for wood working.

I did roll it on a glass top, and I can hear the "thump thump" sound. Great tip!

The owner(s) actually maintains the machine in such a meticulous condition and I cannot find any surface rusty. It doesn't look like other vintage ones in here. Too bad I need one that can do metal work. I guess I will see if you can source a spindle from eBay.

Anther thing worth mentioning is that seller put a very wearied out belt (see attached) I didn't think of too much at the time , I now know this could be a sign that machine has issue.

No I have no complain of all those as seller priced it very reasonable. This is money well spent as I learned a lot from the process and this forum. I think I am well equipped for looking for my 2nd drill press now.

Thanks guys
 

Attachments

  • IMG_20200523_182826448.jpg
    IMG_20200523_182826448.jpg
    151.2 KB · Views: 35
Last edited:

sheltonfilms

Well-known member
Joined
May 28, 2014
Messages
157
Just for reference my 1947 13 1/2" press' spindle taper has about 0.00025" runout. LESS THAN HALF A THOU!

 
Last edited:
OP
F

FrankLee

Well-known member
Joined
Sep 13, 2010
Messages
3,554
Location
seMI, 48317
When you can't rewire your motor to reverse rotation, improvise.

I wish there was a better picture, but that was the only one in the ad. Click photo.

 
Last edited:
To avoid these ads, REGISTER NOW!

sheltonfilms

Well-known member
Joined
May 28, 2014
Messages
157
Re: The Classic Craftsman 100/150 Drill Press

Like a Bridgeport milling machine.


Sent from my iPhone using Tapatalk
 

lafester

Well-known member
Joined
Mar 1, 2017
Messages
2,191
Location
Northern CO
Picking up this old Craftsman/Atlas this afternoon.
Missing too much to restore unfortunately, but I want the cross slide and it has lots of good parts. Also getting all that paint off would be a pain. They even painted right over the badge... $200

Tomorrow I am picking up an old bench top Walker Turner that will be restored.
$50 + long drive time.
 

Attachments

  • 00101_2iAcjDn4P3W_10I0FO_1200x900.jpg
    00101_2iAcjDn4P3W_10I0FO_1200x900.jpg
    69.7 KB · Views: 72
  • 98270914_10217156537849956_3120958365258219520_o.jpg
    98270914_10217156537849956_3120958365258219520_o.jpg
    84.9 KB · Views: 59
OP
F

FrankLee

Well-known member
Joined
Sep 13, 2010
Messages
3,554
Location
seMI, 48317
Picking up this old Craftsman/Atlas this afternoon.
Missing too much to restore unfortunately, but I want the cross slide and it has lots of good parts. Also getting all that paint off would be a pain. They even painted right over the badge... $200

Tomorrow I am picking up an old bench top Walker Turner that will be restored.
$50 + long drive time.

Excellent on both! You should easily recoup your investment, even if you keep the cross slide
 

lafester

Well-known member
Joined
Mar 1, 2017
Messages
2,191
Location
Northern CO
Excellent on both! You should easily recoup your investment, even if you keep the cross slide

Have you seen one of those huge collars before? Looks as beefy as the table lift collar... has the handle on the other side.
 

Attachments

  • 00l0l_2beD0C63xzp_10I0FO_1200x900.jpg
    00l0l_2beD0C63xzp_10I0FO_1200x900.jpg
    92.4 KB · Views: 45
Last edited:
OP
F

FrankLee

Well-known member
Joined
Sep 13, 2010
Messages
3,554
Location
seMI, 48317
Have you seen one of those huge collars before? Looks as beefy as the table lift collar... has the handle on the other side.

I noticed that and that was my first thought... the upper portion of a head & table lift. No, I never had one of those collars.


Yeah, you'll have fun with both of those. IIRC, they both have more parts than the K-S machines.
 
Last edited:

Smokeshow69

Well-known member
Joined
Dec 7, 2012
Messages
8,366
Location
Pacific Northwest
Picking up this old Craftsman/Atlas this afternoon.

Missing too much to restore unfortunately, but I want the cross slide and it has lots of good parts. Also getting all that paint off would be a pain. They even painted right over the badge... $200


Tomorrow I am picking up an old bench top Walker Turner that will be restored.

$50 + long drive time.


Sweet! Someone posted that on the craftsman face book page. Glad a forum member got it!


Sent from my iPhone using The Garage Journal mobile app
 

cclfn

Well-known member
Joined
Jul 31, 2012
Messages
308
Location
NW
Picking up this old Craftsman/Atlas this afternoon.
Missing too much to restore unfortunately, but I want the cross slide and it has lots of good parts. Also getting all that paint off would be a pain. They even painted right over the badge... $200

Tomorrow I am picking up an old bench top Walker Turner that will be restored.
$50 + long drive time.

WOW what a score! If that is an Atlas x-y table that was the price of admission for both DP's in my neighborhood. I don't know what is missing from the CM drill press other than the head piece and I see those periodically for sale. The spray paint can easily be removed and often gently enough from badges to save them. With the slow speed attachment it might be worth trying to restore. The WT 900's are great machines too. If I dare say it here, in other circles they are coveted and held in higher regard than Craftsman models. If the WT has the small, art/deco looking, on/off toggle switch box on the other side of the body - those alone are $100 items. The only bad thing about WT is everything was made with proprietary parts so the bearings are very pricey, but you will love it. I have one of each just opposite of you WT floor model & CM bench. There is a ton of information about the WT 900 over on the OWWM site http://owwm.org/index.php?sid=d6bc033126d171f23fb31c964a1f4994 including owners manuals that you can download. Good luck with your great finds.
Wes
 

lafester

Well-known member
Joined
Mar 1, 2017
Messages
2,191
Location
Northern CO
Thanks, that matches my thoughts on pretty much everything.
The xy is definitely atlas and has a tag but I have not looked at it yet.
I like how small and light it is, perfect for my needs.

The press seems to be in great shape overall under all of that paint.
I was told it was army surplus bought after the war in co springs.
Seems to be well built and the art deco base is pretty cool.

It will be fun to compare it to the walker turner tomorrow.

I'm not sure if it has the original switch. The pic is dark and grainy and there is a bunch of wiring that seems out of place. I can see one of the mounting screws so I know it is removed, but it may still be attached to the wiring somewhere. I asked and of course got the 'I have no idea' response.

I'll get a few pics after I unload.


WOW what a score! If that is an Atlas x-y table that was the price of admission for both DP's in my neighborhood. I don't know what is missing from the CM drill press other than the head piece and I see those periodically for sale. The spray paint can easily be removed and often gently enough from badges to save them. With the slow speed attachment it might be worth trying to restore. The WT 900's are great machines too. If I dare say it here, in other circles they are coveted and held in higher regard than Craftsman models. If the WT has the small, art/deco looking, on/off toggle switch box on the other side of the body - those alone are $100 items. The only bad thing about WT is everything was made with proprietary parts so the bearings are very pricey, but you will love it. I have one of each just opposite of you WT floor model & CM bench. There is a ton of information about the WT 900 over on the OWWM site http://owwm.org/index.php?sid=d6bc033126d171f23fb31c964a1f4994 including owners manuals that you can download. Good luck with your great finds.
Wes
 

cclfn

Well-known member
Joined
Jul 31, 2012
Messages
308
Location
NW
They are very thin pot metal so it may have broken off. This day and age you could probably get some 3D printed because once painted they would look and function the same.
 

cclfn

Well-known member
Joined
Jul 31, 2012
Messages
308
Location
NW
Pic of the cross slide badge...


Sent from my Pixel 3 XL using Tapatalk

That's the same badge as I have on mine did it have the vise pieces with it? Apparently there are some identical looking vises with Atlas badges also.
 

lafester

Well-known member
Joined
Mar 1, 2017
Messages
2,191
Location
Northern CO
That's the same badge as I have on mine did it have the vise pieces with it? Apparently there are some identical looking vises with Atlas badges also.
No vise pieces unfortunately. Yeah atlas = MasterCraft.

Oh it had this cool starrette screw guide on it. https://www.starrett.com/metrology/product-detail/185

UPDATE: I'm having issues getting the pinion shaft out and I do not see anything holding it in. Guess I'll have a look at the manual if there is one available. Also confirmed the base is badged Atlas with the appropriate model number.

UPDATE2: Ahhh, it goes out the other way so you have to remove the wheel hub. First time I've seen one go that way.

a95c7e2262946b1ebf837479763cf714.jpg
 

Attachments

  • IMG_20200525_222149.jpg
    IMG_20200525_222149.jpg
    161.7 KB · Views: 18
  • a95c7e2262946b1ebf837479763cf714.jpg
    a95c7e2262946b1ebf837479763cf714.jpg
    634.3 KB · Views: 4
Last edited:
To avoid these ads, REGISTER NOW!
Top Bottom