Outlawmws
Well-known member
Thanks Frank! I had no idea so many models had the cover as an option!

That was my thoughts on the patch. Spot welding as opposed to a full bead would lead to less heat distortion. I bet you could mix up some paint to touch up that spot pretty easily! I sure wish one of those would pop up in my area!
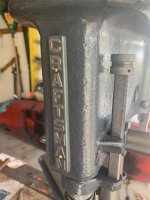
I spent several hours today tearing down the 103.0305 Mohawk DP today. Got most of it cleaned up and I am amazed at the excellent condition everything was in. There was really no wear or damage to anything (besides the mohawk cover with the big hacked slot cut into it). I'm so mad/disappointed in that stupid cutout being there. Still need to figure out a repair plan I can implement for the cover.
I thought for sure the paint color was some kind of olive green. With a little degreaser purple spray, that greenish tint washed right away. I think it must have been some type of oil residue all over the exterior. The real color is just a plain machinery grey (as probably all you experienced guys already knew).
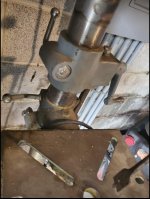
The clock spring for the handle return works perfectly. I just had to give the knob 1/2 turn to tighten by one notch. I had no problems tapping the pulleys off the shafts and tearing everything down for wire wheeling.
I'm "shocked" about the state of the wiring. It was all pretty junky and the terminals in the motor j-box were nowhere near tight or solid. Before the teardown, it turned on and ran just fine, so the wiring would carry current but oh boy was it suspect. That will all have to be redone.
My wife will be out of town next weekend so I should be able to make a lot more headway. I'll repost as I get things finalized.
That junky wiring is very common and is usually worse as the motors get older.That was my thoughts on the patch. Spot welding as opposed to a full bead would lead to less heat distortion. I bet you could mix up some paint to touch up that spot pretty easily! I sure wish one of those would pop up in my area!
I spent several hours today tearing down the 103.0305 Mohawk DP today. Got most of it cleaned up and I am amazed at the excellent condition everything was in. There was really no wear or damage to anything (besides the mohawk cover with the big hacked slot cut into it). I'm so mad/disappointed in that stupid cutout being there. Still need to figure out a repair plan I can implement for the cover.
I thought for sure the paint color was some kind of olive green. With a little degreaser purple spray, that greenish tint washed right away. I think it must have been some type of oil residue all over the exterior. The real color is just a plain machinery grey (as probably all you experienced guys already knew).
The clock spring for the handle return works perfectly. I just had to give the knob 1/2 turn to tighten by one notch. I had no problems tapping the pulleys off the shafts and tearing everything down for wire wheeling.
I'm "shocked" about the state of the wiring. It was all pretty junky and the terminals in the motor j-box were nowhere near tight or solid. Before the teardown, it turned on and ran just fine, so the wiring would carry current but oh boy was it suspect. That will all have to be redone.
My wife will be out of town next weekend so I should be able to make a lot more headway. I'll repost as I get things finalized.

Frank, thanks for checking. I’ll look around and see what’s out there. - Jim

Excellent! Glad you got it worked out.I ordered a set of 3 feed handles from JW Winco. not original of course but the proper spec. I had none.
I''ll let you guys know how they work out.
On another note, I overhauled the Jacobs chuck after much fussin'. Had a small burr inside and major crud buildup from 60 some years. The soakin' I gave it prior did nothing to remove that so just as advised, one should disassemble it, polish to get it back in proper working order. And it now has zero run-out, okay not zero but quite acceptable for my projects.
Also got a light mounted that I think will work well and looks like it could have come with it. I am pleased with the whole deal!
Thanks again for all the advise.
What does the light look like?I ordered a set of 3 feed handles from JW Winco. not original of course but the proper spec. I had none.
I''ll let you guys know how they work out.
On another note, I overhauled the Jacobs chuck after much fussin'. Had a small burr inside and major crud buildup from 60 some years. The soakin' I gave it prior did nothing to remove that so just as advised, one should disassemble it, polish to get it back in proper working order. And it now has zero run-out, okay not zero but quite acceptable for my projects.
Also got a light mounted that I think will work well and looks like it could have come with it. I am pleased with the whole deal!
Thanks again for all the advise.
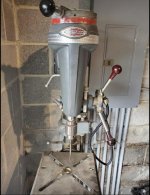
The new feed handles arrived this evening and I installed them after re-taping the holes in the hub. They fit, 3/8 x 16 and are of very high quality I believe. And I think a fair price. www.jwwinco.com. I will probably readjust the hub on the pinion to position the levers. These photos show the light I added and already had from years ago and suited me perfectly. I also ordered and added the metro products engine turned film. IMHO it looks a little too blingy as is and looks better if you simply spray two coats of clear matte acrylic on it to dull and lower the value. I did a test and prefer the results but haven't done it yet. All in all I consider this job DONE! Thanks FrankLee! for a very concise and helpful thread on these DPs.
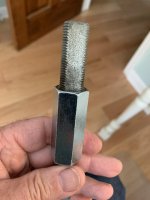
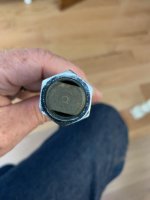
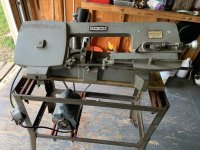
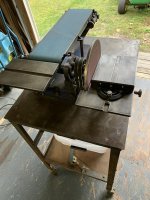
Good alternative to those missing originals!I was thinking about feed stop knuled nuts for my Craftsman 100 Series DP but couldn't find any that were reasonably priced. in my local hardware store I found a 5/8-28 coupler. About 2" long, slim profile. Fit the feed rod with no clearance issues when installed. Cut off two pieces on the Craftsman horizontal metal band saw, then cleaned them up on the 1930s Craftsman belt sander. Now to find the right washer.
A K3 key with 5/16" pilot fits the 6A chuck (no collar) or a 633C chuck (with collar).Does anyone know of a good replacement for the chuck key? Or how to search it? I have a few around and nothing seems to fit. I am finishing up my 100 and I didn't get a key with it when I bought it.
That's the safety collar attached to the chuck that threads onto the thrust collar on the spindle.frank,
Thanks! What do you mean my collar?
2/11/2015:
Craftsman 100/150 Drill Press Evolution
....
In 1952, the Jacobs Safe-Lock chuck with a swiveling threaded lock collar (right) was introduced as a standard feature. http://vintagemachinery.org/pubs/222/5579.pdf
10/1/2018 Edit: Here is evidence from a May 1951 Popular Mechanics magazine advertisement that the Safe-Lock chuck was available earlier. https://books.google.com/books?id=2...tsman drill press&pg=PA239#v=onepage&q&f=true


.....
Thanks for your comments and welcome to the club!Wonderful thread Mr. Lee. Thank you for all your effort. Every aspect of breakdown and sources of parts etc. It is a great find and encouraged me to pull the trigger on my first DP. I've been lurking GJ for a while now and have always leaned toward Craftsman power tools. My Dad and I have used them for decades and now I am the curator of his collection too. I found this forlorn example of 103.24821 here in South Florida. There is not a lot to choose from down here like there is in the mid-west and northeast. When people retire down here they seem to only bring their golf clubs. Gold has never been my favorite color. I like the dark grey examples. It does run. Motor plate has 6 57 stamped into it. I'm looking at your spotter information looking to ID the rest of it. Has only one bent 3/8 feeder handle still in place. Full disassembly to follow but, it may be some time. Too many projects, some of them prioritized by the boss. I get to hobby after all her honey-dos are completed. Then there is that pesky work thing I still have to deal with. Bother and non-sense. Thanks again for the thread and all of you who have contributed. I'm quite content plowing through all 194 pages.
Yes, there was a darker charcoal gray used after the Power Bronze era into the 2nd, 3rd and 4th generation Emerson machines. I'm not aware of anyone that color-matched the darker gray.Speaking of the paint, I also tend to stay away from gloss, except on cars of course. Was there a authentic dark grey Craftsman used? Anyone know a UPC on an existing manufacturers color? I know I'm not up to that yet but, then the cart regularly rolls through long before the horse shows up. The Rust-Oleum Aged Metallic Weathered Steel 285073 looks interesting. I really like the way their Hammered Verde Green 7219830 looks on the Wilton vises.
Any suggestions would be welcome and thanks.
Thanks for the paint info. Looking forward to pictures of your completed machine.Pikapp & FrankLee, Regarding a good Craftsman color, I found a really nice dark grey that comes very close to matching the original grey. My refurb of my 103.0305 Mohawk DP is nearly mechanically complete. I've started reassembly.
Everything was painted in Rustoleum Gloss Deep Slate. The rattle can has a "New" label on the cap. The cap looks very dark but the color came out quite a bit lighter. The picture shows the difference between the new color on the casting and the original color on the nameplate. In my case, the original paint has the slightest green tint to it but I think this is a remnant of of previous shop environment.
I'll have the assembly complete sometime over this weekend and will post a batch of pictures. Everything came out really nice. I was even able to patch the big section of damage (a hacky slot somebody cut) in the mohawk cover with a formed piece of sheetmetal and JB Weld. Obviously, a welded patch would be better than epoxy, but you have to go with the options available.
Pikapp & FrankLee, Regarding a good Craftsman color, I found a really nice dark grey that comes very close to matching the original grey. My refurb of my 103.0305 Mohawk DP is nearly mechanically complete. I've started reassembly.
Everything was painted in Rustoleum Gloss Deep Slate. The rattle can has a "New" label on the cap. The cap looks very dark but the color came out quite a bit lighter. The picture shows the difference between the new color on the casting and the original color on the nameplate. In my case, the original paint has the slightest green tint to it but I think this is a remnant of of previous shop environment.
I'll have the assembly complete sometime over this weekend and will post a batch of pictures. Everything came out really nice. I was even able to patch the big section of damage (a hacky slot somebody cut) in the mohawk cover with a formed piece of sheetmetal and JB Weld. Obviously, a welded patch would be better than epoxy, but you have to go with the options available.
That is one of the finest looking machines in original condition that I've ever seen. The ad still says Pending.Alright who got the deal of the century?
1953ish press with perfect paint, ATLAS TABLE LIFT!!!!, and VARISLO!..........for only $150 in Chattanooga?
That is one of the finest looking machines in original condition that I've ever seen. The ad still says Pending.
Yep. Those can be very frustrating.Spindle Pulley Retaining Screws - ARGH. I was working on the head casting of the Craftsman 100. One screw came out but the screw head broke off the other. Tried drilling with no luck so far. Nothing to grab from the inside. I then tried to assemble with only one screw. Is that an option? Seemed to **** the spindle pulley to one side (perhaps too long) until I installed the spindle but even then there is up and down play with the pulley assembly. Is that normal? Even if I could drill out the screw ther's no room for a tap. Any ideas? Thank you - Jim
Frank,
Finally got mine disassembled. Mangled up the spacers pretty bad, they are unusable. I will have to make a set.
It shouldn't be too difficult to find or fab new flanges.
Anyhow I have a mile long list of questions.....
The bearings have a click to them, any reason not to order new sealed bearings?
New sealed bearings are a good idea. Be sure to measure for the correct size.
Only one side of my grinder had this spring spacer, is it necessary?
Yes. I believe that spring washer is used to pre-load bearings and/or to keep the rotor tight in the housing. It is only installed on the fan side of the motor. There is a link in my first post regarding the Quill and Spindle Assembly with info on bearing pre-load.
you said yours just had shims. Mine also has quite a bit of end play, anyway to tighten that up?
That may tighten up when parts are cleaned and reassembled when the spring washer can do its job.
What do you use to clean the windings?
I use a small dry 1" sash brush, a vacuum with brush attachment and compressed air.
Any chance anyone has found a blue close to the old color?
Member Honza.Vosalik had the paint color matched for a drill press... same color I believe, but honestly, use what you like.
Do you know what size the light bulbs are?
I believe there were two styles, bayonet and E12 candelabra.
Does anyone know what size capacitor is used?
Don't know. Mine was still good.
Also,
What is this?
That is a component of the centrifugal switch. There is a link to info on the cent switch in my first post.
I have a spare capacitor, here are the specs.Frank,
Finally got mine disassembled. Mangled up the spacers pretty bad, they are unusable. I will have to make a set. Anyhow I have a mile long list of questions.....
The bearings have a click to them, any reason not to order new sealed bearings?
Only one side of my grinder had this spring spacer, is it necessary? you said yours just had shims. Mine also has quite a bit of end play, anyway to tighten that up?
View media item 107008
What do you use to clean the windings?
View media item 107007
Any chance anyone has found a blue close to the old color?
Do you know what size the light bulbs are?
Does anyone know what size capacitor is used?