
You are using an out of date browser. It may not display this or other websites correctly.
You should upgrade or use an alternative browser.
You should upgrade or use an alternative browser.
Craftsman Drill Press
- Thread starter FrankLee
- Start date
JoCoSawdust
Well-known member
I lubed it while still assembled when I first got it. I may disassemble it one day and see if I can quiet the thing down with a cleaning. Fooling around with all that pot metal isn't one of my favorite things.JoCo, have you disassembled and relubed the Varislo? Or just running it as found?
Smokeshow69
Well-known member
The only one I have ever seen in person was noisy and all the ones I have seen operating on line are noisy as well! I think it is most likely a design characteristic but I wish you luck in quieting it down! If anyone can find a way it's you !I lubed it while still assembled when I first got it. I may disassemble it one day and see if I can quiet the thing down with a cleaning. Fooling around with all that pot metal isn't one of my favorite things.
Hoorn
Well-known member
Because of the history of Atlas and Craftsman regarding drill presses, head frame safety collars, head and table lifts, etc. I wanted to post this hi-lo pulley I snagged today from an Atlas drill press. the white cotton bag you see in the picture was hanging off the side of the drill press. Inside was the original envelope and instructions dated 1946 for this Atlas pulley. The pulley itself may have come in the bag as it is very faintly stamped "pulley". It closely resembles the MSA pulley on the 100/150 DPs except with the extra lip it sits about 5/8" higher. the Craftsman version slides in and seats on a lip inside the actual column, in this example the upper collar rides on top of the column. Anyway, it's interesting.
Attachments


Myers B
Well-known member
Yes, I was so busy answering the question I failed to bring up how much eye candy is in that picture, including that articulated Heritage logo lamp. Nice setup there.
Man's gotta know when he posts on GJ, every nook and cranny of that picture is going to be dissected and guys will find every last tool in that frame even if there's only 5% of the tool visible lol.
Thanks Hoorn. I have a small collection of mostly mid 1950s craftsman. I either completely restore or just repair everything back into usable condition.
Attachments


Hoorn
Well-known member
Myers, those Heritage stacks! Badass.
Smokeshow69
Well-known member
The real gem in this photo is what is hanging on the wall...so rare! You also on fb craftsman collectors page by chance ?Thanks Hoorn. I have a small collection of mostly mid 1950s craftsman. I either completely restore or just repair everything back into usable condition.
DwightS
Well-known member
I may have missed it somewhere in these 4806 posts, but has anyone found a color match for the later Emerson, Crown logo 100/150 drill press? The colors I‘ve tried are too light including the Rust-Oleum Charcoal Gray (gloss & satin). This original finish seems to have a little dark green in it. Thanks!
DwightS check out my 113 rebuild. I came fairly close to a match with a spray paint. Perhaps Hoorn or someone else has a closer match.
For anyone interested, here is the head and I have painted the top ½ (red circle) with the Krylon Industrial Tough Coat Rust Preventative Spray Paint in Gloss Machinery Blue/Gray, the bottom ½ (yellow circle) is the original Craftsman Gray paint. As you can see, the Krylon is glossier but otherwise it’s a very near color match. For spray paint that is incredible.

 www.garagejournal.com
For anyone interested, here is the head and I have painted the top ½ (red circle) with the Krylon Industrial Tough Coat Rust Preventative Spray Paint in Gloss Machinery Blue/Gray, the bottom ½ (yellow circle) is the original Craftsman Gray paint. As you can see, the Krylon is glossier but otherwise it’s a very near color match. For spray paint that is incredible.
11b30b4's Craftsman 113.213780 15.5" Drill Press (Emerson Gen-4) Rebuild
Craftsman Drill Press 113.213780 Rebuild Greetings everyone, I am Jeff and I am from Georgia. I joined this forum to share what I can and to learn from yall and to get help with the stuff I work on and play with. Currently, I am rebuilding a Craftsman 113.213780 floor Drill Press. I got this...
www.garagejournal.com
I like charcoal grey well enough as a color. But, then again I am never trying to "match" any colors.I may have missed it somewhere in these 4806 posts, but has anyone found a color match for the later Emerson, Crown logo 100/150 drill press? The colors I‘ve tried are too light including the Rust-Oleum Charcoal Gray (gloss & satin). This original finish seems to have a little dark green in it. Thanks!
A question like that is asking what others tolerance is for less than perfect match.
I have brought good clean samples from house siding to various sheet metal parts into hardware stores over the years for color matching using their color reading/matching gadget and have never been satisfied. I gave up on the endeavor. Generally I am painting the whole thing anyway. Further, I am not all that sure their colors or formulas were really set in stone anyway. as they seem to fade to different degrees depending on the year using the small sample size I have seen as an example.
Good luck in our search and finding a suitable option. If you do find something you believe is a perfect match for some period of years I would be interested in knowing what color that is.
Hoorn
Well-known member
11b, that's about as close as you're going to get. The only two colors I have tried to match are the power bronze and the early to mid 50s blue-grey. We all know the champagne mist works out pretty well for the PB -with a few coats of satin clear after. As for the early 1950s blue-gray I've had reasonable success with Ace hardware Machinery gray as it has a decent amount of blue in it. I don't think it's as close as 11b's Emerson gray match though.
Last edited:
Hoorn, I snagged a few cans of the Ace Machine Grey after you and Frank discussed it some time ago. I am planning on redoing my red 100 bench top DP in the grey unless my OCD forces me to p[aint it gold like all the other projects I am working on. Also, I am planning on using the Ace Machine Grey on my Delta Pedestal and grinder.
DwightS
Well-known member
Thanks, I got a couple of cans of the Krylon machinery blue/gray ordered. I’m currently not planning on a full disassembly /restoration. I’m just trying to clean up the base and table, paint over the red overspray from the PO. I’m also going to clean up the handles and bolt heads, etc to make it look a little better. It really runs good, so just some cosmetics. If it isn’t perfect, it’ll be ok for now.
Myers B
Well-known member
I somehow might just be missing it, but ever since the garage journal updated its format I can't seem to find the page in this thread that listed assembly/disassembly for each component. I have my entire press apart minus the spindle pulley. It is still in the head, as the screws are bent and won't unscrew from the head. I haven't stripped them yet, but I know they won't come out on their own. I thought I remembered this thread mentioning a few ways to deal with them, but I can't seem to find the section dealing with the spindle pulley removal.
Smokeshow69
Well-known member
Hello, this was listed on the very first page on post #1 which was an index. I am not sure why that index went away but can you perhaps get a set of vise grips on the bolts on the inside of the head and start to twist it out ?I somehow might just be missing it, but ever since the garage journal updated its format I can't seem to find the page in this thread that listed assembly/disassembly for each component. I have my entire press apart minus the spindle pulley. It is still in the head, as the screws are bent and won't unscrew from the head. I haven't stripped them yet, but I know they won't come out on their own. I thought I remembered this thread mentioning a few ways to deal with them, but I can't seem to find the section dealing with the spindle pulley removal.
Hoorn
Well-known member
What has worked for me at this stage was to put the head frame back on the column, upside down and very close to the base with a thick, folded towel or something underneath to catch the spindle pulley. I then knock out the spindle bearings and pulley assembly with a 1" diameter, long wooden dowel, but of course the screws were out of the head frame. I suppose if worse came to absolute worse and those screws are not coming out of the head frame, and cannot be drilled out, they will be weaker metal than the bearing and would probably bend and break if you knocked out the bearings. I haven't had to go through that yet thankfully but that would be a last resort kind of thing.
I want to say that Frank has had success drilling out those screws which were broken or bent so bad they would not come out on their own. In that case you would just have to redrill and retap the hole to a slightly larger diameter.
I want to say that Frank has had success drilling out those screws which were broken or bent so bad they would not come out on their own. In that case you would just have to redrill and retap the hole to a slightly larger diameter.
Last edited:
Hoorn
Well-known member
Here is a past comment from Frank regarding bent or damaged screws that won't come out of the head:
...use the largest drill bit that will fit in that access hole. Drill the old screw head until you get a nice center point hole. Then, use a smaller bit to drill out the rest of the screw. Use an easy-out then a tap to clean out the threads.
...use the largest drill bit that will fit in that access hole. Drill the old screw head until you get a nice center point hole. Then, use a smaller bit to drill out the rest of the screw. Use an easy-out then a tap to clean out the threads.
Myers B, Hoorn is correct, your best option is to use the largest bit you can get into the hole then ONLY drill off the head of the screw. This will give you a good center point to use a 1/8” or smaller bit to drill into the screw. Then try to extract the screw with an extractor.
Another possible option is if the screws are the original flat tip round head screws then you can lay the headstock on a bench and try using an impact driver like this.
If you try this method, you will need an extended flat tip head for the driver to reach the screw and I would recommend you use a hollow ground flat tip for optimal engagement.
I had a similar situation where the screws were bent inside the bearing bore and stripped out the threaded hole. I ended up having to drill out the entire screw on both sides and push the remainder into the bearing cavity then once I got the spindle pulley assembly out, I had to drill and tap one size larger and use metric screws as a replacement.
Smokeshow69, I believe you may be thinking of a different screw. There is no way to access these screws from inside the head while the spindle pulley is installed and banging the spindle pulley assembly out with these screws in the head will lead to a damaged headstock or pulley shaft or both. The screws must be removed to get the spindle pulley assembly out.
Hoorn, you are correct, the race on the bearings is a stronger steel than the screws but I would be concerned that the headstock would crack or brake if he tried to pound out the bearings to shear off the screws.
Lastly, yes Frank’s thread did have an index on page one but when GJ updated the software, the links were broken, and Frank tied to fix many of them but eventually opted to not do so. Most of everything in this thread is still here but you will now need to search for it. It will not be fixed anytime soon.
Another possible option is if the screws are the original flat tip round head screws then you can lay the headstock on a bench and try using an impact driver like this.
CRAFTSMAN Hand Impact Driver, 3/8-Inch Set (CMMT14104) - - Amazon.com
CRAFTSMAN Hand Impact Driver, 3/8-Inch Set (CMMT14104) - - Amazon.com
www.amazon.com
If you try this method, you will need an extended flat tip head for the driver to reach the screw and I would recommend you use a hollow ground flat tip for optimal engagement.
I had a similar situation where the screws were bent inside the bearing bore and stripped out the threaded hole. I ended up having to drill out the entire screw on both sides and push the remainder into the bearing cavity then once I got the spindle pulley assembly out, I had to drill and tap one size larger and use metric screws as a replacement.
Smokeshow69, I believe you may be thinking of a different screw. There is no way to access these screws from inside the head while the spindle pulley is installed and banging the spindle pulley assembly out with these screws in the head will lead to a damaged headstock or pulley shaft or both. The screws must be removed to get the spindle pulley assembly out.
Hoorn, you are correct, the race on the bearings is a stronger steel than the screws but I would be concerned that the headstock would crack or brake if he tried to pound out the bearings to shear off the screws.
Lastly, yes Frank’s thread did have an index on page one but when GJ updated the software, the links were broken, and Frank tied to fix many of them but eventually opted to not do so. Most of everything in this thread is still here but you will now need to search for it. It will not be fixed anytime soon.
Is that the reason he left the forum? Garage Journal upgraded software he didn't like?Lastly, yes Frank’s thread did have an index on page one but when GJ updated the software, the links were broken, and Frank tied to fix many of them but eventually opted to not do so. Most of everything in this thread is still here but you will now need to search for it. It will not be fixed anytime soon.
subroc, that is something you will need to discuss with him. I am not here to speak for Frank. I was attempting to address the question and all I can say is that the links in this thread were broken and will not be fixed anytime soon.
Thanks for the info. Truth of the matter is it is none of my business why anyone participates in a forum or chooses to leave. Your post seemed to indicate something so I asked.subroc, that is something you will need to discuss with him. I am not here to speak for Frank. I was attempting to address the question and all I can say is that the links in this thread were broken and will not be fixed anytime soon.
I told him a few times I believed this thread was a great resource.
Clearly, the forum is here. If he wants to let us know why he moved on he can.
Many indicate his participation is missed something I agree with.
Hoorn
Well-known member
I too am a member of the "I joined GJ specifically because of the FrankLee Craftsman DP" thread, I think many on this thread did, and I miss his wisdom and straight to the point answers as well.
Maintaining a thread you start, with almost daily responses, for about 8 years takes huge commitment. He shared every possible insight and always had a remarkable solution. His explanations with corresponding pictures were better than any tool manual I ever read. I mean, cutaways of a Craftsman head frame?! Just to make it "that much" easier to explain -since we men are supposedly such visual learners. If anyone has deserved a break it's definitely Frank.
Maintaining a thread you start, with almost daily responses, for about 8 years takes huge commitment. He shared every possible insight and always had a remarkable solution. His explanations with corresponding pictures were better than any tool manual I ever read. I mean, cutaways of a Craftsman head frame?! Just to make it "that much" easier to explain -since we men are supposedly such visual learners. If anyone has deserved a break it's definitely Frank.
Just finished this guy. Its the 2nd I've fixed up. Had to pass it along, as my garage is tiny and it took up too much space. This thread was really helpful, thanks!
Attachments


Outlawmws
Well-known member
I'm hoping its just a break. Frank is a great guy and contributor.
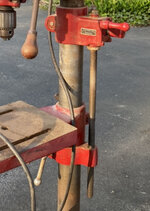
I am getting ready to put together my Buffalo 15 with an Atlas table lift which I picked up a while back. What is the best procedure to make sure I treat the lift well and don’t end up breaking it. Any advice is greatly appreciated.
I am currently cleaning the post up as it is a bit rusty and grimey. The lift went up and down fairly well on the machine it came off of.
I am currently cleaning the post up as it is a bit rusty and grimey. The lift went up and down fairly well on the machine it came off of.
Attachments
Smokeshow69
Well-known member
Man, I hope so as well. I have his cell number from back when he spent half an hour on the phone with me to help me figure out a problem on my spindle bracket. I might send him a message just to let him know he is missed. Top notch guy!I'm hoping its just a break. Frank is a great guy and contributor.
Hoorn
Well-known member
rg17, is it off the column yet? Or are you asking how to get it off and maintain it?I am getting ready to put together my Buffalo 15 with an Atlas table lift which I picked up a while back. What is the best procedure to make sure I treat the lift well and don’t end up breaking it. Any advice is greatly appreciated.
I am currently cleaning the post up as it is a bit rusty and grimey. The lift went up and down fairly well on the machine it came off of.
I have found the following to work for the Atlas lifts I was lucky enough to get. Once the headframe is off, lock the bottom lift collar, and unlock the top. If it easily turns, rotate the handle so that the top collar assembly rises up and once the screw clears the bottom collar, lift it off the column. Then remove the table, then the bottom collar.
If it does not turn freely, remove the four bolts on the upper gearbox and expose the gearbox. You may find 50 years of sawdust, grime and dried grease inside that needs cleaning and then get enough fresh grease, or PB blaster on the gears so that it will freely turn. To be able to then crank it up and off the bottom collar, you will then have to reassemble the gearbox so that the handle and newly cleaned handle gear will re-engage the threaded post gear.
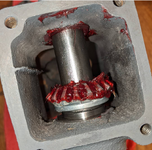
The first attached pic was from a 1940s Atlas made DP I bought with the attached head and table lift. The gears were frozen and opening the gear box showed 70 year old rock hard grease. I used a small pick, and simple green to remove the gunk so that it would turn and could be removed. The second pic shows how I greased up the gears once it was cleaned and going back on.
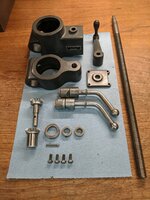
Frank had a very insightful observation about the thrust bearing you see riding atop the gear box in pics 3 and 4. The lift is actually a "head and table" lift, although most people use it exclusively to move the table up and down and not the head. Because of this, if you plan on primarily lifting only the table up and down, once you have it all apart and begin reassembly, put the thrust bearing on top as it will absorb the weight of the table as you lift it up and down. It's original location inside the gearbox (as shown in pic #1) was to absorb the weight of the entire head frame, motor, spindle assembly, etc. Finally, the 2 lock nuts on top should not be cinched down hard onto the thrust bearing but rather riding on top to allowing ease of turning. They should only be locked onto each other. You see that I have an acorn nut on top instead of the original lock nut. That's because this is easier to turn on and off, and because Frank had one, and because it looks cool.
Last picture is the entire Atlas head and table lift, with all the parts visible, the paint is the original color.
Remember to lightly apply super lube or similar along the threads and all points of friction. I used Lucas red and tacky anti-seize grease for the actual gears. Good luck!
Attachments


Last edited:
Thank you very much for the excellent reply. I took it off, but the post was a bit grimey and nothing moved too freely. After cleaning up the post it cranked fairly smoothly and I actually took it and the table off by using the cranking ability of the lift. Would you still consider taking it apart or leave it alone? Have you noticed a significant difference in performance with the thrust washer relocated? Is there a gasket or any sealant required on the cover?rg17, is it off the column yet? Or are you asking how to get it off and maintain it?
I have found the following to work for the Atlas lifts I was lucky enough to get. Once the headframe is off, lock the bottom lift collar, and unlock the top. If it easily turns, rotate the handle so that the top collar assembly rises up and once the screw clears the bottom collar, lift it off the column. Then remove the table, then the bottom collar.
If it does not turn freely, remove the four bolts on the upper gearbox and expose the gearbox. You may find 50 years of sawdust, grime and dried grease inside that needs cleaning and then get enough fresh grease, or PB blaster on the gears so that it will freely turn. To be able to then crank it up and off the bottom collar, you will then have to reassemble the gearbox so that the handle and newly cleaned handle gear will re-engage the threaded post gear.
The first attached pic was from a 1940s Atlas made DP I bought with the attached head and table lift. The gears were frozen and opening the gear box showed 70 year old rock hard grease. I used a small pick, and simple green to remove the gunk so that it would turn and could be removed. The second pic shows how I greased up the gears once it was cleaned and going back on.
Frank had a very insightful observation about the thrust bearing you see riding atop the gear box in pics 3 and 4. The lift is actually a "head and table" lift, although most people use it exclusively to move the table up and down and not the head. Because of this, if you plan on primarily lifting only the table up and down, once you have it all apart and begin reassembly, put the thrust bearing on top as it will absorb the weight of the table as you lift it up and down. It's original location inside the gearbox (as shown in pic #1) was to absorb the weight of the entire head frame, motor, spindle assembly, etc. Finally, the 2 lock nuts on top should not be cinched down hard onto the thrust bearing but rather riding on top to allowing ease of turning. They should only be locked onto each other. You see that I have an acorn nut on top instead of the original lock nut. That's because this is easier to turn on and off, and because Frank had one, and because it looks cool.
Last picture is the entire Atlas head and table lift, with all the parts visible, the paint is the original color.
Remember to lightly apply super lube or similar along the threads and all points of friction. I used Lucas red and tacky anti-seize grease for the actual gears. Good luck!
Thank you for your help!
Hoorn
Well-known member
I would absolutely take it apart and remove all the crud from the gears and repack with fresh grease. As for performance, you will notice a significant improvement in the turning ability once everything is freshly cleaned and lubricated. There is no sealant or gasket nor is one required.Thank you very much for the excellent reply. I took it off, but the post was a bit grimey and nothing moved too freely. After cleaning up the post it cranked fairly smoothly and I actually took it and the table off by using the cranking ability of the lift. Would you still consider taking it apart or leave it alone? Have you noticed a significant difference in performance with the thrust washer relocated? Is there a gasket or any sealant required on the cover?
Thank you for your help!


Hoorn
Well-known member
I used Lucas oil red and tacky anti-seize for the gears, super lube for all other friction areas.
Jayman17
Well-known member
I just wanted to say that I too hope that Frank is just taking a well deserved break from this thread and that he will return. This thread is an incredible resource for restoring a dp and he is a generous guy with his time and willingness to share his knowledge.

Jay
Jay
y'sguy
Well-known member
I do hope to see FrankLee come back as well. His volunteer information was my guide to a successful DP find and renewal.
DwightS
Well-known member
Thank you for the paint recommendation. It’s a close enough match. Probably need to hit it with some satin to take off a little shine, but color wise it’s close. While mine won’t be museum quality, it will serve me well and look good doing it.DwightS check out my 113 rebuild. I came fairly close to a match with a spray paint. Perhaps Hoorn or someone else has a closer match.
For anyone interested, here is the head and I have painted the top ½ (red circle) with the Krylon Industrial Tough Coat Rust Preventative Spray Paint in Gloss Machinery Blue/Gray, the bottom ½ (yellow circle) is the original Craftsman Gray paint. As you can see, the Krylon is glossier but otherwise it’s a very near color match. For spray paint that is incredible.
11b30b4's Craftsman 113.213780 15.5" Drill Press (Emerson Gen-4) Rebuild
Craftsman Drill Press 113.213780 Rebuild Greetings everyone, I am Jeff and I am from Georgia. I joined this forum to share what I can and to learn from yall and to get help with the stuff I work on and play with. Currently, I am rebuilding a Craftsman 113.213780 floor Drill Press. I got this...
Now…. If I can just find a replacement table that doesn’t cost more in shipping than I paid for the press.
 . @Hoorn , if you sell that table, great, if not, I may bite the bullet and get you to send it my way.
Hoorn
Well-known member
Let me know! Give it a week or two and see if you can find a 150 w a decent table, you can part it out and make more than you bought it for in most cases. If not, Ill send 22 pounds of cast iron your way. It would **** to pay more for a table than you did for the whole press though.
Any GJers closer to the east coast than me with a 150 table, I'm as far away from Dwight in the lower 48 as it gets lol
Any GJers closer to the east coast than me with a 150 table, I'm as far away from Dwight in the lower 48 as it gets lol
Dwight, did you see the 150 selling on Craigslist near Franklin and Ashville. Some guys is selling several tools and looks like he is willing to deal.

Radal arm sawand Joyner and two electric garage door opener‘s -...
All craftsman tools and two craftsman electric garage door openers half horse power might trade them if you have something I’m interested in828-342-898seven
asheville.craigslist.org