To avoid these ads, REGISTER NOW!

Craftsman king Seeley drill press

gregtroy52

Member
Joined
Dec 21, 2025
Messages
17
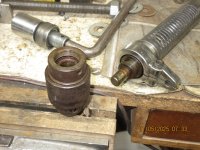
I’m working on an old craftsman 103.23640. I believe it’s from 1951 king seeley. It has a Jacobs 633c 33 taper chuck, and I’m having trouble getting it apart. I loosened the lock nut until it stopped but still can’t get the chuck to separate from the spindle. I was hoping someone would be able to tell me what I’m doing wrong.
 

Attachments

  • IMG_2005.jpeg
    IMG_2005.jpeg
    889.4 KB · Views: 27
  • IMG_2006.jpeg
    IMG_2006.jpeg
    621.1 KB · Views: 17
  • IMG_2007.jpeg
    IMG_2007.jpeg
    674.6 KB · Views: 15
  • IMG_2008.jpeg
    IMG_2008.jpeg
    670 KB · Views: 19
  • IMG_1783.jpeg
    IMG_1783.jpeg
    539 KB · Views: 21
  • IMG_1784.jpeg
    IMG_1784.jpeg
    470.2 KB · Views: 20
  • IMG_1785.jpeg
    IMG_1785.jpeg
    833.1 KB · Views: 19
  • image.jpg
    image.jpg
    898.9 KB · Views: 22
To avoid these ads, REGISTER NOW!

FrankLee

Well-known member
Joined
Sep 13, 2010
Messages
3,617
Location
seMI, 48317
I don’t think you’re doing anything wrong except underestimating the amount of force required to pop off the chuck. You have to keep turning the nut to force the chuck off the taper.
What tools are you using?

Where are you located?
 
Last edited:
OP
G

gregtroy52

Member
Joined
Dec 21, 2025
Messages
17
Pocatello Idaho
Ok that makes sense. I had a large Allen wrench in the jaws and was using the end of the chuck key, but it started to bend. So i definitely need to use better tools. I was looking at getting a spanner wrench, but not sure which one to get. Or maybe you have another recommendation.
 

FrankLee

Well-known member
Joined
Sep 13, 2010
Messages
3,617
Location
seMI, 48317
Pocatello Idaho
Ok that makes sense. I had a large Allen wrench in the jaws and was using the end of the chuck key, but it started to bend. So i definitely need to use better tools.
Yeah. After 75 years, using that chuck key is futile.

I was looking at getting a spanner wrench, but not sure which one to get. Or maybe you have another recommendation.
I don't know what the correct size is for a commercially available pin spanner. I make my own which, IMO, is MUCH better and not difficult to fabricate.
https://www.garagejournal.com/forum/threads/craftsman-drill-press.227480/page-143#post-11453342

1768477797912.png

1768477923763.jpeg 1768478005127.jpeg
 
Last edited:

FrankLee

Well-known member
Joined
Sep 13, 2010
Messages
3,617
Location
seMI, 48317
@gregtroy52,

Check out Jeff's Shop video regarding chucks.

Jeff is a member here, @11b30b4, and has many video series on these drill presses. I don't think he has a series on the Craftsman 80 model, but it is virtually the identical to a later Craftsman 100.

 
OP
G

gregtroy52

Member
Joined
Dec 21, 2025
Messages
17
@gregtroy52,

Check out Jeff's Shop video regarding chucks.

Jeff is a member here, @11b30b4, and has many video series on these drill presses. I don't think he has a series on the Craftsman 80 model, but it is virtually the identical to a later Craftsman 100.

I actually watched his series and that’s how I was able to walk through taking everything else apart. He does an excellent job explaining everything step by step. And yea even though his was a different model it was similar enough that I was able to follow his videos. I was tempted to try building a spanner wrench as well because I wasn’t sure which one to buy, and it’d be cheaper to build something. I think that’s probably the route I’ll go. I really appreciate the help. Thank you.
 

FrankLee

Well-known member
Joined
Sep 13, 2010
Messages
3,617
Location
seMI, 48317
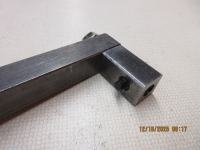
The diameter of the 633C & 3333C collars is 1.546". So the tap drill center punch should be ~0.773" offset from the handle. I repurposed a piece of 5/8" square bar stock. A grade 8, 3/8-16 x 1-1/4" bolt fits perfectly with the 5/8" bar. The set screw is M8 - 1.25 x 20mm.

I made my first pin spanner in August 2016 with 3/4" square bar stock but felt 3/4" was a bit too large.

I've used these many times on often stubbornly stuck chucks. I never broke a dog point off. However, I always pull the spanner toward me and brace myself appropriately for the possibility of a failure.

1768504962689.png
 
Last edited:
To avoid these ads, REGISTER NOW!

Snip's

Well-known member
Joined
Apr 29, 2017
Messages
1,866
Location
Ohio
This worked for me when I got a benchtop Craftsman at an estate sale and wanted to disassemble the drill press...

I cut down a pop can in half and added about a half of cut down pop can of 0W30 engine oil I heated on a hot plate in the garage...
Dipped the chuck end into the hot oil bath for a minute or three... Caused the chuck to expand ever so slightly and came right off...
The hot oil was good for lubricating the internals as a side benefit... I let it drain overnight on some paper towels...

Just make sure there is zero oil on the tapered chuck and spindle surfaces when reassembled...

As bought...
IMG_1895 2.JPG
 
OP
G

gregtroy52

Member
Joined
Dec 21, 2025
Messages
17
The diameter of the 633C & 3333C collars is 1.546". So the tap drill center punch should be ~0.773" offset from the handle. I repurposed a piece of 5/8" square bar stock. A grade 8, 3/8-16 x 1-1/4" bolt fits perfectly with the 5/8" bar. The set screw is M8 - 1.25 x 20mm.

I made my first pin spanner in August 2016 with 3/4" square bar stock but felt 3/4" was a bit too large.

I've used these many times on often stubbornly stuck chucks. I never broke a dog point off. However, I always pull the spanner toward me and brace myself appropriately for the possibility of a failure.

The diameter of the 633C & 3333C collars is 1.546". So the tap drill center punch should be ~0.773" offset from the handle. I repurposed a piece of 5/8" square bar stock. A grade 8, 3/8-16 x 1-1/4" bolt fits perfectly with the 5/8" bar. The set screw is M8 - 1.25 x 20mm.

I made my first pin spanner in August 2016 with 3/4" square bar stock but felt 3/4" was a bit too large.

I've used these many times on often stubbornly stuck chucks. I never broke a dog point off. However, I always pull the spanner toward me and brace myself appropriately for the possibility of a failure.

1768504962689.png
I think I can probably handle making something like this. Just to make sure I’ve got it right, Does the m8 set screw screw in from the back side with an Allen wrench, or do you twist it in from the dog point side. Sorry if that’s a dumb question I’m new at this and really don’t want to mess it up.
 
OP
G

gregtroy52

Member
Joined
Dec 21, 2025
Messages
17
This worked for me when I got a benchtop Craftsman at an estate sale and wanted to disassemble the drill press...

I cut down a pop can in half and added about a half of cut down pop can of 0W30 engine oil I heated on a hot plate in the garage...
Dipped the chuck end into the hot oil bath for a minute or three... Caused the chuck to expand ever so slightly and came right off...
The hot oil was good for lubricating the internals as a side benefit... I let it drain overnight on some paper towels...

Just make sure there is zero oil on the tapered chuck and spindle surfaces when reassembled...

As bought...
IMG_1895 2.JPG
I’ll keep this in mind as well. I read some tips about using a little heat, thank you.
 
OP
G

gregtroy52

Member
Joined
Dec 21, 2025
Messages
17
Either way. The hole is tapped through. I used a thread locker on this one.

On my first one I had a long set screw with a jam nut.
1768517935317.png
Ok thank you, doesn’t seem too hard to make and I think I have everything to do it except the m8 screw so that should work well.

I don’t suppose you have any suggestions on making a depth stop bolt. I’ve got a couple different ideas in mind just curious what you think. It’s also missing release knobs for the head lock bolt and the adjustable table. I was kind of thinking a socket welded to a short extension and bent to an angle. Then I was going to try to clean it up on a grinder, drill and tap a set screw to keep it on the bolt. It won’t look nearly as nice as the right parts but hopefully it’ll turn out decent and should be functional.
 

Attachments

  • IMG_2028.jpeg
    IMG_2028.jpeg
    230.6 KB · Views: 8
  • IMG_2029.jpeg
    IMG_2029.jpeg
    279.9 KB · Views: 11

FrankLee

Well-known member
Joined
Sep 13, 2010
Messages
3,617
Location
seMI, 48317
Ok thank you, doesn’t seem too hard to make and I think I have everything to do it except the m8 screw so that should work well.

I don’t suppose you have any suggestions on making a depth stop bolt. I’ve got a couple different ideas in mind just curious what you think.
Those feed stop rods regularly show up on ebay. There are three now, but IMO, they are overpriced and/or missing the knurled nuts.

When searching for the rod, you can get a longer one from a Craftsman 100 and cut it down. I've done that several times. Your original feed stop rod is threaded 5/8-18 with two flats that are 7/16" apart. Keep in mind that the later 100 and 150 feed stop rods are ACME threaded 5/8-12.

For a quick temporary solution, you can use a length of 3/8-16 all-thread and several hex nuts. Bolt the all-thread to the bracket, one nut on each side., and use another two nuts for adjusting feed depth.

It’s also missing release knobs for the head lock bolt and the adjustable table. I was kind of thinking a socket welded to a short extension and bent to an angle. Then I was going to try to clean it up on a grinder, drill and tap a set screw to keep it on the bolt. It won’t look nearly as nice as the right parts but hopefully it’ll turn out decent and should be functional.
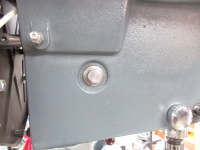
Do yourself a big favor and do not use a lever handle on the head lock. Keep the standard bolt. There is no reason to to have a handle once the head is set and locked. The head is rarely moved. I removed my handle a long time ago after I accidentally hit a lever with my elbow on a different refurb. The head crashed down about 10" to the table.
1768520635279.png

I may have a later one-piece lock handle for the table; I'll have to check. I am not a fan of those separate zamac handles.
1768520525989.jpeg
 
Last edited:

jd5000

Well-known member
Joined
Jan 17, 2024
Messages
146
Location
Massachusetts
Ok thank you, doesn’t seem too hard to make and I think I have everything to do it except the m8 screw so that should work well.

I don’t suppose you have any suggestions on making a depth stop bolt. I’ve got a couple different ideas in mind just curious what you think. It’s also missing release knobs for the head lock bolt and the adjustable table. I was kind of thinking a socket welded to a short extension and bent to an angle. Then I was going to try to clean it up on a grinder, drill and tap a set screw to keep it on the bolt. It won’t look nearly as nice as the right parts but hopefully it’ll turn out decent and should be functional.
If you decide not to make one, I think this is the one I used on mine

 
OP
G

gregtroy52

Member
Joined
Dec 21, 2025
Messages
17
Those feed stop rods regularly show up on ebay. There are three now, but IMO, they are overpriced and/or missing the knurled nuts.

When searching for the rod, you can get a longer one from a Craftsman 100 and cut it down. I've done that several times. Your original feed stop rod is threaded 5/8-18 with two flats that are 7/16" apart. Keep in mind that the later 100 and 150 feed stop rods are ACME threaded 5/8-12.

For a quick temporary solution, you can use a length of 3/8-16 all-thread and several hex nuts. Bolt the all-thread to the bracket, one nut on each side., and use another two nuts for adjusting feed depth.


Do yourself a big favor and do not use a lever handle on the head lock. Keep the standard bolt. There is no reason to to have a handle once the head is set and locked. The head is rarely moved. I removed my handle a long time ago after I accidentally hit a lever with my elbow on a different refurb. The head crashed down about 10" to the table.
1768520635279.png

I may have a later one-piece lock handle for the table; I'll have to check. I am not a fan of those separate zamac handles.
1768520525989.jpeg
I have a couple pieces of 5/8 all thread and was thinking for the depth stop, I’d try to grind the two flat sides and maybe weld a smaller bolt to the bottom to attach to the bracket. But it might not work, but was going to try it and see how it goes. They do seem pretty pricey for the actual part. I paid $40 for the press so it’s hard to spend more on parts than the machine for now, and i like the idea of being able to make one.
 
To avoid these ads, REGISTER NOW!
Top Bottom