jimgood
Well-known member
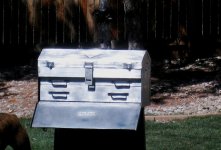
I inherited a Craftsman toolbox from my father and I'm pretty sure he inherited it from his father. I'm guessing this thing was made in the 40's or 50's. It came with an assortment of sockets, a 3/4" drive ratchet and some other odds and ends, none of which I need. Everything was pretty filthy. It looks to have been repainted at some point with the original mint green hammer finish paint covered with some half-assed green paint.
View media item 59064
View media item 59065
View media item 59066
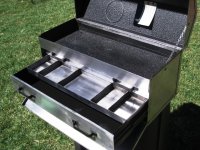
I'm going to restore it, modify it and put it to use for my riveting tools as my current box is tiny and the tools and rivets don't fit in it any more. The modifications will really just be using copper rivets instead of spot welds. I'm going for that bare metal and copper look.
I'm doing it the hard way since the rust is really bad and I can't wrap my head around how to remove it from deep in the corners and in the seams. I'm not fond of using chemicals though I did try some spray stuff I got at Tractor Supply. It's acid based and turns the rust to zinc oxide (?). Whatever. Did I mention I don't like chemicals? It did this but that's as far as I got.
View media item 59069
I started disassembly by drilling out the riveted hardware. Some of the rivets were 1/8", like these and others were 3/16". The handle was relatively easy to clean up with a wire wheel.
View media item 59067
View media item 59068
View media item 59074
The latches are going to require some work to get them cleaned up. They hinge on a rivet but I'm not sure I want to risk taking them apart. The rivet looks specialized.
The placard is very thin stamped aluminum. I'm hoping I can just remove the paint with acetone.
View media item 59075
I could tell that there was still a lot of gunk and rust in the seams where parts are spot welded together. So, I decided that if they could assemble it with spot welds, I could disassemble it by drilling them out. Finding them is the tricky part.
Sometimes I could see them through the paint. Sometimes a little wire brushing would reveal them. I could also guess their approximate location by how tight the seam was. There's usually a slight gap between the welds so the seam will be tight at the welds. Even then, there were a couple of places where the only thing I had to go on was a slight anomaly. Once I found them, I circled them then went back and center punched them. I drilled them out with a standard 3/16" HSS bit.
View media item 59071
View media item 59072
This was removed from the back side of the above. It's the rest for the tool tray. It was spot welded on the side and at the front and back of the box. This shows just how much gunk and rust was in the seams.
View media item 59073
I did the same with the tool tray. The handle is just bent sheet metal with 2 tabs on each end. Each tab had one spot weld.
View media item 59076
View media item 59077
View media item 59079
The socket divider was a ***** but I found that, if I wiggled it back and forth, I could see where it would and wouldn't move. Where it didn't move was the approximate location of the welds. Once I figured out the approximate location, I flipped it over and wire brushed the area to find the spot weld.
View media item 59078
View media item 59082
View media item 59081
View media item 59080
View media item 59083
That's all for now. The main box is still intact, other than the tool tray rests and the hardware. But it's going to get the same treatment, though I haven't decided if I'm going to detach the lid from the box yet. I'm a little leery of messing up the alignment of the hinge but it will depend on how frustrated I get trying to clean up the box. Who knows, I may end up trashing the whole thing if I bungle it up too bad.
View media item 59064
View media item 59065
View media item 59066
I'm going to restore it, modify it and put it to use for my riveting tools as my current box is tiny and the tools and rivets don't fit in it any more. The modifications will really just be using copper rivets instead of spot welds. I'm going for that bare metal and copper look.
I'm doing it the hard way since the rust is really bad and I can't wrap my head around how to remove it from deep in the corners and in the seams. I'm not fond of using chemicals though I did try some spray stuff I got at Tractor Supply. It's acid based and turns the rust to zinc oxide (?). Whatever. Did I mention I don't like chemicals? It did this but that's as far as I got.
View media item 59069
I started disassembly by drilling out the riveted hardware. Some of the rivets were 1/8", like these and others were 3/16". The handle was relatively easy to clean up with a wire wheel.
View media item 59067
View media item 59068
View media item 59074
The latches are going to require some work to get them cleaned up. They hinge on a rivet but I'm not sure I want to risk taking them apart. The rivet looks specialized.
The placard is very thin stamped aluminum. I'm hoping I can just remove the paint with acetone.
View media item 59075
I could tell that there was still a lot of gunk and rust in the seams where parts are spot welded together. So, I decided that if they could assemble it with spot welds, I could disassemble it by drilling them out. Finding them is the tricky part.
Sometimes I could see them through the paint. Sometimes a little wire brushing would reveal them. I could also guess their approximate location by how tight the seam was. There's usually a slight gap between the welds so the seam will be tight at the welds. Even then, there were a couple of places where the only thing I had to go on was a slight anomaly. Once I found them, I circled them then went back and center punched them. I drilled them out with a standard 3/16" HSS bit.
View media item 59071
View media item 59072
This was removed from the back side of the above. It's the rest for the tool tray. It was spot welded on the side and at the front and back of the box. This shows just how much gunk and rust was in the seams.
View media item 59073
I did the same with the tool tray. The handle is just bent sheet metal with 2 tabs on each end. Each tab had one spot weld.
View media item 59076
View media item 59077
View media item 59079
The socket divider was a ***** but I found that, if I wiggled it back and forth, I could see where it would and wouldn't move. Where it didn't move was the approximate location of the welds. Once I figured out the approximate location, I flipped it over and wire brushed the area to find the spot weld.
View media item 59078
View media item 59082
View media item 59081
View media item 59080
View media item 59083
That's all for now. The main box is still intact, other than the tool tray rests and the hardware. But it's going to get the same treatment, though I haven't decided if I'm going to detach the lid from the box yet. I'm a little leery of messing up the alignment of the hinge but it will depend on how frustrated I get trying to clean up the box. Who knows, I may end up trashing the whole thing if I bungle it up too bad.
Last edited:


")