To avoid these ads, REGISTER NOW!

Crawl Space to Garage...

robs400

Well-known member
Joined
Aug 19, 2010
Messages
116
Location
Central MA.
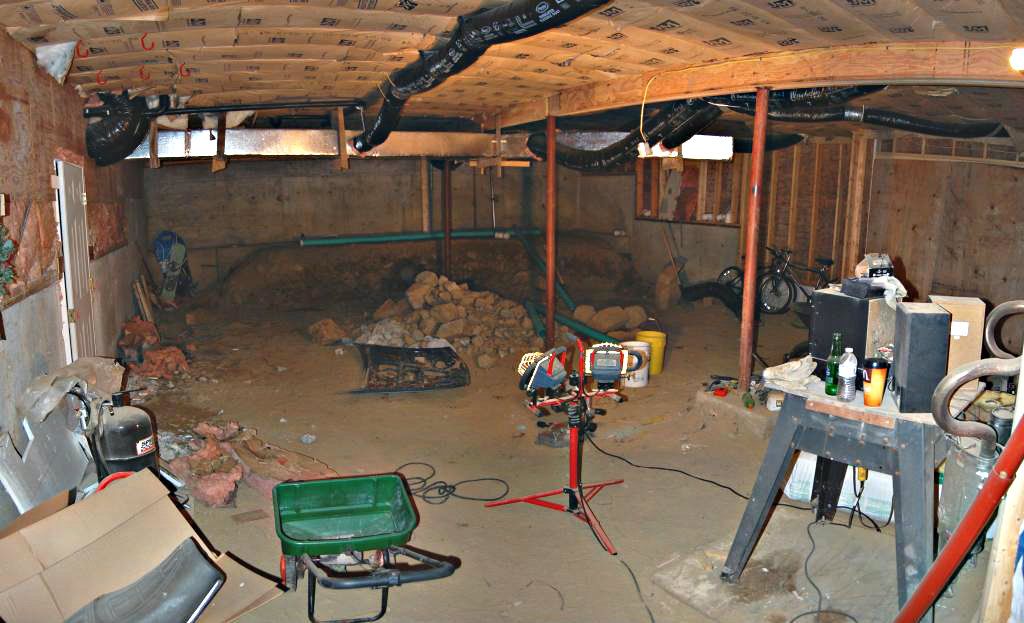
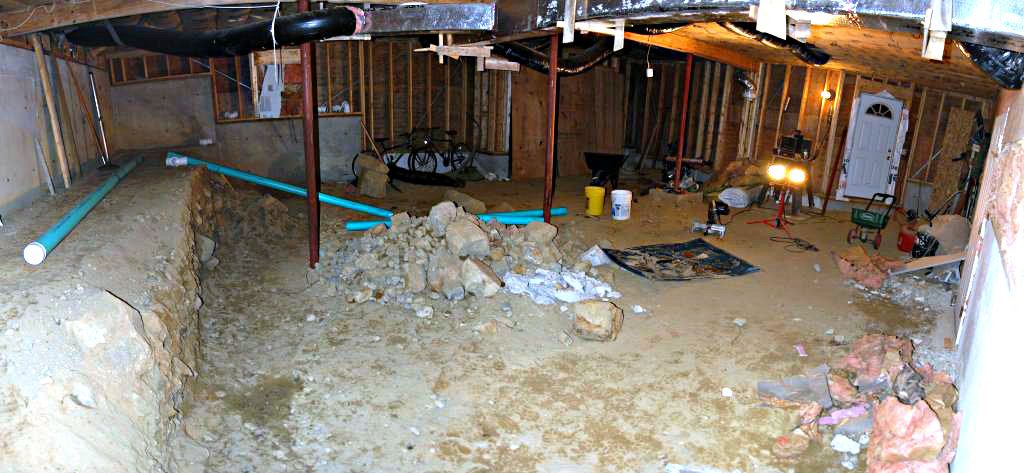
As the title mentions, I am in the middle of making what was originally a crawl space into a useable work space. Its been an ongoing project for nearly two years now and just last week I had a hole cut in the wall that will end up being a garage door. I have a lot of work left but the end is at least in sight, all tho still too far away for my liking.

I have talked to the concrete guy about a few little hiccups in the slab that make it slightly non-standard. In the discussions with him I brought up wanting a vapor barrier under the slab. He said this is standard, and typically 6 mil poly is used.

Reading into this lightly I found that 6 mil poly is not all that great tho. I really want to make sure this space is dry and want to do whatever I can at this stage in the project to help with that in the future. I have read that poly has a limited lifespan and eventually will disappear under the slab. How is this acceptable?

I'm looking for other options/input that people can suggest for a homeowners budget.

And of course a photo for good measure....
2012-03-28_21-03-42_818.jpg
 
To avoid these ads, REGISTER NOW!

Kevin54

MEMBER EMERITUS
Joined
Jan 12, 2005
Messages
29,341
Location
Urbana, Ohio
Did you dig all of that out by hand, or how did you do it? How high is the ceiling so far?

I do have to say, if you've done that by hand, you have way more ambition than I have. I'm looking forward to seeing some more pics of this job!!! :beer:
 

BDAZSVT

Well-known member
Joined
Jun 22, 2010
Messages
204
Is your foundation and footers deep enough to dig that far down?
 

uniballer

Well-known member
Joined
Aug 6, 2012
Messages
2,567
Location
bedford, va
Is your foundation and footers deep enough to dig that far down?

Did you dig all of that out by hand, or how did you do it? How high is the ceiling so far?

I do have to say, if you've done that by hand, you have way more ambition than I have. I'm looking forward to seeing some more pics of this job!!! :beer:


The have laborers for that!:lol_hitti

Great job thus far tho!:rocker:
 

Charles (in GA)

Well-known member
Joined
Jan 11, 2006
Messages
12,489
Location
50 mi south of Atlanta
It can be done, just don't dig out to the foundation, and then pour a good solid wall inside to support the foundation to prevent it from collapsing inside.

The discussion at hand however is the poly. 6 mil is fairly heavy poly and I've never heard if it "disappearing" from under the concrete. I've seen concrete pulled up after years and the poly was still there. The only reason poly will deteriorate is largely exposure to sunlight and weather.

I just replaced a no freeze hydrant. It was in an area that I had bordered with round cement cylinders (test pours) and covered with two layers of typical black poly like used in flower beds and islands in yards, and then it was covered with a layer of 3-4 stone. It was down ten years and was in perfect condition. I put it back down when I finished the hydrant replacement and washed the rock and shoveled it back in place on the poly. Under a slab that will last about forever.

Charles
 
OP
R

robs400

Well-known member
Joined
Aug 19, 2010
Messages
116
Location
Central MA.
Charles, Thanks for providing some insight on my actual question. The contractor I have that has guided me with getting the foundation cut and framing in some openings has many years experience. He had said that he had recently put an addition on a house that he had a slab poured in a few years prior. He had to tear up the slab in a section and noticed that the poly was nearly gone.

After doing some quick reading it looks like poly even when new still allows vapor to pass thru and due to its recycled nature, it can deteriorate. I just want to make sure I'm putting down something that will help keep this area dry, and not for a limited amount of time.

To answer a few of the other questions. Yes this has been done by hand. Its not easy work, A shovel does not go thru this stuff. Its all pick axe work where stone gets separated from the sand. The sand has been taken out in 5 gallon buckets, and the stones rolled out. Now that there is an opening in the side of the basement I can roll the large ones out with the help of a few friends (I hope).

I understand I could hire people to do this, but I have a hard time paying someone to do something that I can do myself. I'm sure people will have other ways this should have been done, but I considered it good use of my time and gave me some exercise at the same time.

Structurally, I am not digging under any footings. I do not feel that I have compromised the foundation in any way. The house is on a hill, and all footings are full depth except the one along the back wall. If you look closely, I have not dug up to that wall. I am in the middle of trying to figure out how to build some type of retainer there all in one pour of the concrete truck.

A few pics along the way....

When I first bought the house....
DSCF2335.jpg


Some progress pics...
DSC_9990.jpg


DSC_9989.jpg


DSC_0383a.jpg


DSC_0961a.jpg


DSC_0555a.jpg


DSC_1252.jpg


All the rocks I have moved outside so far....another load inside ready to go still...

2012-01-24_07-55-06_841.jpg


And a quick cell phone pic of the new hole....

Resampled_2012-10-11_18-10-00_521.jpg
 

Kevin54

MEMBER EMERITUS
Joined
Jan 12, 2005
Messages
29,341
Location
Urbana, Ohio
If you were around my area or visa-versa, I'd be over there taking those rocks off of your hands. I have to pay for rocks like that and to the ones that have them they are a curse. I've been on both sides of the fence though.

Looking forward to seeing your progress pics.
 
OP
R

robs400

Well-known member
Joined
Aug 19, 2010
Messages
116
Location
Central MA.
Progress pics will be slow unfortunately...the ones you see above were over the course of two years.

I know rocks go for good money, but transporting them is a hassle. I have the idea in my head that I will learn how to make decent rock walls and use them in various locations around the yard/house.

I need to do some more digging to relocate and pour a new footing for the last column as well as for a footing on that back half wall/retaining wall. Unfortunately my back is messed up at the moment and it is directly impacting the progress of this project.
 

KULIWOBBY

Well-known member
Joined
Feb 28, 2011
Messages
227
Location
NE Iowa
It almost appears that when the house was built it was intended for a basement floor but never got the dirt out and finished. Maybe I'm wrong but it just looks that way.
 
OP
R

robs400

Well-known member
Joined
Aug 19, 2010
Messages
116
Location
Central MA.
I'm not sure what the original intent was for this space. The house is essentially divided down the middle on the lower/basement level. The one side of the house has a "finished" basement, heated, insulated walls and floor - but no sheetrock, finished flooring/ceiling etc.

The only access to the dirt cave area is thru a man door on an exterior wall, there was no connection back over to the other basement. I did just have the middle wall cut so I will have a door to connect the two areas. Being that the back footing is elevated on this side I figured the builder may have run into ledge. The builder ended up losing the house back to the bank, so I thought this was an attempt to save a few bucks as the one side of the basement is decent sized already.

I started digging with the expectation of finding ledge, but only found lots and lots...and lots of rocks. The three columns were all sitting on footings that were poured on the original grade, which also created more work for me. I still have one more to move, however I am repositioning this post to allow access for a vehicle thru the new garage opening.

This is going to be no giant garage, but I figured if I can dig for free its a "cheaper" version of a garage I can be using while saving for a real one down the road. I plan on being able to keep one car project in there, and a number of motorcycles and some basic woodworking tools to help complete the rest of the finish work inside the house.

I love this site!
 

MScott

Well-known member
Joined
Jun 30, 2009
Messages
1,616
Location
Eastern Ontario
Progress pics will be slow unfortunately...the ones you see above were over the course of two years.

I know rocks go for good money, but transporting them is a hassle. I have the idea in my head that I will learn how to make decent rock walls and use them in various locations around the yard/house.

I need to do some more digging to relocate and pour a new footing for the last column as well as for a footing on that back half wall/retaining wall. Unfortunately my back is messed up at the moment and it is directly impacting the progress of this project.

Do you have an ATV or lawn tractor? If so, get yourself an old car hood (I'm useing one from a Dodge Omni which has sturdy metal latch,) and a hunk of chain to attach the hood to the ATV. I have been moving rocks around my place with one of these and I have moved rocks that weigh up to 500 lbs. Just roll or lever them onto the hood, tow them where you want and roll them off. Got the idea from the stone boat the pioneers used when clearing land.
 
OP
R

robs400

Well-known member
Joined
Aug 19, 2010
Messages
116
Location
Central MA.
Do you have an ATV or lawn tractor? If so, get yourself an old car hood (I'm useing one from a Dodge Omni which has sturdy metal latch,) and a hunk of chain to attach the hood to the ATV. I have been moving rocks around my place with one of these and I have moved rocks that weigh up to 500 lbs. Just roll or lever them onto the hood, tow them where you want and roll them off. Got the idea from the stone boat the pioneers used when clearing land.

No current ATV...the lawn tractor I have thats in working order would not pull them. I do have an old cub cadet lined up for yard duty but it needs some love before its ready to go....thats one of the first projects I have lined up for the new space.

Despite my lack of power equipment I do have good friends that will work for beer....

2012-01-21_11-45-52_917.jpg


Some more than others....

2012-01-21_13-09-33_329.jpg
 

camarotoolman

Banned
Joined
Mar 12, 2011
Messages
2,372
Location
cocoa Fl.
If you are going to cut out for a garage door, do it now, then rent a bob cat to dig it out. My bro did that exact thing to his old place.
 
OP
R

robs400

Well-known member
Joined
Aug 19, 2010
Messages
116
Location
Central MA.
Well I made a choice on the vapor barrier. After going back and forth for far to long between standard poly (most commonly used) and the commercial grade stuff...I bit the bullet and went with the good stuff. I figured for the amount of time I have invested in this project I would hate to have the basement garage end up being damp because I cheaped out on something that I could no longer replace/fix.

The stuff I ended up going with is A Raven product, 15 mils thick that lets very little gas thru it and will stand up to being in contact with earth/concrete for many years without degradation.

I thought I was much closer to getting the slab poured than I have discovered I actually am. I spent a lot of time this past weekend and week (with the help of friends) removing more stone and cutting back the banking.

A few more progress pics...

DSC_1724.jpg


DSC_1728.jpg


basement_11512.jpg


basement_02_11512.jpg


basement_01_11512.jpg


I'm renting a jack hammer saturday to get some trenches in there to bury a bunch of pipe. The pipe system I am trying to lay down is for radon removal as well as pulling out any humidity from under the slab which should help ensure it stays dry in there as well.

I was hoping I could use the green pipe seen in the pictures, but ended up switching over to all PVC schedule 40 as I could not get the fittings I needed to go with the green stuff.
 

fsdogwood

Well-known member
Joined
Oct 28, 2010
Messages
195
Location
RTP, NC
If you were around my area or visa-versa, I'd be over there taking those rocks off of your hands. I have to pay for rocks like that and to the ones that have them they are a curse. I've been on both sides of the fence though.

Looking forward to seeing your progress pics.

Same here, I'll have to buy rock
 

roblouvasz

Well-known member
Joined
Nov 12, 2011
Messages
1,314
Location
Somewhere between the end of the line and the midd
First of all I think you get the "crazy project of the year" award for starting this project. But, that being said I think most of us on GJ likely would have done the same thing. You are a shining example of what us guys will do to have some place to be able to tear apart, fix, build, and hopefuly put things back together again. On a serious note, I would recomend not tapping into your existing heating/cooling if you have forced air system since you plan on working on atv's tractors, etc. You don't want to pull fumes into the system or into the house. Keep up the good work and keep us posted!
 
To avoid these ads, REGISTER NOW!

lakee911

Well-known member
Joined
Sep 8, 2012
Messages
53
Location
Columbus, OH
If you wanted to remove that ledge in the back, what you need to do is dig out sections about 4' wide every 8' or so and then pour a new footer under there and pour or lay in a new wall up to the existing.. Then you move over and do it again, dig out a section 4' wide and pour a new footer and pour or lay in a new wall up to the existing. Finally, remove the last 4' and you'll have a complete wall. You can even put drain tile on the outside doing this ... just connect up each section as you go.

The idea is you don't undermine the entire foundation at once ... just a little here and the existing acts as a bridge over the area where you are working.
 
OP
R

robs400

Well-known member
Joined
Aug 19, 2010
Messages
116
Location
Central MA.
I dont know about the craziest project of the year...I see lots of impressive stuff on here. Just about anyone can dig dirt, and its free to do it so I look it as a good use of any spare time I have had.

I'm actually hoping that it will stay fairly warm in there without the addition of heat. I plan on insulating the walls and putting up some sheetrock and I think that will keep it mild enough out there for me. Its partially underground, the shared wall is heated, and the ceiling is already warm.

I really hope I can get a big part of the remaining work finished up this weekend and dial in a concrete date! Its nice to get some positive feedback, my gf just thinks I am crazy HA!

- The idea of moving that ledge back def. crossed my mind. I have already spent a lot of time in there tho, and I'm looking at this as a "gateway" garage, something that will hold me over until I can afford a larger detached structure. Being that I can only get one vehicle in this area, I was willing to lose the extra floor space. It will still have a slab on it so I figured it will be a good place to designate some storage that I would be using anyways. If this stuff wasnt so terrible to dig through I probably would have pursued it a little more.
 
Last edited:

Brian R

Well-known member
Joined
Dec 1, 2009
Messages
591
Location
Chestertown, MD
Been there, done that (or something very similar).
Moved into a 100 year old house that used an old gravity fed heating system with water pipes 4 inches wide and approx. 1 - 2 feet below ceiling. In addition, crawl space was anywhere from 4 - 5 feet deep.

Removed all heating pipes to replace with 1-2 inch copper pipe and were tight to ceiling (that was an absolute fortune in materials but I can now sweat pipe with the best of them).

Dug out 2-3 feet of dirt to get a total of 7 feet of headroom.

Yes, moving dirt is 'free' but having done it once I am now having nightmares looking at your pictures and remembering that backbreaking chore.

I hired out a concrete contractor that also added footers and an approx 9 inch square curb along wall that required additional support.

Other random comments. Our new basement was plenty cool in summer and was heated with only one small propane heater in winter. I don't remember contractor adding vapor barrier before pouring concrete.


Great job!
 

Steevo

Well-known member
Joined
Aug 18, 2009
Messages
8,738
Location
43.49600, -112.04300
That is a lot of work but it will all be worth it when you are there in your new workspace, tinkering on a project while the snow falls outside.
 

STINEY

Well-known member
Joined
Jan 23, 2009
Messages
266
Location
Bucyrus Ohio
Having done nearly the same thing to my 150 year old house, I salute you. :beer:

I also wish to share this. While you may want to punt me for not suggesting it sooner, keep in mind that I didn't discover this time-and-back saver until I was 1/2 done digging 3' lower.

414wl7eQzcL._SL500_AA300_.jpg


The spade bit is like a power shovel, place in position, pull trigger, repeat. Then shovel loose dirt into wheelbarrow/bucket and haul out.

These also work.

41kg9TJuY8L._SL500_AA300_.jpg


Just cap that rear bank with cement, lots of old houses around these parts have similar capped banks where they were dug out years ago. Makes nice sturdy shelving.

Awesome project and great way to gain space at minimal cost!
 

TireTracks

Well-known member
Joined
Nov 11, 2009
Messages
2,397
Location
Yakima,Washington.
You know what I would do with the ledge?
I would keep picking a way at it till it's the right hight and width for step 2-

Pour a concrete shell over it and use it as a workbench. It would be indesctructable.
 

Doug B

Well-known member
Joined
Dec 24, 2008
Messages
1,236
Location
Schroon Lake, NY

Thats gonna be great space when you're done! What size is it? looks like about 22'x30' ish?
As far as the rocks, I built this stone wall mostly from rocks that came out of the excavation for my garage.Took a couple of weeks of Saturday afternoons to build.It was quite relaxing and satisfying(but back-breaking!)
Good luck on your project. Keep us updated on the progress
 

Attachments

  • wall 4.JPG
    wall 4.JPG
    88.3 KB · Views: 109
Last edited:
OP
R

robs400

Well-known member
Joined
Aug 19, 2010
Messages
116
Location
Central MA.
A lot has happened since the last set of pics, biggest change being I now have a real floor!

The jackhammer idea mentioned above would have been handy. Had I have thought of it before I might have invested in one earlier. It def. saved me a lot of back breaking labor while digging the trenches and getting rid of the last few buried rocks.

Here is a pic after the trenches were dug with some of the piping laid down.
VentPiping.jpg


Trenches filled with stone, and concrete retaining wall/slab poured.
Clean_pretamping.jpg


Soil Compacted, New Column and footing in, old one out...getting late at this point...and cold.
posttamping.jpg


Vapor Barrier Down - this was the reason I started this thread. This stuff was expensive, but it was thick, and easy to work with(on the flat areas) Hopefully it helps keep things dry in there. Getting really late at this point - but ready to go for the pour in the morning.
vaporbarrier.jpg


Stopped back at lunch time to see how things went...
slab1.jpg


So far I am happy with it. He spent a good amount of time going over it, and the lower slab has a really smooth finish on it. I'm def. happy with it. I'll be waiting a while before putting anything real heavy on it tho.
 

thrifty bill

Well-known member
Joined
Jan 12, 2011
Messages
490
Location
The Mountains of North Carolina
I did something somewhat similar, at my SC home. House was built on a slope, with a mandoor on the back of the house, with a small 10x15 storage area. One challenge here is that houses are built on piers, with a support pier every seven feet or so. I had an engineer design a beam plan to allow me to remove the piers. Another challenge was that all the mechanical (plumbing and HVAC) was designed to hang down in the crawl space. The last challenge was a low overall head height (7 1/2 feet). And the HOA did not permit a driveway or garage on the rear. So I went with a wide sidewalk and an oversized door. Don't get me started on stupid HOA rules....

I ended up with a 900 sq ft work shop, not ideal due to the low ceiling height, but it did take advantage of wasted space. For the garage door, I went with a golf cart sized door (area was designed for my motocycles).

Scariest part was cutting out a hole in the brick facade wall on the rear of the house, to allow for the large door.
 

hmbemis

Well-known member
Joined
Dec 29, 2009
Messages
1,052
Location
Eastern Massachusetts
Just found this thread... unbelievable project, very cool!

When I was a kid a friend of mine lived in a house and his dad did something similar, except they had to take each bucket of dirt and rock up a set of stairs and outside...

...now that you're basically done, feel free to PM me for a hand since I'm in the neighborhood :lol_hitti
 

justanengineer

Well-known member
Joined
Apr 5, 2011
Messages
7,722
Location
Motor City
Dam, this is one of those projects that makes me wish I was closer as Id volunteer to help. Manual labor + dirt + beer + garage = cool by me. Definitely redefines "man cave."
 

M-technik-3

Well-known member
Joined
Feb 16, 2008
Messages
1,785
Location
Western Mass
Damn that snow must have been from our Halloween storm from last year. Lack of snow must have been a *****. It offered very low friction.

That's some serious hard work to dig out that. Looks impressive. Odd you just didn't put another structure on the property.
 

fergus

Well-known member
Joined
Oct 4, 2009
Messages
1,620
Location
Yolo County CA
THIS IS RAD! Very impressive that you did it all by hand. And you're almost there now. Keep us posted. Definitely one of the coolest things I've seen on here lately.
 

e-tek

Well-known member
Joined
Dec 19, 2007
Messages
10,690
Location
Saskatoon, SK
Fanastic work - and work ethic!! To think I wasted my youth swimming, biking, running (Triathalons) and smoking dope....when I could have been digging myself a garage!

Sure looks good with the floor in it and I know you're gonna go all out with the finishing.
 
To avoid these ads, REGISTER NOW!
Top Bottom