To avoid these ads, REGISTER NOW!

Cutting a Table Top

bczygan

Well-known member
Joined
Nov 4, 2009
Messages
22,002
Location
DETROIT! Arsenal of Scrappers
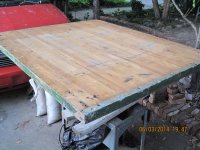
So I have this very nice and solid table top.

It obviously came out of a school, where it was a workbench top and had at least a couple of vises mounted on the corners.

The top is 2 3/16" thick and 4'4" x 4'0".

This top is too big for my use, but could be useful if I cut it in half. I would cut it parallel with the boards that make up the top.

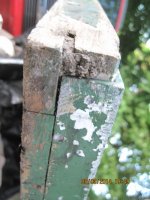
At the ends of the top, aluminum channels are let into the ends of the boards and are screwed in from the bottom.

I have attached some photos showing the overall top as well as closeup photos showing details.

In cutting this top in two, I am facing a few problems.

First, I am finding it impossible to remove the screws that hod on the aluminum channel. They are slotted flat head and 5/8" diameter at the top. My largest screwdriver is way smaller at the tip. And I suspect that even the right size one won't work. What other options are there?

Now, I am thinking that it might not be necessary to remove all these screws and the aluminum channel. If I can cut through the channel, only the one screw on each end, that is in the middle, need be removed. Can I use a typical circular saw to cut through an aluminum channel and a 2 3/16 thick hard wood top?

The last problem is that I suspect that the individual boards in this top are held together by threaded rod and nuts and washers. 10" from each corner are what appears to be a plug.

So how do I handle this? Do I try to cut through it with the circular saw? Or do I drill out the plug and remove the rods before cutting?

Note: Top is bottom side up in the photos.
Bill
 

Attachments

  • IMG_0361.JPG
    IMG_0361.JPG
    102.2 KB · Views: 112
  • IMG_0362.JPG
    IMG_0362.JPG
    75.6 KB · Views: 84
  • IMG_0363.JPG
    IMG_0363.JPG
    90.4 KB · Views: 77
  • IMG_0368.JPG
    IMG_0368.JPG
    82.1 KB · Views: 77
  • IMG_0372.JPG
    IMG_0372.JPG
    74.1 KB · Views: 74
  • IMG_0373.JPG
    IMG_0373.JPG
    100.8 KB · Views: 67
  • IMG_0366.JPG
    IMG_0366.JPG
    87.9 KB · Views: 65
To avoid these ads, REGISTER NOW!

RivennHewn

Well-known member
Joined
Jun 4, 2011
Messages
10,381
Location
PNW
A demo blade in a skilsaw will go thru the aluminum no problem.

I'd lay out the threaded rod, then cut up to and as close as you can with the skilsaw, then change to a metal cutting jigsaw. Then back to the skilsaw……….
 

G_P

Well-known member
Joined
Jul 11, 2010
Messages
7,135
Location
Central CT
Get a proper sized screwdriver and you can get those big slotted screws out. Screws into wood dont rust up and seize, they usually come out fairly easy with the right tools.
 

fivespdcat

Well-known member
Joined
Oct 25, 2011
Messages
1,520
Get the demo blade for sure. Diablo makes a nice one that cuts through anything. I would also pull the aluminum channel, the best way is to use either an electric impact or hand impact. They come out real easy then!
 

Zeke

Well-known member
Joined
Aug 13, 2009
Messages
17,176
Location
Long Beach CA, the sewer by the sea.
AL is NO problem for any typical carbide blade. The steel rods will be but you can get some mileage out of a standard carbide blade hitting steel. It will be toast after the cut but at what, $7 ?, big deal. Wear your eye protection as carbide will be a flyin'.
 

stingry

Well-known member
Joined
Oct 14, 2006
Messages
732
Location
Western Nebraska
Personally, I would attempt to disassemble the top. Remove the screws if possible using the correct tool. If you cannot remove them, drill them out. Remove the aluminum angles, drill out the wood plugs and remove the tie rods. Possibly the top will then just come apart (if glue was not used). If glued, then cut to the size you want and reassemble. Obviously you will have to shorten the tie rods and angles but then you will have a proper top and not hacked up mess.

Cheers
Steve
 

brickG-man

Well-known member
Joined
Jul 31, 2011
Messages
134
Location
Chicagoland
Personally, I would attempt to disassemble the top. Remove the screws if possible using the correct tool. If you cannot remove them, drill them out. Remove the aluminum angles, drill out the wood plugs and remove the tie rods. Possibly the top will then just come apart (if glue was not used). If glued, then cut to the size you want and reassemble. Obviously you will have to shorten the tie rods and angles but then you will have a proper top and not hacked up mess.

Cheers
Steve

:+1:
 

alinc100

Well-known member
Joined
May 26, 2013
Messages
3,037
Location
Dearborn,MI
Personally, I would attempt to disassemble the top. Remove the screws if possible using the correct tool. If you cannot remove them, drill them out. Remove the aluminum angles, drill out the wood plugs and remove the tie rods. Possibly the top will then just come apart (if glue was not used). If glued, then cut to the size you want and reassemble. Obviously you will have to shorten the tie rods and angles but then you will have a proper top and not hacked up mess.

Cheers
Steve

+2
I am in Dearborn and have a full woodshop if you require an assistant.
 
To avoid these ads, REGISTER NOW!

-Brent-

Well-known member
Joined
Dec 23, 2009
Messages
4,709
Location
Utah
A couple ways to remove the screws: 1) Hit up HF and get a wide slotted screwdriver. 2) use a punch and a hammer and tap the screw loose by placing the punch at the outer edge of the slot ant tap it CCW.

Me? I'd disassemble it. Stuff of that era (prewar, likely) is pretty easy to rebuild because they didn't complicate things and they used quality materials.
 

csp

Well-known member
Joined
Mar 23, 2010
Messages
5,720
Location
Franktown, CO
Remove those plugs and just pull the threaded rod out. You're going to want to remove it anyhow if it's cut in half.
 

srmofo

Well-known member
Joined
Oct 15, 2009
Messages
6,161
Location
SW ohio
I'd cut right through the aluminum. Steel on the other hand would be removed, cut to length, and reinstalled in the finished bench.

Did you get the lockers that the table tops were bolted to as well?
 
OP
B

bczygan

Well-known member
Joined
Nov 4, 2009
Messages
22,002
Location
DETROIT! Arsenal of Scrappers
I'd cut right through the aluminum. Steel on the other hand would be removed, cut to length, and reinstalled in the finished bench.

Did you get the lockers that the table tops were bolted to as well?

Would have liked the lockers, but they were long gone.

Found this in a funny place....a house up the street, abandoned and partly burned. House and garage still full of trash. I cleaned out the garage, and the prior owner had used this top with some old square head screws on the corners, for legs, to keep boxes of old trashy paperbacks off the floor.

Saw what it was and grabbed it. VERY heavy!

Full size, it's too big for my 1 car garage, but I have enough bench tops for the garage anyway. I am starting to think it should stay full size, either for someone else, or to use in a wood shop?

Can't decide yet.

Cut up, it would be only 2'x 4'4" tops.

On the other hand, that's a good size for a HF roller, but a little heavy.

Could be a nice top for a small but HD workbench.

Still thinking.

If I do make it smaller, I will go the dis-assembly route.

After reassembly, I will plug all holes and hit the top with a belt sander and refinish it. Oh, and scrape the gum off the underside!

Thanks for the help guys.

Might start with this:

image_11099.jpg


Bill
 
Last edited:

rslaback

Well-known member
Joined
Jul 24, 2010
Messages
4,079
Location
Westcentral Wisconsin
I have some experience with these as a shop teacher. You are going to be way better off to cut it parallel to the rods, perpendicular to the grain.

There isn't really a good way to get those rods out. You will be able to get the plugs out and the nuts off. However the rods, which are 3/8-24 all thread are almost impossible to get out. The way the tables are assembled is that the pieces have 3/8" holes drilled in them. The glued strip is then slid onto the rod. Excess glue ends up filling the threads of the rod and work a lot like lock tite.

If you cut the rods in half in place you'll need to figure out some way to counterbore around the existing rod and then get a nut on it to pull it back tight.

For your time and money you would be a lot better off to cut it the other way, use the angle as the front lip of the counter, put a matching piece of angle on the back if you want and be done with it.
 
OP
B

bczygan

Well-known member
Joined
Nov 4, 2009
Messages
22,002
Location
DETROIT! Arsenal of Scrappers
I have some experience with these as a shop teacher. You are going to be way better off to cut it parallel to the rods, perpendicular to the grain.

There isn't really a good way to get those rods out. You will be able to get the plugs out and the nuts off. However the rods, which are 3/8-24 all thread are almost impossible to get out. The way the tables are assembled is that the pieces have 3/8" holes drilled in them. The glued strip is then slid onto the rod. Excess glue ends up filling the threads of the rod and work a lot like lock tite.

If you cut the rods in half in place you'll need to figure out some way to counterbore around the existing rod and then get a nut on it to pull it back tight.

For your time and money you would be a lot better off to cut it the other way, use the angle as the front lip of the counter, put a matching piece of angle on the back if you want and be done with it.

That's what I like about this forum....no matter how esoteric your question, there is someone with experience and knowledge in that area, who will take the time to assist you.

Bill

Just noticed that I only have 9 more posts until I turn into a pumpkin.
 

rslaback

Well-known member
Joined
Jul 24, 2010
Messages
4,079
Location
Westcentral Wisconsin
That's what I like about this forum....no matter how esoteric your question, there is someone with experience and knowledge in that area, who will take the time to assist you.

Bill

Just noticed that I only have 9 more posts until I turn into a pumpkin.

I should probably tell you as well that there are more than the two rods in that table. The way some of the maufacturer's do it is to glue up the bulk of the table with 4 or 5 rods and then run two or three more courses on each side to cover up the ends of the rods so you don't have visible plugs. The two plugs that you can see are usually covered up by the stationary jaw of the underslung bench vise.

If you want to know where the other rods are, my suggestion would be be to use either a metal detector or get a cylindrical cow magnet and roll it along the table to try to find the other rods. A good stud finder may also work. So might a good compass which would point toward the hidden metal.
 
OP
B

bczygan

Well-known member
Joined
Nov 4, 2009
Messages
22,002
Location
DETROIT! Arsenal of Scrappers
I should probably tell you as well that there are more than the two rods in that table. The way some of the maufacturer's do it is to glue up the bulk of the table with 4 or 5 rods and then run two or three more courses on each side to cover up the ends of the rods so you don't have visible plugs. The two plugs that you can see are usually covered up by the stationary jaw of the underslung bench vise.

If you want to know where the other rods are, my suggestion would be be to use either a metal detector or get a cylindrical cow magnet and roll it along the table to try to find the other rods. A good stud finder may also work. So might a good compass which would point toward the hidden metal.

Now you are just trying to make my head explode....with too much good info.!

Leaving it whole is looking better. Maybe mount it on a roll around cart. Could mount 4 grinders and 4 vises on it.

Hmmmmmmmm............!
 
Last edited:

Saw

Well-known member
Joined
May 28, 2014
Messages
45
Location
Illinois
Decisions, decisions, you might build a custom base on casters with brakes so you can move it out to use and out of the way when not in use. Almost a shame to cut it up.
 
To avoid these ads, REGISTER NOW!
Top Bottom