To avoid these ads, REGISTER NOW!

Deck flashing best practice?

jar944

Well-known member
Joined
Jul 26, 2010
Messages
5,953
Location
Northern VA
I'm about to start on my deck, (ledger attached with epdm waterproof membrane) and plan on running the membrane up the side of the house 6" or so with a layer of peel and stick bridging between the membrane and sheathing (under the housewrap). I see trex and others offer a 12" flashing tape for this application. Seems more like a requirement of the rain escape than something specifically better?

Thoughts or opinions on the best way to waterproof this assembly?

 
To avoid these ads, REGISTER NOW!
OP
J

jar944

Well-known member
Joined
Jul 26, 2010
Messages
5,953
Location
Northern VA
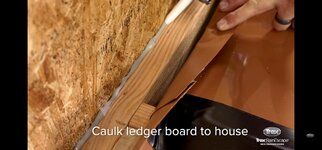
Trex has several Youtubes out on how to install ledger board and flashing. Very helpful for me once get to that point

I checked out their flashing procedures for the rainescape product, and was less than impressed with the methods. The 12" tape they offer is the only way that system works.

My plan at this point is no flashing between the ledger and band joist, and g-tape over the epdm on each joist and against the house.
 
OP
J

jar944

Well-known member
Joined
Jul 26, 2010
Messages
5,953
Location
Northern VA
With my deck I will use those plastic puck spacers between ledger and the house to forgo that flashing detail.


This deck will be fully dried in with waterproof membrane. Its effectively a low slope/flat roof with a deck on top. The intent being a dry living space underneath.

Screenshot_20230915-135054_Chrome.jpgScreenshot_20230915-135207_Chrome.jpgScreenshot_20230915-135244_Chrome.jpg
 

acer66

Well-known member
Joined
Dec 4, 2010
Messages
4,418
Location
Western North Carolina
This deck will be fully dried in with waterproof membrane. Its effectively a low slope/flat roof with a deck on top. The intent being a dry living space underneath.

Screenshot_20230915-135054_Chrome.jpgScreenshot_20230915-135207_Chrome.jpgScreenshot_20230915-135244_Chrome.jpg
I think I just replied at your post on advrider too.

But you raise a good point of using those pucks because I want to do the same thing as you.

Might just run the membrane up and underneath the siding and tape it to the underlayment which is the zip system.
 
Last edited:
OP
J

jar944

Well-known member
Joined
Jul 26, 2010
Messages
5,953
Location
Northern VA
I think I just replied at your post on advrider too.

But you raise a good point of using those pucks because I want to do the same thing as you.

Might just run the membrane up and underneath the siding and tape it to the underlayment which is the zip system.

If you want waterproof, that's the only way I'm aware of to actually make it water tight.

I've seen some flash behind the ledger with 12" tape, then lap over the ledger witn 6" tape, then lap over all of that with another 12" on top of the membrane, with or without another aluminum flashing under the bottom corse of siding. It all seems excessive (famous last words)
 

tarmy

Well-known member
Joined
May 28, 2014
Messages
4,707
Location
Nor Cal
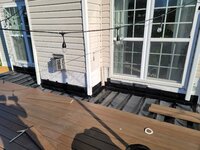
You can sorta see what I did when I rebuilt my deck. I flashed the main 2x12 PT ledger against the house and used membrane to completely seal the lags/thru bolts into the main structure of the house. Then I used the plastic pucks to fasten the PT 2x8 deck ledger board to the main house ledger. Then hung the deck joists from that. Has worked great thru 2 winters so far. The pics show old deck I was working around until it could be torn down.
IMG_2594.jpegIMG_2770.jpegIMG_2802.jpegIMG_2934.jpeg
 

rancherbill

Well-known member
Joined
Oct 18, 2007
Messages
5,335
Location
Foothills County, Alberta, Canada
I checked out their flashing procedures for the rainescape product, and was less than impressed with the methods. The 12" tape they offer is the only way that system works.

My plan at this point is no flashing between the ledger and band joist, and g-tape over the epdm on each joist and against the house.
ummm, if you are not going to take instructions from a big company that has been involved in 100,000 thousands of deck what do you expect to get from GJ? I am curious.
 

hefnerconstructionlc

Well-known member
Joined
Nov 1, 2016
Messages
665
Location
Kansas
Deck we are building right now. Tape top side of joist. Pucks on backside of ledger. Roll flashing on rim joist then galvanized flashing behind siding. Then galvanized L flashing on top of ledger/joist. Then plastic L flashing on top of deck material. Redundancy is key.
 

Attachments

  • IMG_20230915_163432232.jpg
    IMG_20230915_163432232.jpg
    839.6 KB · Views: 55
  • IMG_20230915_163419689.jpg
    IMG_20230915_163419689.jpg
    606.1 KB · Views: 54
  • IMG_20230915_163401835.jpg
    IMG_20230915_163401835.jpg
    632.1 KB · Views: 50

larry4406

Well-known member
Joined
Jan 27, 2006
Messages
19,558
Location
Northern Virginia
On our new construction decks we apply a membrane to the house where the ledger will attach. This membrane is about 24" and extends below the ledger by about 1-2" with the balance above the ledger. So assuming 2x10 joists (net 9.5" deep), the membrane extends about 12" above the ledger.

Our homes use rim board so we lag directly to the house (some counties I build in do not permit lags and instead require machine bolts with nuts to clinch the ledger, membrane, and rim board).

After the ledger is installed, we then install a metal Z-flash over the ledger. This is sticky flash taped to the membrane discussed above. The Z-flash has a small downward bent lip with drip edge on the joist side. This turns out water to the exposed side of the ledger and away from the home.

Sorry I have no experience with the membrane system to create a dry space below the elevated deck so I will continue to lurk and see this unfold.
 
Last edited:
OP
J

jar944

Well-known member
Joined
Jul 26, 2010
Messages
5,953
Location
Northern VA
ummm, if you are not going to take instructions from a big company that has been involved in 100,000 thousands of deck what do you expect to get from GJ? I am curious.

This is just bad practice, you are likely expected to buy the additional flashing and never do it this way.. but they are suggesting it's appropriate as a complete solution, and it's not.

Screenshot_20231004_093613_YouTube.jpgScreenshot_20231004_093628_YouTube.jpgScreenshot_20231004_093643_YouTube.jpgScreenshot_20231004_093648_YouTube.jpg
 
Last edited:
OP
J

jar944

Well-known member
Joined
Jul 26, 2010
Messages
5,953
Location
Northern VA
Deck we are building right now. Tape top side of joist. Pucks on backside of ledger. Roll flashing on rim joist then galvanized flashing behind siding. Then galvanized L flashing on top of ledger/joist. Then plastic L flashing on top of deck material. Redundancy is key.

I'm surprised you pre-install the hangers, do you notch the joists to the all land at the same height, or are you marking and measuring each joist and compensating with the hanger placement?
 
To avoid these ads, REGISTER NOW!

hefnerconstructionlc

Well-known member
Joined
Nov 1, 2016
Messages
665
Location
Kansas
You can do it either way, each has pros and cons. This project has a center support beam, rimjoist, and ledger. It was easiest for me to layout all three at the same time. The ledger has spacers on back that need oriented, the rimjoist and center beam has a particular fastening schedule, and it seemed to make sense to do all the detail/layout/fiddle at the same time. For the floor joist, I use plastic flat shims for short boards and plane the tops of the tall boards. You could hand fit or measure each individual. Or nail one at a time, like you are suggesting. I found it quickest to just get all hangers up. Then cut each board to fit the span and then trim or shim each board. I have done it both ways.
 
OP
J

jar944

Well-known member
Joined
Jul 26, 2010
Messages
5,953
Location
Northern VA
You can do it either way, each has pros and cons. This project has a center support beam, rimjoist, and ledger. It was easiest for me to layout all three at the same time. The ledger has spacers on back that need oriented, the rimjoist and center beam has a particular fastening schedule, and it seemed to make sense to do all the detail/layout/fiddle at the same time. For the floor joist, I use plastic flat shims for short boards and plane the tops of the tall boards. You could hand fit or measure each individual. Or nail one at a time, like you are suggesting. I found it quickest to just get all hangers up. Then cut each board to fit the span and then trim or shim each board. I have done it both ways.

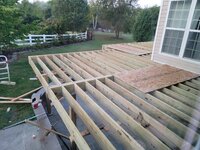
This deck is similar in it has a mid span beam and outside rim/beam. I contemplated notching all the joists, but ended up setting them flush and adding the brackets after. Everything was planed into compliance. 20230920_145919.jpg20230921_070327.jpg20230918_141123.jpg
 

hefnerconstructionlc

Well-known member
Joined
Nov 1, 2016
Messages
665
Location
Kansas
This deck is similar in it has a mid span beam and outside rim/beam. I contemplated notching all the joists, but ended up setting them flush and adding the brackets after. Everything was planed into compliance. 20230920_145919.jpg20230921_070327.jpg20230918_141123.jpg
That make sense, that is also a good way to go, looks very nice.
 

rancherbill

Well-known member
Joined
Oct 18, 2007
Messages
5,335
Location
Foothills County, Alberta, Canada
I'm about to start on my deck, (ledger attached with epdm waterproof membrane) and plan on running the membrane up the side of the house 6" or so with a layer of peel and stick bridging between the membrane and sheathing (under the housewrap).
I re-read the original post, my post, your picture post.

Your picture post of their technique is a very poor installation video. They say in the audio that this technique is for special situations like brick, yet theyare showing OSB. You is not one of the special cases.

Having re-read the thread your initial post is ok. I would however add a 6 inch galvanized "L" flashing. Decks move from settlement storms etc. A nailed flashing covered with EDPM will retain water tightness.
 

ludakris04

Well-known member
Joined
May 16, 2011
Messages
3,774
Location
Maryland
I am so glad I didn't have to do an elevated deck. These are one of the reasons that I decided to do a floating deck instead of attaching it to the house.
 
OP
J

jar944

Well-known member
Joined
Jul 26, 2010
Messages
5,953
Location
Northern VA
I am so glad I didn't have to do an elevated deck. These are one of the reasons that I decided to do a floating deck instead of attaching it to the house.

Positives and negatives there. If you have the elevation you gain usable covered patio space underneath. The downside is it's a bit more complicated to execute.
 

manwithtools

ALLIANCE MEMBER
Joined
Aug 24, 2015
Messages
14,074
Location
Lebanon, TN
This deck is similar in it has a mid span beam and outside rim/beam. I contemplated notching all the joists, but ended up setting them flush and adding the brackets after. Everything was planed into compliance. 20230920_145919.jpg20230921_070327.jpg20230918_141123.jpg
I love it, a man with cabinet making skills building a deck...
.
.
.
I'm the exact same way and so many have laughed at my extra attention to detail. It has not offered me any regrets so far, I think I'll stick to my ways :)
 

duneslider

Well-known member
Joined
Jan 20, 2013
Messages
2,267
Location
Riverton, Utah
The concern I have with what I am seeing in your pictures is the Tyvek behind everything. Any moisture that gets past the tyvek will stay back there and run down the wall. I have always been taught to shingle everything. So, the tyvek should have been cut and overlapped the new deck membranes and those being taped to the wall.

Now, how much water is gonna be behind the tyvek, probably not much at all and its probably not an issue. So, that said, I really don't think you will get bulk water through the tyvek so probably not an issue but I also live in the desert so we don't get a lot of water vapor to be concerned with.
 

larry4406

Well-known member
Joined
Jan 27, 2006
Messages
19,558
Location
Northern Virginia
The concern I have with what I am seeing in your pictures is the Tyvek behind everything. Any moisture that gets past the tyvek will stay back there and run down the wall. I have always been taught to shingle everything. So, the tyvek should have been cut and overlapped the new deck membranes and those being taped to the wall.

Now, how much water is gonna be behind the tyvek, probably not much at all and its probably not an issue. So, that said, I really don't think you will get bulk water through the tyvek so probably not an issue but I also live in the desert so we don't get a lot of water vapor to be concerned with.
WIP and retrofit.

He still has time to slit the Tyvek above the EPDM, use a 16-24” piece of Tyvek tucked under the Tyvek above and over the EPDM below to restore “shingle flow” concept.

Siding repair is last.

The perceived misorder of things happens all the time at my day job. Tyvek the house, cut it to tuck under the flashing for masonry, etc. One by one it sorts out as long as competency is present.

I’ve yet to be on a job where it’s 100% forward and zero rewind.
 
OP
J

jar944

Well-known member
Joined
Jul 26, 2010
Messages
5,953
Location
Northern VA
The concern I have with what I am seeing in your pictures is the Tyvek behind everything. Any moisture that gets past the tyvek will stay back there and run down the wall. I have always been taught to shingle everything. So, the tyvek should have been cut and overlapped the new deck membranes and those being taped to the wall.

Now, how much water is gonna be behind the tyvek, probably not much at all and its probably not an issue. So, that said, I really don't think you will get bulk water through the tyvek so probably not an issue but I also live in the desert so we don't get a lot of water vapor to be concerned with.

The flashing gets another layer at the top (after cutting the house wrap and the tape gets stuck to the sheathing. If you notice the 12" tape isn't always over top of the rubber.

Also everything shown as flashed is getting a gabel roof, and both windows on either side of the chimney will be re-framed with french doors. so belt, suspenders and superglue..


107163.jpg
 
Last edited:

larry4406

Well-known member
Joined
Jan 27, 2006
Messages
19,558
Location
Northern Virginia
@jar944

With so much grade change back there, any idea if you have frost footings in the now on grade areas?

We only put frost footings where needed per the site plan.
 
OP
J

jar944

Well-known member
Joined
Jul 26, 2010
Messages
5,953
Location
Northern VA
@jar944

With so much grade change back there, any idea if you have frost footings in the now on grade areas?

We only put frost footings where needed per the site plan.

I had that same concern / thought, but when I checked while digging the deck footings it looked 24+ below the wall pour.
 

duneslider

Well-known member
Joined
Jan 20, 2013
Messages
2,267
Location
Riverton, Utah
The flashing gets another layer at the top (after cutting the house wrap and the tape gets stuck to the sheathing. If you notice the 12" tape isn't always over top of the rubber.

Also everything shown as flashed is getting a gabel roof, and both windows on either side of the chimney will be re-framed with french doors. so belt, suspenders and superglue..


107163.jpg
Sounds like you have it covered! (y)
 
To avoid these ads, REGISTER NOW!
Top Bottom