To avoid these ads, REGISTER NOW!

Deckover dump trailer build

OP
F

f150skidoo

Well-known member
Joined
Dec 29, 2012
Messages
1,206
Location
Ontario, Canada
Like most trailers the license plate mounting location is usually A after thought and my trailers are no exception. I was struggling with the placement of the plate so that it was easily visible but won't get damaged. The only place I found that would work is to be behind the cavity of the step. So I cut some 14ga sheet metal with lots of cut outs to remove unnecessary weight then bent it up to the final shape. I also mounted the box to the frame so I can roll it out from the shop, but while it was hooked up to the gantry I weighed the trailer. The trailer as pictured weighs 2012lbs, after I install the steel floor, battery. hydraulic pump, and some other miscellaneous parts it should be between 2500-2600 lbs
 

Attachments

  • IMG_0677.jpg
    IMG_0677.jpg
    118.1 KB · Views: 261
  • IMG_0678.jpg
    IMG_0678.jpg
    130 KB · Views: 258
  • IMG_0679.jpg
    IMG_0679.jpg
    81.4 KB · Views: 261
  • IMG_0682.jpg
    IMG_0682.jpg
    147.9 KB · Views: 334
  • IMG_0683.jpg
    IMG_0683.jpg
    151.4 KB · Views: 361
To avoid these ads, REGISTER NOW!
OP
F

f150skidoo

Well-known member
Joined
Dec 29, 2012
Messages
1,206
Location
Ontario, Canada
curious to see the fitment of the fenders, no doubt it will be fabulous


Actually there is no fenders. The picture doesn’t show it but the body of the box is actually 2” wider then the tires. Two things I’m going to do is change the equalizer to a shorter version to lower the bed height and a mud flaps.


Sent from my iPhone using Tapatalk
 

bullnerd

Well-known member
Joined
Sep 17, 2012
Messages
5,690
Location
Jersey
Its perfect!

I'm not a fan of the diamond aluminum.

I think you should make your own on the next trailer.
 

bigguns69

Well-known member
Joined
Aug 23, 2011
Messages
411
Location
Iowa
Nice trailer. I like your tilt down sides. Where did you source the cast pivot bosses from? Compared to buying a new trailer, how much do think you have in it as a percentage of new trailer cost. Any concern with the air gap between the sheet metal sides and the tube structure in regards to moisture and fine debri collecting in there and starting to rust long term? Could caulk the seam with a clear seam sealer after galvanize. Nice project.
 
OP
F

f150skidoo

Well-known member
Joined
Dec 29, 2012
Messages
1,206
Location
Ontario, Canada
Nice trailer. I like your tilt down sides. Where did you source the cast pivot bosses from? Compared to buying a new trailer, how much do think you have in it as a percentage of new trailer cost. Any concern with the air gap between the sheet metal sides and the tube structure in regards to moisture and fine debri collecting in there and starting to rust long term? Could caulk the seam with a clear seam sealer after galvanize. Nice project.

I sourced those parts and many other parts from a trailer supply store locally to me called Cerka industries. I'm roughly half the cost of buying a pre-manufactured trailer, but I also have never seen a a small deck over dump that's galvanized. I imagine that the zinc will fill any nooks and cranny's but if not I will caulk the seams.
 

readhead

Well-known member
Joined
Dec 8, 2012
Messages
6,175
Location
Durango, Co.
When ever we were fabricating pieces to be galvanized we could not have any overlapping parts. in your case I would caulk them after with a good polyurethane. The zinc will not get in the overlaps. Sounds like they already went over vent holes and look at possible hang holes. Very impressive build skills. You could come work in my shop anytime.
 

sweetk30

Well-known member
Joined
Jan 2, 2011
Messages
2,306
Location
finger lakes area upstate ,ny
i would add in some sort of inner fender on the underside of the body . this will keep the tire spray / rocks / chips / **** from blasting the underside of the body .

i know at my old job the trucks that had some sort of full tire arch inner fender flap on the back tires would have a lot less problems than those who didnt have anything and the stuff was able to just splash all over on the underside .

as said before NICE BUILD and were is the plans ? :bowdown:
 
OP
F

f150skidoo

Well-known member
Joined
Dec 29, 2012
Messages
1,206
Location
Ontario, Canada
I was able to pickup the sheet of steel for the floor at the end of last week. Once the floor got cut and welded into place I then welded 16 D rings to the floor. I was originally only going to install 8 D rings but then remembered their is no such thing as to many tie down points. Next I competently disassembled the trailer to prep it for going out for galvanizing. But first I wanted to weigh the dump bed which totaled 1286 lbs. What surprised me when I did the design of the trailer I created a material list with weights. Some things I had to guess the weights of since I did'nt know how I would design them or the thickness, I estimated the box to weigh 1276 lbs so If I deduct the weight of the rigging i'm within a pound or two of the actual weight.
 

Attachments

  • IMG_0699.jpg
    IMG_0699.jpg
    141 KB · Views: 183
  • IMG_0698.jpg
    IMG_0698.jpg
    145.1 KB · Views: 185
  • IMG_0695.jpg
    IMG_0695.jpg
    138 KB · Views: 181
  • IMG_0691.jpg
    IMG_0691.jpg
    127 KB · Views: 181

aczr2k

Well-known member
Joined
Oct 24, 2007
Messages
523
Location
NW Minnesota
The difference in the two trailers is the H&H trailer the tires are under the bed, this one the tires are in the open.

Nice trailer build! I would rethink the fender idea, I wouldn't want the tires chucking rocks at my truck.
 
OP
F

f150skidoo

Well-known member
Joined
Dec 29, 2012
Messages
1,206
Location
Ontario, Canada
Here's a image of a CAM superline deck over dump which is fairly similar to mine. In my case the body of the trailer does cover the width of the trailer tires but doesn't cover down to the center line of the wheel so I then must have mud flaps/ splash guards to control the tire spray (which i was already planning on doing). A good example is when a highway tractors is bob tailing the majority don't have fenders covering their tandem duals but the all have mud flaps which control the tire spray.
 

Attachments

  • DeckoverDumpFrontHero.jpg
    DeckoverDumpFrontHero.jpg
    17.8 KB · Views: 111

bullnerd

Well-known member
Joined
Sep 17, 2012
Messages
5,690
Location
Jersey
It looks to me (hard to tell from the pics) that the box is very close to being centered over the axles?

Do you use a percentage to figure out the axle location?

Actually, now that i looked again, It looks like the box is in a different location in the two earlier pics? Post 41.
 
OP
F

f150skidoo

Well-known member
Joined
Dec 29, 2012
Messages
1,206
Location
Ontario, Canada
It looks to me (hard to tell from the pics) that the box is very close to being centered over the axles?

Do you use a percentage to figure out the axle location?

Actually, now that i looked again, It looks like the box is in a different location in the two earlier pics? Post 41.


I use the industry standard which is 60/40 to the centreline between the tandems. The pictures are all taken at a angle so it can be deceiving.


Sent from my iPhone using Tapatalk
 

Spencer Was Here

Well-known member
Joined
Jan 2, 2006
Messages
327
Location
Western Michigan
Another very nice build. :bowdown:

Two questions. First, how do you like your digital scale? I'd like to pick one up, but of course all the economical models are Made in China. It would be nice to hear a real review, as opposed to trusting the anonymous online reviews.

Second, did/does it bother you at all that the angle of the aluminum storage box doesn't match up to the angle of your trailer frame? With everything else you've designed and fabricated to perfection, I have to believe it affected you somehow.
 
OP
F

f150skidoo

Well-known member
Joined
Dec 29, 2012
Messages
1,206
Location
Ontario, Canada
Another very nice build. :bowdown:

Two questions. First, how do you like your digital scale? I'd like to pick one up, but of course all the economical models are Made in China. It would be nice to hear a real review, as opposed to trusting the anonymous online reviews.

Second, did/does it bother you at all that the angle of the aluminum storage box doesn't match up to the angle of your trailer frame? With everything else you've designed and fabricated to perfection, I have to believe it affected you somehow.

The scale has been really good so far, I have owned it for a few years now and it always works. I have tested it with items with known weights and its been accurate. I would like one that reads a higher weight but my scale is a 1000 kg scale but it actually max out around 2370 lbs

The tool box angle really pissed me off at the beginning but doesn't bug me now. I built the A frame tongue to the standard which is 50 degrees and I assumed that the tool box would match that angle like every other tool box I have ever bought, but I was wrong. I searched the internet for hours for a aluminum tool box that would fit my needs. But all the ones I could find were either to small of more money then I wanted to spend on a toolbox.
 

bullnerd

Well-known member
Joined
Sep 17, 2012
Messages
5,690
Location
Jersey
Soo...the companies that make the tongue mounted tool boxes don't make them to match the industry standard tongue angle? lol!

That's why I said earlier, I'm surprised you didn't make your own box.
 
To avoid these ads, REGISTER NOW!
OP
F

f150skidoo

Well-known member
Joined
Dec 29, 2012
Messages
1,206
Location
Ontario, Canada
My post from yesterday was wrong since the galvanizers called me today to say it was ready for pickup. My buddy is going to take his flatbed trailer tomorrow to go and pick it up.
 
OP
F

f150skidoo

Well-known member
Joined
Dec 29, 2012
Messages
1,206
Location
Ontario, Canada
Its back in the shop and is bright and shiny. The 2 10' doors warped from the heat which is no surprise and simple to straighten in my 50 ton press. But I didn't expect the box to warp so ill have a fun day with hydraulics trying to straighten it out.
 

Attachments

  • IMG_0709-1.jpg
    IMG_0709-1.jpg
    145.9 KB · Views: 235

bigguns69

Well-known member
Joined
Aug 23, 2011
Messages
411
Location
Iowa
Interesting to hear about the warping. Some trailer manufacturers are advertising that they powder coat paint. Given that most powder is cured at about 350 degrees f for 15 minutes, you would think they would experience warping too unless they account for it in their manufacturing processes.

What was the cost difference comparing the galvanizing versus painting if you don't mind giving out the info.
 
OP
F

f150skidoo

Well-known member
Joined
Dec 29, 2012
Messages
1,206
Location
Ontario, Canada
I believe the reason for the box warping was when I welded the floor and the D rings on it pre stressed the material but the frame was stiff enough to stay straight. But once dipped the extra heat warped the box. The box warped in the exact way as it would've from to much heat from welding.
 
OP
F

f150skidoo

Well-known member
Joined
Dec 29, 2012
Messages
1,206
Location
Ontario, Canada
Interesting to hear about the warping. Some trailer manufacturers are advertising that they powder coat paint. Given that most powder is cured at about 350 degrees f for 15 minutes, you would think they would experience warping too unless they account for it in their manufacturing processes.

What was the cost difference comparing the galvanizing versus painting if you don't mind giving out the info.

I don't know for sure but I think the powder coating ovens aren't hot enough to warp the steel. Were as galvanizing the temperature is over twice as hot and the steel structure stays in the zinc bath until the steel reaches the same temperature as the zinc

I don't know a cost of painting since I would normally spray it myself, but I would guess painting would cost me $3-$400 in material. The galvanizing was 52 cents a pound which worked out to $1026.
 
Last edited:
OP
F

f150skidoo

Well-known member
Joined
Dec 29, 2012
Messages
1,206
Location
Ontario, Canada
Finally a bit of a progress update on the trailer. I painted up the axle and jack and I would normally also paint all the axle hardware since it comes uncoated. But I figured since I galvanized the trailer I might as well spend the money and buy all plated suspension hardware. Once I got the lower frame to a rolling chassis so it can be moved it was time to start fixing the major issue. I forgot to check the dump box with a straight edge to know exactly how much it warped but I would guess it was at least a inch. To straighten it I chained a chunk of 8" H beam to the box and I started to us my 4 ton porta-power to straighten it, but did'nt have enough force. Next I grabbed the 8 ton bottle jack from my shop made plate roller which straighten it to within a 1/2" but did'nt have enough force to bend it anymore. So I had to buy a bigger bottle jack and a 12 ton did the trick.
 

Attachments

  • IMG_0715.jpg
    IMG_0715.jpg
    105.5 KB · Views: 193
  • IMG_0714.jpg
    IMG_0714.jpg
    146.6 KB · Views: 187
  • IMG_0711.jpg
    IMG_0711.jpg
    84.5 KB · Views: 187
  • IMG_0713.jpg
    IMG_0713.jpg
    150.6 KB · Views: 202

chickenfarmer

Well-known member
Joined
Aug 20, 2011
Messages
242
Location
Michigan
Well done on the straightening, you are a real professional. That trailer is gonna last a long time

Sent from my SM-G930P using Tapatalk
 
OP
F

f150skidoo

Well-known member
Joined
Dec 29, 2012
Messages
1,206
Location
Ontario, Canada
After I wired up the lower frame I did the final joining of the box to the lower frame. Next I mounted the rear doors which was simple since none of the parts warped from galvanizing, I also mounted the tarp system. The side doors warped from the heat so its a pain to straighten it but I got the passenger side functioning smoothly and fitting decently. But on the drivers side I need to do more straightening for better fitment.
 

Attachments

  • IMG_0721.jpg
    IMG_0721.jpg
    147.8 KB · Views: 210
  • IMG_0718.jpg
    IMG_0718.jpg
    144 KB · Views: 191
  • IMG_0717.jpg
    IMG_0717.jpg
    140.3 KB · Views: 191
  • IMG_0716.jpg
    IMG_0716.jpg
    143.9 KB · Views: 191

shedfullatools

Well-known member
Joined
Apr 10, 2016
Messages
834
Location
Nova Scotia
That is a beautiful trailer :beer: I love the design and function of that rear bumper, cant go wrong with hot galvanized either should last a long time :thumbup:
 

Spencer Was Here

Well-known member
Joined
Jan 2, 2006
Messages
327
Location
Western Michigan
OP, the straightening you've showed is quite impressive. I'm probably not the only one who would enjoy photos and descriptions of your continued efforts to straighten the side.

Also, is your tarp kit from Buyers? If so, is the gear on yours perfectly symmetrical? Meaning, is the geometry (radius) of the gears identical on each side of the teeth? Mine won't lock in place very well, as the wind can actually unroll the tarp even when I have the lever in the locked position.
 
OP
F

f150skidoo

Well-known member
Joined
Dec 29, 2012
Messages
1,206
Location
Ontario, Canada
OP, the straightening you've showed is quite impressive. I'm probably not the only one who would enjoy photos and descriptions of your continued efforts to straighten the side.

Also, is your tarp kit from Buyers? If so, is the gear on yours perfectly symmetrical? Meaning, is the geometry (radius) of the gears identical on each side of the teeth? Mine won't lock in place very well, as the wind can actually unroll the tarp even when I have the lever in the locked position.

Ya it is a buyers kit and I thought the gear is insufficient for holding, I might have to make my own gear.
 
OP
F

f150skidoo

Well-known member
Joined
Dec 29, 2012
Messages
1,206
Location
Ontario, Canada
The drivers side door would rub the top of the posts so I had to do some blocking and rigging so I could use my porta power to square the posts. Next was to wire up the box with all the marker & tail lights. The only things left to do is get the hydraulic lines made, wire up everything in the tool box, and a few small things like installing the mud flaps, safety chains, & coupler.
 

Attachments

  • IMG_0722.jpg
    IMG_0722.jpg
    148.5 KB · Views: 102
  • IMG_0723.jpg
    IMG_0723.jpg
    144.5 KB · Views: 106

Spencer Was Here

Well-known member
Joined
Jan 2, 2006
Messages
327
Location
Western Michigan
My Sure-Trac doesn't lift as much as I believe it should be, so I just added a pressure gauge to my system.

The KTI pump is rated for 3,000 PSI, but for whatever reason, Sure-Trac set it to have a maximum of 2,500 PSI. I believe that is my main issue with not being able to always lift to the rated capacity, but unfortunately it is not adjustable. I need to get a hold of them to see if they are willing to send me out a new relief valve.

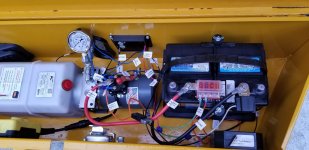
I've a picture of the new pressure gauge I recently installed. This gauge states I max out at 2,600 PSI, as opposed to the 2,500 PSI Sure-Trac tried to adjust it to. Not sure how accurate the gauge is, but either way, I want to get it closer to 3,000. You may want to consider adding a gauge yourself, if you haven't already planned on it.

I'm going to be adding a relay to interrupt the charge circuit coming from the truck whenever the hydraulic pump is activated. Right now, if the battery is low, the pump will try to pull too much current from the charge circuit through my 7-way and blow the fuse in the truck. Here is a YouTube video describing the relay I'll be adding:


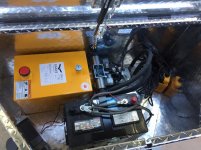
Since I have a wireless dump controller and an on-board 1.5 amp charger, my current wiring is kind of hard to follow. I don't like having to refer to three different wiring diagrams in various owners manuals, so I'm making my own master wiring diagram. Right now, I'm almost finished with the wiring as it is now (before I add the relay circuit). I want to make sure I have it as accurate as possible before I make it even more complicated with the relay.

Once the relay circuit has been added, I'll update the drawing, laminate it, and affix it to the inside lid of the trailer box containing the pump, battery, and all the wiring.

I've attached an image of the Visio diagram as it is today. It is not quite finished, I still have to add in a few more wires going to the down control connection on the pump solenoid.

I've also attached a photo showing all the labels I put on the wires on Friday at the same time I was installing the Blue Sea Systems ST-Blade Battery Terminal Mount Fuse Block Kit on the battery.
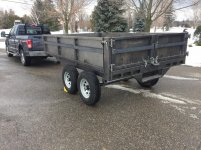
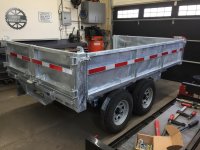
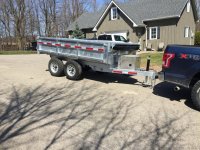
 

Attachments

  • 20200304_141653.jpg
    20200304_141653.jpg
    54 KB · Views: 67
  • 20200329_170937.jpg
    20200329_170937.jpg
    136.9 KB · Views: 69
  • Visio Drawing Of Dump Trailer Wiring 20200329.jpg
    Visio Drawing Of Dump Trailer Wiring 20200329.jpg
    105 KB · Views: 66
OP
F

f150skidoo

Well-known member
Joined
Dec 29, 2012
Messages
1,206
Location
Ontario, Canada
Finished up the last few parts on the trailer. I needed to make a mount for my group 27 deep cycle battery so I drew up a design and cut it out from 1/8" steel and painted it up. When I have some 1/8" aluminum kicking around I will re cut the part. Once I got the wiring hooked up in the tool box I was able to do a test dump and I measured a 54 degree dump angle. It was nice to finally pull the trailer out of my shop so I can have room for other projects:beer:
 

Attachments

  • IMG_0728.jpg
    IMG_0728.jpg
    148.4 KB · Views: 96
  • IMG_0725.jpg
    IMG_0725.jpg
    150.2 KB · Views: 95
  • IMG_0731.jpg
    IMG_0731.jpg
    152.9 KB · Views: 105
  • IMG_0729.jpg
    IMG_0729.jpg
    154.4 KB · Views: 135
  • IMG_0733.jpg
    IMG_0733.jpg
    154.1 KB · Views: 144
  • IMG_0735.jpg
    IMG_0735.jpg
    154.3 KB · Views: 136

1wook

Active member
Joined
Feb 22, 2014
Messages
42
Location
Central MN
Very nice!

I think your going to like the back-up lights. I added a set to one of my trailers and they are so handy, no more tapping the brakes to see.
 
To avoid these ads, REGISTER NOW!
Top Bottom