To avoid these ads, REGISTER NOW!

Delta Rockwell 17-600

OP
M

Macrosill

Well-known member
Joined
Mar 21, 2015
Messages
51
Location
Long Island, NY
6PT,
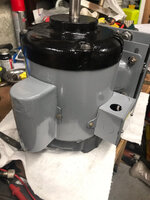
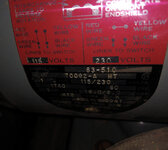
I got the motor working properly. The switch was not closing. All is well now. Thanks for the info though.

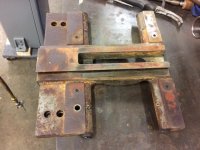
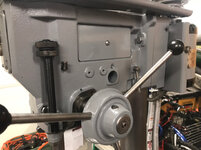
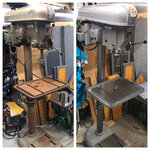
Made some more progress on the press. Almost all the hardware is cleaned and ready to go. Everything is painted minus the table, base and head. I got head and bas stripped and cleaned today. Things were going a little to smoothly so I decided to add some excitement. I hit my leg with the twisted wire cup wheel on the grinder at 13k rpm.

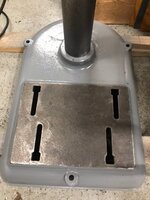
The base got a coat of primer on the bottom. Paint tomorrow and then prime the head.

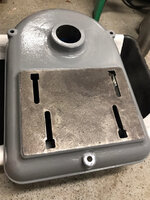
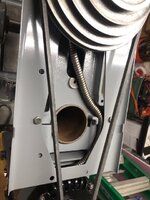
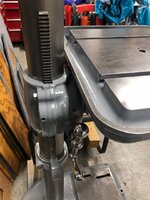
On the table I am at a stand still right now. I stripped as much as I could with the 4" wire cup. But not sure how to get to the coolant trough around the top of the table and in the T slots. I am awaiting a twisted wire wheel but are there any other ideas?

8d17eec4be26a1f245ee716121b6b9b2.jpg

6214e3d66cb8d95ba282fe057560f514.jpg


Sent from my iPhone using Tapatalk
 

Attachments

  • 6214e3d66cb8d95ba282fe057560f514.jpg
    6214e3d66cb8d95ba282fe057560f514.jpg
    303.1 KB · Views: 17
  • 8d17eec4be26a1f245ee716121b6b9b2.jpg
    8d17eec4be26a1f245ee716121b6b9b2.jpg
    80.3 KB · Views: 9
To avoid these ads, REGISTER NOW!

OccupantRJ

Well-known member
Joined
May 15, 2009
Messages
10,969
Location
Eastern North Carolina
I do a LOT or refurb work, every day. I rarely use a twisted wire brush due to a little too stiff and grabby for me. I use cheap HF wire brushes to chuck into a corded drill to use in places like the coolant trough. End brushes for the drill in various sizes are great for places like the trough and in tight corners. My best restore tools are my round and triangular carbide tipped paint scrapers, about $20 apiece. I use them to get to metal, then use the wire brushes, or either I will cabinet blast after scraping.
 

OccupantRJ

Well-known member
Joined
May 15, 2009
Messages
10,969
Location
Eastern North Carolina
This is a lathe carriage before and after. All surfaces were first scraped, then wire brushed, followed up by maroon color scotchbrite.
 

Attachments

  • BB404A02-CE91-4A3A-8B73-C63F8D050D4C.jpg
    BB404A02-CE91-4A3A-8B73-C63F8D050D4C.jpg
    97.6 KB · Views: 38
  • 8F722C42-5E91-4A26-9357-C93729D47D5B.jpg
    8F722C42-5E91-4A26-9357-C93729D47D5B.jpg
    149.3 KB · Views: 34

OccupantRJ

Well-known member
Joined
May 15, 2009
Messages
10,969
Location
Eastern North Carolina
Something along this line is what I use in general. The HF brushes have held up rather well for me, and can be obtained for a couple dollars a set on their sales. A knotted brush has it’s place, but can be dangerous under the right conditions. One of these might bounce off your pants.

I also use both loose and knotted 3” brushes on a 4-1/2” grinder on larger areas. The reason I hand scrape is in the case of precision parts to protect them from damage, and I have found that when I scrape I spend less time standing in front of the cabinet.

I have bad knees, so I can sit in an office chair and do quite a bit of prep just as easily as I can stand for long periods. A carbide tipped paint scraper will make paint FLY off an old machine, especially when it has had several coats of paint over the years. I refurb daily for a hobby, and have equipment lined up waiting.

I am working on a 20” Walker Turner drill press at this time, and am scraping before I even take it apart. I will go to a certain level, then blow it apart for more detail. This keeps a project from clogging the shop until it has to.
 

Attachments

  • 1AB3B440-128D-45A8-95DF-B24D49CC6EC7.jpeg
    1AB3B440-128D-45A8-95DF-B24D49CC6EC7.jpeg
    57.9 KB · Views: 23
  • A1E75548-FF88-4A41-9D51-9600BC804F91.jpg
    A1E75548-FF88-4A41-9D51-9600BC804F91.jpg
    80.6 KB · Views: 39
Last edited:
OP
M

Macrosill

Well-known member
Joined
Mar 21, 2015
Messages
51
Location
Long Island, NY
More progress today. Actually started reassembly. Motor attached to its mount and ready to slide onto the head. Both the upper and lower spindles have their bearings installed. The quill is ready to go in. Table column and lift clamp assembled. Tomorrow I can paint the base and head. Hopefully I can get this finished next week.

Here are a couple pictures.

a462b079ef0cf6d6a315a655c1d53eae.jpg

0d12e9f34289b1c7fd0361a212fdd9e3.jpg

5f06af13377ff41ac9135aaeadc99f31.jpg


Sent from my iPhone using Tapatalk
 

Attachments

  • 5f06af13377ff41ac9135aaeadc99f31.jpg
    5f06af13377ff41ac9135aaeadc99f31.jpg
    315 KB · Views: 4
  • 0d12e9f34289b1c7fd0361a212fdd9e3.jpg
    0d12e9f34289b1c7fd0361a212fdd9e3.jpg
    321 KB · Views: 0
  • a462b079ef0cf6d6a315a655c1d53eae.jpg
    a462b079ef0cf6d6a315a655c1d53eae.jpg
    320.5 KB · Views: 4

dogzbody1

Well-known member
Joined
May 2, 2015
Messages
152
Location
Long Island, NY
I love this build! The paintwork looks great - I've made note of the color, it will look new when done. I'm doing the same at a slower pace with a smaller 14" Delta (DP 220). I'm in need of a spindle pulley, is there a reliable source for used parts for these machines?
 

454ragtop

Well-known member
Joined
Mar 24, 2008
Messages
5,011
Location
Carver, MA
I love this build! The paintwork looks great - I've made note of the color, it will look new when done. I'm doing the same at a slower pace with a smaller 14" Delta (DP 220). I'm in need of a spindle pulley, is there a reliable source for used parts for these machines?

Do you need the high speed or low speed spindle pulley? Do you have the bearing and sleeve, etc.? I may be able to help.
 

454ragtop

Well-known member
Joined
Mar 24, 2008
Messages
5,011
Location
Carver, MA
Yes, I got that, there are 2 different ones, a high speed and a low speed.
 

Attachments

  • 20161226_163155_resized.jpg
    20161226_163155_resized.jpg
    72.4 KB · Views: 23
Last edited:

dogzbody1

Well-known member
Joined
May 2, 2015
Messages
152
Location
Long Island, NY
Awesome! Would a 14" have one of each of those or were there different models. Mine both look to be the same size but the one I want to replace is a craftsman with a bearing glued into it. I'll measure mine in the morning and come back to you. (I'd check tonight but my mobility is a bit limited following surgery). Thanks!, Steve
 

dogzbody1

Well-known member
Joined
May 2, 2015
Messages
152
Location
Long Island, NY
Hi again
I just measured the pulley on mine at it is the smaller one of the two at just over 5 inches (high speed?). While we are talking parts I am also looking for the belt guard (the larger rear section). Please le me know if you have the suitable pulley and what you are asking for it. Thanks so much, Steve
 

Packard V8

Well-known member
Joined
Mar 16, 2009
Messages
7,380
Location
Spokane, WA
Awesome! Would a 14" have one of each of those or were there different models. Thanks!, Steve

No, the 14" came as either a high speed or slow speed, but never seen one come with both.

There were several different motors, spindles and pulleys as accessories.

jack vines
 

dogzbody1

Well-known member
Joined
May 2, 2015
Messages
152
Location
Long Island, NY
Thanks for the clarification. I've googled around a little but and it seems the low speed is preferred for metal work while the high speed is preferred for woodwork.
It was suggested on one forum that the nose piece and belt cover might be bigger on the low speed presses. I don't have a belt guard but the nose piece on mine measures about 9 inches (inside to inside) so it might accommodate either.
I'll use this thread as an inspiration to restore mine to a higher standard that I had in mind!
Thanks again
Steve
 
OP
M

Macrosill

Well-known member
Joined
Mar 21, 2015
Messages
51
Location
Long Island, NY
Made a littlel more progress yesterday. One coat of paint on the base and head. Another day of paint and drying and then full reassembly can start. I am hoping to get this done this week.
 
OP
M

Macrosill

Well-known member
Joined
Mar 21, 2015
Messages
51
Location
Long Island, NY
Paint is finished, minus the hood and table. I will do those after the rest is assembled.

Here is a picture of the base. I hope to start assembly tomorrow.

98cb3317613e7bf5727cb0695b086874.jpg


Sent from my iPhone using Tapatalk
 

Attachments

  • 98cb3317613e7bf5727cb0695b086874.jpg
    98cb3317613e7bf5727cb0695b086874.jpg
    359.3 KB · Views: 5
To avoid these ads, REGISTER NOW!
OP
M

Macrosill

Well-known member
Joined
Mar 21, 2015
Messages
51
Location
Long Island, NY
As of this afternoon. Still have to do the table and belt cover. When completed I will do a side by side photo.

443fd46fcbf1c16216870d5795bd4485.jpg


Sent from my iPhone using Tapatalk
 

Attachments

  • 443fd46fcbf1c16216870d5795bd4485.jpg
    443fd46fcbf1c16216870d5795bd4485.jpg
    399.8 KB · Views: 6
Last edited:
OP
M

Macrosill

Well-known member
Joined
Mar 21, 2015
Messages
51
Location
Long Island, NY
As of this morning. Only thing left is the hood.

c230095fca1099130a2cd5e4a7354cdc.jpg

cb4bcc8b569caf82aa09a37cdb9f492a.jpg

a393aeb94a47981cf4fb997613a662fa.jpg

bdd1a58eba7c478a9ad64d6e242ff1e1.jpg

d5cbe65c5bb2bdbb4d2eaab1c08972b3.jpg

518578038073e11fcd72816a82384a51.jpg

9d8784dbf4f6a51af0486dafb54658cf.jpg

459bb3e6588501a71f55ebabec8b37a2.jpg

0cec9fd8bacb3ad61b70d5dc088fd593.jpg

a3905c7d442bd7e3713070d239d09d13.jpg

bb0f29c82bc2332134addce5379cfbdf.jpg

Here are a couple of the hood in the condition I received it in.

fc4de30c457e17073d93fceea3393ce4.jpg

afb0ccb3eed0022c511ecde7022f8a45.jpg

I will post a side by side image once the hood is refinished and installed.


Sent from my iPhone using Tapatalk
 

Attachments

  • afb0ccb3eed0022c511ecde7022f8a45.jpg
    afb0ccb3eed0022c511ecde7022f8a45.jpg
    329.7 KB · Views: 3
  • fc4de30c457e17073d93fceea3393ce4.jpg
    fc4de30c457e17073d93fceea3393ce4.jpg
    371.8 KB · Views: 1
  • bb0f29c82bc2332134addce5379cfbdf.jpg
    bb0f29c82bc2332134addce5379cfbdf.jpg
    274.2 KB · Views: 1
  • a3905c7d442bd7e3713070d239d09d13.jpg
    a3905c7d442bd7e3713070d239d09d13.jpg
    59.9 KB · Views: 1
  • c230095fca1099130a2cd5e4a7354cdc.jpg
    c230095fca1099130a2cd5e4a7354cdc.jpg
    78 KB · Views: 1
  • cb4bcc8b569caf82aa09a37cdb9f492a.jpg
    cb4bcc8b569caf82aa09a37cdb9f492a.jpg
    301.5 KB · Views: 1
  • a393aeb94a47981cf4fb997613a662fa.jpg
    a393aeb94a47981cf4fb997613a662fa.jpg
    53 KB · Views: 1
  • 0cec9fd8bacb3ad61b70d5dc088fd593.jpg
    0cec9fd8bacb3ad61b70d5dc088fd593.jpg
    33.5 KB · Views: 1
  • 459bb3e6588501a71f55ebabec8b37a2.jpg
    459bb3e6588501a71f55ebabec8b37a2.jpg
    40.6 KB · Views: 1
  • 9d8784dbf4f6a51af0486dafb54658cf.jpg
    9d8784dbf4f6a51af0486dafb54658cf.jpg
    301.2 KB · Views: 1
  • 518578038073e11fcd72816a82384a51.jpg
    518578038073e11fcd72816a82384a51.jpg
    63.3 KB · Views: 1
  • d5cbe65c5bb2bdbb4d2eaab1c08972b3.jpg
    d5cbe65c5bb2bdbb4d2eaab1c08972b3.jpg
    315.1 KB · Views: 1
  • bdd1a58eba7c478a9ad64d6e242ff1e1.jpg
    bdd1a58eba7c478a9ad64d6e242ff1e1.jpg
    60.8 KB · Views: 3
OP
M

Macrosill

Well-known member
Joined
Mar 21, 2015
Messages
51
Location
Long Island, NY
After some cold rain and snow, fun filled weekends, work and family errands I had some time today to continue on this project. The final step is in progress. I stripped the hood and all its hardware this morning. It is hanging in the garage after a coat of primer. I have something to do tomorrow and will not be home until late afternoon. If there is not enough daylight left to get 2 coats of paint sprayed then it will have to wait until Wednesday, weather permitting.
 

tombell572

Well-known member
Joined
Oct 3, 2015
Messages
1,034
Location
Sea Cliff, NY & Portland, OR
Macrosill--coming along nicely! A decent repair for the drill holes in the table is JB Weld or a similar product. Clean the holes to degrease, then fill a bit proud of the table surface. Level when it dries with a file, scraper or whatever. Its durable and color match is good. Similar repairs I made to my Buffalo D/P are fine after 30+ years.


Tom B.
 
OP
M

Macrosill

Well-known member
Joined
Mar 21, 2015
Messages
51
Location
Long Island, NY
Tom,
Thank you for the JB Weld suggestion.

I did get the remaining parts painted over the weekend. I hope to get the press finished this week.
 
OP
M

Macrosill

Well-known member
Joined
Mar 21, 2015
Messages
51
Location
Long Island, NY
334cb487f9dd100b628783eb1181ddcb.jpg

51f54ba7ad60ef8300ce7b802463f29b.jpg

1d1401f651952f3719f3f7db0ba16b0e.jpg

7ba34bce3e2c1f52624d72bd6b37cd5f.jpg

Finally finished!. Only 1 minor issue. The top cover seems to be about 1/4" too far forward. See below.

a78c719e1ba2fb2040f5f5f47e2ee8b1.jpg

ac2fc46ef58d8eeb3a4a6e990214efc9.jpg

Sent from my iPhone using Tapatalk
 

Attachments

  • 334cb487f9dd100b628783eb1181ddcb.jpg
    334cb487f9dd100b628783eb1181ddcb.jpg
    499 KB · Views: 4
  • 51f54ba7ad60ef8300ce7b802463f29b.jpg
    51f54ba7ad60ef8300ce7b802463f29b.jpg
    403.8 KB · Views: 4
  • 1d1401f651952f3719f3f7db0ba16b0e.jpg
    1d1401f651952f3719f3f7db0ba16b0e.jpg
    358.5 KB · Views: 4
  • 7ba34bce3e2c1f52624d72bd6b37cd5f.jpg
    7ba34bce3e2c1f52624d72bd6b37cd5f.jpg
    314.5 KB · Views: 3
  • a78c719e1ba2fb2040f5f5f47e2ee8b1.jpg
    a78c719e1ba2fb2040f5f5f47e2ee8b1.jpg
    234.4 KB · Views: 3
  • ac2fc46ef58d8eeb3a4a6e990214efc9.jpg
    ac2fc46ef58d8eeb3a4a6e990214efc9.jpg
    232 KB · Views: 18
Last edited:
OP
M

Macrosill

Well-known member
Joined
Mar 21, 2015
Messages
51
Location
Long Island, NY
Used it for the first time yesterday. Man, what a difference from that little piece of **** I had before. This one is so smooth and so quiet. I drilled a 3/8" hole through the 3 1/2" side of 6 2x4s for a project for my RV.
 
Last edited:

Packard V8

Well-known member
Joined
Mar 16, 2009
Messages
7,380
Location
Spokane, WA
Nice job and yes they're a pleasure to use.

Delta/Rockwell used at least three different covers on those DPs. The hinged mechanism you have is somewhat fragile and it could be the original links were bent or even replaced with shop made pieces.

jack vines
 

Zamzet

New member
Joined
Aug 24, 2021
Messages
1
Hey Guys. This is my first post. I just bought an old delta drill press model 17-600. The machine is on very rough shape and came without the starting capacitor. Could some of you tell me which is the correct capacitance?
 

Attachments

  • D1D812F3-0F50-43DD-A5F4-958E1E913D72.jpeg
    D1D812F3-0F50-43DD-A5F4-958E1E913D72.jpeg
    168.9 KB · Views: 19
  • 7802607C-5580-4323-B47B-238651D8AF54.jpeg
    7802607C-5580-4323-B47B-238651D8AF54.jpeg
    129.1 KB · Views: 21
  • 462002FA-D2E3-4C87-B6F1-CCCFE621811C.jpeg
    462002FA-D2E3-4C87-B6F1-CCCFE621811C.jpeg
    695.2 KB · Views: 21

11b30b4

Well-known member
Joined
Jul 16, 2020
Messages
1,029
Location
GA
Macroslll, that thing came out real nice. Great rebuild on an outstanding drill press.
 

454ragtop

Well-known member
Joined
Mar 24, 2008
Messages
5,011
Location
Carver, MA
Welcome Zamzet, best to ask in the electrical forum over at owwm.org, your resource for all things Delta.
 

Roberts210

Well-known member
Joined
Dec 21, 2015
Messages
3,177
Location
Missouri
Electrolysis does produce H, and O also. I do mine in a shed next to my barn. Do you have a garage you can work in that doesn't have a water heater w/ pilot light in it?
 
To avoid these ads, REGISTER NOW!
Top Bottom