
You are using an out of date browser. It may not display this or other websites correctly.
You should upgrade or use an alternative browser.
You should upgrade or use an alternative browser.
Between 485 & 705 SQ/FT Denver MCM garage expansion
- Thread starter kwyjibo
- Start date
Workspaces between 485 and 705 squarefeet.
The 300SL Gullwing, along with the DB5, E-Type, Miura and 250 GTO are my Top 5 Classic "super cars".
You don't fully "get" the Gullwing, until you are next to one. It's just perfect, imho.
Interesting list. I've learned that at least 2 other cars on your list are also hiding in this complex! Who are these people!?!
Interesting list. I've learned that at least 2 other cars on your list are also hiding in this complex! Who are these people!?!
Brothers from another mothers! Rich mothers!

Arclitgold
Well-known member
- Joined
- Dec 20, 2017
- Messages
- 317
Let’s see some pics of the buttoned up e30! I’m also super excited to see what you do with the credenza considering your other cabinet build are great!
Sent from my iPhone using Tapatalk
Sent from my iPhone using Tapatalk
ok....

In all seriousness, in my hurry to get the work done I didn't take any photos before dropping it down and going on a test drive. The new exhaust was still smoking when I got the emissions test. The wait at the emissions station was nerve wracking - the inspector must have believed that I deleted the cat or some other illegal mod because he spent twice as long on my car, including a long inspection of the engine compartment and mirror inspection of the exhaust. I'll take some photos the next time I drive it by a photogenic spot.
The photo also shows our Colorado weather. It was almost 70 F a few days ago with nice upper-50s weather on Christmas Day. Today the state closed a couple busy sections of interstate because of snow.
In all seriousness, in my hurry to get the work done I didn't take any photos before dropping it down and going on a test drive. The new exhaust was still smoking when I got the emissions test. The wait at the emissions station was nerve wracking - the inspector must have believed that I deleted the cat or some other illegal mod because he spent twice as long on my car, including a long inspection of the engine compartment and mirror inspection of the exhaust. I'll take some photos the next time I drive it by a photogenic spot.
The photo also shows our Colorado weather. It was almost 70 F a few days ago with nice upper-50s weather on Christmas Day. Today the state closed a couple busy sections of interstate because of snow.
Attachments

Max Power
Well-known member
That gull wing looks like one I got to work on about 10 years ago. I did a bit of body repair and never even sat in it.
Arclitgold
Well-known member
- Joined
- Dec 20, 2017
- Messages
- 317
I saw that crazy storm on th news!
E30 still looks good, even under alll that snow
Sent from my iPhone using Tapatalk
E30 still looks good, even under alll that snow
Sent from my iPhone using Tapatalk
It's possibly the same car. I was told that it's been in town for a while and I can't imagine that there are that many here.That gull wing looks like one I got to work on about 10 years ago. I did a bit of body repair and never even sat in it.
Thanks! I tracked down a slow coolant leak, but so far (!) everything seems to be working fine.I saw that crazy storm on th news!
E30 still looks good, even under alll that snow
What did you have? I'll keep an eye out for your TR6 when I'm up in the hills.Beautiful cars....makes me miss mine.
I spent a few hours in the last couple days to finish some wiring and siding at the front of the garage. Went from this:
to this:
I used scraps so there's a couple horizontal seams. I'm still painting and need to pick up trim, but I'm happy to finally finish off this corner.
Attachments

smschriefer
Well-known member
That looks so good with the new panel installed. Will you do a crown molding, or a simple piece of dimensional lumber at the ceiling?
mannydantyla
Well-known member
I just skimmed through most of the the whole thread and this is an impressive garage! It was good to see an extension as that's what I might be doing in the future. I love the style and I love all the windows!! Good job mate
Are you going to replace the trees that were removed from the backyard?
Are you going to replace the trees that were removed from the backyard?
Last edited:
I've been using plain 1/2 x 2-1/2 moulding to match the original trim on the house. I've only finished a couple sections, but below is one. The trim goes around the beams and along the ceiling. The one on the beam is only there to cover the hurricane straps.That looks so good with the new panel installed. Will you do a crown molding, or a simple piece of dimensional lumber at the ceiling?
Thanks! I grew up surrounded by fruit trees and feel like I should get a tasty reward for taking care of trees, not just shade. So, I've already planted two cherry trees and a peach in place of the silver maples. I'm hoping to get a couple more varieties later. They won't grow anywhere near as tall but I'm planning their spacing to get denser coverage.I just skimmed through most of the the whole thread and this is an impressive garage! It was good to see an extension as that's what I might be doing in the future. I love the style and I love all the windows!! Good job mate
Are you going to replace the trees that were removed from the backyard?
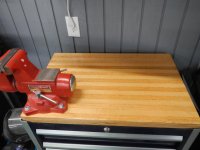
A small update that I didn't post yesterday because it was still drying, but I refinished the oak/maple top of the mobile box. I recycled the top of a dining table that was being thrown out about 10 years ago.
Attachments

I've been finishing little details that got put off along the way.
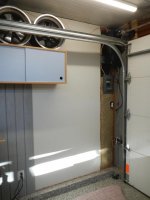
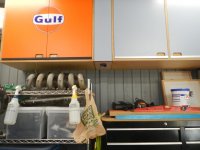
First up, one of the cabinet doors had a long scratch from shipping of the laminate sheets. I finally got around to buying a large Gulf decal to cover the scratch. Another thing that I never found a solution for is what to do with the space between the two upper cabinets in the photo. It's only 6.5" between the orange and blue cabinets. I was thinking of an air hose reel but the narrowest ones are too wide, so that leaves me with an extension cord reel and/or boxes of gloves. Any other suggestions?

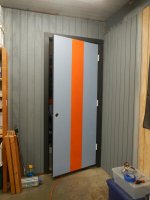
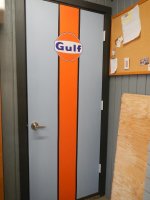
Second, I'm finally painting the other side of the door between the two garages. I had enough paint left over from the arrow to paint a simple vertical stripe. After another coat, I'll put on the black border stripes and apply another Gulf oil decal (thanks to eBay for the decal 2 for 1 deal).

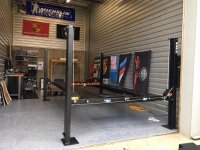
The bigger update is actually for my friend's garage condo. He used my recommended floor and electrical guys to epoxy coat the floor and install additional lights and outlets. Afterwards I spent a few hours to help assemble the lift... I'll be storing a car on the lift while I restore the green Targa at my home garage.

First up, one of the cabinet doors had a long scratch from shipping of the laminate sheets. I finally got around to buying a large Gulf decal to cover the scratch. Another thing that I never found a solution for is what to do with the space between the two upper cabinets in the photo. It's only 6.5" between the orange and blue cabinets. I was thinking of an air hose reel but the narrowest ones are too wide, so that leaves me with an extension cord reel and/or boxes of gloves. Any other suggestions?
Second, I'm finally painting the other side of the door between the two garages. I had enough paint left over from the arrow to paint a simple vertical stripe. After another coat, I'll put on the black border stripes and apply another Gulf oil decal (thanks to eBay for the decal 2 for 1 deal).
The bigger update is actually for my friend's garage condo. He used my recommended floor and electrical guys to epoxy coat the floor and install additional lights and outlets. Afterwards I spent a few hours to help assemble the lift... I'll be storing a car on the lift while I restore the green Targa at my home garage.
Attachments

Arclitgold
Well-known member
- Joined
- Dec 20, 2017
- Messages
- 317
Those cabinets look wonderful; you built them all right?
Sent from my iPhone using Tapatalk
Sent from my iPhone using Tapatalk
Brian R
Well-known member
‘ I was thinking of an air hose reel but the narrowest ones are too wide, so that leaves me with an extension cord reel and/or boxes of gloves. Any other suggestions?‘
I just did some reorganization in my garage and had a similar spot to fill. I ended up getting a wooden magazine holder from Ikea and painted it to match my cabinets. I leave current reading material in it like set of manuals of current projects.
Place is really looking sharp.
Brian
I just did some reorganization in my garage and had a similar spot to fill. I ended up getting a wooden magazine holder from Ikea and painted it to match my cabinets. I leave current reading material in it like set of manuals of current projects.
Place is really looking sharp.
Brian
Trapps
ALLIANCE MEMBER
How about batteries and charger shelves for your cordless tools in the cabinet gap?
Mark
Mark
Thanks! Yes, many of the cabinets are almost a year old now so I can look back with some self-criticism: I didn't use enough glue on some of the early joints, I should have returned/not used any ply sheets that showed signs of warpage when new, etc. I'll be making a few more cabinets for the single garage and then there's the audio cabinet. Hopefully I'll be able to apply everything I learned to get the best possible end product for actual furniture that will sit in a central position in the house.Those cabinets look wonderful; you built them all right?
Speaking of which, I moved the Carrera out to my friend's garage to make room for the cabinet work. (and another thing that I learned is just how much saw dust gets on everything)
I just did some reorganization in my garage and had a similar spot to fill. I ended up getting a wooden magazine holder from Ikea and painted it to match my cabinets. I leave current reading material in it like set of manuals of current projects.
Place is really looking sharp.
Brian
Thanks for the suggestions. I'm going to mock up some shelves to test some ideas - I'll update when I decide.How about batteries and charger shelves for your cordless tools in the cabinet gap?
Mark
I got some final touches done on the front corner. I hid most of the opener wiring, finished painting and hung a few bits of garage art. I wanted to keep the lower part of this wall 'open' but it looked bare, so it made sense to put up some wall covering. Also, I wanted to get the frames off the spare bedroom floor. I have a couple more to fill in the space to the left, but that area is currently storing sheet goods, a bench and seats.
Attachments


Thanks Anth! I'm glad that I finally have a place to put some of this stuff. I have posters from the '80s that haven't seen the light of day for decades.
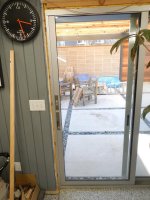
Just a couple updates from the weekend. The first is the trim around the sliding glass door. You can't see it clearly in the photo, but the door's aluminum frame is not flush to any part of the wall's framing

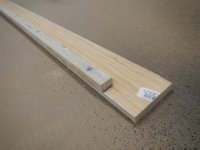
So, I cut some spacers from plywood scraps to fill the gap. These were glued and screwed to the trim before painting and mounting. The gap is greatest at the top and bottom of the wall

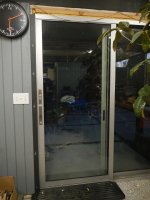
Here is the first piece in place. I was worried that the variation in the black trim's thickness would be obvious but it does a good job hiding the fact that the wall studs are warped. The horizontal and other vertical pieces are ready but I first need to decide on a couple details between the sliding door and window.

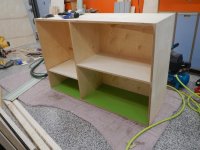
Here is the newest cabinet carcass for the single garage. I'm happy with the test fit so I'll move ahead with the laminating and poly'ing. This will be the first one with the Alpina blue and green color scheme

Just a couple updates from the weekend. The first is the trim around the sliding glass door. You can't see it clearly in the photo, but the door's aluminum frame is not flush to any part of the wall's framing
So, I cut some spacers from plywood scraps to fill the gap. These were glued and screwed to the trim before painting and mounting. The gap is greatest at the top and bottom of the wall
Here is the first piece in place. I was worried that the variation in the black trim's thickness would be obvious but it does a good job hiding the fact that the wall studs are warped. The horizontal and other vertical pieces are ready but I first need to decide on a couple details between the sliding door and window.
Here is the newest cabinet carcass for the single garage. I'm happy with the test fit so I'll move ahead with the laminating and poly'ing. This will be the first one with the Alpina blue and green color scheme
Attachments

Last edited:
Arclitgold
Well-known member
- Joined
- Dec 20, 2017
- Messages
- 317
Pictures aren’t showing up and I was so excited to see them!!
Sent from my iPhone using Tapatalk
Sent from my iPhone using Tapatalk
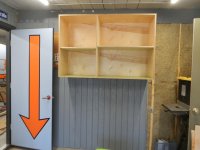
It took a few days to poly and laminate the panels for the newest cabinet, and then on Sunday, I hung it on the wall. The left side with the adjustable shelf will get a blue door. I'll break out the blue laminate when another cabinet I'm working on gets to that stage. Also, I've decided that the adjustable shelf will get the green laminate.
Here it is at the glue-up stage

And, with a little help, the cabinet is hanging on the wall

Here it is at the glue-up stage
And, with a little help, the cabinet is hanging on the wall
Attachments
Arclitgold
Well-known member
- Joined
- Dec 20, 2017
- Messages
- 317
Those cabinets are so great. How are you attaching them to the wall?
Sent from my iPhone using Tapatalk
Sent from my iPhone using Tapatalk
I've been using French cleats to hang the cabinets. Also, the cabinets sit on the T1-11 siding, like a mini-ledger.Those cabinets are so great. How are you attaching them to the wall?
I didn't make much progress on the cabinets because of the beautiful weather this weekend. I got the E9 out instead. First, there was a BMW event at the Wings over the Rockies Museum, so I joined some friends to crash the beginning of the party. We then went to the beer garden next door to enjoy the sunset. Too bad the ice cream place (the Art Deco rocket) was closed.
Today is SuperGroundhogBowl day. So I went on a drive with a couple friends. Enjoyed the weekend because I don't think it will get above freezing for the next few days.
Attachments



Arclitgold
Well-known member
- Joined
- Dec 20, 2017
- Messages
- 317
That sunset is gorgeous. My parents tried to get me to fly in for the weekend as our January in Seattle has been miserable. We lucked out with sun all day so the weekend wasn’t a total loss!
Sent from my iPhone using Tapatalk
Sent from my iPhone using Tapatalk
arclitgold - coincidentally, my Mother in-law was just visiting from Tacoma. She "escaped" the PNW rain to come here... we got about a foot of snow.
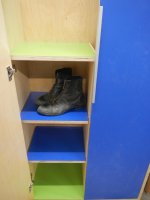
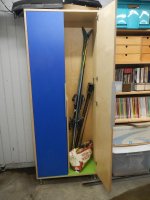
I finished the tall closet over the weekend. This is for my wife's stuff in the single-car garage so I let her design the interior for her needs. She started loading stuff in as soon as I hung it on the wall. The rightside is open to hold her skis and other tall items.

On the left side there are some shelves on the lower half for organizing smaller things

I finished the tall closet over the weekend. This is for my wife's stuff in the single-car garage so I let her design the interior for her needs. She started loading stuff in as soon as I hung it on the wall. The rightside is open to hold her skis and other tall items.
On the left side there are some shelves on the lower half for organizing smaller things
Attachments
Arclitgold
Well-known member
- Joined
- Dec 20, 2017
- Messages
- 317
Nice work. Those cabinets are legit. I bet you’re saving a bundle building them all yourself
Sent from my iPhone using Tapatalk
Sent from my iPhone using Tapatalk
Thanks Arclitgold - I haven't actually gone through all the invoices but the value to me is more than just the money. I always want to learn new skills and keep busy so this has done a lot towards keeping me from going insane.
I've been doing some small garage projects to avoid some other work.
First thing is to fill the small gap between two upper cabinets. I didn't want to build either cabinet with a cutout to fit around a large beam. I finally decided to put in a small storage pullout below the beam. The bottom is a glove dispenser that will be partially concealed by the drawer front. I'm still finishing the drawer, but you can see the dispenser


The second project was to finish the wall next to the big bench. The trim is uninteresting, but I now have a bunch of BMWCCA prints on the wall. The M30 motor keeps getting in the way, but it's the original for the E9 so I can't sell it off. Until I can figure out a permanent solution, I'll just roll it into whatever space I'm not working

The last project is a new T-shirt design. Its not quite finished so I don't want to reveal yet. As soon as it's off to the printer I'll be out of distractions and will need to get to back to work.
I've been doing some small garage projects to avoid some other work.
First thing is to fill the small gap between two upper cabinets. I didn't want to build either cabinet with a cutout to fit around a large beam. I finally decided to put in a small storage pullout below the beam. The bottom is a glove dispenser that will be partially concealed by the drawer front. I'm still finishing the drawer, but you can see the dispenser
The second project was to finish the wall next to the big bench. The trim is uninteresting, but I now have a bunch of BMWCCA prints on the wall. The M30 motor keeps getting in the way, but it's the original for the E9 so I can't sell it off. Until I can figure out a permanent solution, I'll just roll it into whatever space I'm not working
The last project is a new T-shirt design. Its not quite finished so I don't want to reveal yet. As soon as it's off to the printer I'll be out of distractions and will need to get to back to work.
Attachments


Growlertdi
Well-known member
if you are going to keep the engine around, how about dressing it up and making a display piece out of it, at least degreasing and a little cleaning?
either way, I like what you have build with those custom cabinets and the glove dispenser is a nice feature.
either way, I like what you have build with those custom cabinets and the glove dispenser is a nice feature.
964haus
Well-known member
Are you using 3/4" baltic plywood for your cabinets? I really like how finished they look and I'm planning on starting on my own next weekend.
Where do you source your plywood from?
Looks great.
M.
Where do you source your plywood from?
Looks great.
M.
Thanks for reading! The long-term plan for the motor has always been to rebuild it. But even when clean the problem is storage. It takes up more than its fair share of space in a small garage.if you are going to keep the engine around, how about dressing it up and making a display piece out of it, at least degreasing and a little cleaning?
either way, I like what you have build with those custom cabinets and the glove dispenser is a nice feature.
Yes, it's 3/4" Baltic birch. It took a few phone calls to find someone selling baltic birch in Denver. I've been going to a lumberyard called Austin Hardwoods. I don't know the equivalent place up in Vancouver but I've seen that Rockler, Woodcraft and Home Depot sell smaller sheets. In fact, I bought walnut-faced birch ply from HD online with in-store pickup.Are you using 3/4" baltic plywood for your cabinets? I really like how finished they look and I'm planning on starting on my own next weekend.
Where do you source your plywood from?
Looks great.
M.
I've been continuing with small projects
The glove dispenser is done. The front panel is basically a vertical drawer that pulls out to replace the box of gloves. The bottom backside of the face is cutout for a hidden finger pull. I wanted it to look like a fixed panel so I didn't match the rest of the pulls.
Some of the ply is warping - it's most obvious in the doors, but the bottoms of the upper cabinets are close to eye level. The cabinets along the Northwall at the front of the garage are the worst because it's mostly made of sheets that I rejected earlier. So to fix that I mounted a steel T-bar along the bottom. To hide and help the steel reinforcement, I added a 2" strip of ply. I'm going to add some lighting so the whole thing looks like a valence. I finished painting this section so I could hang a few more bits of garage art.
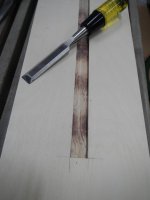
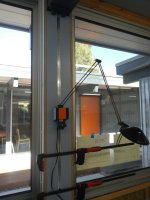
I'm working on the trim around the big windows now. These are above the big bench and flank a steel post. It's a reasonably large section that I didn't want to go unused so I'm mounting a T-track vertically in the trim. I'll see if there are other uses for it, but I'm thinking of an adjustable height mount for a work lamp. The teaser photo is of groove for the track in the main panel that will cover the post. It will be laminated blue to match the glove dispenser panel that sits on the opposite end of the beam.
Attachments

I’m sorry if I missed it but did you laminate both sides of the plywood? With products like laminate that inhibit moisture from reaching the sub-surface (ply/MDF) the moisture will penetrate from one side and cause the warping. It’s advisable to laminate both sides of the panel and the warping will be greatly reduced if not eliminated. Looking good though!
Sent from my iPhone using Garage Journal
Sent from my iPhone using Garage Journal
Thanks for the comment, topcok88
There's no need to sugarcoat - I f'd up. Most pieces are laminated on a single side. A neighbor that worked as a cabinetmaker stopped by one day and pointed that out. He said that you can pick up white laminate that is priced cheaper just for this function. The larger doors would have benefitted the most from a second lamination.
But my question is what can be done with sheets that are warping prior to any work? When I'm at the lumberyard, I'm pretty selective but sometimes the wood warps after I get them home.
There's no need to sugarcoat - I f'd up. Most pieces are laminated on a single side. A neighbor that worked as a cabinetmaker stopped by one day and pointed that out. He said that you can pick up white laminate that is priced cheaper just for this function. The larger doors would have benefitted the most from a second lamination.
But my question is what can be done with sheets that are warping prior to any work? When I'm at the lumberyard, I'm pretty selective but sometimes the wood warps after I get them home.
Meh, everyone makes errors. I wouldn’t worry or consider laminating both sides of everything especially if it is supported by other panels. But large format doors with no rails and stiles - gotta laminate and edge band to stabilize the substrate. If I were you I would make ply boxes, drawer boxes, and such. And then for doors and drawer fronts use MDO (medium density overlay). Good material stability and should stay flat better. Just make sure you do the laminate on both sides and edge banding. I don’t have any good answers to straighten a sheet after purchase. Just store it flat in a stack with weight in it to keep it flat.
Sent from my iPhone using Garage Journal
Sent from my iPhone using Garage Journal
Thanks for the advice topcok88. There's always more stuff to build so I'll look into MDO
Finished a couple projects
First, the trim between the large windows with the T-track is up. I used some scrap wood to make a sliding mount for the cheapo IKEA work lamp. The stupid thing is that I didn't make sure that the lamp worked before going ahead with the build. So I didn't discover that the transformer was toast until I finished.

I also finally got around to finishing the other side of the door.

Finished a couple projects
First, the trim between the large windows with the T-track is up. I used some scrap wood to make a sliding mount for the cheapo IKEA work lamp. The stupid thing is that I didn't make sure that the lamp worked before going ahead with the build. So I didn't discover that the transformer was toast until I finished.
I also finally got around to finishing the other side of the door.
Attachments
Growlertdi
Well-known member
Door looks great, and so does the light mount, even if the light itself doesn't function
964haus
Well-known member
Love your builds, and thanks for the answer on the wood.
Another question - what hinges are you using? I love the look of keeping the end grain visible on the cabinets, and I'd like to go that route with my cabinets, but trying to source the right hidden hinge. Online?
Oh, and one more.... - how deep are your upper cabinets? Seem to work OK for you?
Thanks!
Matthew
Another question - what hinges are you using? I love the look of keeping the end grain visible on the cabinets, and I'd like to go that route with my cabinets, but trying to source the right hidden hinge. Online?
Oh, and one more.... - how deep are your upper cabinets? Seem to work OK for you?
Thanks!
Matthew
Last edited:
Thanks guys
I've been using Blum full inset hinges with blumotion soft-close mechanisms. The best bargains that I found were buying bulk packs on Amazon at just over $4 each. Look out for some places that seem cheaper but they don't include the mounting plate.
The upper cabinets range from 12" to 18" outer depth, depending on location. The shallower ones are all in the front of the garage where its narrower. The deepest ones are towards the back where the addition was made. I had a use in mind when I designed each section so they're working out fine. The shallow ones are mostly for holding manuals and books so their ~10" inside dimension is sufficient. The deeper ones hold larger books, small parts, stereo, helmet and steering wheels - which all fit fine. I'll probably add more shelves at some point to add to the usability.
I stopped by the storage garage to visit the targa and start bringing some parts home. I grabbed the decklid which looked like it was used to house an angry bobcat. The lid itself is mostly free of rust and dents but the grill... current replacements are not quite right and still expensive so I'll see how straight I can get it.

Very excited to see this: you can see the original conda green color under the goo and flaking Earl Scheib paint job.

I've been using Blum full inset hinges with blumotion soft-close mechanisms. The best bargains that I found were buying bulk packs on Amazon at just over $4 each. Look out for some places that seem cheaper but they don't include the mounting plate.
The upper cabinets range from 12" to 18" outer depth, depending on location. The shallower ones are all in the front of the garage where its narrower. The deepest ones are towards the back where the addition was made. I had a use in mind when I designed each section so they're working out fine. The shallow ones are mostly for holding manuals and books so their ~10" inside dimension is sufficient. The deeper ones hold larger books, small parts, stereo, helmet and steering wheels - which all fit fine. I'll probably add more shelves at some point to add to the usability.
I stopped by the storage garage to visit the targa and start bringing some parts home. I grabbed the decklid which looked like it was used to house an angry bobcat. The lid itself is mostly free of rust and dents but the grill... current replacements are not quite right and still expensive so I'll see how straight I can get it.
Very excited to see this: you can see the original conda green color under the goo and flaking Earl Scheib paint job.
Attachments


First off, I hope my fellow GJers are staying healthy.
The short answer is: I don't know. The car was an aborted restoration project that was in the POs garage for over a decade. It really looks like someone got mad and took it out on the poor grill.
The grill is now apart and it seems that I have some time on my hands to straighten out the bars.

What happened to that grill?
The short answer is: I don't know. The car was an aborted restoration project that was in the POs garage for over a decade. It really looks like someone got mad and took it out on the poor grill.
The grill is now apart and it seems that I have some time on my hands to straighten out the bars.
Attachments

Arclitgold
Well-known member
- Joined
- Dec 20, 2017
- Messages
- 317
Let us know how it goes!
Sent from my iPhone using Tapatalk
Sent from my iPhone using Tapatalk