To avoid these ads, REGISTER NOW!

Designing a workbench for a specific space

barrysuperhawk

Well-known member
Joined
Jun 20, 2015
Messages
116
Location
Middle of Illinois
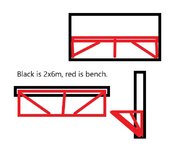
Ok, so I have a wall in my basement that needs a workbench, but I am having issues figuring out the measurements. My original plan was to just buy a bench, tack it to the wall and call it good, but then I started measuring and realized it would be so much more work to try to modify a "standard" bench - or even a bench "plan". I also seem to be failing the learning curve on Sketchup. I obviously need to watch several hundred more youtube vids to make that work.

So, I can sketch my basic idea on actual paper, and I know what my outside dimensions need to be, but I am having issues with the details like what angle I need to cut boards at, how to minimize bulk and still maximize sturdiness, etc. I am just not a woodworker, in fact I have even considered welding this out of steel to avoid jointery... Thats really not practical, but I have considered it.

my objectives are:

Only tall enough to fit a normal office chair, and no taller. I have clearance issues with what I am putting on it being too tall, so it needs to be short.
It needs to fit within a 2x6 shell with 1/2" plywood back. This is challenge #1, actually explaining this. Imagine a 2x6 frame wall, only with no studs in the middle, and Plywood on the back side where Drywall would go.
It needs to not touch the ground at all, so needs to be cantilevered from the wall.
It needs to fit a standard generic kitchen style countertop with backsplash for ease of top replacement and because I already have several.
Needs to support a minimum 250 lbs load at the center front edge.

So, whats the most effective way to translate the mess that I have on paper and in my noggin into useful plans that can tell me "cut this board **" long and at this angle" because I know for a fact if I just try to wing it, it will be a mess and probably fail...
 

Attachments
  • benchy.jpg
    benchy.jpg
    34 KB · Views: 48
Last edited:
To avoid these ads, REGISTER NOW!

Leaflessshadetree

Well-known member
Joined
Aug 1, 2013
Messages
7,173
Location
Don't ask.
Free standing or attached to a wall? How strong/sturdy does it need to be?
Could be as simple as attaching a ledger to the wall and a couple gussets to support the countertop.
 

Zeke

Well-known member
Joined
Aug 13, 2009
Messages
17,176
Location
Long Beach CA, the sewer by the sea.
Install blocking where you plan to attach support and then cover the wall. Might be a good idea to put in an electrical outlet. Make a template of the opening and cut you counter top. For 250lbs. at the front edge you need some steel. Steel because if it's this low, lumber will severely affect knee space.

Now all you have to do is install a ledger for the back and the steel for the front. Many ways to do this so I won't elaborate. The center brace you show is s good idea but it will try it's hardest to pull away from the wall. Hence the blocking (backing) as 1/2" ply won't hold much pull. You can attach your sides the same or just level is you have backing. The splayed angles you so aren't necessary.

If you can weld up such a configuration and slide it in, lag it to your backing, that would support your prefab counter all you need. You could consider a couple of level supports from the front to the back wall under the cabinet and definitely one at the center brace to make a triangle.

The key is to have the structure beefy enough to attach to, then making the frame well enough to do the job. I'm sure there will be 40 more post all with new ideas, so read them all. Toss out the chaff and keep the wheat.
 

Shiftless

Well-known member
Joined
Mar 9, 2014
Messages
14,568
Location
East Bay SFO
It would be simpler and sturdier if it could have 2 front legs. Is there a non negotiable reason it can’t have legs touching the floor?
 

kyrbz

Well-known member
Joined
Jan 30, 2012
Messages
1,322
Location
midwest US
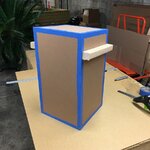
Cardboard Aided Design is grossly under appreciated.
In my wood shop (not the metal shop), I like using Simpson Strong-Tie brackets for benches, tables, and shelving. One style of bracket has many configurations you can use them for. It's a fast, easy and strong way to build and you can easily disassemble things and reuse the brackets and lumber as needed.

simpson1.JPG

simpson2.JPG

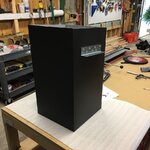
Cardboard mock-ups are always helpful. Just last week I made a cardboard mock-up of a chimney ceiling transition box before I cut the angle at the top and attached brackets to the real SS box. As they say, measure twice cut once.

box1.JPG box2.JPG box3.JPG
 
Last edited:
To avoid these ads, REGISTER NOW!
OP
B

barrysuperhawk

Well-known member
Joined
Jun 20, 2015
Messages
116
Location
Middle of Illinois
This.

The OP's design is unnecessarily overcomplicated.

Keep it simple.

LOL if I was able to make do with simple I wouldn't be here.

So lets answer some questions/comments:

I want it to be attached to the wall so I have complete access to the floor underneath without having to move anything to clean the floor.. It is going in a basement which has had water problems in the past... I am pretty sure I have the water issues handled, but I never say never. Plus, I think the design will look cool.

I won't need much knee space, I will be in front of this bench when I am sitting, not under it, so as long as I can mostly store a chair under it, I am good. I also don't intend any shelves or other storage under, either.

I don't think I want to to try to weld anything downstairs, but the point about sturdiness is well taken. I may find a way to incorporate some angle or c-channel to stiffen things up.

The plywood back is glued, biscut-ed, and backed up by (and screwed to) a 2x12 staircase, and there is no reason I can't reinforce it.

I have used Cardboard Aided Drafting on metal work, but I never thought to use it on this.
 

RoninB4

Well-known member
Joined
Jul 22, 2020
Messages
3,606
Location
Under My House
I was a toolmaker in a former life, have 3D CAD, a full machine shop, a welder, and I still use "Cardboard Aided Design" for things.
Bench design really depends upon the intended use. Light assembly requires less than full-on hammering. Plan accordingly.
Some design sources state to make the height reach the knuckles of a clenched fist when standing, I adjust that to what the bench is for.
Legs can be a PITA at times, they offer better stability/support than not having them. Bracing will not compensate for lack of legs.
A cast-off kitchen counter top is cheap (maybe free) and makes a good top surface that doesn't absorb liquids and cleans up nicely.
Metal brackets are no substitute for mass IMO but it depends upon what you'll be doing on the bench and the how much the work weighs.

Just some thoughts that apply to me and what I do, they may not work for you.
 

u2slow

Well-known member
Joined
Nov 20, 2011
Messages
3,610
Location
BC
Fwiw, I tend to build things in-place. I need constraints vs a clean slate. Rarely are the surrounding floors and walls perfectly level and plumb.

Maybe build yourself a rectangle from 2x4 or 2x6 to simulate your countertop. Attach one edge to the wall, and prop up the front edge. Measure up for the angle braces. (Maybe they can land on foundation ledge?) Mount the counter on top.
 

Trapps

ALLIANCE MEMBER
Joined
Feb 10, 2017
Messages
2,003
Location
The Detroit Zoo
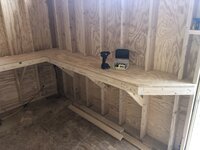
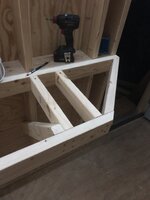
This simple bench has held four people, totaling well over 500Lbs.

51003043625_c6a4c0ba81_k.jpg

51072231786_d6d5975ae0_k.jpg

51072326817_24496458c4_k.jpg

I built it in situ without a plan. I hung the ledger across the back and everything else just sort of designed itself. The studs are 2x6. All screws are 9x3 (Spax, GripFast, GRK,etc.). All simple cuts in 2x4 framing.
 
To avoid these ads, REGISTER NOW!
Top Bottom