To avoid these ads, REGISTER NOW!

Detached garage 70’x42’

NVSean

Well-known member
Joined
Aug 16, 2013
Messages
55
Location
Henderson, Nevada
I have been reading (with great interest and admiration) about many projects over the past year on The Garage Journal, and decided to start posting about my own project.
I initially envisioned building a small detached garage on the back of our property to store our boat, mountain bikes, and other toys. Then came the idea to install an indoor batting cage for my youngest son, and then the project took on a whole new dimension.
We live in Southern Nevada and needed a functional space to store our toys, boats, and so I could set up my wood working tools (only a hobby). My space was limited as seen below:
a062618a788ab401d5d1fec9516ee1a2.jpg
After searching the internet and talking with friends and neighbors, we decided to move ahead. I commissioned a local architect to draw up plans for this project, and he came in with estimates that were out of the stratosphere for cost. Then I started to read more about steel buildings and the benefits of this type of building over conventional stick framing.
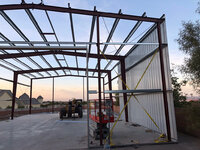
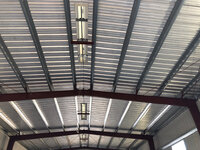
We decided to go ahead with steel and I placed an order with General Steel.
Then the fun started. I had to have structural and engineering drawings, as I suspected, for the city building inspectors. This took many more months than anticipated, but after 4 months I received approval from the city to move forward.
Our site, after excavating the area looked as follows:
49a15e49d0824aaf9482cc3610774149.jpg
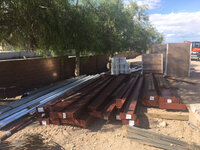
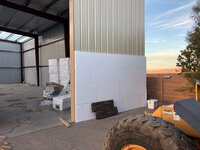
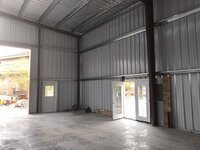
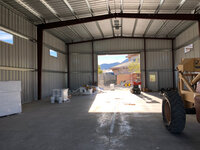
And then the we started to receive materials that made for some tricky juggling given our limited space:
f5ba923024434b0a785b9cd75ddf10f2.jpg
4eb40b7ce932801b32f812a93ac75470.jpg


Sent from my iPad using Tapatalk
 

Attachments

  • 49a15e49d0824aaf9482cc3610774149.jpg
    49a15e49d0824aaf9482cc3610774149.jpg
    992.1 KB · Views: 1
  • f5ba923024434b0a785b9cd75ddf10f2.jpg
    f5ba923024434b0a785b9cd75ddf10f2.jpg
    965.7 KB · Views: 1
  • 4eb40b7ce932801b32f812a93ac75470.jpg
    4eb40b7ce932801b32f812a93ac75470.jpg
    1 MB · Views: 1
  • a062618a788ab401d5d1fec9516ee1a2.jpg
    a062618a788ab401d5d1fec9516ee1a2.jpg
    594.5 KB · Views: 0
To avoid these ads, REGISTER NOW!
OP
N

NVSean

Well-known member
Joined
Aug 16, 2013
Messages
55
Location
Henderson, Nevada
I decided to go with a 6inch slab with rebar, as I knew we would be parking a boat and possibly RV in the future in this structure.
Little did I realize we would need soils reports, and compaction testing, all increasing the cost.
8a9d0522f76506f0be6e866a1d3fa910.jpg1af1289d2afa7341dbed8bcc9adb76c7.jpg3d8f0eda6561dcb26f3df57a2b27b6d4.jpgaff4e27c402230198019b80de6f10bc5.jpged6c542e9639cf62a61d9105dd0ecda0.jpg4f62aef9073779f41df21acfc5f23497.jpg52ac7c4b5147db9293146795e345fea4.jpg
I decided to install a central drain in the floor so that the boat would drip and drain without leaving large puddles.


Sent from my iPad using Tapatalk
 

Attachments

  • 52ac7c4b5147db9293146795e345fea4.jpg
    52ac7c4b5147db9293146795e345fea4.jpg
    791.6 KB · Views: 0
  • 1af1289d2afa7341dbed8bcc9adb76c7.jpg
    1af1289d2afa7341dbed8bcc9adb76c7.jpg
    934.4 KB · Views: 0
  • 3d8f0eda6561dcb26f3df57a2b27b6d4.jpg
    3d8f0eda6561dcb26f3df57a2b27b6d4.jpg
    746.1 KB · Views: 0
  • ed6c542e9639cf62a61d9105dd0ecda0.jpg
    ed6c542e9639cf62a61d9105dd0ecda0.jpg
    754.5 KB · Views: 0
  • 8a9d0522f76506f0be6e866a1d3fa910.jpg
    8a9d0522f76506f0be6e866a1d3fa910.jpg
    913.5 KB · Views: 0
  • 4f62aef9073779f41df21acfc5f23497.jpg
    4f62aef9073779f41df21acfc5f23497.jpg
    846.6 KB · Views: 0
  • aff4e27c402230198019b80de6f10bc5.jpg
    aff4e27c402230198019b80de6f10bc5.jpg
    817.3 KB · Views: 0
OP
N

NVSean

Well-known member
Joined
Aug 16, 2013
Messages
55
Location
Henderson, Nevada
We realized we needed to pour the walks around the building if we were going to erect the building.
db83cd932aa32abd64e93fc41697e064.jpg
14775a12aa3ee29324a0cb59047b88ce.jpg
36cfa3bb15e52e5cebe0aa9ed294e156.jpg
6b6b1eee20d5c580a09b1e410a73b8c6.jpg


Sent from my iPad using Tapatalk
 

Attachments

  • db83cd932aa32abd64e93fc41697e064.jpg
    db83cd932aa32abd64e93fc41697e064.jpg
    874 KB · Views: 0
  • 14775a12aa3ee29324a0cb59047b88ce.jpg
    14775a12aa3ee29324a0cb59047b88ce.jpg
    786.3 KB · Views: 0
  • 36cfa3bb15e52e5cebe0aa9ed294e156.jpg
    36cfa3bb15e52e5cebe0aa9ed294e156.jpg
    785.9 KB · Views: 0
  • 6b6b1eee20d5c580a09b1e410a73b8c6.jpg
    6b6b1eee20d5c580a09b1e410a73b8c6.jpg
    977.1 KB · Views: 0
OP
N

NVSean

Well-known member
Joined
Aug 16, 2013
Messages
55
Location
Henderson, Nevada
Finally, time to start erecting Steel!
71c38c10d90386af504e46639c52ee1c.jpg
8c114a910d5f5d21dc0db9fdb504d763.jpg
055552983c9ccf1d2617a40d373a6abb.jpg
855c739cc2fef706ea534336ef4c359e.jpg
863a75543a4243b61283d7c51d861104.jpg
02863b9fcb42aad98039928170663a3a.jpg
d09636576f1ea25532b7673d161810be.jpg
f84b9312104fc4a4e23d9b267997fbef.jpg


Sent from my iPad using Tapatalk
 

Attachments

  • 863a75543a4243b61283d7c51d861104.jpg
    863a75543a4243b61283d7c51d861104.jpg
    1 MB · Views: 0
  • 02863b9fcb42aad98039928170663a3a.jpg
    02863b9fcb42aad98039928170663a3a.jpg
    911.8 KB · Views: 0
  • d09636576f1ea25532b7673d161810be.jpg
    d09636576f1ea25532b7673d161810be.jpg
    879.5 KB · Views: 0
  • f84b9312104fc4a4e23d9b267997fbef.jpg
    f84b9312104fc4a4e23d9b267997fbef.jpg
    841.5 KB · Views: 0
  • 855c739cc2fef706ea534336ef4c359e.jpg
    855c739cc2fef706ea534336ef4c359e.jpg
    1 MB · Views: 0
  • 8c114a910d5f5d21dc0db9fdb504d763.jpg
    8c114a910d5f5d21dc0db9fdb504d763.jpg
    841.1 KB · Views: 0
  • 055552983c9ccf1d2617a40d373a6abb.jpg
    055552983c9ccf1d2617a40d373a6abb.jpg
    1.2 MB · Views: 0
  • 71c38c10d90386af504e46639c52ee1c.jpg
    71c38c10d90386af504e46639c52ee1c.jpg
    796.1 KB · Views: 0
OP
N

NVSean

Well-known member
Joined
Aug 16, 2013
Messages
55
Location
Henderson, Nevada
We decided to insulate the building and then stucco the exterior so it would blend in with the surrounding structures. The city planning group was insistent that we don’t build a steel eyesore in the backyard.
aa37cefa3ddeead7ab6155436ba0be0c.jpg
b938ad163ba297aa108b2f4f89df2cd4.jpg
d0f6f48b4456c3cce80fd9b6dd0fee64.jpg
b49bd27fdf5d2bdb25ded657b58c592e.jpg
dfa370ed7edecdd2fb3cdf212e34bf03.jpg
3bd4640b4fe72882f86cd0b8d8f09aef.jpg
ff8ee95046eecbb67aa8f115e4775dba.jpg


Sent from my iPad using Tapatalk
 

Attachments

  • ff8ee95046eecbb67aa8f115e4775dba.jpg
    ff8ee95046eecbb67aa8f115e4775dba.jpg
    675.6 KB · Views: 0
  • 3bd4640b4fe72882f86cd0b8d8f09aef.jpg
    3bd4640b4fe72882f86cd0b8d8f09aef.jpg
    754.6 KB · Views: 0
  • dfa370ed7edecdd2fb3cdf212e34bf03.jpg
    dfa370ed7edecdd2fb3cdf212e34bf03.jpg
    724 KB · Views: 0
  • b49bd27fdf5d2bdb25ded657b58c592e.jpg
    b49bd27fdf5d2bdb25ded657b58c592e.jpg
    692 KB · Views: 0
  • d0f6f48b4456c3cce80fd9b6dd0fee64.jpg
    d0f6f48b4456c3cce80fd9b6dd0fee64.jpg
    814.9 KB · Views: 0
  • b938ad163ba297aa108b2f4f89df2cd4.jpg
    b938ad163ba297aa108b2f4f89df2cd4.jpg
    928 KB · Views: 0
  • aa37cefa3ddeead7ab6155436ba0be0c.jpg
    aa37cefa3ddeead7ab6155436ba0be0c.jpg
    879.2 KB · Views: 0
OP
N

NVSean

Well-known member
Joined
Aug 16, 2013
Messages
55
Location
Henderson, Nevada
More pictures:
568cacea4d8e90796e84dcfea48880aa.jpg
afb12aa745f29975c12ab8e51c519fcc.jpg
87bc525fe1810db75c037f3340b7f674.jpg
I put some windows up high to allow some light in the garage.
3e92034a09f0aa2cf370bde336739af5.jpg
b4ab39918a161801b2065448f3ff6dca.jpg
3709dc7adf9ed83c1cfeb5be5cd1e5ee.jpg
7929004ab5028989fd19620d392defd6.jpg
4720a39f83234aabad4653d0bc9c6684.jpg
8d8a329cd1b4b4adccfe32914282c99c.jpg

We are in the process of finishing the exterior foam and will be adding stucco early next week. I will keep adding photos as we progress.
Cheers.


Sent from my iPad using Tapatalk
 

Attachments

  • 8d8a329cd1b4b4adccfe32914282c99c.jpg
    8d8a329cd1b4b4adccfe32914282c99c.jpg
    831 KB · Views: 0
  • 87bc525fe1810db75c037f3340b7f674.jpg
    87bc525fe1810db75c037f3340b7f674.jpg
    839.3 KB · Views: 0
  • 4720a39f83234aabad4653d0bc9c6684.jpg
    4720a39f83234aabad4653d0bc9c6684.jpg
    779 KB · Views: 0
  • 7929004ab5028989fd19620d392defd6.jpg
    7929004ab5028989fd19620d392defd6.jpg
    628.9 KB · Views: 0
  • afb12aa745f29975c12ab8e51c519fcc.jpg
    afb12aa745f29975c12ab8e51c519fcc.jpg
    706.4 KB · Views: 0
  • 568cacea4d8e90796e84dcfea48880aa.jpg
    568cacea4d8e90796e84dcfea48880aa.jpg
    741.8 KB · Views: 0
  • b4ab39918a161801b2065448f3ff6dca.jpg
    b4ab39918a161801b2065448f3ff6dca.jpg
    945.9 KB · Views: 0
  • 3e92034a09f0aa2cf370bde336739af5.jpg
    3e92034a09f0aa2cf370bde336739af5.jpg
    839.3 KB · Views: 0
  • 3709dc7adf9ed83c1cfeb5be5cd1e5ee.jpg
    3709dc7adf9ed83c1cfeb5be5cd1e5ee.jpg
    1 MB · Views: 0
OP
N

NVSean

Well-known member
Joined
Aug 16, 2013
Messages
55
Location
Henderson, Nevada
More photos:
4aff95ad3d984d5e9c623a551925ac08.jpg
1e97f03d4e5689cbb727921ab13c402f.jpg
f06eaed2c8a759215ca7570af8c802e8.jpg
65939a294c310ea64d97fcd48ad682ac.jpg
72c0f304ae63091817da097ec9465d87.jpg
1bc46526f2ad7c2734339a3da786a351.jpg


Sent from my iPad using Tapatalk
 

Attachments

  • 1bc46526f2ad7c2734339a3da786a351.jpg
    1bc46526f2ad7c2734339a3da786a351.jpg
    767.7 KB · Views: 0
  • 72c0f304ae63091817da097ec9465d87.jpg
    72c0f304ae63091817da097ec9465d87.jpg
    636.6 KB · Views: 0
  • 65939a294c310ea64d97fcd48ad682ac.jpg
    65939a294c310ea64d97fcd48ad682ac.jpg
    537.5 KB · Views: 0
  • f06eaed2c8a759215ca7570af8c802e8.jpg
    f06eaed2c8a759215ca7570af8c802e8.jpg
    713.3 KB · Views: 0
  • 1e97f03d4e5689cbb727921ab13c402f.jpg
    1e97f03d4e5689cbb727921ab13c402f.jpg
    626.7 KB · Views: 0
  • 4aff95ad3d984d5e9c623a551925ac08.jpg
    4aff95ad3d984d5e9c623a551925ac08.jpg
    735.9 KB · Views: 1
OP
N

NVSean

Well-known member
Joined
Aug 16, 2013
Messages
55
Location
Henderson, Nevada
I apologize. I realize that I posted this project in the lighting and electrical by mistake. Can a moderator move this to the general section?
Thanks,
Sean


Sent from my iPad using Tapatalk
 

Toomanytools?

Well-known member
Joined
Nov 4, 2010
Messages
855
Location
Washington
Interesting build, I would think the different expansion and contraction variables of the metal and Stucco would cause problems down the line. Looks to be a nice building though.
 
OP
N

NVSean

Well-known member
Joined
Aug 16, 2013
Messages
55
Location
Henderson, Nevada
Interesting build, I would think the different expansion and contraction variables of the metal and Stucco would cause problems down the line. Looks to be a nice building though.


Yes, that was a concern. We are using a polymer type stucco mixture with a shear plane as well. Not your usual stick frame type of stucco. I will send more pictures once we are there next week.
Sean


Sent from my iPad using Tapatalk
 
OP
N

NVSean

Well-known member
Joined
Aug 16, 2013
Messages
55
Location
Henderson, Nevada
Back to my original question, what type of lighting would you recommend for this type of steel garage? I want to put in a indoor batting cage that runs the entire length on the North side of the garage, with at least 14’ tall net. We have 20’ ceiling height.
I would like to know recommended layout of lights to get enough light for my boys to use the batting cage with all doors closed.
Any thoughts?
Thanks,
Sean


Sent from my iPad using Tapatalk
 
OP
N

NVSean

Well-known member
Joined
Aug 16, 2013
Messages
55
Location
Henderson, Nevada
More pictures as we are moving along:
The lighting came out great! Thank you all for your advice and wisdom.
Before lights:
IMG_0259.jpg
After lights installed and insulation on ceiling:
IMG_0387.jpg
IMG_0377.jpgIMG_0388.jpgIMG_0390.jpgIMG_0384.jpg


Sent from my iPad using Tapatalk
 
OP
N

NVSean

Well-known member
Joined
Aug 16, 2013
Messages
55
Location
Henderson, Nevada
Now at he fun part- painting the ceiling! I can not recommend enough using a good spray system and scissor lift to make life easier. We have 20’ ceiling.IMG_0393.jpgIMG_0923.jpgIMG_0919.jpgIMG_0396.jpgIMG_0400.jpg


Sent from my iPad using Tapatalk
 

Platonic Solid

Well-known member
Joined
Nov 29, 2014
Messages
3,587
Location
CT-USA
Progress! Dang, painting all that looks like a real PIA (but worth it). I see you moved the lights around the garage doors. Refresh my memory - what type of doors will they be? I'll have to make some time later to post your layout.
 
OP
N

NVSean

Well-known member
Joined
Aug 16, 2013
Messages
55
Location
Henderson, Nevada
Progress! Dang, painting all that looks like a real PIA (but worth it). I see you moved the lights around the garage doors. Refresh my memory - what type of doors will they be? I'll have to make some time later to post your layout.


We have traditional small panel insulated steel doors going in with a walnut wood color paint, that are to installed with jack screw as a high lift door. These will go all the way to the ceiling, thus we had to move two lights around each garage door on the ceiling. The light inside the garage is incredible! Thank you for the layout and recommendations. My boys are going to really appreciate this light in the batting cage.


Sent from my iPad using Tapatalk
 
To avoid these ads, REGISTER NOW!

checkthisout

Well-known member
Joined
Sep 5, 2008
Messages
5,232
Awesome build. I have never seen that done to a metal building before. (stucco over the regular siding).

Keep the pictures coming.
 
OP
N

NVSean

Well-known member
Joined
Aug 16, 2013
Messages
55
Location
Henderson, Nevada
Garage doors were next. I went through Costco to get Amarr Heritage 3000 insulated doors 16’x14’ and 14’x12’. We went with high lift and wall mounted LiftMaster 8500W openers

.
View attachment 1
IMG_0440.jpg
IMG_0439.jpg
IMG_0436.jpg
IMG_0438.jpg

It is now much less windy in the garage, and much cooler as we get into our warmer weather. It was a nice 82 degrees just now, with 96 degrees and sunny this morning.


Sent from my iPad using Tapatalk
 
OP
N

NVSean

Well-known member
Joined
Aug 16, 2013
Messages
55
Location
Henderson, Nevada
Now for the interior walls for our batting cage.

IMG_0482.jpg
IMG_0509.jpg
IMG_0518.jpg
IMG_0527.jpg
IMG_0529.jpg
Working around the existing steel.
IMG_0539.jpg
IMG_0542.jpg
Even the dog was happy with the progress.
IMG_0545.jpg


Sent from my iPad using Tapatalk
 
OP
N

NVSean

Well-known member
Joined
Aug 16, 2013
Messages
55
Location
Henderson, Nevada
I followed advice on GJ and used Kills Original oil based primer for the OSB to protect from water exposure.
IMG_0552.jpg
IMG_0555.jpg
IMG_0556.jpg
I still have one section of wall to go, as we are not done with electrical panel yet. We need two grounding rods, as per local inspector. Hopefully, we can get all done this week, and finally get wall closed up, after final inspections.


Sent from my iPad using Tapatalk
 
OP
N

NVSean

Well-known member
Joined
Aug 16, 2013
Messages
55
Location
Henderson, Nevada
A long weekend of floor preparation for dye and sealing.
I thought I would be done grinding in 6 hours. Instead it took 2 days, total of 23 hours!!

IMG_0569.jpg
Even the dog had fun.

IMG_0578.jpg
IMG_0579.jpg
I rented and Edco 2EC diamond grinder, with the Edco dry vacuum system. It was easy to grind when the bits were sharp and working well. I was the first person to use the new machine, and it took some tweaking to get it working well.
IMG_0581.jpg
I still have some hand grinding left around the base of the walls and steel support columns, but it will have to wait for another day.


Sent from my iPad using Tapatalk
 
OP
N

NVSean

Well-known member
Joined
Aug 16, 2013
Messages
55
Location
Henderson, Nevada
I am following the idea posted by Revamped

Revamped's Delta Dye and HD6525 Acrylic install
https://r.tapatalk.com/shareLink?sh...om/forum/showthread.php?t=371600&share_type=t

I spoke with Scotty at Legacy Industrial and placed my order almost 10 days ago. I hope to have everything by next weekend, so I can get started with the Delta Dye and then sealing with the HD-6600 MMA Concrete Sealer. I decided to try blending a few colors, as I really like the look of Revamped garage floor in the post above. I will post more photos as we progress.
Next weekend will be slow work on the garage, as my son has a baseball tournament. We need to push ahead to get his batting cage set up soon.


Sent from my iPad using Tapatalk
 
OP
N

NVSean

Well-known member
Joined
Aug 16, 2013
Messages
55
Location
Henderson, Nevada
Working on grinding the floor for preparation of Delta Dye followed by sealing with Legacy Industrial HD-6600 MMA sealer.


Sent from my iPad using Tapatalk
 
OP
N

NVSean

Well-known member
Joined
Aug 16, 2013
Messages
55
Location
Henderson, Nevada
IMG_0601.jpg
Grinding with Edco 2EC unit and vacuum system

IMG_0607.jpg
Hand grinding the walls and everything the 2 disk push unit couldn’t get.
IMG_0614.jpg
Patchy streaks after Edco grinding. The floor was not as level as I thought!

IMG_0610.jpg
Grinding was hard work but worth it to get the best looking floor!

IMG_0623.jpg
Even the dog approved of the job!


Sent from my iPad using The Garage Journal mobile app
 
OP
N

NVSean

Well-known member
Joined
Aug 16, 2013
Messages
55
Location
Henderson, Nevada
IMG_0631.jpg
We decided to fill in the saw cut expansion joints on the floor. We used the Legacy Industrial product for the project. The set times are very fast in the Summer in Southern Nevada when it is 92 degrees at 9 pm.
IMG_0630.jpg

I used a plastic application bottle, but quickly learned to only mix half of a small bottle, about enough to do 10-12’ of crack filling. You may be able to use more at a cooler temperature, but this exothermic reaction created some good heat after mixing! You have to work quickly in our heat
IMG_0632.jpg
The cracks look good after MORE grinding again! I have over 40 hours of floor preparation for this project, much longer than I anticipated, but hoping for a beautiful floor that looks great. My last DIY big box epoxy job in our last house looked good for several years and then started to yellow. I etched with muriatic acid for that floor, but decided to grind this floor.


Sent from my iPad using The Garage Journal mobile app
 

OOBER

Well-known member
Joined
Dec 2, 2012
Messages
153
Location
Kansas City
Cool build!

So, silly question. How did they attach the foam for the stucco to the building?

I was looking at the pictures and in some pics it looks like they did two screws per board with big washers, but in other pictures there are no holes so that makes me think they glued it?
 
OP
N

NVSean

Well-known member
Joined
Aug 16, 2013
Messages
55
Location
Henderson, Nevada
Oober,
The foam is both glued and secured with fasteners (sheet metal screws with plastic washers). This is a common method for applying the foam.


Sent from my iPad using Garage Journal
 
OP
N

NVSean

Well-known member
Joined
Aug 16, 2013
Messages
55
Location
Henderson, Nevada
Now for some color to the floor.
I started with red oak and then added amber.

IMG_0645.jpg
Initial spraying of Delta Dye Red Oak

IMG_0648.jpg

IMG_0649.jpg
Then I added some Amber Delta Dye

IMG_0653.jpg

Still not very impressive when just sprayed on. I followed Revamped’s suggestion and used a mop to mix the dye in random patterns
IMG_0655.jpg

IMG_0658.jpg

IMG_0659.jpg


Sent from my iPad using Garage Journal
 
OP
N

NVSean

Well-known member
Joined
Aug 16, 2013
Messages
55
Location
Henderson, Nevada
All of these above pictures are just the Delta Dye on a dry ground slab. There is some very interesting patterns seen in the concrete after grinding and then power washing with Honda gas sprayer. The Dye picks up all of the imperfections in the concrete. I will try to show more details in next set of photos.
As with all of these projects, I estimated 3 hours to apply the floor dye, and instead it took almost 6 hours. This was hard work blending the colors with the mop, as the concrete just chewed up the mop head quickly. The patterns that developed are very unique and interesting. It has a look of “Rust” or even “Leather”.
The wife is going to inspect before I seal the floor next. I think she will want more color. I still have some Mahogany dye that I was going to use for some accents, if we needed more richness.


Sent from my iPad using Garage Journal
 
OP
N

NVSean

Well-known member
Joined
Aug 16, 2013
Messages
55
Location
Henderson, Nevada
Just finished with sealing last night using Legacy Industrial HD-6600 MMA, 3 coats on top of Delta Dye.
IMG_0672.jpg
IMG_0678.jpg
IMG_0679.jpgIMG_0681.jpgIMG_0680.jpg


Sent from my iPad using Garage Journal
 
To avoid these ads, REGISTER NOW!
Top Bottom