
You are using an out of date browser. It may not display this or other websites correctly.
You should upgrade or use an alternative browser.
You should upgrade or use an alternative browser.
Above 1200 Sq/FT DFB's Garage
- Thread starter D.F.B
- Start date
Wokspaces above 1200 squarefeet.
@D.F.B this has proved how little I know. I better get onto this. Thanks for saving my 15+ year old Honda.
You've done well thus far so you must be doing something right.
Those little Honda GX25 and GX35 are lovely little engines. Smooth, responsive, nice quiet idle, fuel efficient. They are heavier than a 2-stroke though.
In the commercial world, they are probably too heavy for constant use. I also think they are best suited to owner operators, employees will destroy them quickly. As you would know, they only hold about 80ml of oil, so the difference between full and low is not a lot, its super easy to burn one of them up. We had them on Atom edgers, I never really had to use them, but those who did never checked the oil. I went to grab one of them once and it smoked like a freight train, the rings worn so much that it was diverting fuel and exhaust gases into the crankcase, turning the oil grey.

I've now got a GX25 on an Atom, I'm pretty particular in keeping an eye on and changing the oil.


Fitted the blade attachment to the BG86 this morning.
https://bwmachinery.com.au/product/...06GxI-4vHdDJvYDSQKB3zYC3G9zC3Lsep2MuizO5SGB5m


I wonder why it reminds me of these......................

https://bwmachinery.com.au/product/...06GxI-4vHdDJvYDSQKB3zYC3G9zC3Lsep2MuizO5SGB5m
I wonder why it reminds me of these......................
hewey
Well-known member
Nice work on that little shelf. I'm a big fan of making the most of what you've got, particularly when you don't have much... uh, not sure that came out right
Nice work on that little shelf. I'm a big fan of making the most of what you've got, particularly when you don't have much... uh, not sure that came out right
I don't have that problem...........................
Today I went down to Nagambie to help my Dad pull the boat out of the river for winter. While this thing is just waaay to big, it's one of very few indulgent purchases he has ever made. When he bought it, my Mum and my sister were disgusted, but as far I'm concerned, he worked his ar.e off his whole life, let the man have his boat!

I have to say, even though it was quite chilly on the water this morning, the sun was shining and the air had that lovely sweet, fresh winter scent.
POWER! I love the sound of these at full tilt!


Considering I don't have a boat licence, someone had to wrangle the car and trailer into position on the ramp while Dad stayed with the boat. I'm over the moon to say that I did this in one shot! I struggled for years to reverse trailers until a client of mine broke it down into very simplistic terms. Am I confident reversing trailers? No, not really. But can I do it, well, I can now.

The trailer and vehicle were actually reversed further back into the water to allow Dad to drive the boat up onto the trailer. I even engaged 4H to drive it up the ramp.
You can see the Wildtrak is nose up with the boat and trailer hanging off the back. The 2.0 Bi-Turbo diesel engine has the torque to pull this rig, but it certainly works hard and makes its presence heard. The 10-speed auto becomes a great asset for towing as it keeps the engine in the torque band. Anyone who has towed with a 4 or 5-speed auto will know the compromise, you either labour the engine in top gear and lose momentum, or end up revving too hard in 3rd or 4th, making more noise and consuming more fuel. The 10-speed will seamlessly cycle through the upper ratios to keep the engine at peak performance. I also had it in S mode to help the cause.

Back home, both boat and Wildtrak are in need of some detailing love.
I have to say, even though it was quite chilly on the water this morning, the sun was shining and the air had that lovely sweet, fresh winter scent.
POWER! I love the sound of these at full tilt!
Considering I don't have a boat licence, someone had to wrangle the car and trailer into position on the ramp while Dad stayed with the boat. I'm over the moon to say that I did this in one shot! I struggled for years to reverse trailers until a client of mine broke it down into very simplistic terms. Am I confident reversing trailers? No, not really. But can I do it, well, I can now.
The trailer and vehicle were actually reversed further back into the water to allow Dad to drive the boat up onto the trailer. I even engaged 4H to drive it up the ramp.
You can see the Wildtrak is nose up with the boat and trailer hanging off the back. The 2.0 Bi-Turbo diesel engine has the torque to pull this rig, but it certainly works hard and makes its presence heard. The 10-speed auto becomes a great asset for towing as it keeps the engine in the torque band. Anyone who has towed with a 4 or 5-speed auto will know the compromise, you either labour the engine in top gear and lose momentum, or end up revving too hard in 3rd or 4th, making more noise and consuming more fuel. The 10-speed will seamlessly cycle through the upper ratios to keep the engine at peak performance. I also had it in S mode to help the cause.
Back home, both boat and Wildtrak are in need of some detailing love.
Of all the boats to indulge in, a pontoon seems to be the most economical way to do so. Good on him. Pontoons are such great hang out boats.
I'm jealous of that 10 speed. My Canyon with the 3.0 diesel has the 6l50e which leaves a lot to be desired.
I'm jealous of that 10 speed. My Canyon with the 3.0 diesel has the 6l50e which leaves a lot to be desired.
slodat
ALLIANCE MEMBER
As a new Dark Horse owner, I REALLY appreciate all of your in depth Mustang posts! Excellent all around.
Of all the boats to indulge in, a pontoon seems to be the most economical way to do so. Good on him. Pontoons are such great hang out boats.
I'm jealous of that 10 speed. My Canyon with the 3.0 diesel has the 6l50e which leaves a lot to be desired.
The 10-speed isn't perfect, but then I'm VERY particular with transmission calibration and feel. Hate CVT's with a passion, DCT's are not for me, which leaves the traditional torque converter auto, they are smoother when you want, fast enough when the hammer goes down.
With the 10-speed, it has a LOT going on. I've driven enough across Ranger and Mustang to know that the latest versions are vastly better sorted. The one in my fathers Ranger is an earlier calibration that skip gears in normal driving situations. That tends to make it sluggish as it goes from 1st to 3rd, 3rd to 5th and so on. Hence towing in S mode as drops the skip shifting. On the latest Ranger though using the same engine, the gearbox now shifts normally without skipping, so it feels much nicer even if its shifting more often. The manual shift function with the rocker switch on the gear selector is dumb, and manual inputs have a terrible delay.
In the Mustang, its a mixed bag. I've driven S550 and S650, again the latest is better calibrated. When the hammer is down, the way the gearbox keeps the rev happy Coyote in the power zone is impressive, it just rips through each gear. In normal driving, the shifts are smooth and logical. But......................manual inputs are just too slow to react. On a Ranger, you can kinda excuse that, but on a sports car, it doesn't sit well with me. I've had it ignore upshifts, then gives it you two instead of one. The gear shifts themselves are actually very fast, and the rev matched down shifts are epic, but the time it takes between pulling a paddle and the gearbox responding is just too conservative. I find when the hammer is down, you have to preempt when to pull the paddle to avoid slamming into the limiter. Even the old ZF 6-speeds in my Falcon's do this better, a gearbox that originally went on sale in 2001, and the ZF 8-Speed in the Jag is on another page.
I'm not necessarily complaining here, I'm just naturally analytical. As I've said before, Ford are sooo close to making the 10-speed perfect, if only they could take out some of the conservative shift response.
As a new Dark Horse owner, I REALLY appreciate all of your in depth Mustang posts! Excellent all around.
I'm glad to hear that.
So, don't leave me hanging here, dish the specs on the Darkhorse!
I always forget how much extra work it is to maintain a car in winter. Wet or damp roads, and the road film and mud the comes from that, well it generally takes more time and more chemical aggression to deal with. In the Wildtrak's case, transporting a dog with wet and muddy paws every day, off roading and pulling a boat out of the river doesn't help the situation.
I actually pre-treated the wheels, tyres and wheel arches with Bilt Hamber Touch-less, followed by contact washing with P&S Brake Buster and Undressed. For the paint, I tried P&S Frostbite, which apart from the unique Eucalyptus-Green Tea scent, it's thoroughly unremarkable. Just shows you that even with benchmark products in their lineup, they can still make a dud.

Contact wash was via Reset, drying aid Megs HCD, windows via Invisible Glass. Tyres dressed with Carpro Perl.
The interior was filthy. I started by foaming and scrubbing the floor mats with Touch-less. After a vacuum, the plastics got wiped down with Nextzett Cockpit Premium, such an obscure product that is well worth tracking down. The leather was wiped with Bowden's Leather Love, although I had to break out the ColourLock Strong cleaner for the drivers seat, steering wheel, gear shifter and central armrest. I followed that with ColourLock Leather Protector.

Clean again.....................for now.
I actually pre-treated the wheels, tyres and wheel arches with Bilt Hamber Touch-less, followed by contact washing with P&S Brake Buster and Undressed. For the paint, I tried P&S Frostbite, which apart from the unique Eucalyptus-Green Tea scent, it's thoroughly unremarkable. Just shows you that even with benchmark products in their lineup, they can still make a dud.
Contact wash was via Reset, drying aid Megs HCD, windows via Invisible Glass. Tyres dressed with Carpro Perl.
The interior was filthy. I started by foaming and scrubbing the floor mats with Touch-less. After a vacuum, the plastics got wiped down with Nextzett Cockpit Premium, such an obscure product that is well worth tracking down. The leather was wiped with Bowden's Leather Love, although I had to break out the ColourLock Strong cleaner for the drivers seat, steering wheel, gear shifter and central armrest. I followed that with ColourLock Leather Protector.
Clean again.....................for now.
Well, I got a little carried away................................
 www.garagejournal.com


The Stihl MS 500i is the world's first and only fuel injected chainsaw. I've had my eye these for a couple of years, but being heavily discounted for the current Stihl winter sale, I felt now was the time. Tax deduction and all.
The Stihl MS500i – A True Game Changer!
The Stihl MS 500i – A True Game Changer! It’s hard to know exactly why I love chainsaws so much. The sound? The smell? The look? The teetering on the edge of danger? All of the above? In fact, it’s probably easier to determine WHEN and WHY I became obsessed with these noisy, dangerous and oh so...
www.garagejournal.com
The Stihl MS 500i is the world's first and only fuel injected chainsaw. I've had my eye these for a couple of years, but being heavily discounted for the current Stihl winter sale, I felt now was the time. Tax deduction and all.
slodat
ALLIANCE MEMBER
New 2024 DH Premium six speed, handling package, 700A, dark matter gray.I'm glad to hear that.
So, don't leave me hanging here, dish the specs on the Darkhorse!


Ceramic Coating –
Yeah yeah, I know, but I'm sure you expected this would happen.
On a machine that will spend its life covered in oil and fuel, the coating is probably not going to last very long. But……………………it makes me happy, so I’m going with it.
For something like this, you would probably use a high-temperature wheel coating. However, I didn’t have any leftover wheel coating for this task, and I wasn’t dipping into a fresh bottle either. I did have an open bottle of Gyeon Can Coat EVO, so here we go.............................

First step, a wipe down with Koch Chemie Panel Prep Spray. Any prep spray would work, but I had this left over from another project and I thought I would stay with the German theme. In tandem with TRC Rip-n-Rag towels, the entire power head was cleaned, followed by the freshly unboxed 20-inch bar.

From here, it was time for the coating. Can Coat EVO is a sprayable coating, but for this task I used it like a traditional ceramic coating by applying a small amount to a Gtechniq finger mitt, then applied to the saw in sections. From there, more TRC Rip-n-Rags were used to level the coating. Can Coat was applied to the pretty much everything, from the top plastics to the chain brake, the recoil cover and name badge, the wrap handle and clutch cover, the rear handle and throttle, the stop switch and the front case. I even applied it to bar and fluid caps. The muffler, dogs and bottom of the saw missed out. Four hours later, I went over it again with a layer of Gyeon Cure.
You can see I also mounted the bar and chain.


In the past, I've done something similar to other new equipment purchases. Does it make a difference to how the tool performs? Absolutely not. Will it last for forever? Highly unlikely. Does it make me feel better? You betcha!
Yeah yeah, I know, but I'm sure you expected this would happen.
On a machine that will spend its life covered in oil and fuel, the coating is probably not going to last very long. But……………………it makes me happy, so I’m going with it.
For something like this, you would probably use a high-temperature wheel coating. However, I didn’t have any leftover wheel coating for this task, and I wasn’t dipping into a fresh bottle either. I did have an open bottle of Gyeon Can Coat EVO, so here we go.............................
First step, a wipe down with Koch Chemie Panel Prep Spray. Any prep spray would work, but I had this left over from another project and I thought I would stay with the German theme. In tandem with TRC Rip-n-Rag towels, the entire power head was cleaned, followed by the freshly unboxed 20-inch bar.
From here, it was time for the coating. Can Coat EVO is a sprayable coating, but for this task I used it like a traditional ceramic coating by applying a small amount to a Gtechniq finger mitt, then applied to the saw in sections. From there, more TRC Rip-n-Rags were used to level the coating. Can Coat was applied to the pretty much everything, from the top plastics to the chain brake, the recoil cover and name badge, the wrap handle and clutch cover, the rear handle and throttle, the stop switch and the front case. I even applied it to bar and fluid caps. The muffler, dogs and bottom of the saw missed out. Four hours later, I went over it again with a layer of Gyeon Cure.
You can see I also mounted the bar and chain.
In the past, I've done something similar to other new equipment purchases. Does it make a difference to how the tool performs? Absolutely not. Will it last for forever? Highly unlikely. Does it make me feel better? You betcha!
A once-a-year job, a heavy winter prune of this ornamental grape vine, or Vitis Vinifera. This is a job of two halves, I really like pruning, but then I really dislike ladders.
From this.....................

To this..............................

And after pruning back to a main framework, to this.........................

It's impressive how much material this one plant generates in a single season. Prior to planting, the summer sun would belt through the windows and meant a heavy reliance on climate control. Now though, the foliage blocks out the harsh sunlight, significantly reducing temperatures inside. Come winter, the lack of foliage allows the sunlight to pass through and reduce heating costs.
From this.....................
To this..............................
And after pruning back to a main framework, to this.........................
It's impressive how much material this one plant generates in a single season. Prior to planting, the summer sun would belt through the windows and meant a heavy reliance on climate control. Now though, the foliage blocks out the harsh sunlight, significantly reducing temperatures inside. Come winter, the lack of foliage allows the sunlight to pass through and reduce heating costs.
hewey
Well-known member
That's a great looking vine. I'm a big fan of using vines and creepers to help with passive heating and cooling.
Stihl Model Naming System -
This is a topic I came across while researching a post on my new MS 500i.
Roughly speaking, each model is made up of two or three sequences. Two letters, followed by two or three numbers, and on some models, there are additional letters that follow. For example, FS 45 C. This system has been in place since about 2000 and was gradually rolled out across the entire line as new models came to market.

The first two letters are usually an abbreviation of the German word for the tool itself. For example, FS is an abbreviation of “Freischneider”, which translates to “free strimmer”, or line trimmer/brush cutter. For chainsaws, Stihl have used the MS letters since the early 2000’s, which abbreviates “Motorsäge”, German for chainsaw. Further to that, an A after the first two letters denotes battery power, MSA or FSA for example.
MS = Motorsäge (Chain Saw)
MSE = Motorsäge (AC Electric Corded Chain Saw)
MSA = Motorsäge (Accumulator Battery Chain Saw)
HT = Hoch-Entaster (Pole Pruner)
FS = Freischneider (Line Trimmer)
FC = Kantenschneider (Edge Trimmer)
BG = Blasgerät (Handheld Blower)
BR = Blasgerät Rückentragbar (Backpack Blower)
SH = Saug Häcksler (Shredder Vac / Blower)
SR = Sprühgerät, rückentragbar (Backpack Sprayer)
TS = Trennschleifer (Cut Off Machine)
BT = Bohrgerät (Earth Auger)
HL = Heckenschere (Extended Length Hedge Trimmer)
HS = Heckenschere (Hedge Trimmer)
MM = Multi Motor
KM = Kombi Motor
KB = Kehrbürste (Bristle Brush Attachment)
KW = Kehrwalze (PowerSweep)
RMA = Rasenmäher (Accumulator Battery Mower)
GS = Gestinschneider (Rock/Stone Cutter)

Following the first letters, this is where the numbering sequence begins. As a rough guide, the bigger the number, the more powerful the machine………….. sometimes. For example, a MS 261 would appear to be smaller than the MS 271, but they share the exact same engine capacity and the 261 is actually more powerful and $500 more expensive. This where the lines blur because Stihl often have two or three different model lines, usually divided into homeowner and professional usage. Using the 261/271 as example, the 271 is a farm saw and the 261is a pro saw. Confused? I don’t blame you.
But do the numbers have any meaning? I first assumed not, but after stumbling across the below website, it appears I was wrong.

So, going off that, the first number denotes the engine capacity range. The second and third number are used to denote the model within the same engine capacity range. At this point, I’ll note that the battery range has recently started to use only two numbers, obviously there is no cubic capacity range with electric motors, and each tool can be powered by different battery capacities.
Then there are the letters that follow, which are used to denote certain features. This will vary depending on the tool type and production date.
AV = Anti-Vibration
B = Quick Chain Adjuster (QCA)
C = Comfort (Usually refers to one or more of the following - Easy2Start, Decomp Valve, ElastoStart, Quick Chain Adjuster)
D = Catalytic Converter
E = Easy2Start
E = Electronic Ignition
FB = Stihl Farm Boss®
L = Low Noise
M = M-Tronic Fuel Management
MB = STIHL MiniBoss
Q = STIHL Quickstop Chain Brake
QS = Second Chain Braking System
R = Wrap Handle (Chain Saw)
S = Super
T = Top Handle (Chain Saw)
V = Heated Carb
W = Heated Handle/Carburetor
WB = STIHL WOOD BOSS®
Z = Fire Safe Muffler
So, lets have a look at a few case studies…………………….
MS 172 CB-E
MS = Short for “Motorsäge”, German for chainsaw
1 = Engine capacity range 23.6 - 31.9 cc (1.44 - 1.95 cu. in.)
7 = Denotes user type
2 = Denote generation/model type
C = Comfort, which would be from the combo of the next two letters………………
B = Quick Chain Adjuster
E = Easy2Start

MS 261 C-M
MS =Short for “Motorsäge”, German for chainsaw
2 = Engine capacity range 35.2 - 55.5 cc (2.15 - 3.39 cu. in.)
6 = Denotes user type
1 = Denotes generation/model type
C = Comfort, on this model it would be ElastoStart, the decomp valve and M-tronic
M = M-tronic

At the start of writing that post, I just assumed the Stihl model names were used purely for selection purposes only. Turns out there is in fact a meaning behind the complicated numbers and letters.
This is a topic I came across while researching a post on my new MS 500i.
Roughly speaking, each model is made up of two or three sequences. Two letters, followed by two or three numbers, and on some models, there are additional letters that follow. For example, FS 45 C. This system has been in place since about 2000 and was gradually rolled out across the entire line as new models came to market.
The first two letters are usually an abbreviation of the German word for the tool itself. For example, FS is an abbreviation of “Freischneider”, which translates to “free strimmer”, or line trimmer/brush cutter. For chainsaws, Stihl have used the MS letters since the early 2000’s, which abbreviates “Motorsäge”, German for chainsaw. Further to that, an A after the first two letters denotes battery power, MSA or FSA for example.
MS = Motorsäge (Chain Saw)
MSE = Motorsäge (AC Electric Corded Chain Saw)
MSA = Motorsäge (Accumulator Battery Chain Saw)
HT = Hoch-Entaster (Pole Pruner)
FS = Freischneider (Line Trimmer)
FC = Kantenschneider (Edge Trimmer)
BG = Blasgerät (Handheld Blower)
BR = Blasgerät Rückentragbar (Backpack Blower)
SH = Saug Häcksler (Shredder Vac / Blower)
SR = Sprühgerät, rückentragbar (Backpack Sprayer)
TS = Trennschleifer (Cut Off Machine)
BT = Bohrgerät (Earth Auger)
HL = Heckenschere (Extended Length Hedge Trimmer)
HS = Heckenschere (Hedge Trimmer)
MM = Multi Motor
KM = Kombi Motor
KB = Kehrbürste (Bristle Brush Attachment)
KW = Kehrwalze (PowerSweep)
RMA = Rasenmäher (Accumulator Battery Mower)
GS = Gestinschneider (Rock/Stone Cutter)
Following the first letters, this is where the numbering sequence begins. As a rough guide, the bigger the number, the more powerful the machine………….. sometimes. For example, a MS 261 would appear to be smaller than the MS 271, but they share the exact same engine capacity and the 261 is actually more powerful and $500 more expensive. This where the lines blur because Stihl often have two or three different model lines, usually divided into homeowner and professional usage. Using the 261/271 as example, the 271 is a farm saw and the 261is a pro saw. Confused? I don’t blame you.
But do the numbers have any meaning? I first assumed not, but after stumbling across the below website, it appears I was wrong.
So, going off that, the first number denotes the engine capacity range. The second and third number are used to denote the model within the same engine capacity range. At this point, I’ll note that the battery range has recently started to use only two numbers, obviously there is no cubic capacity range with electric motors, and each tool can be powered by different battery capacities.
Then there are the letters that follow, which are used to denote certain features. This will vary depending on the tool type and production date.
AV = Anti-Vibration
B = Quick Chain Adjuster (QCA)
C = Comfort (Usually refers to one or more of the following - Easy2Start, Decomp Valve, ElastoStart, Quick Chain Adjuster)
D = Catalytic Converter
E = Easy2Start
E = Electronic Ignition
FB = Stihl Farm Boss®
L = Low Noise
M = M-Tronic Fuel Management
MB = STIHL MiniBoss
Q = STIHL Quickstop Chain Brake
QS = Second Chain Braking System
R = Wrap Handle (Chain Saw)
S = Super
T = Top Handle (Chain Saw)
V = Heated Carb
W = Heated Handle/Carburetor
WB = STIHL WOOD BOSS®
Z = Fire Safe Muffler
So, lets have a look at a few case studies…………………….
MS 172 CB-E
MS = Short for “Motorsäge”, German for chainsaw
1 = Engine capacity range 23.6 - 31.9 cc (1.44 - 1.95 cu. in.)
7 = Denotes user type
2 = Denote generation/model type
C = Comfort, which would be from the combo of the next two letters………………
B = Quick Chain Adjuster
E = Easy2Start
MS 261 C-M
MS =Short for “Motorsäge”, German for chainsaw
2 = Engine capacity range 35.2 - 55.5 cc (2.15 - 3.39 cu. in.)
6 = Denotes user type
1 = Denotes generation/model type
C = Comfort, on this model it would be ElastoStart, the decomp valve and M-tronic
M = M-tronic
At the start of writing that post, I just assumed the Stihl model names were used purely for selection purposes only. Turns out there is in fact a meaning behind the complicated numbers and letters.
If it's a German based company you know their naming convention has a purpose and is usually overly-complex.
I love me some Stihl stuff, and knock on wood have always had great luck with it. My only small regret is getting talked out of getting a pro level saw by a coworker. Not knowing much about chainsaws, I crowd sourced my knowledge and my coworker talked me out of the MS261 and into a smaller MS250. Does the amount of time I would likely spend on an annual basis cutting wood warrant a pro level saw....no. But don't seem to have as much satisfaction in buying nice tools that aren't heirloom quality, and while I have no complaints I just should have spend the cash and followed my heart. haha
On a different note, I have some anodized bronze Volk Racing wheels on the Miata that I couldn't ever seem to get good and clean. I randomly read a post that coating them in Vaseline (petroleum jelly?) and letting it soak for 24hrs works wonders. Sure enough even after cleaning the wheels very well with Megs All Wheel Cleaner, the Vaseline pulled a lot more brake dust off the wheels.
This morning, I was made an offer for the MS 271 that I was happy with. The buyer turned up, took one look at it and handed me the money. I even removed the top cover to show the lack of sawdust and oil around the carburettor and air filter, gave him a spare chain and the owner's manual too. Apparently, it will be his sons camping/firewood saw.
Before it left the building this afternoon, I took the opportunity to film a few videos of the 271. I did this back-to-back with the 500i, and I'm glad I did because the difference between the two is massive. The 500i has a very throaty induction note and overall a much smoother sound. The 271 on the other hand has a harsher tone, but without that addictive intake bark. Also, it just cannot approach how quickly the 500i responds to the throttle, like a night and day difference. The throttle and acceleration response is huge selling point, I just didn't realise just how much better it would be. The other notable difference being the fact I can drop or crotch start the 271, but the 500i I need on the ground, even with the decomp valve.
While the sale of the 271 made the 500i possible, it was still a little sad to let it go. For some reason, I get emotionally attached to machines.
I bought this in November 2022, my first "big" saw.


And how it looked today before I moved it on......................

Note the condition of the bar, that's what happens when you lend a chainsaw. Never do this by the way, hell will freeze over before I loan out the 500i!!!
Before it left the building this afternoon, I took the opportunity to film a few videos of the 271. I did this back-to-back with the 500i, and I'm glad I did because the difference between the two is massive. The 500i has a very throaty induction note and overall a much smoother sound. The 271 on the other hand has a harsher tone, but without that addictive intake bark. Also, it just cannot approach how quickly the 500i responds to the throttle, like a night and day difference. The throttle and acceleration response is huge selling point, I just didn't realise just how much better it would be. The other notable difference being the fact I can drop or crotch start the 271, but the 500i I need on the ground, even with the decomp valve.
While the sale of the 271 made the 500i possible, it was still a little sad to let it go. For some reason, I get emotionally attached to machines.
I bought this in November 2022, my first "big" saw.
And how it looked today before I moved it on......................
Note the condition of the bar, that's what happens when you lend a chainsaw. Never do this by the way, hell will freeze over before I loan out the 500i!!!
moab11
Well-known member
I've been dreaming of a good reason to buy a 500i to replace my ms291, but for as little as I would need that big of a saw, it's a tough sell.
How much bigger/heavier does the 500i feel compared to the 271?
How much bigger/heavier does the 500i feel compared to the 271?
I've been dreaming of a good reason to buy a 500i to replace my ms291, but for as little as I would need that big of a saw, it's a tough sell.
How much bigger/heavier does the 500i feel compared to the 271?
I mean, I probably don't need a 500i either.
Going off the published weights, I was expecting the 500i to feel very heavy. But surprisingly, it doesn't necessarily feel that way and is actually better balanced and less nose heavy than the 271. That's despite the 271 having a shorter 18-inch bar. However, it's the power to weight ratios that paint the picture. This would translate to the MS 291 as well because Stihl quote the same weight figures for it and the 271.
MS 271 / 291 - 2.0 kg/kW
MS 500i - 1.3 kg/kW

The final fire of the MS 271 in my care. Both starts are with the engine already warmed up.
Funny, the mere mention of a MS 251, 271, 291, 311 or 391, basically the farm-class saws, the "expert" chainsaw nuts will tell you that these are all junk. Or as one said, "Yup, all turds in the same bowl".
Objectively, they have a point. Despite not having a plastic case, they are strangely heavier than similar sized magnesium case pro-grade saws. Combined with the lower power figures, you end up with a less favorable weight to power ratio.

But, what else do you buy at those price points? The Stihl pro saws are between $300 to $700 more than the farm class stuff. Looking at Husqvarna, they have a similar situation playing out, although Echo seem to be lighter across the board.
I know this much though, spending Stihl-level money on a chainsaw will always be a better situation than buying the plastic **** sold at Bunning's, eBay or Amazon. A $150 52cc "Giantz" from Amazon apparently produces 4hp / 2.9kW, but weighs in at colossal 7.5kg and requires a smokey 25:1 fuel mix, presumably to get it past the warranty period. And where would you buy an air filter or other parts from? You don't, you throw it away and buy another chainsaw. Had to laugh at the name of it though.........................."Cordless Petrol Hand Power Chain Saw Home Garden Farm Tree Gear, with 2 Stroke Engine 20” Bar Sharpener". Cordless hey? And a 20" bar sharpening function too? TAKE MY MONEY!!
Funny, the mere mention of a MS 251, 271, 291, 311 or 391, basically the farm-class saws, the "expert" chainsaw nuts will tell you that these are all junk. Or as one said, "Yup, all turds in the same bowl".
Objectively, they have a point. Despite not having a plastic case, they are strangely heavier than similar sized magnesium case pro-grade saws. Combined with the lower power figures, you end up with a less favorable weight to power ratio.
But, what else do you buy at those price points? The Stihl pro saws are between $300 to $700 more than the farm class stuff. Looking at Husqvarna, they have a similar situation playing out, although Echo seem to be lighter across the board.
I know this much though, spending Stihl-level money on a chainsaw will always be a better situation than buying the plastic **** sold at Bunning's, eBay or Amazon. A $150 52cc "Giantz" from Amazon apparently produces 4hp / 2.9kW, but weighs in at colossal 7.5kg and requires a smokey 25:1 fuel mix, presumably to get it past the warranty period. And where would you buy an air filter or other parts from? You don't, you throw it away and buy another chainsaw. Had to laugh at the name of it though.........................."Cordless Petrol Hand Power Chain Saw Home Garden Farm Tree Gear, with 2 Stroke Engine 20” Bar Sharpener". Cordless hey? And a 20" bar sharpening function too? TAKE MY MONEY!!
Giantz Chainsaw, 52cc Cordless Petrol Hand Power Chain Saw Home Garden Farm Tree Gear, with 2 Stroke Engine 20” Bar Sharpener Auto-throttle Locking E-Start : Amazon.com.au: Garden
Giantz Chainsaw, 52cc Cordless Petrol Hand Power Chain Saw Home Garden Farm Tree Gear, with 2 Stroke Engine 20” Bar Sharpener Auto-throttle Locking E-Start : Amazon.com.au: Garden
www.amazon.com.au
littlebean
Well-known member
- Joined
- Mar 7, 2018
- Messages
- 781
Thread drift..................somewhere I've got a pic of my dad sitting on that car, he worked for Astons and was delivering it
In the past few weeks, I've been fueling my OCD tendencies with other interests......................and enjoying every single second of it. In addition to the actual subject matter, I'm trying to push myself to make more videos. Quite often, the process of getting the camera out makes to film a particular subject has me over thinking what I'm trying to do. When in reality, its just a matter of turning the camera on and going with it. But, I'm pushing through, mainly so I become more confident with the camera rolling nest to me, but also with editing.
But, I'm happy with how I'm progressing. I just need to cross the barrier of being seen and heard. As a shy person, that may never happen. With my lates videos, I'm very pleased with how they turned out. Although, I'm not sure the neighbours agree with that.
With that said, I thought it was about time for more detailing content. Today, it was the Mustang's turn.
To start, the wheels were pre-treaded with NV Purge while I filled the buckets. With the Purge rinsed off, I went back in with Brake Buster for the tyres and foamed Carpro Reset for the wheels. From here, I applied some Hydr02 to top up the coating, then Atom Mac on the rotors.
For the wash, once again the transcendent Reset, teamed with the Carpro DabDab.

Following the final rinse, I again grabbed Hydr02 and applied it to the upper and lower grills as these weren't ceramic coated. From there, Amplify was the drying aid, Opti-Coat Clean & Protect for the glass, OG TD on the tyres. Moving to the interior, I gave it a wipe down with Griots Interior Cleaner, then applied a fresh layer of ColourLock Leather Shield to the seats, steering wheel, gear selector, handbrake and door panels.
Freshly cleaned and ready to swap places with old blue..................


But, I'm happy with how I'm progressing. I just need to cross the barrier of being seen and heard. As a shy person, that may never happen. With my lates videos, I'm very pleased with how they turned out. Although, I'm not sure the neighbours agree with that.
With that said, I thought it was about time for more detailing content. Today, it was the Mustang's turn.
To start, the wheels were pre-treaded with NV Purge while I filled the buckets. With the Purge rinsed off, I went back in with Brake Buster for the tyres and foamed Carpro Reset for the wheels. From here, I applied some Hydr02 to top up the coating, then Atom Mac on the rotors.
For the wash, once again the transcendent Reset, teamed with the Carpro DabDab.
Following the final rinse, I again grabbed Hydr02 and applied it to the upper and lower grills as these weren't ceramic coated. From there, Amplify was the drying aid, Opti-Coat Clean & Protect for the glass, OG TD on the tyres. Moving to the interior, I gave it a wipe down with Griots Interior Cleaner, then applied a fresh layer of ColourLock Leather Shield to the seats, steering wheel, gear selector, handbrake and door panels.
Freshly cleaned and ready to swap places with old blue..................
Some bike detailing today.
This bike has been in storage for a while, so it was extremely dusty and had a fair bit of oil and grease build up on the crank, gear cassette, derailleur and chain. So, I started by spraying those areas with Bilt Hamber Sufex HD mixed at 1:1, which is quite a strong rate. I then foamed with Touch-less.

Touch-less doing its thing, breaking down contamination, then pulling it from the surface and onto the ground.


After a rinse, I followed with Hydr02 and dried it off with the EGO. As a finishing touch, a little Bead Maker on a towel.
Then, I replaced the lubrication the wash removed, this time trying something new to me, WD-40 Gel Lube (Spray & Stay No Drip) -
Spray Gel Lubricant for Tools | WD-40 Spray Gel Lube | WD-40
Gel Lubricant - WD-40 Australia

Effectively, a touch free wash that delivered the result I was looking for.
This bike has been in storage for a while, so it was extremely dusty and had a fair bit of oil and grease build up on the crank, gear cassette, derailleur and chain. So, I started by spraying those areas with Bilt Hamber Sufex HD mixed at 1:1, which is quite a strong rate. I then foamed with Touch-less.
Touch-less doing its thing, breaking down contamination, then pulling it from the surface and onto the ground.
After a rinse, I followed with Hydr02 and dried it off with the EGO. As a finishing touch, a little Bead Maker on a towel.
Then, I replaced the lubrication the wash removed, this time trying something new to me, WD-40 Gel Lube (Spray & Stay No Drip) -
Spray Gel Lubricant for Tools | WD-40 Spray Gel Lube | WD-40
Gel Lubricant - WD-40 Australia
Effectively, a touch free wash that delivered the result I was looking for.


What are the advantages of topping all of that with Megs detailer?
Good question.
The simple answer would be "because I like to go OTT". Long answer..............................
1. Prior to coating, the vehicle was polished using Carpro Essence. This is what Carpro calls a "primer polish", as in it leaves behind a layer of Si02, in theory to cross link with the ceramic coating and improve longevity. The side benefit being that its super easy to work with and can actually hide minor imperfections.

2. After polishing and a mild panel wipe (Eraser), the Can Coat EVO can be applied. Being that the surface is super slick from Essence, the coating tends to glide over the surface easier.

3. To protect the coating as it fully cures over the following 14-days, Gyeon Cure is applied four hours after Can Coat EVO. The side benefit to this using this product is the slickness it leaves behind, Can Coat is not naturally slick. Reapplications every 3 months can help extend the life of the coating as well. I will probably switch to the similar Carpro Reload after this bottle runs out, the latest 2.0 version is superior.

4. The use of Megs Ceramic Detailer is for a few reasons -
- Helps maintain the coating
- Helps provide lubrication when towel drying (effectively a drying aid)
- Keeps the surface slick
- Because I can't help myself

The reality is, you probably don't need the Megs with ceramic in it, a traditional quick detailer will do the same thing, say P&S Paint Gloss or Megs Last Touch. But on this car, which is parked outdoors 24/7, I use a drying aid with protection to keep the coating topped off. At the moment, I'm using the Megs HCD, but other products such as OG Drying Aid and Armour Detail Supply Amplify are in rotation as well. Funnily, while the base layers are Gyeon products, I really don't like their ceramic detailer and quick detailer products.
These were taken after the Ranger sat outside overnight in the rain. Forgetting that mental trauma for second, it at least left a pretty display of bead **** to admire.


The base coating is Gyeon Pure EVO, topped with God knows what at this point.
Actually, I washed it on Tuesday with P&S Inspiration Radiance and Bead Maker as the drying aid. These two are a very nice combo, to the point where the salesman at the timber yard thought I had a new Ute. No, it's 9-years-old and well cared for.


This is what 50 microfiber towels looks like.......................
https://www.microfibreworld.com.au/...d-microfibre-cloths-50?variant=40947764035636

These will only be used as shop towels for machinery maintenance and dirty jobs that would ruin "nice" towels. I've been using TRC Rip-n-Rags for this role, however I wanted something a little bigger. Unquestionably, the TRC towels are superior, but that doesn't really matter for the purpose I have in mind.
The specs on both towels are a mixed bag -
Microfiber World -
Size - 40cm x 40cm
Blend - 80% Polyester / 20% Polyamide
Weight - 250 GSM
Edge - Overlock Stitch
Origin - Vietnam
Price Per Towel - 0.99c
TRC -
Size - 30cm x 30cm
Blend - 70% Polyester / 30% Polyamide
Weight - 180 GSM
Edge - Edgeless
Origin - China
Price Per Towel - 0.87c
Are these best towels on the market, not even close. But they will serve the intended roles just fine. Oh, and I ordered them in orange to match the Stihl and Husqvarna tools, that will make them work even better..................
https://www.microfibreworld.com.au/...d-microfibre-cloths-50?variant=40947764035636
These will only be used as shop towels for machinery maintenance and dirty jobs that would ruin "nice" towels. I've been using TRC Rip-n-Rags for this role, however I wanted something a little bigger. Unquestionably, the TRC towels are superior, but that doesn't really matter for the purpose I have in mind.
The specs on both towels are a mixed bag -
Microfiber World -
Size - 40cm x 40cm
Blend - 80% Polyester / 20% Polyamide
Weight - 250 GSM
Edge - Overlock Stitch
Origin - Vietnam
Price Per Towel - 0.99c
TRC -
Size - 30cm x 30cm
Blend - 70% Polyester / 30% Polyamide
Weight - 180 GSM
Edge - Edgeless
Origin - China
Price Per Towel - 0.87c
Are these best towels on the market, not even close. But they will serve the intended roles just fine. Oh, and I ordered them in orange to match the Stihl and Husqvarna tools, that will make them work even better..................
The Wildtrak was in the box seat this morning. It's been cold, wet and miserable of late, so I had some work ahead of me, inside and out.
Starting out, I foamed everything bar the horizontal panels with Bilt Hamber Touch-less, wheels and wheel arches included. With the roof and hood not covered in road film, I see no reason to douse those areas with an aggressive pre-cleaner if it's not needed. Normally, I would foam the pre-cleaner after doing the wheels, but with the cold conditions, I didn't have to worry about water drying on the paint while attending to the wheels.
Using Touch-less on the wheels and wheel arches is such a genius move as it significantly reduces the amount of grime you have to plough through with your brushes, which is always higher in wet winter conditions. With that all rinsed away, I went in with foamed Brake Buster, then foamed and contact washed the rest of the vehicle with Carpro Reset.
For today, I decided to give Hydr02 Foam another shot. Mixed at the recommended 9:1 dilution, this soap doesn't produce shaving cream foam. In which case, why call it Hydr02 "Foam"? In this instance, I just foamed it on, left it for 60 seconds and rinsed it off, no contact with a wash mitt. I think using it this way is probably better than trying to actually clean with it. Overall, I was very impressed with the uptick in slickness to the paint and the boost in hydrophobics. I'm trying to keep the CanCoat EVO alive for as long as possible.

After a blow down, which I'm finding the EGO batteries really dislike the cold conditions, I went in with Megs HCD. Considering I used Hydr02 Foam, this was probably overboard, but again, I'm doing my best to keep the coating at peak performance.
From there, exterior glass was attended to using the excellent Stoners Ceramic Glass Cleaner, switching to the regular Stoners for the interior glass and info screens. ADS Pilot for the interior cleaning, P&S Swift was used to dress the rubber mats after also being cleaned with Touch-less. The final steps being a light wipe down of the wheels using Bead Maker, and the tyres dressed with Carpro Perl.
It's easy to become desensitized to paint slickness when you are always spraying on something to make gains in that department. But after using Hydr02 Foam and Megs HCD, I have to say the slickness was extremely high. So perhaps I'll start using the Hydr02 Foam more now?
Starting out, I foamed everything bar the horizontal panels with Bilt Hamber Touch-less, wheels and wheel arches included. With the roof and hood not covered in road film, I see no reason to douse those areas with an aggressive pre-cleaner if it's not needed. Normally, I would foam the pre-cleaner after doing the wheels, but with the cold conditions, I didn't have to worry about water drying on the paint while attending to the wheels.
Using Touch-less on the wheels and wheel arches is such a genius move as it significantly reduces the amount of grime you have to plough through with your brushes, which is always higher in wet winter conditions. With that all rinsed away, I went in with foamed Brake Buster, then foamed and contact washed the rest of the vehicle with Carpro Reset.
For today, I decided to give Hydr02 Foam another shot. Mixed at the recommended 9:1 dilution, this soap doesn't produce shaving cream foam. In which case, why call it Hydr02 "Foam"? In this instance, I just foamed it on, left it for 60 seconds and rinsed it off, no contact with a wash mitt. I think using it this way is probably better than trying to actually clean with it. Overall, I was very impressed with the uptick in slickness to the paint and the boost in hydrophobics. I'm trying to keep the CanCoat EVO alive for as long as possible.
After a blow down, which I'm finding the EGO batteries really dislike the cold conditions, I went in with Megs HCD. Considering I used Hydr02 Foam, this was probably overboard, but again, I'm doing my best to keep the coating at peak performance.
From there, exterior glass was attended to using the excellent Stoners Ceramic Glass Cleaner, switching to the regular Stoners for the interior glass and info screens. ADS Pilot for the interior cleaning, P&S Swift was used to dress the rubber mats after also being cleaned with Touch-less. The final steps being a light wipe down of the wheels using Bead Maker, and the tyres dressed with Carpro Perl.
It's easy to become desensitized to paint slickness when you are always spraying on something to make gains in that department. But after using Hydr02 Foam and Megs HCD, I have to say the slickness was extremely high. So perhaps I'll start using the Hydr02 Foam more now?
More Touch-less action today.....................
First up, the weekly wash of the Ranger. I've been parking this car outside over the last week as I'm currently house sitting for a gardening client. With no undercover parking, I probably wasted my time washing it, but I don't care.
As per yesterday, I used Touch-less to pre-clean the wheels, wheel arches, tray sides and lower body panels prior to contact.

 www.obsessedgarage.com

 carzilla.ca
 detailingshed.com.au


From there, I cleaned the wheels and body using Shine Supply Shift. Drying aid of choice today was KCx Quick & Shine, Glass via KCx Speed Glass, the tray wiped down with OPT Car Wax and the interior with Carpro InnerQD. After wiping the wheels with Amplify, the tyres were dressed using Carpro Perl.
With the house sit only a few blocks away, I rode my bike and collected the owners Subaru Forrester. I plan on giving this a full DFB-spec detail within the next week so that the owners come back to a clean car. For now though, I decided to plough through months of neglect with a quick foam and rinse, again with Touch-less.
For v1 Touch-less, I had to run it un-diluted in the foam cannon as my pressure washer flows so much that it was not achieving optimal panel impact ratios. With v2, I can run that down to 85ml for a 0.5% PIR, or right up to 340ml for a 2% PIR. I actually split the difference between 1.5 and 2% by mixing 300ml into 700ml of water. Because I don't use all of that on a single vehicle, I'm mixing Touch-less with demineralized water to improve stability.


After allowing the Touch-less to do its thing, I then thoroughly rinsed working bottom up. I know that sounds back to front, but trust me, it works better that way as you keep the soap working for longer and improve the touch-free cleaning effect. With the vehicle parked outdoors 24/7, there was a lot of dirt and debris to be flushed from the roof rails, door belt lines and tail gate crevices.
And that's where I left it, I didn't even attempt to blow dry the car as the water behavior was flat as a tack. I will say though, the Touch-less removed 95% of the visible dirt, road film and bugs spread across the paint, roof rails, wheels and trim. If nothing else, it gives me a head start on the detail next week.
First up, the weekly wash of the Ranger. I've been parking this car outside over the last week as I'm currently house sitting for a gardening client. With no undercover parking, I probably wasted my time washing it, but I don't care.
As per yesterday, I used Touch-less to pre-clean the wheels, wheel arches, tray sides and lower body panels prior to contact.
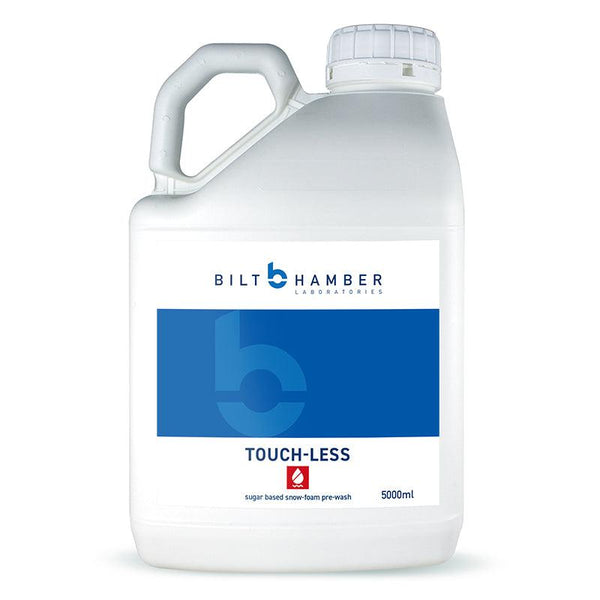
Bilt Hamber Touch-Less Eco-Friendly Snow Foam for Exceptional Vehicle Cleaning
OG's Bilt Hamber Touch-Less, the eco-friendly snow foam that revolutionizes your car cleaning process. This powerful, biodegradable, sugar-based formula removes dirt and grime without contact, utilizing advanced foaming and chemical action.
www.obsessedgarage.com
Bilt Hamber Touch-Less Pre-Wash
Bilt Hamber TouchLess sugar-based snow-foam pre-wash Eco-friendly car shampoo, newly updated formula TOUCH-LESS is our new eco-friendly pressure-washer, pre-clean, snow foam which can be applied by pump spray or trigger too. Applied at between 0.5% – 2% PIR this bio-degradable sugar-based...
Bilt Hamber Touch-Less V2 Snow Foam Pre Wash
BILT HAMBER TOUCH-LESS V2 SNOW FOAM PRE WASH Bilt Hamber Touch-Less 5 Liter Snow Foam Pre Wash Touch Less Works great in our MTM PF22.2 Foam Cannon or our IK Foam Pro foamers. TOUCH-LESS is our new eco-friendly pressure-washer, pre-clean, snow foam which can be applied by pump spray or trigger...
From there, I cleaned the wheels and body using Shine Supply Shift. Drying aid of choice today was KCx Quick & Shine, Glass via KCx Speed Glass, the tray wiped down with OPT Car Wax and the interior with Carpro InnerQD. After wiping the wheels with Amplify, the tyres were dressed using Carpro Perl.
With the house sit only a few blocks away, I rode my bike and collected the owners Subaru Forrester. I plan on giving this a full DFB-spec detail within the next week so that the owners come back to a clean car. For now though, I decided to plough through months of neglect with a quick foam and rinse, again with Touch-less.
For v1 Touch-less, I had to run it un-diluted in the foam cannon as my pressure washer flows so much that it was not achieving optimal panel impact ratios. With v2, I can run that down to 85ml for a 0.5% PIR, or right up to 340ml for a 2% PIR. I actually split the difference between 1.5 and 2% by mixing 300ml into 700ml of water. Because I don't use all of that on a single vehicle, I'm mixing Touch-less with demineralized water to improve stability.
After allowing the Touch-less to do its thing, I then thoroughly rinsed working bottom up. I know that sounds back to front, but trust me, it works better that way as you keep the soap working for longer and improve the touch-free cleaning effect. With the vehicle parked outdoors 24/7, there was a lot of dirt and debris to be flushed from the roof rails, door belt lines and tail gate crevices.
And that's where I left it, I didn't even attempt to blow dry the car as the water behavior was flat as a tack. I will say though, the Touch-less removed 95% of the visible dirt, road film and bugs spread across the paint, roof rails, wheels and trim. If nothing else, it gives me a head start on the detail next week.
The mighty Stihl 028 AV Super..................
This saw recently turned 39-years old, making it 6 months older than I am. I'm cutting pine here, so not a true work out. Still, she sounds mighty strong.
I've been running this on the same fuel mix as the rest of my two strokes, Stihl HP Ultra mixed at 50:1. The original owners manual states either 50 or 40:1 for Stihl branded oil, which would have been mineral-based and not the modern synthetic. Note that if you used other oils, they recommended 25:1. Also, when was the last time you heard reference to leaded fuel.

In the video, you will notice some smoke after finishing each cutting round, that's some residual WD-40 burning off the muffler. Also, these old saws had a different transfer port design, which means they tend eject more unburnt fuel into the muffler, the result is more smoke. New 2-strokes have been designed with a "cross-flow" layout to improve efficiency and power.
This saw recently turned 39-years old, making it 6 months older than I am. I'm cutting pine here, so not a true work out. Still, she sounds mighty strong.
I've been running this on the same fuel mix as the rest of my two strokes, Stihl HP Ultra mixed at 50:1. The original owners manual states either 50 or 40:1 for Stihl branded oil, which would have been mineral-based and not the modern synthetic. Note that if you used other oils, they recommended 25:1. Also, when was the last time you heard reference to leaded fuel.
In the video, you will notice some smoke after finishing each cutting round, that's some residual WD-40 burning off the muffler. Also, these old saws had a different transfer port design, which means they tend eject more unburnt fuel into the muffler, the result is more smoke. New 2-strokes have been designed with a "cross-flow" layout to improve efficiency and power.
littlebean
Well-known member
- Joined
- Mar 7, 2018
- Messages
- 781
I've been a bit lax about responding recently and just caught up, interesting as always
Not entirely an even match here, but this is an edited 028 vs 500i....................
The below video was posted 14-days ago, easily the fastest growth in views I have achieved so far. Just on 6000 views is nothing in the grand scheme of things, but for me its massive. To be clear, I'm not making videos to generate income, get free stuff, or to become famous. I'm just too shy and self-conscious to stand in front of a camera, or play the Youtube game, you know, the "like and subscribe" brigade. Rather, it's a way of keeping my mind active, a new challenge to explore. At the moment, I'm deep in chainsaw land, but detailing content will have a comeback at some stage as well.
The below video was posted 14-days ago, easily the fastest growth in views I have achieved so far. Just on 6000 views is nothing in the grand scheme of things, but for me its massive. To be clear, I'm not making videos to generate income, get free stuff, or to become famous. I'm just too shy and self-conscious to stand in front of a camera, or play the Youtube game, you know, the "like and subscribe" brigade. Rather, it's a way of keeping my mind active, a new challenge to explore. At the moment, I'm deep in chainsaw land, but detailing content will have a comeback at some stage as well.
I thought I'd make a start on the Subaru today by knocking out the interior, allowing me to do the exterior closer to the owners return. What I thought would take me an hour ended up being a 3.5-hour marathon.
I'll do a full write up once I've done the exterior, so for now I'll let some images paint the picture..........................


That cargo mat is useless, the "carpet" underneath was covered in dog hair, surely the bane of any detailer's existence. Addressing the dog hair probably took an hour alone, and even after throwing everything I had at it, I'm not 100% happy with the outcome. The term "carpet" is relative, the front door mat that I wipe my muddy boots on is plusher than this stuff. I've found Subaru to make some of the worst carpet in the industry, second only to Hyundai and Kia.

As for the rest, pretty much everything needed the scrub ninja treatment, including the leather. The glass needed to be cleaned twice, first with a sledgehammer to plough through the greasy film, the second pass to refine it. I had planned to knock out the door jambs too, but I'd burnt so much time on the vacuuming that I decided to leave that as part of the exterior detail next week.
Also, why do people keep so much useless **** in their cars?
I'll do a full write up once I've done the exterior, so for now I'll let some images paint the picture..........................
That cargo mat is useless, the "carpet" underneath was covered in dog hair, surely the bane of any detailer's existence. Addressing the dog hair probably took an hour alone, and even after throwing everything I had at it, I'm not 100% happy with the outcome. The term "carpet" is relative, the front door mat that I wipe my muddy boots on is plusher than this stuff. I've found Subaru to make some of the worst carpet in the industry, second only to Hyundai and Kia.
As for the rest, pretty much everything needed the scrub ninja treatment, including the leather. The glass needed to be cleaned twice, first with a sledgehammer to plough through the greasy film, the second pass to refine it. I had planned to knock out the door jambs too, but I'd burnt so much time on the vacuuming that I decided to leave that as part of the exterior detail next week.
Also, why do people keep so much useless **** in their cars?
Subaru Forrester Refresh
This vehicle is owned by one of my gardening clients. I’ve detailed this car many times, but it's been quite a while since I’ve touched it. I’m currently house sitting for them, so I thought I’d treat the Subaru to a refresh. With 108,000 km on the clock, there is some wear and tear starting to appear, but it mostly just needed a dam good clean, especially the interior.
I ended up splitting this detail into two parts, the interior was first last week, and the exterior this week. And I’m glad I did because the interior required far more time than I had expected…………………………………………..
Interior Detail –
I hate doing interiors like this! And with two golden retrievers frequently riding in the back, I knew I was up for a fight!


Vacuuming – I’m one of those people who likes to tackle the hardest task first, be that in detailing or for anything I do. On this Subaru, the carpet in the boot was clearly that task. I spent at least an hour attempting to remove the dog hair from the boot carpet and seat backs, I even removed the lift-up floor panel so that I could vac underneath. With cheap carpet throughout, this fought me all the way, and even then, I wasn’t happy with the result. I threw everything at it, including a Lily Brush, Fur-Eel vacuum attachment, the Tornador, even P&S Paint Gloss as a vacuum static aid. Eventually, I knew I had reached the limit of what I could achieve and decided to move on.


For the rest of the interior, I teamed the vacuum with the Tornador and Paint Gloss to address the carpets, seats, door trims and centre console. When using the Tornador, you always make more mess before it gets better. However, this tool is so handy to have, allowing you to dislodge debris from the carpet, console, door trims, air vents, and between the seats, in turn allowing easier removal via the vacuum.
The floor mats were given an initial blast with the Tornador, then misted with Pol Star and scrubbed with a carpet brush. From there, I used the Tornador and the vacuum turbo attachment in tandem to remove the Pol Star and remaining debris. To finish, I then misted with KCx Fresh Up before being put in the sun to dry. I also sprayed the carpets with Fresh Up, which is not just an interior scent, rather an odour neutralizer. And with being home to two dogs, and the little surprise I found later, there was some neutralizing to be done!
Cleaning – Following the vacuuming, I directed attention to the initial cleaning. First, the rubber cargo mat was pressure rinsed, then scrubbed with McKee’s and a tyre brush. It was then generously misted with P&S Swift and allowed to dry and self-level in the sun.
Apart from the dashboard, all interior plastics were cleaned using P&S Xpress and the Carpro InnerScrub Mitt, which is basically scrub ninja in glove format. The InnerScrub helps lather up Xpress, which is then followed with a towel to mop up the residue. The dashboard and console only needed a spray and wipe with Xpress. I even needed the Xpress for sections of the glass.

The Little Surprise - Removing the rubber cup holder insert, I discovered a thick, sticky residue that was hidden underneath. Then the stench hit me................rotten milk from a spilled coffee. Yuk! To address this, I took the rubber insert over to the sink and cleaned it with Gtechniq Tri-Clean, which in addition to being a general interior cleaner, it contains anti-microbial agents. I then flooded the cup holder with Tri-Clean and sacrificed two TRC Rip-n-Rags.
At this point, I could still smell the milk on the rubber insert, so I sprayed with P&S Finisher, left it to soak for 5-minutes, then rinsed again in the sink. That sorted the smell. Finisher is the third step in their carpet cleaning trio, but it worked here as well.
Leather – For the seats, console lid and steering wheel, I again used the InnerScrub, but teamed it with KCx Pol Star mixed at 6:1. A relatively strong ratio, at 6:1 it safely and effectively removes that shiny finish caused by a build-up of grime with NO need for a second pass. Again, a towel was used to remove the residue.
For protection and enhancement, I followed with Geist Leather Conditioner, applied using a microfiber brick and levelled with another interior towel. I’m liking this product more and more, in this case providing a subtle enhancement without being looking tacky.

Glass – Both the windscreen and cargo area glass were nasty. Whenever presented with this sort of thing, it's too much to expect a single once over to deliver an acceptable result. In fact, it gets worse as you move from window to window as the towels become more and more loaded with funk. For the initial mow down, I went with the lethal smelling Angelwax Vision and two waffle weave towels. Even with all of the doors wide open, this stuff gets up your nose in an unpleasant way, a byproduct of the ammonia content. And yet, it's supposed to be tint safe.
Following that initial cleaning, I went back in with two FRESH towels and Invisible Glass.

Dressing – I very rarely apply a dedicated interior dressing, mainly because I find its not needed on my garage queens, and partly because interior detailers have just the right amount of “enhancement” and UV inhibitors. However, this car sits outside 24/7, so it probably needs that extra UV protection. The interior plastics were looking a little dry too.
I went to grab an old favourite, 303 Protectant, but couldn’t find it in the cabinet. Remembering I let someone “borrow” it, I instead reached for KCx Top Star. Both products are similar in look and feel, producing a nicely balanced finish that’s not overloaded with gloss, but with enough sheen to see where you’ve been. Unlike 303, Top Star has a subtle, pleasant scent. This went on all plastic surfaces, as well as the vinyl door trim sections.

Exterior Detail -
Last week, I actually started on the exterior before tackling the interior. This involved a rather quick foam and rinse using Bilt Hamber Touch-less, basically mowing down the bulk of the road film and bugs. So, the following is the more involved exterior cleaning session that followed.

Wheels & Tyres – The Touch-less from last week did a sterling job on these wheels, so basically, today I’m finishing them off. As always, I like to pre-soak wheels with an iron-remover, Carpro WheelX the weapon of choice today. OMG, this stuff is totally revolting. I’m pretty used to iron removers now, but this is THE worst I have encountered. Now, apparently after the first batch, Carpro changed something within the formula to address the stench, but not this bottle! Regardless, I won’t be buying it again.

From here, I then foam with Touch-less over the top and leave the wheels to continue soaking. After that, I then rinse to deliver a nearly clean wheel. Next, the tyres are scrubbed with Wise Guy, then foamed with Brake Buster for the contact wash of the wheel and wheel arch. After another rinse, I then apply Hydr02. While addressing the wheels, I like to scrub the black plastic cladding as I move around the vehicle, likewise the exhaust tip.


Decontamination – Now technically, I’m just washing the car. But I also knew it would be heavily contaminated. So, extra time spent removing some of that without going overboard seemed like the right thing to do. To start, I applied Gyeon Iron to the whole vehicle from dry. And yep, pretty much instantly, the purple started to bleed through.


Next, I foamed the whole car with Touch-less and allowed to continue soaking.


After a very thorough rinse, I moved onto the next step.
Door Jambs – I hate neglected door jambs! They are tedious and messy to address. Normally, a careful quick blast with the pressure washer and a wipe down post wash is all you need to do. But these were feral! KCx Green Star and a brush was needed, followed by flushing with water. After the rest of the vehicle was washed and dried, I went back with some waterless wash and a towel to finish them off.

Contact Wash – For this step, I used Carpro Descale. I like to use this as follow up to my iron remover and alkaline pre-soak process because not only does it target mineral deposits, but it also CLEANS very well. As always, the car is foamed with the soap and a little added to the bucket, then washed with the foam on the vehicle.

Sqeeeeeeaky clean!


Protection – After washing and while the car was still wet, I decided to make use of some Capro Hydr02 Foam that I already had mixed up. This was foamed, allowed to dwell, then rinsed. This provided a base layer of protection, gloss and slickness, which in turn helps with hydrophobic properties, which then helps with air drying.
Following that, a heavy application of P&S Defender, one of the longer lasting spray sealants on the market. Not a favourite of mine, but its simple to use and decently slick.

Glass – The exterior glass needed to be given a quick hand polish with P&S Clarity Crème to remove some mild oxidation and etching that wasn’t removed during the cleaning process. Following this, I wiped down with Eraser, then the excellent Stoner’s Ceramic Glass Cleaner to add some hydrophobic properties to the surface.
Black Trim – Realistically, the black plastic cladding would look amazing with a Solution Finish treatment, but would the customer notice? Probably not. So, I went over it with a Carpro Reload, which quickly freshens the trim without turning into a streaky mess the next time it rains.
Tyre Dressing – Prior to dressing the tyres, I went over them with Mineral Spirits. I ended up following with a layer of Carpro Perl at 1:1.

Finishing Touches -
Returning to the interior, I gave it a quick wipe over with P&S Swift, a final vacuum and a misting of interior scent (Angelwax Bliss). Returning to the exterior, I removed and cleaned the licence plate protectors, wiped the tyres down to level off the Perl, then a final wipe down of the paint with Bead Maker to make it POP.


I spent over 7 hours on this vehicle, working non-stop over two sessions. Will I make money out of this detail? No, not even close. Chemicals are expensive, especially the iron removers. I don’t charge by the hour for detailing like I do for garden maintenance. Also, all the little extra’s that I do soak up time and product. However, the owners have looked after me for decades now, be that in terms of business, but also from an advisory perspective. So, when they arrive home tomorrow, there will be a little surprise sitting in the driveway.
This vehicle is owned by one of my gardening clients. I’ve detailed this car many times, but it's been quite a while since I’ve touched it. I’m currently house sitting for them, so I thought I’d treat the Subaru to a refresh. With 108,000 km on the clock, there is some wear and tear starting to appear, but it mostly just needed a dam good clean, especially the interior.
I ended up splitting this detail into two parts, the interior was first last week, and the exterior this week. And I’m glad I did because the interior required far more time than I had expected…………………………………………..
Interior Detail –
I hate doing interiors like this! And with two golden retrievers frequently riding in the back, I knew I was up for a fight!
Vacuuming – I’m one of those people who likes to tackle the hardest task first, be that in detailing or for anything I do. On this Subaru, the carpet in the boot was clearly that task. I spent at least an hour attempting to remove the dog hair from the boot carpet and seat backs, I even removed the lift-up floor panel so that I could vac underneath. With cheap carpet throughout, this fought me all the way, and even then, I wasn’t happy with the result. I threw everything at it, including a Lily Brush, Fur-Eel vacuum attachment, the Tornador, even P&S Paint Gloss as a vacuum static aid. Eventually, I knew I had reached the limit of what I could achieve and decided to move on.
For the rest of the interior, I teamed the vacuum with the Tornador and Paint Gloss to address the carpets, seats, door trims and centre console. When using the Tornador, you always make more mess before it gets better. However, this tool is so handy to have, allowing you to dislodge debris from the carpet, console, door trims, air vents, and between the seats, in turn allowing easier removal via the vacuum.
The floor mats were given an initial blast with the Tornador, then misted with Pol Star and scrubbed with a carpet brush. From there, I used the Tornador and the vacuum turbo attachment in tandem to remove the Pol Star and remaining debris. To finish, I then misted with KCx Fresh Up before being put in the sun to dry. I also sprayed the carpets with Fresh Up, which is not just an interior scent, rather an odour neutralizer. And with being home to two dogs, and the little surprise I found later, there was some neutralizing to be done!
Cleaning – Following the vacuuming, I directed attention to the initial cleaning. First, the rubber cargo mat was pressure rinsed, then scrubbed with McKee’s and a tyre brush. It was then generously misted with P&S Swift and allowed to dry and self-level in the sun.
Apart from the dashboard, all interior plastics were cleaned using P&S Xpress and the Carpro InnerScrub Mitt, which is basically scrub ninja in glove format. The InnerScrub helps lather up Xpress, which is then followed with a towel to mop up the residue. The dashboard and console only needed a spray and wipe with Xpress. I even needed the Xpress for sections of the glass.
The Little Surprise - Removing the rubber cup holder insert, I discovered a thick, sticky residue that was hidden underneath. Then the stench hit me................rotten milk from a spilled coffee. Yuk! To address this, I took the rubber insert over to the sink and cleaned it with Gtechniq Tri-Clean, which in addition to being a general interior cleaner, it contains anti-microbial agents. I then flooded the cup holder with Tri-Clean and sacrificed two TRC Rip-n-Rags.
At this point, I could still smell the milk on the rubber insert, so I sprayed with P&S Finisher, left it to soak for 5-minutes, then rinsed again in the sink. That sorted the smell. Finisher is the third step in their carpet cleaning trio, but it worked here as well.
Finisher completes the system by adding a final attack on odor causing molecules and organic stains. Finisher breaks down odor causing chemicals, eliminates any residual organic stains and slightly sterilizes the surface. Finisher assists in reducing water stains, mold and mildew odors as well as finalized stain removal. Finisher breaks down into oxygen and water, leaving no chemical residue left that requires further removal.
Leather – For the seats, console lid and steering wheel, I again used the InnerScrub, but teamed it with KCx Pol Star mixed at 6:1. A relatively strong ratio, at 6:1 it safely and effectively removes that shiny finish caused by a build-up of grime with NO need for a second pass. Again, a towel was used to remove the residue.
For protection and enhancement, I followed with Geist Leather Conditioner, applied using a microfiber brick and levelled with another interior towel. I’m liking this product more and more, in this case providing a subtle enhancement without being looking tacky.
Glass – Both the windscreen and cargo area glass were nasty. Whenever presented with this sort of thing, it's too much to expect a single once over to deliver an acceptable result. In fact, it gets worse as you move from window to window as the towels become more and more loaded with funk. For the initial mow down, I went with the lethal smelling Angelwax Vision and two waffle weave towels. Even with all of the doors wide open, this stuff gets up your nose in an unpleasant way, a byproduct of the ammonia content. And yet, it's supposed to be tint safe.
Following that initial cleaning, I went back in with two FRESH towels and Invisible Glass.
Dressing – I very rarely apply a dedicated interior dressing, mainly because I find its not needed on my garage queens, and partly because interior detailers have just the right amount of “enhancement” and UV inhibitors. However, this car sits outside 24/7, so it probably needs that extra UV protection. The interior plastics were looking a little dry too.
I went to grab an old favourite, 303 Protectant, but couldn’t find it in the cabinet. Remembering I let someone “borrow” it, I instead reached for KCx Top Star. Both products are similar in look and feel, producing a nicely balanced finish that’s not overloaded with gloss, but with enough sheen to see where you’ve been. Unlike 303, Top Star has a subtle, pleasant scent. This went on all plastic surfaces, as well as the vinyl door trim sections.
Exterior Detail -
Last week, I actually started on the exterior before tackling the interior. This involved a rather quick foam and rinse using Bilt Hamber Touch-less, basically mowing down the bulk of the road film and bugs. So, the following is the more involved exterior cleaning session that followed.
Wheels & Tyres – The Touch-less from last week did a sterling job on these wheels, so basically, today I’m finishing them off. As always, I like to pre-soak wheels with an iron-remover, Carpro WheelX the weapon of choice today. OMG, this stuff is totally revolting. I’m pretty used to iron removers now, but this is THE worst I have encountered. Now, apparently after the first batch, Carpro changed something within the formula to address the stench, but not this bottle! Regardless, I won’t be buying it again.
From here, I then foam with Touch-less over the top and leave the wheels to continue soaking. After that, I then rinse to deliver a nearly clean wheel. Next, the tyres are scrubbed with Wise Guy, then foamed with Brake Buster for the contact wash of the wheel and wheel arch. After another rinse, I then apply Hydr02. While addressing the wheels, I like to scrub the black plastic cladding as I move around the vehicle, likewise the exhaust tip.
Decontamination – Now technically, I’m just washing the car. But I also knew it would be heavily contaminated. So, extra time spent removing some of that without going overboard seemed like the right thing to do. To start, I applied Gyeon Iron to the whole vehicle from dry. And yep, pretty much instantly, the purple started to bleed through.
Next, I foamed the whole car with Touch-less and allowed to continue soaking.
After a very thorough rinse, I moved onto the next step.
Door Jambs – I hate neglected door jambs! They are tedious and messy to address. Normally, a careful quick blast with the pressure washer and a wipe down post wash is all you need to do. But these were feral! KCx Green Star and a brush was needed, followed by flushing with water. After the rest of the vehicle was washed and dried, I went back with some waterless wash and a towel to finish them off.
Contact Wash – For this step, I used Carpro Descale. I like to use this as follow up to my iron remover and alkaline pre-soak process because not only does it target mineral deposits, but it also CLEANS very well. As always, the car is foamed with the soap and a little added to the bucket, then washed with the foam on the vehicle.
Sqeeeeeeaky clean!
Protection – After washing and while the car was still wet, I decided to make use of some Capro Hydr02 Foam that I already had mixed up. This was foamed, allowed to dwell, then rinsed. This provided a base layer of protection, gloss and slickness, which in turn helps with hydrophobic properties, which then helps with air drying.
Following that, a heavy application of P&S Defender, one of the longer lasting spray sealants on the market. Not a favourite of mine, but its simple to use and decently slick.
Glass – The exterior glass needed to be given a quick hand polish with P&S Clarity Crème to remove some mild oxidation and etching that wasn’t removed during the cleaning process. Following this, I wiped down with Eraser, then the excellent Stoner’s Ceramic Glass Cleaner to add some hydrophobic properties to the surface.
Black Trim – Realistically, the black plastic cladding would look amazing with a Solution Finish treatment, but would the customer notice? Probably not. So, I went over it with a Carpro Reload, which quickly freshens the trim without turning into a streaky mess the next time it rains.
Tyre Dressing – Prior to dressing the tyres, I went over them with Mineral Spirits. I ended up following with a layer of Carpro Perl at 1:1.
Finishing Touches -
Returning to the interior, I gave it a quick wipe over with P&S Swift, a final vacuum and a misting of interior scent (Angelwax Bliss). Returning to the exterior, I removed and cleaned the licence plate protectors, wiped the tyres down to level off the Perl, then a final wipe down of the paint with Bead Maker to make it POP.
I spent over 7 hours on this vehicle, working non-stop over two sessions. Will I make money out of this detail? No, not even close. Chemicals are expensive, especially the iron removers. I don’t charge by the hour for detailing like I do for garden maintenance. Also, all the little extra’s that I do soak up time and product. However, the owners have looked after me for decades now, be that in terms of business, but also from an advisory perspective. So, when they arrive home tomorrow, there will be a little surprise sitting in the driveway.
DFB, you are amazing.
Thank you, I just wish I felt amazing.