My bottle says Mothers "Back To Black" so maybe an older version?The aerosol version is not too bad, but if it's the one shown below, like any dressing it won't last very long.


You are using an out of date browser. It may not display this or other websites correctly.
You should upgrade or use an alternative browser.
You should upgrade or use an alternative browser.
Above 1200 Sq/FT DFB's Garage
- Thread starter D.F.B
- Start date
Wokspaces above 1200 squarefeet.
kitdoctor
Well-known member
@D.F.B are the handles solid plastic on these brushes? I had a set of cheapies and my wife stood on one, crushing the handle.When these Detail Factory brushes hit the market a few years ago, they were pushing $30 each. Now that Waxit are carrying them, they have suddenly become much more affordable. At just under $17 a piece, I couldn't resist stocking up on some fresh colours.
@D.F.B are the handles solid plastic on these brushes? I had a set of cheapies and my wife stood on one, crushing the handle.
I'm not totally sure if they are solid plastic, but the entire handle is made of a single piece rather than separate handle and brush head pieces. I've found them very sturdy and durable.
Those particular ones I posted earlier are the original version -

Detail Factory | Boar Detailing Brush (Large)
The perfect stiff brush for heavy duty cleaning! Looking to expand your detailing brush collection? Now you can! Boar's hair brushes have stiffer hair which makes these great for scrubbing interior plastics. They can also be used for cleaning engine bays, brake callipers, exhaust tips, wheels...

Detail Factory | Ultra-Soft Detail Brush (Large)
Ultra-Soft Detailing brushes for all purposes! These Ultra-soft brushes are specifically designed for light duty cleaning on sensitive automotive surfaces. Ideal for instrument clusters and infotainment panel dusting and cleaning, as well as piano black trims. Great for use in detailing around...
Detail Factory have since added the Tri-Grip version, which has a rubberized grip -

Detail Factory | TriGrip Ultra-Soft Detail Brush (Large)
Ultra Soft Detailing brushes with a comfortable tri-grip for all purposes! These Ultra-soft brushes are specifically designed for light duty cleaning on sensitive automotive surfaces. Ideal for instrument clusters and infotainment panel dusting and cleaning, as well as piano black trims. Great...
You could also look at the Carpro equivalents -

CarPro Detailing Brush Set | Waxit
Elevate your detailing with premium Carpro brushes for interior and exterior cleaning. Shop online at Waxit for top-quality detailing brushes!
I'd recommend sticking with the long handle versions as they are more ergonomic.
And I don't recommend brushes with a wooden handle. The timber swells and contracts when they get wet and potentially cracking the plastic bristle holder. As me how I know this.
kitdoctor
Well-known member
@D.F.B thanks for that response and that's a good tip on avoiding the ones with wooden handles.And I don't recommend brushes with a wooden handle. The timber swells and contracts when they get wet and potentially cracking the plastic bristle holder. As me how I know this.
I'm in awe of your detailing skills and my plan is to draw upon it when I finally get onto my old bombs. I think I'll put together a cheat sheet that lists products, where to use them and brief instructions.
@D.F.B thanks for that response and that's a good tip on avoiding the ones with wooden handles.
I'm in awe of your detailing skills and my plan is to draw upon it when I finally get onto my old bombs. I think I'll put together a cheat sheet that lists products, where to use them and brief instructions.
I haven't posted it here, but the link below is my "Little Black Book of Detailing", basically a cheat sheet to help cut through all of the fluff and waffle (yes, I tend to waffle a lot). It was last updated in November 2024, which reminds me I need to update a couple of things, but other than that it remains current. I have it in categories, so find the category you need and buy with confidence.
I had the shredder out the other day to process the material removed from two large Buddleja plants, which I prune heavily once a year. You have to pick your mark with this thing, try to shred material that's too wet and all you do is create a headache. That tends to rule out a lot of stuff removed from this garden. Rose pruning's are not nice to feed through it either. It's also time consuming, although you do get free mulch from it at the end.
The shredder in question is a Yardeco Recycler 2000 fitted with the 5hp Honda GX 160 engine. These are Australian designed and engineered and were available with Briggs & Stratton or Honda engines, thankfully, the owner went with the Honda engine (I hate Honda machines but like their commercial engines). It would appear the Yardeco brand no longer makes shredders, but still offers garden scratchers (tillers), powered wheelbarrows, and log splitters.
https://www.yardeco.com.au/
However, it would appear that the same machines are now branded TruYard, even the promotional video is the same. The Briggs engines have made way for crappy Krohler's, and the Honda engines upped to the GX 200.
https://www.truyard.com.au/products/1


After using it the other day, I figured the engine has never been serviced since it was bought at least a decade ago. Not that it's been run constantly over that period, even so, it's probably well overdue for an oil change.
Because of the size, weight and awkwardness of the machine, draining the old oil is not easy. To get around that, I used my small Briggs & Stratton oil extractor. A B&S tool used to service a Honda!
https://powermowers.com.au/products...VZkF0ArlhFkFGGFCeYFI7vKWNFfofv1XlVlmaN3aLfVnb
The old oil wasn't too bad, a dark gold-brown, but well worth refreshing. I refilled with Penrite Small Engine 10w30, which is semi-synthetic. From what I can see, the Honda-branded oil offered in Australia is a mineral based 10w30, although there is a synthetic 5w30 offered overseas.
I also replaced the original spark plug, an NGK BPR6ES.

Honda makes three different air filter types for these engines. The first two are conventional, either a low-profile foam sock, or an oval paper cartridge with a foam pre-filter. On this particular GX 160, it has the third type, an oil bath filter. I've never worked on an engine with a filter like this, a design I thought was confined to the early days of small engines, but clearly not.

In conjunction with a conventional oiled foam filter, the idea here is to trap debris in the oil reservoir. Over time, that oil becomes loaded with dust and debris and needs to be drained and refreshed. On this occasion, I drained the oil, then cleaned out the reservoir with Surfex and water, then left to dry in the sun while I finished elsewhere. The foam element was blown out and re-oiled. Once dry, the reservoir was refilled using the same Penrite oil that went in the engine.

I have to say, this is an unnecessarily complicated and messy filtration system. You can't just install a new filter and be done with it, as such I'd much prefer the standard dual-element paper/foam type.
Because of the infrequent use, I have no idea how old the fuel in the tank was. While the engine (eventually) started and ran fine earlier in the week, the exhaust gas smelt stale. After use, I actually shut off the fuel and let the engine run dry. So, the final step today was to drain and discard the fuel left in the tank. I also have no idea when I'll use this machine again, so leaving the fuel any longer wouldn't do the engine any good.
The shredder in question is a Yardeco Recycler 2000 fitted with the 5hp Honda GX 160 engine. These are Australian designed and engineered and were available with Briggs & Stratton or Honda engines, thankfully, the owner went with the Honda engine (I hate Honda machines but like their commercial engines). It would appear the Yardeco brand no longer makes shredders, but still offers garden scratchers (tillers), powered wheelbarrows, and log splitters.
https://www.yardeco.com.au/
However, it would appear that the same machines are now branded TruYard, even the promotional video is the same. The Briggs engines have made way for crappy Krohler's, and the Honda engines upped to the GX 200.
https://www.truyard.com.au/products/1
After using it the other day, I figured the engine has never been serviced since it was bought at least a decade ago. Not that it's been run constantly over that period, even so, it's probably well overdue for an oil change.
Because of the size, weight and awkwardness of the machine, draining the old oil is not easy. To get around that, I used my small Briggs & Stratton oil extractor. A B&S tool used to service a Honda!
https://powermowers.com.au/products...VZkF0ArlhFkFGGFCeYFI7vKWNFfofv1XlVlmaN3aLfVnb
The old oil wasn't too bad, a dark gold-brown, but well worth refreshing. I refilled with Penrite Small Engine 10w30, which is semi-synthetic. From what I can see, the Honda-branded oil offered in Australia is a mineral based 10w30, although there is a synthetic 5w30 offered overseas.
I also replaced the original spark plug, an NGK BPR6ES.
Honda makes three different air filter types for these engines. The first two are conventional, either a low-profile foam sock, or an oval paper cartridge with a foam pre-filter. On this particular GX 160, it has the third type, an oil bath filter. I've never worked on an engine with a filter like this, a design I thought was confined to the early days of small engines, but clearly not.
In conjunction with a conventional oiled foam filter, the idea here is to trap debris in the oil reservoir. Over time, that oil becomes loaded with dust and debris and needs to be drained and refreshed. On this occasion, I drained the oil, then cleaned out the reservoir with Surfex and water, then left to dry in the sun while I finished elsewhere. The foam element was blown out and re-oiled. Once dry, the reservoir was refilled using the same Penrite oil that went in the engine.
I have to say, this is an unnecessarily complicated and messy filtration system. You can't just install a new filter and be done with it, as such I'd much prefer the standard dual-element paper/foam type.
Because of the infrequent use, I have no idea how old the fuel in the tank was. While the engine (eventually) started and ran fine earlier in the week, the exhaust gas smelt stale. After use, I actually shut off the fuel and let the engine run dry. So, the final step today was to drain and discard the fuel left in the tank. I also have no idea when I'll use this machine again, so leaving the fuel any longer wouldn't do the engine any good.
Spring orders, one from both Waxit and Detailing Shed................

The Carpro and KCx are replenishments from Waxit..................

The next lot is from Detailing Shed, again, replenishing a number of favourites. The Brake Buster and R2R would have to be my most used chemical products. Pilot is my favorite interior cleaner/detailer at the moment. I've also decided to try out the Optimum version of Glass Clean & Protect, I absolutely love the Opti-Coat version as its everything Carpro ClarifyPhobic should have been.
https://detailingshed.com.au/produc...ean-protect-504ml?_pos=7&_sid=e0eb36b81&_ss=r

The OG Tire Dressing is expensive, but you do get 946ml for the money, and a little goes a long way. I love the way it looks, its application feel (similar to ADS Tire+), and the scent is so addictive. Yes, I know scent is a non-functional aspect, but it plays a big part in the user experience..................it makes me happy.
https://detailingshed.com.au/collections/obsessed-garage/products/obsessed-garage-tire-dressing


The Carpro and KCx are replenishments from Waxit..................
The next lot is from Detailing Shed, again, replenishing a number of favourites. The Brake Buster and R2R would have to be my most used chemical products. Pilot is my favorite interior cleaner/detailer at the moment. I've also decided to try out the Optimum version of Glass Clean & Protect, I absolutely love the Opti-Coat version as its everything Carpro ClarifyPhobic should have been.
https://detailingshed.com.au/produc...ean-protect-504ml?_pos=7&_sid=e0eb36b81&_ss=r
The OG Tire Dressing is expensive, but you do get 946ml for the money, and a little goes a long way. I love the way it looks, its application feel (similar to ADS Tire+), and the scent is so addictive. Yes, I know scent is a non-functional aspect, but it plays a big part in the user experience..................it makes me happy.
https://detailingshed.com.au/collections/obsessed-garage/products/obsessed-garage-tire-dressing
ajohno
Well-known member
Can’t wait for spring to arrive. Do you dilute the Brake Buster down? This might be my next purchase.
Thanks
Thanks
Can’t wait for spring to arrive. Do you dilute the Brake Buster down? This might be my next purchase.
Thanks
Most people dilute Brake Buster, then say bad things about the product along the lines of or "it doesn't clean very well" or "its only good for well-maintained wheels".
The thing is, P&S never actually recommended diluting Brake Buster, rather someone tried it, then it became law.
That doesn't mean you shouldn't dilute the product, just that it will reduce its effectiveness. In any case, I'd say never dilute it for cleaning tyres, I've found it very underwhelming if diluted for this task. For wheels, if you need full power, use it neat. Otherwise, you can dilute it between 5:1 to 10:1.
Personally, I use Brake Buster undiluted in a spray bottle for tyres, then have it undiluted in a foam cannon. In effect, the foam cannon dilutes it for me, but at what ratio I have no idea. I like foaming Brake Buster as it keeps the chemical on the surface to be cleaned. If I need more than what BB can supply, I will pre-treat with NV Purge first, which is sprayed and allowed to soak, then rinsed away. I then go back in with BB.


Cdubu52
Well-known member
DFB, since you are everyone's go to guy on the detailing supplies and product reviews, can you put your list on your signature or on your first post? That way we always have a reference for it, rather than trying to find that post? Im sure im not the only one that would like to use it as a reference from time to time. Even though, I have traditionally used a ton of Adams products, I still enjoy your reviews and insights and as I use up my supply, I have looked at your reviews for future purchases.I haven't posted it here, but the link below is my "Little Black Book of Detailing", basically a cheat sheet to help cut through all of the fluff and waffle (yes, I tend to waffle a lot). It was last updated in November 2024, which reminds me I need to update a couple of things, but other than that it remains current. I have it in categories, so find the category you need and buy with confidence.
ajohno
Well-known member
Thanks mate. I will give this product a try as I’m ready to order a few more things.Most people dilute Brake Buster, then say bad things about the product along the lines of or "it doesn't clean very well" or "its only good for well-maintained wheels".
The thing is, P&S never actually recommended diluting Brake Buster, rather someone tried it, then it became law.
That doesn't mean you shouldn't dilute the product, just that it will reduce its effectiveness. In any case, I'd say never dilute it for cleaning tyres, I've found it very underwhelming if diluted for this task. For wheels, if you need full power, use it neat. Otherwise, you can dilute it between 5:1 to 10:1.
Personally, I use Brake Buster undiluted in a spray bottle for tyres, then have it undiluted in a foam cannon. In effect, the foam cannon dilutes it for me, but at what ratio I have no idea. I like foaming Brake Buster as it keeps the chemical on the surface to be cleaned. If I need more than what BB can supply, I will pre-treat with NV Purge first, which is sprayed and allowed to soak, then rinsed away. I then go back in with BB.
DFB, since you are everyone's go to guy on the detailing supplies and product reviews, can you put your list on your signature or on your first post? That way we always have a reference for it, rather than trying to find that post? Im sure im not the only one that would like to use it as a reference from time to time. Even though, I have traditionally used a ton of Adams products, I still enjoy your reviews and insights and as I use up my supply, I have looked at your reviews for future purchases.
Done!
Cdubu52
Well-known member
Thanks! Im sure there are others that appreciate that as well. Now you will just have to keep it updated for us!Done!
Optimum Opti-Glass Clean & Protect / Opti-Coat Glass Clean & Protect –
While manufactured side by side, Optimum Polymer Technologies operates under two separate banners.
The base Optimum range of detailing products has been freely available via OPT dealers and retailers. Depending on the individual product, bottles sizes range from the small 118ml and 246ml sample sizes, mid-sized 504ml and 946ml bottles, and large gallon size jugs. While this range of products is universal, the second range has been tailored for ceramic coatings.
https://optimumcarcare.com/
https://detailingshed.com.au/collections/optimum-polymer-technologies

Meanwhile, the focus of the Opti-Coat range centres around a variety of ceramic coatings. However, they also offer a separate line of maintenance products, which only come in a 473ml bottle and carry a significant price premium over the base OPT product. Up until recently, the Opti-Coat maintenance product line had been exclusive to Opti-Coat installers and their Opti-Coat customers. However, in recent times, that has changed and the Opti-Coat maintenance range has become available to the general public.
https://detailingshed.com.au/collections/opti-coat
https://store.optimumcarcare.com/collections/opti-coat-maintenance

In theory, the difference between Optimum and Opti-Coat products was the latter being geared towards ceramic coated surfaces. I say “in theory” because in some instances, I feel like the only difference is a change in colour and a fancier bottle design. Some of them come pre-diluted instead of concentrate forms. Having said that, the Opti-Coat version of ONR is different to the base product in that it contains Si02 and has a much slicker finished result.
So, where do the glass cleaners sit in relation to this?
I’ve been using the Opti-Coat Glass Clean & Protect version for a while now, which I had bought at a significant discount. The very first time I tried it, I knew I was onto something good. Not only is it super easy to work with, flashing away quickly to a streak free finish, the hydrophobic performance is very impressive. And slickness is pretty epic as well. Sadly, this version is no longer carried by Australian OPT dealers. ******!
Which brings us to the Optimum Glass Clean & Protect variant. Rather than the pretty frosted bottle and finicky trigger head, this version comes in a rather basic looking 504ml bottle and a conventional spray head in fluro green and blue.

Are these the same product, or have improvements been made for the premium version? Both descriptions make similar claims……………
Optimum –
https://store.optimumcarcare.com/products/optimum-opti-glass-clean-protect-17-oz
"Optimum Opti-Glass Clean & Protect Spray is a ready to use spray glass cleaner that contains a combination of mild cleaners and an advanced polymer that bonds to glass and other silica-based surfaces ……….Optimum Opti-Glass Clean & Protect can be used as a stand-alone glass sealant or as a booster to Optimum Opti-Glass Coating."

Opti-Coat -
https://store.optimumcarcare.com/products/opti-coat-opti-glass-clean-protect-16-oz
“Opti-Coat Glass Clean & Protect not only effectively cleans glass surfaces without streaking but also boosts the performance of your Opti-Glass Pro Coating and other ceramic coated glass. The polymers in the formula bond to glass surfaces, providing continuous protection with each use.”

Having now used both, the different between them is miniscule, if any at all. The only thing I would note is that the Opti-Coat version is slightly quicker to flash, and I mean slightly! What I like about these two is that they require no special application methods, just spray, wipe, buff. This is a complete contrast to Carpro’s ClarifyPhobic, which I just couldn’t get to work properly and is now recognised as being very sensitive to non-Carpro glass coatings and sealants. In other words, for that glass cleaner to work, you need to install a Carpro glass coating.
Note - This type of glass cleaner is not intended for interior glass.
What’s remarkable here is that these OPT products have existed for years, but only recently have companies like Carpro, Gyeon and P&S have come out with their own versions. And yet, people seem to have flocked to the Carpro and P&S product as if its something ground-breaking or new. No, Optimum have been offering this style of glass cleaning for many, many years.
While manufactured side by side, Optimum Polymer Technologies operates under two separate banners.
The base Optimum range of detailing products has been freely available via OPT dealers and retailers. Depending on the individual product, bottles sizes range from the small 118ml and 246ml sample sizes, mid-sized 504ml and 946ml bottles, and large gallon size jugs. While this range of products is universal, the second range has been tailored for ceramic coatings.
https://optimumcarcare.com/
https://detailingshed.com.au/collections/optimum-polymer-technologies
Meanwhile, the focus of the Opti-Coat range centres around a variety of ceramic coatings. However, they also offer a separate line of maintenance products, which only come in a 473ml bottle and carry a significant price premium over the base OPT product. Up until recently, the Opti-Coat maintenance product line had been exclusive to Opti-Coat installers and their Opti-Coat customers. However, in recent times, that has changed and the Opti-Coat maintenance range has become available to the general public.
https://detailingshed.com.au/collections/opti-coat
https://store.optimumcarcare.com/collections/opti-coat-maintenance
In theory, the difference between Optimum and Opti-Coat products was the latter being geared towards ceramic coated surfaces. I say “in theory” because in some instances, I feel like the only difference is a change in colour and a fancier bottle design. Some of them come pre-diluted instead of concentrate forms. Having said that, the Opti-Coat version of ONR is different to the base product in that it contains Si02 and has a much slicker finished result.
So, where do the glass cleaners sit in relation to this?
I’ve been using the Opti-Coat Glass Clean & Protect version for a while now, which I had bought at a significant discount. The very first time I tried it, I knew I was onto something good. Not only is it super easy to work with, flashing away quickly to a streak free finish, the hydrophobic performance is very impressive. And slickness is pretty epic as well. Sadly, this version is no longer carried by Australian OPT dealers. ******!
Which brings us to the Optimum Glass Clean & Protect variant. Rather than the pretty frosted bottle and finicky trigger head, this version comes in a rather basic looking 504ml bottle and a conventional spray head in fluro green and blue.
Are these the same product, or have improvements been made for the premium version? Both descriptions make similar claims……………
Optimum –
https://store.optimumcarcare.com/products/optimum-opti-glass-clean-protect-17-oz
"Optimum Opti-Glass Clean & Protect Spray is a ready to use spray glass cleaner that contains a combination of mild cleaners and an advanced polymer that bonds to glass and other silica-based surfaces ……….Optimum Opti-Glass Clean & Protect can be used as a stand-alone glass sealant or as a booster to Optimum Opti-Glass Coating."
Opti-Coat -
https://store.optimumcarcare.com/products/opti-coat-opti-glass-clean-protect-16-oz
“Opti-Coat Glass Clean & Protect not only effectively cleans glass surfaces without streaking but also boosts the performance of your Opti-Glass Pro Coating and other ceramic coated glass. The polymers in the formula bond to glass surfaces, providing continuous protection with each use.”
Having now used both, the different between them is miniscule, if any at all. The only thing I would note is that the Opti-Coat version is slightly quicker to flash, and I mean slightly! What I like about these two is that they require no special application methods, just spray, wipe, buff. This is a complete contrast to Carpro’s ClarifyPhobic, which I just couldn’t get to work properly and is now recognised as being very sensitive to non-Carpro glass coatings and sealants. In other words, for that glass cleaner to work, you need to install a Carpro glass coating.
Note - This type of glass cleaner is not intended for interior glass.
What’s remarkable here is that these OPT products have existed for years, but only recently have companies like Carpro, Gyeon and P&S have come out with their own versions. And yet, people seem to have flocked to the Carpro and P&S product as if its something ground-breaking or new. No, Optimum have been offering this style of glass cleaning for many, many years.
After having to park outdoors while I was house sitting, a busy mowing run, and the crappy weather, I finally got a chance to wash the Ranger for the first time in more than two weeks yesterday. Good. Great. Sanity restored.....................until I had to go out at this afternoon, which the sky decided to rain just enough to undo my hard work yesterday, but not enough to warrant a full-scale wash.
Considering the roads weren't wet, it meant I could skip the wheels and tyres, making this situation a perfect candidate for a quick waterless wash. For reference, I don't normally waterless wash, not unless strict criteria like this are met. I guess the same applies to rinse-less washing, I have a very low limit to what I can tolerate before a proper soap and water wash becomes the better choice. Anyway, product of choice today was the delightful Carpro ECH20.

 www.waxit.com.au

 www.carpro-us.com

ECH20 is exceptional value, not only for the low price of entry, but also the fact it's a concentrate. This contrasts with many dedicated waterless wash products on the market, which are ready-to-use. Considering how much product you use when waterless washing, the ability to mix up larger quantities at a relatively low cost is highly desirable here. For example, a 473ml bottle of DIY Detail Waterless Wash retails for $29.95, or ADS Adapt for $32.99. A 500ml bottle of ECH20 is sub $19.00, and a 1-litre bottle is just under $30. Put it this way, I can mix up 7.6 litres (2-gallon) of product from that 500ml bottle. And even if you don't like the idea of "waterless" washing, ECH20 is one of those go-to do it all products that makes it well worth having around.
On this occasion, I mixed up a 1000ml at the recommended 15:1 dilution ratio, then sprayed the car down with a Solo battery powered sprayer. I then used TRC Platinum Pluffle's to wipe, and a Microfiber Madness Chipmunk Jr. to dry. I then followed up with a glass cleaner on the windows, mainly because ECH20 doesn't finish out as I'd like at this dilution ratio.


Sanity restored.....................again.
Considering the roads weren't wet, it meant I could skip the wheels and tyres, making this situation a perfect candidate for a quick waterless wash. For reference, I don't normally waterless wash, not unless strict criteria like this are met. I guess the same applies to rinse-less washing, I have a very low limit to what I can tolerate before a proper soap and water wash becomes the better choice. Anyway, product of choice today was the delightful Carpro ECH20.
Get CarPro ECH2o Concentrate Online | Waxit
Ech2O is an innovative waterless cleanser and gloss-enhancer that safely cleans, and glosses a variety of exterior surfaces with ease! Get Yours Online Today! FREE Shipping over $150!
CARPRO ECH2O Waterless & QD Concentrate 500ml (17oz)
CarPro ECH2O Concentrate 17oz. (500ml) Waterless Wash & High Gloss Detail Spray EcH2o is an entirely new waterless cleanser and gloss-enhancer built on 2 years of research and development by CarPro Chemicals! EcH2o was designed to work in harmony with ceramic coatings and even provides easy...
www.carpro-us.com
ECH20 is exceptional value, not only for the low price of entry, but also the fact it's a concentrate. This contrasts with many dedicated waterless wash products on the market, which are ready-to-use. Considering how much product you use when waterless washing, the ability to mix up larger quantities at a relatively low cost is highly desirable here. For example, a 473ml bottle of DIY Detail Waterless Wash retails for $29.95, or ADS Adapt for $32.99. A 500ml bottle of ECH20 is sub $19.00, and a 1-litre bottle is just under $30. Put it this way, I can mix up 7.6 litres (2-gallon) of product from that 500ml bottle. And even if you don't like the idea of "waterless" washing, ECH20 is one of those go-to do it all products that makes it well worth having around.
On this occasion, I mixed up a 1000ml at the recommended 15:1 dilution ratio, then sprayed the car down with a Solo battery powered sprayer. I then used TRC Platinum Pluffle's to wipe, and a Microfiber Madness Chipmunk Jr. to dry. I then followed up with a glass cleaner on the windows, mainly because ECH20 doesn't finish out as I'd like at this dilution ratio.
Sanity restored.....................again.
Came across a PDF version of the Victa VC Mustang owner's manual. I'm sure my grandfather kept the original, he kept EVERYTHING, even broken nuts and bolts. However, when the house was cleaned out after his death and my grandmother moving into a home, I have no doubt an aunt or uncle would have thrown it in the bin, along with a lot of stuff I wish I had been present to intercept.


I note Victa recommended against turning off the fuel and running the engine dry. My grandfather did just that after each mow. He would have done that for 25+ years, and yet the engine still runs strong. Not that he was alone in doing this, for some reason it was the done thing with 2-stroke Victa's.
Myself, I've never liked this idea, running an engine dry that relies on fuel as a lubricant is counter intuitive. Instead, I'll throttle the engine down, turn off the fuel tap, allow the engine to idle for 20-30-seconds to run the carb bowl down a little, then close off the throttle. I've also been told on G4 Carb Victa's to then push the throttle to mid position, this takes load off the rubber ignition cutout plugs that are a high failure part.
The following is the biggest vehicle I've ever detailed, and by a considerable margin as well. While I don't personally see the appeal of caravans, I do see the appeal in earning money by cleaning them.

As you can see from the spare wheel cover, this rig made the trip to the Mundi Mundi Bash, which is held 40 km's north-west of Broken Hill. Of course, that means lots of red dust!

Considering my client is nearly blind, his wife does all the driving. Having never towed anything bigger than a garden trailer before, kudos to her for doing a caravan towing course before jumping in the deep end. This is something most would never even contemplate, they just buy a Landcruiser and the biggest van possible and off they go.
Anyway, I offered to wash the van in the driveway. This would save them the hassle of hooking the van up to the Landcruiser, towing it to a car wash, then towing it back, unhook.............with only one pair of eyes between them, it would've taken them half a day to do all that. Due to a heavy downpour last week, quite a lot of the red dust was washed away from the rain. So, I was just finishing what mother nature started.
Back when I installed a wall-mounted pressure washer, I contemplated selling my old Kranzle K1152. Thinking I wouldn't need it anymore, I nearly sold it to a colleague, but for some reason, I changed my mind at the last minute. For jobs like this, I'm thankful I decided to keep it. Once you've used one of these machines, it ruins you for other pressure washers, in fact I'd rather use a garden hose as other pressure washers just don't flow enough water to be efficient.

Another thing I've noticed using the K1152, its vastly quieter than the big boy KHD-10 that's sitting on a shelf in my garage. Both of these produce similar numbers, 10-lpm at 2800 rpm. So, this extra noise could be due to how the K1152's motor is covered by a plastic shroud, or that the KHD-10 uses more power (15-amp vs 10amp). Either way, the K1152 is much smoother and more pleasant to listen to.
Before leaving home, in addition to the Kranzle, I grabbed two buckets, several brushes, two foam cannons and a few chemicals. Oh, and a step ladder.
After setting up the pressure washer, the first thing I did was foam the whole van with Bilt Hamber Touch-less. While that did its thing, I scrubbed the tyres with Shine Supply Wise Guy and a Detail Factory Tyre Brush in XL size.

The van was then rinsed from top to toe, which took the majority of the road grime, dust and dead bugs with it. From here, I foamed the wheels with Carpro Lift and cleaned with a Maxshine Curved Grip XL brush and an EZ-Detail brush. The sizable wheel arches were then scrubbed with a Detail Factory Fender Brush.
Working on one side at a time, I then foamed with Lift and washed with a TRC Cyclone Bone pad. For the textured black lowers, I again used that DF Fender Brush. The same process was used for the front and back. As for the roof, I reached what I could and made sure to rinse the solar panels as best I could.

The finishing touch was an application of Carpro Hydr02 to the body and wheels. I had contemplated dressing the tyres but decided not to bother.
The photos don't do the end result justice, but even to my vision compromised client, the difference is remarkable.


And that was that, my first caravan detail.
As you can see from the spare wheel cover, this rig made the trip to the Mundi Mundi Bash, which is held 40 km's north-west of Broken Hill. Of course, that means lots of red dust!
Home - Mundi Mundi Bash
2025 IS GOING TO BE A BIG YEAR! We know you’re all more than ready to soak up live music, hit the open road and immerse yourself in the wide open spaces of the Australian outback! WILL YOU BE JOINING US? The Broken Hill Mundi Mundi Bash is an all ages family friendly festival. Whether […]
mundimundibash.com.au
Considering my client is nearly blind, his wife does all the driving. Having never towed anything bigger than a garden trailer before, kudos to her for doing a caravan towing course before jumping in the deep end. This is something most would never even contemplate, they just buy a Landcruiser and the biggest van possible and off they go.
Anyway, I offered to wash the van in the driveway. This would save them the hassle of hooking the van up to the Landcruiser, towing it to a car wash, then towing it back, unhook.............with only one pair of eyes between them, it would've taken them half a day to do all that. Due to a heavy downpour last week, quite a lot of the red dust was washed away from the rain. So, I was just finishing what mother nature started.
Back when I installed a wall-mounted pressure washer, I contemplated selling my old Kranzle K1152. Thinking I wouldn't need it anymore, I nearly sold it to a colleague, but for some reason, I changed my mind at the last minute. For jobs like this, I'm thankful I decided to keep it. Once you've used one of these machines, it ruins you for other pressure washers, in fact I'd rather use a garden hose as other pressure washers just don't flow enough water to be efficient.
Another thing I've noticed using the K1152, its vastly quieter than the big boy KHD-10 that's sitting on a shelf in my garage. Both of these produce similar numbers, 10-lpm at 2800 rpm. So, this extra noise could be due to how the K1152's motor is covered by a plastic shroud, or that the KHD-10 uses more power (15-amp vs 10amp). Either way, the K1152 is much smoother and more pleasant to listen to.
Before leaving home, in addition to the Kranzle, I grabbed two buckets, several brushes, two foam cannons and a few chemicals. Oh, and a step ladder.
After setting up the pressure washer, the first thing I did was foam the whole van with Bilt Hamber Touch-less. While that did its thing, I scrubbed the tyres with Shine Supply Wise Guy and a Detail Factory Tyre Brush in XL size.
The van was then rinsed from top to toe, which took the majority of the road grime, dust and dead bugs with it. From here, I foamed the wheels with Carpro Lift and cleaned with a Maxshine Curved Grip XL brush and an EZ-Detail brush. The sizable wheel arches were then scrubbed with a Detail Factory Fender Brush.
Working on one side at a time, I then foamed with Lift and washed with a TRC Cyclone Bone pad. For the textured black lowers, I again used that DF Fender Brush. The same process was used for the front and back. As for the roof, I reached what I could and made sure to rinse the solar panels as best I could.
The finishing touch was an application of Carpro Hydr02 to the body and wheels. I had contemplated dressing the tyres but decided not to bother.
The photos don't do the end result justice, but even to my vision compromised client, the difference is remarkable.
And that was that, my first caravan detail.
Since June 2008, Victa has been owned by Briggs & Stratton. For a number of those years, it was business as usual and the product lineup remained strong. However, over the last 5-years, the brand has been progressively getting more and more diluted. This is especially seen in the pursuit of cheap and nasty rebranded China-Special mowers that have a bar blade, a tiny 16-inch cut and overall shi.ty build quality.
What baffles me most is that despite being owned by a small-engine powerhouse, Victa started putting non-Briggs engines on these mowers in favour of a range of rebranded generic China-Special engines.
Well, today Briggs and Stratton announced the sale of the Victa brand to Roy Gripske & Sons (RGS), in turn putting the brand back in Australian hands once again. And on surface level, I guess this is a good thing...........................
https://www.rgs.com.au/index.php
https://www.victa.com/content/dam/v...KOhzoZ7Z7GWB6z457Q_aem_NT6dVln1lpxs83zB8vs_6g
Roy Gripske & Sons own and run a variety of outdoor power equipment brands, including Bushranger, Maruyama, Efco, Oleo-Mac, Craftsman, Stiga, Ryan, Hustler and BigDog, GA Spares, ProKut. "PLP is one of the largest independent distributors of outdoor power equipment in Australia."
For those that don't know, the Bushranger mower range is made via tooling that was discarded by Rover and Honda, in turn making these mowers in Australia. The SuperSwift brand basically mirrors the Bushranger lineup.
https://bushrangerpe.com.au/
https://supaswift.com.au/
My fear with this move to buy Victa is multi-faceted -
- I feel the Victa 18 and 19-inch steel, as well as the 19-inch alloy decks are the best on the market. Hopefully PLP keep it this way instead of replacing them with Bushranger items, in turn streamlining their production.
- The majority of the Bushranger/SuperSwift range is powered by either Loncin or Kohler engines, with a stray Briggs or Honda in the mix. I hate those Loncin and Kohler engines, they just don't make the power or torque, are noisy and cheaply made, I've even had trouble getting a basic air filter for them. The Honda GXV160 used on the commercial mowers is indeed very durable and reliable, but they also lack torque.
- With that in mind, and with Briggs dusting their hands of Victa, I desperately hope the Victa range won't be repowered with these crappy Chinese engines.
- Considering how Briggs pandered to the "Lowest Prices Are Just The Beginning" crowd with cheap and nasty price-point machines, I'm hoping this doesn't progress from here, if anything, I hope PLP recognise the Victa heritage and make it a premium, go-to once again.
- I also hope they keep the full line of commercial mowers. I fear this because Bushranger/SuperSwift already have side discharge models that would compete with the Mulchmaster (Big Bob) and MasterCut (Little Bob), as well as the Commercial 19 and Commercial 21 (48AH6IM and 53AH6IMSP).
- In regard to that last point, Victa have gutted the Commercial range in the last month, and even those that remain, the corresponding product pages are a dead link.
In Briggs and Stratton's eyes, Victa is indeed an industry leader, but not for the right reasons. Being an American company, there is only one way to do business and make money.........................volume at all costs. Perhaps this is why they have pandered to Bunnings, they both have the same end-goal.
However, there is absolutely NOTHING good about an entry level 16-inch bucket of bolts with paper thin steel sold in that store. And I mean that from an end user point of view, but also how it drags down the reputation of the brand. Considering Victa is a 73-year-old brand, they should be an industry leader, not one that pursues selling cheap **** at Bunnings. They should be THE choice for contractors. They should be playing up their Australian heritage.
Here's to hoping PLP don't screw it up.
customh
Well-known member
Here's to hoping PLP don't screw it up.
Hope you aren't holding your breath.
American company or not it seems that in general consumer/commodity goods are going the way of a "race to the bottom". Even a commercial push mower here (Toro, Honda, Ariens, etc.) like your Victas have gotten tougher to find with the quality they used to have. Not to mention the gas-powered market share getting smaller every day for the walk behind segment.
There simply aren't enough people that get gratification from having the same mower 20 years in the future operate like new and hopefully appear as close to new as those 20 years of use will allow.
Yesterday it was the caravan, today it was the tow vehicle.
But first, a little reminder of how this vehicle looked after its last visit back in April this year.............

Since then, the Landcruiser has had a set of brand-new genuine Toyota headlights installed. Also, due to some damage from a previous trip, the vehicle has been treated to a new set of wheels. I have to say, I never liked those CSA 'Jackal' wheels, the car looks so much better with these CSA Kinetic's. And thankfully, he went with the machined silver version instead of satin black.

 csawheels.com.au
Detailers Tip - For anyone putting aftermarket wheels on an off-roader, never choose a matte or satin finish, especially black. That's because matte and satin finishes tend to absorb road grime and never truly release it. That means you will never have them clean again, even with a wheel coating and sledgehammer cleaning products. A clear coated wheel on the other hand is much more resistant to dirt, brake dust and road grime. In effect, the clearcoat rejects the grime rather than absorbs it. This of course applies to all satin/matte finish wheels, but it's more pronounced on a vehicle that is subjected to off-road driving.

After the on-site caravan detail yesterday, I used up the remainder of the Touch-less and Lift in my foam cannons by pre-treating the Landcruiser. Not only did this give me a head start for today, but it washed all the red dust into the gravel and NOT onto my concrete driveway.
Wheels & Tyres - Working wheel to wheel, after a pre-rinse, I sprayed the wheel with NV Purge. While that began doing its job, the tyre was sprayed with Wise Guy and scrubbed. The whole wheel and wheel arch was then foamed with Brake Buster and scrubbed with an assortment of brushes. This duo of Purge and Brake Buster worked extremely well.
Also during this step, I cleaned the side steps, front steel bumper, steel rear bumper, and the spare wheel carrier. Wise Guy was then used to scrub the rubber floor mats, followed by a misting of P&S Swift before being left in the spring sunshine to dry.

Pre-Wash - Even though I did this yesterday, I again foamed with Bilt Hamber Touch-less. While this was active, I went around with a brush to agitate around the badges, fuel filler door, window trims and door handles. That red dust gets everywhere! A thorough rinse followed.
Contact Wash - For this step, I switched to Carpro Descale. This was foamed onto the whole vehicle, and a little added to the rinse bucket for good measure.


Post Wash - After a very thorough rinse, making sure to blast behind the door handles and door jambs, I went around and applied Carpro Hydr02. A blow off with the Ego (no, not my Ego, the leaf blower), a heavy application of NV Boost v2 was used in connection with two large drying towels. I then wiped out the door jambs with Carpro ECH20, which were surprisingly clean.
Interior - Considering the number of kilometers this vehicle has done since it was last detailed back in April, the interior was actually pretty good. Of course, it needed a vacuum, made super easy due to the high-quality carpet Toyota used for this model. I then wiped down the interior with Nextzett Cockpit Premium, I keep forgetting how ****** good that product is. For the leather, I used KCx Pol Star in a spray and wipe manner, although I did use a leather brush on the shiny steering wheel, gear shifter and handbrake handle. After that, NV Nourish was applied to the leather, the carpets misted with KCx Fresh Up and Cozy Cotton, and the rubber mats reinstalled.
Glass - For the exterior, I went with Optimum Glass Clean & Protect, then switched to Stoner's for the interior glass. Because the car was in sun, it won't fit inside my garage, I probably didn't get the glass perfect but it's now much better than before.
Tyres - It's probably not worth dressing off-road tyres. But...............well I couldn't help myself. For big tyres like this, I like to use a runny dressing and apply with a TRC Ultra Utility Brush. The combo of that brush and a runny dressing is more efficient and helps get product into all the groves. Once applied, I leave it for 10 - 15 minutes, then buff off any excess with a towel.
In this case, I used Carpro Perl at 1:1, but Meg's Hyper Dressing, Duragloss 253, or Shine Supply Decked Out would be great alternatives. The key is having that runny consistency

Final Result - The old girl has a few battle scars, the result of this vehicle being used for what it was designed for rather than being a glorified shopping trolly or pram. It also needs to have a few stone chips and scrapes touched up. For reference, the Landcruiser now has just over 157,000 kms on the clock.


And if you've read this far, well enjoy this little time-lapse of me hard at work cleaning the exterior.....................
But first, a little reminder of how this vehicle looked after its last visit back in April this year.............
Since then, the Landcruiser has had a set of brand-new genuine Toyota headlights installed. Also, due to some damage from a previous trip, the vehicle has been treated to a new set of wheels. I have to say, I never liked those CSA 'Jackal' wheels, the car looks so much better with these CSA Kinetic's. And thankfully, he went with the machined silver version instead of satin black.
Kinetic – CSA Wheels
Designed for serious off-road enthusiasts, CSA-X Kinetic combines strength, style, and performance. Available in 17x9 and 18x9 sizes and both 5-stud and 6-stud bolt patterns, it fits a wide range of off-road vehicles. Whether tackling rough trails or hauling heavy loads, Kinetic’s 1500 kg load...
csawheels.com.au
Detailers Tip - For anyone putting aftermarket wheels on an off-roader, never choose a matte or satin finish, especially black. That's because matte and satin finishes tend to absorb road grime and never truly release it. That means you will never have them clean again, even with a wheel coating and sledgehammer cleaning products. A clear coated wheel on the other hand is much more resistant to dirt, brake dust and road grime. In effect, the clearcoat rejects the grime rather than absorbs it. This of course applies to all satin/matte finish wheels, but it's more pronounced on a vehicle that is subjected to off-road driving.
After the on-site caravan detail yesterday, I used up the remainder of the Touch-less and Lift in my foam cannons by pre-treating the Landcruiser. Not only did this give me a head start for today, but it washed all the red dust into the gravel and NOT onto my concrete driveway.
Wheels & Tyres - Working wheel to wheel, after a pre-rinse, I sprayed the wheel with NV Purge. While that began doing its job, the tyre was sprayed with Wise Guy and scrubbed. The whole wheel and wheel arch was then foamed with Brake Buster and scrubbed with an assortment of brushes. This duo of Purge and Brake Buster worked extremely well.
Also during this step, I cleaned the side steps, front steel bumper, steel rear bumper, and the spare wheel carrier. Wise Guy was then used to scrub the rubber floor mats, followed by a misting of P&S Swift before being left in the spring sunshine to dry.
Pre-Wash - Even though I did this yesterday, I again foamed with Bilt Hamber Touch-less. While this was active, I went around with a brush to agitate around the badges, fuel filler door, window trims and door handles. That red dust gets everywhere! A thorough rinse followed.
Contact Wash - For this step, I switched to Carpro Descale. This was foamed onto the whole vehicle, and a little added to the rinse bucket for good measure.
Post Wash - After a very thorough rinse, making sure to blast behind the door handles and door jambs, I went around and applied Carpro Hydr02. A blow off with the Ego (no, not my Ego, the leaf blower), a heavy application of NV Boost v2 was used in connection with two large drying towels. I then wiped out the door jambs with Carpro ECH20, which were surprisingly clean.
Interior - Considering the number of kilometers this vehicle has done since it was last detailed back in April, the interior was actually pretty good. Of course, it needed a vacuum, made super easy due to the high-quality carpet Toyota used for this model. I then wiped down the interior with Nextzett Cockpit Premium, I keep forgetting how ****** good that product is. For the leather, I used KCx Pol Star in a spray and wipe manner, although I did use a leather brush on the shiny steering wheel, gear shifter and handbrake handle. After that, NV Nourish was applied to the leather, the carpets misted with KCx Fresh Up and Cozy Cotton, and the rubber mats reinstalled.
Glass - For the exterior, I went with Optimum Glass Clean & Protect, then switched to Stoner's for the interior glass. Because the car was in sun, it won't fit inside my garage, I probably didn't get the glass perfect but it's now much better than before.
Tyres - It's probably not worth dressing off-road tyres. But...............well I couldn't help myself. For big tyres like this, I like to use a runny dressing and apply with a TRC Ultra Utility Brush. The combo of that brush and a runny dressing is more efficient and helps get product into all the groves. Once applied, I leave it for 10 - 15 minutes, then buff off any excess with a towel.
In this case, I used Carpro Perl at 1:1, but Meg's Hyper Dressing, Duragloss 253, or Shine Supply Decked Out would be great alternatives. The key is having that runny consistency
Final Result - The old girl has a few battle scars, the result of this vehicle being used for what it was designed for rather than being a glorified shopping trolly or pram. It also needs to have a few stone chips and scrapes touched up. For reference, the Landcruiser now has just over 157,000 kms on the clock.
And if you've read this far, well enjoy this little time-lapse of me hard at work cleaning the exterior.....................
littlebean
Well-known member
- Joined
- Mar 7, 2018
- Messages
- 783
can't be time lapse, that's your normal speed right
Geoff289
Well-known member
Can I pick your brains about car covers? I've been researching a replacement for the Autotecnica one I currently use on my Mustang.
https://www.autotecnica.com.au/indoor-show-car-cover-1-best-seller-2-198bk-x-larg
This is OK but not as dust proof as I'd like. I blow any dust of the car and dust it with an anti-static duster thing before I cover it up but as soon as I back it out into the sun dust is clearly evident on the horizontal surfaces. Being a black car doesn't help.
What covers do you use on your cars? I only need an indoor cover to keep the dust off, no need for rain protection or anything. I'd appreciate your advice.
Can I pick your brains about car covers? I've been researching a replacement for the Autotecnica one I currently use on my Mustang.
https://www.autotecnica.com.au/indoor-show-car-cover-1-best-seller-2-198bk-x-larg
This is OK but not as dust proof as I'd like. I blow any dust of the car and dust it with an anti-static duster thing before I cover it up but as soon as I back it out into the sun dust is clearly evident on the horizontal surfaces. Being a black car doesn't help.
What covers do you use on your cars? I only need an indoor cover to keep the dust off, no need for rain protection or anything. I'd appreciate your advice.
I have issues with dust as well. The problem is, the covers that prevent dust passing through usually don't have the soft fleecy interior. You are going to think I'm insane, but I actually have a soft form-fitting cover for each vehicle, then a cheaper weatherproof cover that sits over the top to prevent dust pass-through.
My go-to for many years was CoverCraft, which are probably the best on the market. However, the Australian distributor has phased them out for his own branded covers and sold under the Purfit brand. I think what was happening here was the CoverCraft distribution catered to imported vehicles, and then he would make covers for the Australian made cars on behalf of CoverCraft (Falcon, Commodore ect). From memory, he also supplied Ford/FPV with genuine accessory car covers sold through dealers.

Purfit Premium Custom Car Covers
Bespoke custom car covers with 100,000+ patterns. Exclusive Purfit 240gsm cotton fleece & Outdoorxv3 600D marine-grade fabric with polycotton Fleece liner. Free Worldwide shipping with tariffs and duties pre-paid. Shop now.
 purfitcovers.com
Each of my cars has what CoverCraft calls Form-Fit, or a Purfit. Both are custom cut for the vehicle rather than a more generic stretch fit -
FormFit -


Purfit -
Purfit
Bespoke custom car covers with 100,000+ patterns. Exclusive Purfit 240gsm cotton fleece & Outdoorxv3 600D marine-grade fabric with polycotton Fleece liner. Free Worldwide shipping with tariffs and duties pre-paid. Shop now.
purfitcovers.com


Having said that, the Luxguard would be the best bet for dust repellency. These are a more "relaxed" fit rather than custom fit like the above -
Luxguard
Bespoke custom car covers with 100,000+ patterns. Exclusive Purfit 240gsm cotton fleece & Outdoorxv3 600D marine-grade fabric with polycotton Fleece liner. Free Worldwide shipping with tariffs and duties pre-paid. Shop now.
purfitcovers.com
Geoff289
Well-known member
Many thanks for that. Covercraft and Purfit were on my short list, along with thisI have issues with dust as well. The problem is, the covers that prevent dust passing through usually don't have the soft fleecy interior. You are going to think I'm insane, but I actually have a soft form-fitting cover for each vehicle, then a cheaper weatherproof cover that sits over the top to prevent dust pass-through.
My go-to for many years was CoverCraft, which are probably the best on the market. However, the Australian distributor has phased them out for his own branded covers and sold under the Purfit brand. I think what was happening here was the CoverCraft distribution catered to imported vehicles, and then he would make covers for the Australian made cars on behalf of CoverCraft (Falcon, Commodore ect). From memory, he also supplied Ford/FPV with genuine accessory car covers sold through dealers.
Purfit Premium Custom Car Covers
Bespoke custom car covers with 100,000+ patterns. Exclusive Purfit 240gsm cotton fleece & Outdoorxv3 600D marine-grade fabric with polycotton Fleece liner. Free Worldwide shipping with tariffs and duties pre-paid. Shop now.
Each of my cars has what CoverCraft calls Form-Fit, or a Purfit. Both are custom cut for the vehicle rather than a more generic stretch fit -
FormFit -
Purfit -
Purfit
Bespoke custom car covers with 100,000+ patterns. Exclusive Purfit 240gsm cotton fleece & Outdoorxv3 600D marine-grade fabric with polycotton Fleece liner. Free Worldwide shipping with tariffs and duties pre-paid. Shop now.
Having said that, the Luxguard would be the best bet for dust repellency. These are a more "relaxed" fit rather than custom fit like the above -
Luxguard
Bespoke custom car covers with 100,000+ patterns. Exclusive Purfit 240gsm cotton fleece & Outdoorxv3 600D marine-grade fabric with polycotton Fleece liner. Free Worldwide shipping with tariffs and duties pre-paid. Shop now.
https://carcoversandshelter.com.au/...s/custom-made-bespoke-velvet-indoor-car-cover
The 200 gsm fabric seems like it would do a better job of dust exclusion than lighter 160 or so that many are made from.
Many thanks for that. Covercraft and Purfit were on my short list, along with this
https://carcoversandshelter.com.au/...s/custom-made-bespoke-velvet-indoor-car-cover
The 200 gsm fabric seems like it would do a better job of dust exclusion than lighter 160 or so that many are made from.
The higher the density of the fabric (gsm), the more it will naturally filter out dust. I hadn't actually thought about this when I purchased, so went and checked the Purfit specs -
"Crafted from an exclusive 240gsm cotton fleece blend, featuring a remarkable 4-way stretch and 10% spandex composition."

littlebean
Well-known member
- Joined
- Mar 7, 2018
- Messages
- 783
Mate, no idea what lead you to post that but hope you're ok
hewey
Well-known member
Amazing work on that van and tow vehicle. Having seen the red dust after doing the Oodnadatta Track in our family L300 van back in the 90s, I know how it gets everywhere.
And likewise, hope you're doing okay
And likewise, hope you're doing okay
Well………………………..I Did It Again…………………….
I know, I know, I didn’t need another mower. But, I needed another project. Let me say, very rarely does a lawn mower come up for sale in my area that is worth pursuing. In that I mean solidly built alloy chassis Rover’s and Victa’s powered by the larger Briggs, Honda and Victa engines. Instead, it’s a sea of beaten-up steel chassis Victa’s, Masport’s and Rover’s, powered by entry level Briggs, Krohler and other Chonda engines. Most of what I’m looking for is from the mid-2000’s back to the late 1980’s, back when these companies cared about making a machine that would last longer than two seasons.
So, you can imagine my excitement last night when I opened Facebook Marketplace for my daily unicorn trawl and immediately spotted something I was interested in. Just the single photo was included, and a very brief description. And yet, I could tell it was worth the pursuit.
“Rover professional 20 inch cut starts first pull”.

I quickly messaged the seller, explained that I was a genuine buyer and asked when I could come and get it. No “is this still available?”, “will you take $2.50”, “can you hop on one leg while patting your head”……………….no haggle, just “I’ll take it and when can I pick it up”. When I went this afternoon to pick it up, the seller told I was first of many who wanted it, and also the only one who didn’t play games with lowballing and “is this still available” syndrome. I also arrived 5 minutes before the agreed pickup time, not 45 minutes late with no explanation.
As per the description, the engine fired on the first pull. The seller has owned it since new, and other than basic servicing and blade replacements, its performed flawlessly.

TURBOTHRUST!!


The size of the muffler is noticeably larger than other Briggs engines. The extra size of Briggs & Stratton mufflers is what makes these engines noticeable quieter than an equivalent Honda, Krohler or Chonda.

This plate covers the pass-through for the deck mounted gearbox on self-propel models. Just like the ProCut models, the belt driven gearbox directs drive through this pass-through via chain, which then turns the axle. This arrangement means a full width discharge chute, improving catching performance, as well as protecting the gearbox from debris. Why this type of drive isn’t widely used baffles me, perhaps Rover (MTD) own the patent?

I find this odd. Why fit an air filter snorkel, then tell the customer it’s not mandatory? For reference, there is a pleated paper filter at the engine, so in theory they are correct, but this is something I will be addressing.

So why this mower? This is a late 90's vintage Rover Professional Supercut, featuring a 20-inch alloy chassis. Rover’s from this era were brilliant, well built, sturdy, exceptional cutting and catching performance. Dating back to the 1980’s, this particular chassis with its squarer design was later replaced by the smoother looking ProCut series. They do however share a lot of similar parts, from the handles and handle mounting location, the axle and wheels, catcher, throttle control and blade carrier. I actually have the period brochure that I collected from the dealer back in 1999/2000 at age 13 or 14.


So, if this is so similar to the ProCut, of which I have two, again, why this mower? Well, it’s the engine fitted to this mower, the Briggs & Stratton Intek Edge. These engines were reserved for high end commercial mowers like this. The Intek was never offered on Victa’s, only a select range of Rover and Masport mowers. But again, what is so special about this engine? Well, this was the first time Briggs & Stratton offered a lawn mower engine with an OHV layout and not the simpler and more cost-effective L-Head / Side Valve engines.


I’ve never had an Intek engine before, let alone used one. Because of their rarity in Australia, I’ve always been fascinated by these engines. More to come on that front shortly. I’ve also looked up the Model-Type-Code and confirmed this is the 190cc version (there was a 170cc variant as well) and was manufactured on the 24th August 1999, which makes this mower at least 26 years old. That sounds about right as the brochure is dated from 1998 / 1999.

After a quick inspection, there are a few things that will need addressing –
- The front axle is sloppy. These use the same re-enforced mounting hardware as the ProCut series, and after a quick look, it appears to they just need to be tightened up. If not, I have some spares in stock if I need to replace them.
- Replace the air filter at the engine, install a filter in the snorkel.
- Replace spark plug.
- Oil change.
- Blades are borderline, so I’ll leave them for now.
- The tank to carb fuel line is looking dry rotted, I’m not going to mess with it as I don’t want to break the tank outlet barb, but I have replacement line in stock if needed.
- A good deep clean!
I’ve already found PDF owners and parts manuals for this engine, finding the same for the actual mower is harder as MTD have basically abandoned the Rover brand now.
I know, I know, I didn’t need another mower. But, I needed another project. Let me say, very rarely does a lawn mower come up for sale in my area that is worth pursuing. In that I mean solidly built alloy chassis Rover’s and Victa’s powered by the larger Briggs, Honda and Victa engines. Instead, it’s a sea of beaten-up steel chassis Victa’s, Masport’s and Rover’s, powered by entry level Briggs, Krohler and other Chonda engines. Most of what I’m looking for is from the mid-2000’s back to the late 1980’s, back when these companies cared about making a machine that would last longer than two seasons.
So, you can imagine my excitement last night when I opened Facebook Marketplace for my daily unicorn trawl and immediately spotted something I was interested in. Just the single photo was included, and a very brief description. And yet, I could tell it was worth the pursuit.
“Rover professional 20 inch cut starts first pull”.
I quickly messaged the seller, explained that I was a genuine buyer and asked when I could come and get it. No “is this still available?”, “will you take $2.50”, “can you hop on one leg while patting your head”……………….no haggle, just “I’ll take it and when can I pick it up”. When I went this afternoon to pick it up, the seller told I was first of many who wanted it, and also the only one who didn’t play games with lowballing and “is this still available” syndrome. I also arrived 5 minutes before the agreed pickup time, not 45 minutes late with no explanation.
As per the description, the engine fired on the first pull. The seller has owned it since new, and other than basic servicing and blade replacements, its performed flawlessly.
TURBOTHRUST!!
The size of the muffler is noticeably larger than other Briggs engines. The extra size of Briggs & Stratton mufflers is what makes these engines noticeable quieter than an equivalent Honda, Krohler or Chonda.
This plate covers the pass-through for the deck mounted gearbox on self-propel models. Just like the ProCut models, the belt driven gearbox directs drive through this pass-through via chain, which then turns the axle. This arrangement means a full width discharge chute, improving catching performance, as well as protecting the gearbox from debris. Why this type of drive isn’t widely used baffles me, perhaps Rover (MTD) own the patent?
I find this odd. Why fit an air filter snorkel, then tell the customer it’s not mandatory? For reference, there is a pleated paper filter at the engine, so in theory they are correct, but this is something I will be addressing.
So why this mower? This is a late 90's vintage Rover Professional Supercut, featuring a 20-inch alloy chassis. Rover’s from this era were brilliant, well built, sturdy, exceptional cutting and catching performance. Dating back to the 1980’s, this particular chassis with its squarer design was later replaced by the smoother looking ProCut series. They do however share a lot of similar parts, from the handles and handle mounting location, the axle and wheels, catcher, throttle control and blade carrier. I actually have the period brochure that I collected from the dealer back in 1999/2000 at age 13 or 14.
So, if this is so similar to the ProCut, of which I have two, again, why this mower? Well, it’s the engine fitted to this mower, the Briggs & Stratton Intek Edge. These engines were reserved for high end commercial mowers like this. The Intek was never offered on Victa’s, only a select range of Rover and Masport mowers. But again, what is so special about this engine? Well, this was the first time Briggs & Stratton offered a lawn mower engine with an OHV layout and not the simpler and more cost-effective L-Head / Side Valve engines.
I’ve never had an Intek engine before, let alone used one. Because of their rarity in Australia, I’ve always been fascinated by these engines. More to come on that front shortly. I’ve also looked up the Model-Type-Code and confirmed this is the 190cc version (there was a 170cc variant as well) and was manufactured on the 24th August 1999, which makes this mower at least 26 years old. That sounds about right as the brochure is dated from 1998 / 1999.
After a quick inspection, there are a few things that will need addressing –
- The front axle is sloppy. These use the same re-enforced mounting hardware as the ProCut series, and after a quick look, it appears to they just need to be tightened up. If not, I have some spares in stock if I need to replace them.
- Replace the air filter at the engine, install a filter in the snorkel.
- Replace spark plug.
- Oil change.
- Blades are borderline, so I’ll leave them for now.
- The tank to carb fuel line is looking dry rotted, I’m not going to mess with it as I don’t want to break the tank outlet barb, but I have replacement line in stock if needed.
- A good deep clean!
I’ve already found PDF owners and parts manuals for this engine, finding the same for the actual mower is harder as MTD have basically abandoned the Rover brand now.
I got stuck into the Rover this morning, excited to see what I could get sorted. There were a few small details I wanted to address, and in the process, I found a few other issues that I suspect led the previous owner to replace it.
The first thing I wanted to get sorted was the sloppy front axle, if I couldn’t fix this, the chassis would be effectively junk. After a quick look yesterday, the threaded hook anchors were loose and simply needed to be tightened up.
I could have simply nipped them up, however I decided to drop the axle and inspect the plastic bushes. I’ve seen worse than these, but seeing as I had some in stock, I decided to replace them. I also had a set of new old stock anchor hardware, but I managed to get the old ones tight, solving the problem.
In this image taken before removal, you can see the gap between the axle/bush and the top of the deck recess.


This is the same system used on the later ProCut models, so I have previous experience here. Those bushes and anchor hardware are long obsolete and extremely hard to find. The funny thing is, its because of these that I began doing my own repairs.


After a test start first thing, I could hear a light ticking noise that came and went. This was initially concerning, but then I remembered the state of the blades. With the deck in the air, I could see where the blades had been contacting the side of the aluminium deck. And while the blade hardware was TIGHT, they were far too sloppy. As luck would have it, I had a new set of blades, the 18-inch and 20-inch Rover’s used the same parts. This is when I discovered that the crush washers had been installed incorrectly, which was causing the blades to be sloppy. With the new blades fitted, a quick test start confirmed the fix.


Hearing that noise, and the sloppy front axle, this is where I suspect the previous owner bailed on the mower, thinking it was worn out. No, it just needed some attention and maintenance. Oh, and the blades put on the correct way!
After the test start, I left it running to warm up the oil for an oil change. The oil that eventually drained out was fairly contaminated. I ended up putting mineral SAE30 in it, purely because it's an old girl now with plenty of miles on it. Considering the oil that came out of it, and how quickly the usually bright red SAE30 turned brown, I’m going to use this oil as a flush and change it again in the near future.

Next, I needed to dive into the air filter situation. As per the previous post, the owner decided not to run the snorkel filter, instead relying on the filters at the engine. With the covers removed, um, yep……………………..


I’ll give those filters credit though, they did their jobs considering how clean the inner box was, any flecks of dirt were from me opening it up.
From here, I decided to just pull the filter box from the carburettor and clean things properly. I then soaked all of the filter covers with Surfex, including the snorkel tube and cap. Some agitation with a brush, I rinsed with the hose and set them aside to dry. Because I found something else that needed attention………………………….


That hose takes fuel from the tank to the carburettor, which believe it or not, wasn’t leaking. This hose has a very thick wall, which would is probably why it wasn't leaking, but no doubt it wouldn't be long before it did. So, the question was, replace it or leave it alone? My hesitation here stems from the plastic barb leading out of the fuel tank can often be brittle, so I didn’t want to junk a very expensive part of the engine. In the end, I thought I’d only have to pull it all apart again, and considering I had the hose in stock, I though I may as well do it now. The old hose came off easily, the new hose went back very firmly, assisted by a little Stihl press fluid, the old clamps reused. Fresh fuel in the tank verified my work.
Strangely, the fuel I drained out of the tank was bright blue, almost as if it was 2-stroke. Now, the engine wasn’t smoking on this fuel, but my fuel is always amber yellow. So, I’m not sure what’s up there.
At this point, I noticed the cylinder baffle plate was not installed correctly. This was an easy fix, the front bolts holding the blower shroud were removed, allowing enough upward movement for me to slot the baffle back to where it should have been. After reinstalling the bolts, I then went around and tightened up the valve cover bolts, which are known to back out over time and cause leaks.
Next, I dove into the parts department for a new spark plug, the old one was well past its use by date. These Intek’s take the same RC12YC Champion plugs that Briggs uses in all of its OHV mower engine these days, from the base 300e right up to the big boy 850-series. While I had the engine running to warm up the oil, I noticed the occasional slight miss, well the new plug fixed that.


At this point, I swung from small engine mechanic to detailer because I JUST HAD to remove the 26 years’ worth of oil and dirt from this engine. To avoid getting water where it shouldn’t be, I reinstalled the filter base to the carb, then the cover without filters installed. The snorkel outlet was then plugged with a towel. Shine Supply Wise Guy and Surfex teamed up here for degreasing, I then blasted the bulk of the grime off with the pressure washer. A reapplication of Wise Guy, then some agitation with a brush got the rest clean. The deck, wheels, catcher and snorkel housing got the same treatment.


It was then time for an application of Carpro Hydr02, then lashings of Megs Hyper Dressing.


After drying off with the blower, it was time for another trip to the spare parts department for some new filters. All three I had in stock! I really don’t know why you wouldn’t use a filter in the snorkel, in fact it was rather silly of Rover to put that sticker on the housing. If the previous owner had, the old filters would not have looked like they did.


Finally, I polished the muffler and used some steel wool to remove the surface rust from the chrome handle bars. On that front, I went around and tightened all of the handle mounting hardware, which were just a touch sloppy. This combined with the repaired axle made the mower feel much tighter, almost like new!

And with that, I’m very happy with the results here. Yes, a few battle scars, and it has the standard issue paint drips over the deck (explain to me how this happens, why wouldn’t you move the mower when painting your garage?). But for a 26-year old mower, you can’t really ask for more…………………..


Now, I never do this for financial gain, its purely my own curiosity and enjoyment. But I thought it would be insightful to see what this project has cost me (so far). It also relates to a theory I will explain shortly. Obviously, I haven’t included a labour charge here.


Now, lets address the elephant in the room. The previous owner basically gave this high-end lawn mower away. Yes, it needed some maintenance thrown at it, but a drop in the ocean all things considered. Because what did he replace it with? An EGO battery powered mower worth the better part of $1000.
Now, I actually respect the EGO brand, I have several EGO tools powered by THE BEST battery technology out there. And that joins several other battery-powered garden tools. But, will he get 26-years out of that mower? Not even close! Plastic deck vs aluminium alloy? Batteries don’t last forever, whereas an iron bore Briggs will. The original purchase price of that Rover would have been about $800 in 1999, plus 26 years of fuel and oil. But it’s not even close to the same amount he will eventually spend replenishing batteries over “life” of that EGO. And guess what? This Rover has another 26 years left in it.
So, which is the more economical and environmentally sound choice here? I’d wager spending that $90 on maintenance would have been the better choice. And that’s before you consider the limitations of an EGO mower.
The first thing I wanted to get sorted was the sloppy front axle, if I couldn’t fix this, the chassis would be effectively junk. After a quick look yesterday, the threaded hook anchors were loose and simply needed to be tightened up.
I could have simply nipped them up, however I decided to drop the axle and inspect the plastic bushes. I’ve seen worse than these, but seeing as I had some in stock, I decided to replace them. I also had a set of new old stock anchor hardware, but I managed to get the old ones tight, solving the problem.
In this image taken before removal, you can see the gap between the axle/bush and the top of the deck recess.
This is the same system used on the later ProCut models, so I have previous experience here. Those bushes and anchor hardware are long obsolete and extremely hard to find. The funny thing is, its because of these that I began doing my own repairs.
After a test start first thing, I could hear a light ticking noise that came and went. This was initially concerning, but then I remembered the state of the blades. With the deck in the air, I could see where the blades had been contacting the side of the aluminium deck. And while the blade hardware was TIGHT, they were far too sloppy. As luck would have it, I had a new set of blades, the 18-inch and 20-inch Rover’s used the same parts. This is when I discovered that the crush washers had been installed incorrectly, which was causing the blades to be sloppy. With the new blades fitted, a quick test start confirmed the fix.
Hearing that noise, and the sloppy front axle, this is where I suspect the previous owner bailed on the mower, thinking it was worn out. No, it just needed some attention and maintenance. Oh, and the blades put on the correct way!
After the test start, I left it running to warm up the oil for an oil change. The oil that eventually drained out was fairly contaminated. I ended up putting mineral SAE30 in it, purely because it's an old girl now with plenty of miles on it. Considering the oil that came out of it, and how quickly the usually bright red SAE30 turned brown, I’m going to use this oil as a flush and change it again in the near future.
Next, I needed to dive into the air filter situation. As per the previous post, the owner decided not to run the snorkel filter, instead relying on the filters at the engine. With the covers removed, um, yep……………………..
I’ll give those filters credit though, they did their jobs considering how clean the inner box was, any flecks of dirt were from me opening it up.
From here, I decided to just pull the filter box from the carburettor and clean things properly. I then soaked all of the filter covers with Surfex, including the snorkel tube and cap. Some agitation with a brush, I rinsed with the hose and set them aside to dry. Because I found something else that needed attention………………………….
That hose takes fuel from the tank to the carburettor, which believe it or not, wasn’t leaking. This hose has a very thick wall, which would is probably why it wasn't leaking, but no doubt it wouldn't be long before it did. So, the question was, replace it or leave it alone? My hesitation here stems from the plastic barb leading out of the fuel tank can often be brittle, so I didn’t want to junk a very expensive part of the engine. In the end, I thought I’d only have to pull it all apart again, and considering I had the hose in stock, I though I may as well do it now. The old hose came off easily, the new hose went back very firmly, assisted by a little Stihl press fluid, the old clamps reused. Fresh fuel in the tank verified my work.
Strangely, the fuel I drained out of the tank was bright blue, almost as if it was 2-stroke. Now, the engine wasn’t smoking on this fuel, but my fuel is always amber yellow. So, I’m not sure what’s up there.
At this point, I noticed the cylinder baffle plate was not installed correctly. This was an easy fix, the front bolts holding the blower shroud were removed, allowing enough upward movement for me to slot the baffle back to where it should have been. After reinstalling the bolts, I then went around and tightened up the valve cover bolts, which are known to back out over time and cause leaks.
Next, I dove into the parts department for a new spark plug, the old one was well past its use by date. These Intek’s take the same RC12YC Champion plugs that Briggs uses in all of its OHV mower engine these days, from the base 300e right up to the big boy 850-series. While I had the engine running to warm up the oil, I noticed the occasional slight miss, well the new plug fixed that.
At this point, I swung from small engine mechanic to detailer because I JUST HAD to remove the 26 years’ worth of oil and dirt from this engine. To avoid getting water where it shouldn’t be, I reinstalled the filter base to the carb, then the cover without filters installed. The snorkel outlet was then plugged with a towel. Shine Supply Wise Guy and Surfex teamed up here for degreasing, I then blasted the bulk of the grime off with the pressure washer. A reapplication of Wise Guy, then some agitation with a brush got the rest clean. The deck, wheels, catcher and snorkel housing got the same treatment.
It was then time for an application of Carpro Hydr02, then lashings of Megs Hyper Dressing.
After drying off with the blower, it was time for another trip to the spare parts department for some new filters. All three I had in stock! I really don’t know why you wouldn’t use a filter in the snorkel, in fact it was rather silly of Rover to put that sticker on the housing. If the previous owner had, the old filters would not have looked like they did.
Finally, I polished the muffler and used some steel wool to remove the surface rust from the chrome handle bars. On that front, I went around and tightened all of the handle mounting hardware, which were just a touch sloppy. This combined with the repaired axle made the mower feel much tighter, almost like new!
And with that, I’m very happy with the results here. Yes, a few battle scars, and it has the standard issue paint drips over the deck (explain to me how this happens, why wouldn’t you move the mower when painting your garage?). But for a 26-year old mower, you can’t really ask for more…………………..
Now, I never do this for financial gain, its purely my own curiosity and enjoyment. But I thought it would be insightful to see what this project has cost me (so far). It also relates to a theory I will explain shortly. Obviously, I haven’t included a labour charge here.
Now, lets address the elephant in the room. The previous owner basically gave this high-end lawn mower away. Yes, it needed some maintenance thrown at it, but a drop in the ocean all things considered. Because what did he replace it with? An EGO battery powered mower worth the better part of $1000.
Now, I actually respect the EGO brand, I have several EGO tools powered by THE BEST battery technology out there. And that joins several other battery-powered garden tools. But, will he get 26-years out of that mower? Not even close! Plastic deck vs aluminium alloy? Batteries don’t last forever, whereas an iron bore Briggs will. The original purchase price of that Rover would have been about $800 in 1999, plus 26 years of fuel and oil. But it’s not even close to the same amount he will eventually spend replenishing batteries over “life” of that EGO. And guess what? This Rover has another 26 years left in it.
So, which is the more economical and environmentally sound choice here? I’d wager spending that $90 on maintenance would have been the better choice. And that’s before you consider the limitations of an EGO mower.
I’m very happy with how this mower responded to its well overdue service. As I said previously, the engine had a very slight miss at full throttle, which I’d attribute to the packed air filters and carboned up spark plug.

Prior to the service, I checked the speed of the engine with my tachometer. As per the manual, full throttle yielded 3300 rpm, idle at 2800 rpm. Compared to a modern 850-Series, those are set at 2800 rpm at full throttle and about 2300 rpm for the idle. So, out of the box this Intek was running faster than any modern equivalent. But I couldn’t help myself, so out came the pliers for a slight tweak of the governor tab, bringing the full throttle revs up to a very strong sounding 3600 rpm.
This engine has great throttle response, I just wish it would idle down more. At some point, I’ll probably pull the rocker cover and check the valve clearance. I’d also like to get a zone starter fitted to the handle, the rope on Briggs engines provide plenty of scope for this……………….are you listening Honda?
Geoff289
Well-known member
Great work on that mower.
Great work on that mower.
I cut the front lawns with it this afternoon, it's an absolute pearler!
ajohno
Well-known member
Great job on the mower D.F.B
Briggs & Stratton Intek Edge
WARNING - Super geeky post that satisfies a 25-year curiosity itch.
The Intek (alloy bore) and Intek Edge (cast iron bore) were offered from the mid-1990’s through to the late 2000’s as Briggs & Stratton's premium / commercial-grade mower engines. These were offered as a step above the 190cc Quantum engines and represented the first OHV push mower engine from the brand. Two capacities were offered, 170cc 11000-Series and 190cc 12000-Series, both sharing the same 68.26mm bore with a 46mm (170cc) or 52mm (190cc) bore. For the most part, the Intek pre-dated the move to a torque-class rating system, so the number on the engine represented the horsepower output. The 190cc was offered in 55 (5hp), 60 (6hp) and 65 (6.5hp), while the smaller 170cc engines carried 55 and 60. The smaller 170 was discontinued in about 2005. From what I can tell, these engines were not fitted with chokes, be that manual or automatic engagement, they used a primer bulb instead.


Confusing things more, there appears to be a third variant called the Intek Edge Modular. I think this correlates with a Quantum-style flat air filter and a paired back engine cover design, differing from the standard oval-shaped cartridge filter and smoother engine cover of the non-modular engines. Looking at the model-type-code data of my engine, it confirms I have the Intek Edge Modular 55 in the 190cc capacity.


The Intek was the predecessor of the 850-Series that went into production in the late 2000’s. Considering both share the same 190cc capacity and a very similar cylinder head/rocker cover layout, as well as the exact same bore and stroke, you may assume that the Intek and 850-Series are the same thing, but they are far from it.
Considering the fundamental differences in block design between a flat head and an OHV layout, you’d also assume that Briggs created an all-new block for the Intek. Nope, the Intek was created in the most cost-effective manner possible. The basic block and sump castings follow the same shape as the 190cc side-valve engine, although with modifications to eliminate the valve recess on the deck and redesigned cylinder fins. A new cylinder head was then created to mate to this new deck. But take note of how they kept the old valve spring pocket and cover, on the Intek this functions purely as a breather port. Also check out the channelled groove of the flywheel side of the block, identical to the side-valve.
L-Head (190cc) –

Intek -

Comparing Intek and 850-Series is a different story. The 850 uses a new block design, eliminating a bunch of legacy parts that Briggs had been using since the 60’s. The style of the cylinder head and rocker cover is a similar concept to the Intek, but the porting is totally different. The 850 has the carburettor and exhaust location reversed and functions as a cross-flow arrangement. The Intek had intake and exhaust ports vertically stacked, with fuel drawn from the bottom valve, the exhaust direct upward then into a transfer tube connected to the muffler. The exhaust layout of the Intek is probably the quirkiest part of the engine, that and the protruding valve cover.


Intek Block & Head –


850 Block & Head –


Also note how Briggs have gone about these cylinder heads. Compared to a Honda, the rockers and valve springs are mounted on top of the cylinder head casting, supported by a separate plate and gasket, then encased with a deep valve cover. With a Honda/Chonda/Krohler, the valve train is recessed and surrounded by the head casting and covered by a much shallower valve cover. This explains why the valve cover on an Intek or 850 juts so far forward. The newer 125, 140, 150 and 163cc domestic engines do the same.

With the Intek being so close in architecture to the Quantum L-Head's, naturally a lot of parts are common between them. For example, think air filters, the primer bulb, dipstick, fuel tank, starter recoil, sump and breather gaskets, ignition coil, and crank seals and general hardware. The Intek however uses a long reach sparkplug, same as used on all other OHV Briggs engines. However, it's the unique parts that pose a potential problem down the track. With less of these made, the demand for spare parts is lower and therefore less were made. That means a lot of parts are NLA and therefore harder to find suitable replacements. For example, the Intek uses a unique carburettor and carburettor rebuild kit, the carb itself NLA. The associated intake related gaskets likewise. The valve cover gasket, valve plate and valve plate gaskets are also hard to find.
The other Intek quirk is the sizable muffler. This is larger than the Quantum and 850, and comfortably bigger than any modern competitor. This is one area where Briggs have had a clear advantage over other brands, they just run quieter and have less "pitter-patter" than the Honda and Krohler. Actually, Honda and Krohler play funny buggers here because the included heat shield gives the impression of a larger muffler. But DFB, don't you like a noisy engine? I do, but not annoying high frequency noise.
148cc and 158 cc L-Head -

Quantum -

850-Series (chambered QPT version shown) -

Honda GC -

Krohler -
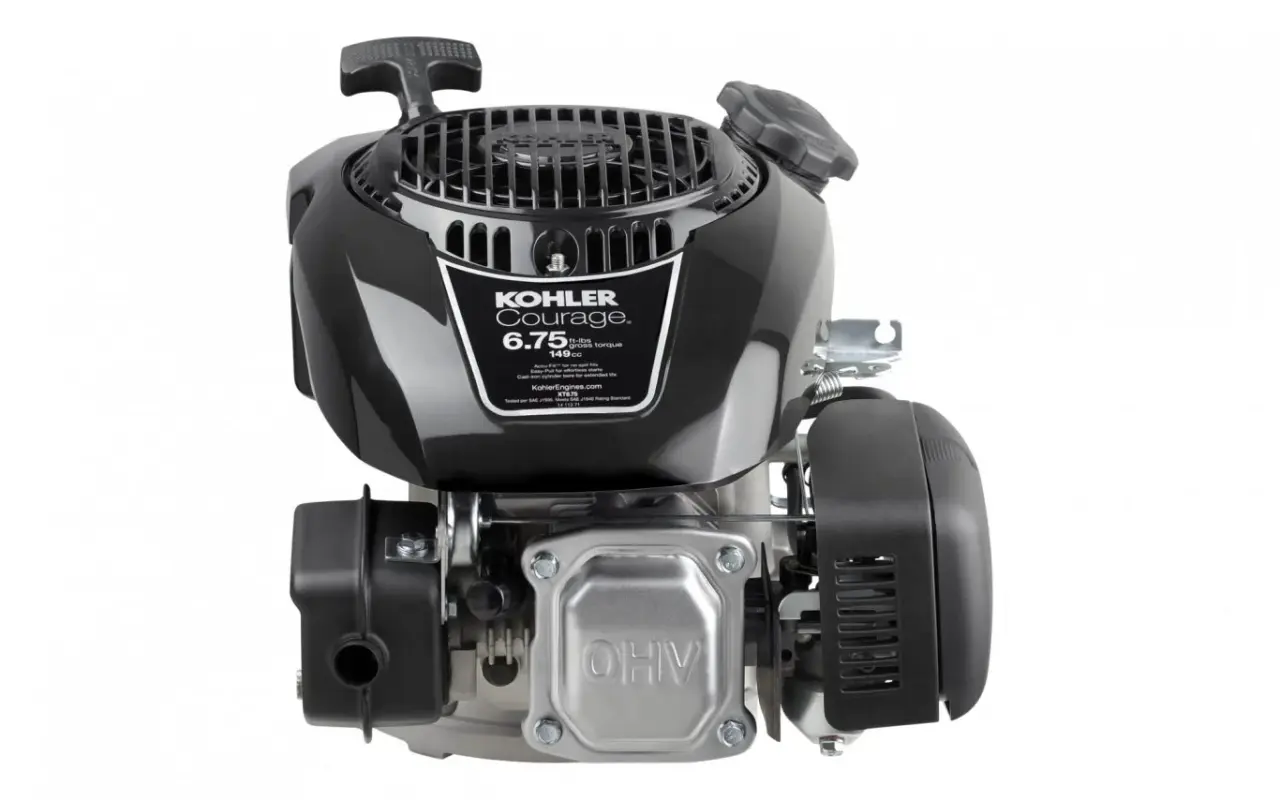
Intek -

I cut the front lawns with this mower today. What an absolute pearler! It feels super solid, but not heavy. The catcher is huge and easy to empty. And despite not being the more powerful 60 or 65, this engine has got so much grunt! It laughed at patches of thick, wet clover. The only thing that would make this mower better would be if it had self-propel.

So, I've checked off another bucket list lawn mower with this Intek engine. I've always been fascinated by them, and now I have one. I've also had someone talk up the Suzuki 2-Stroke, apparently they are much smoother and more responsive than a Victa Powertorque. Both Masport and Rover offered this engine choice, so I guess I'm looking for one of those now too. I'm still on the hunt for a Victa Twin, and either finding or making a 2000's era Victa Razor with the Briggs or Victa engine.
WARNING - Super geeky post that satisfies a 25-year curiosity itch.
The Intek (alloy bore) and Intek Edge (cast iron bore) were offered from the mid-1990’s through to the late 2000’s as Briggs & Stratton's premium / commercial-grade mower engines. These were offered as a step above the 190cc Quantum engines and represented the first OHV push mower engine from the brand. Two capacities were offered, 170cc 11000-Series and 190cc 12000-Series, both sharing the same 68.26mm bore with a 46mm (170cc) or 52mm (190cc) bore. For the most part, the Intek pre-dated the move to a torque-class rating system, so the number on the engine represented the horsepower output. The 190cc was offered in 55 (5hp), 60 (6hp) and 65 (6.5hp), while the smaller 170cc engines carried 55 and 60. The smaller 170 was discontinued in about 2005. From what I can tell, these engines were not fitted with chokes, be that manual or automatic engagement, they used a primer bulb instead.
Confusing things more, there appears to be a third variant called the Intek Edge Modular. I think this correlates with a Quantum-style flat air filter and a paired back engine cover design, differing from the standard oval-shaped cartridge filter and smoother engine cover of the non-modular engines. Looking at the model-type-code data of my engine, it confirms I have the Intek Edge Modular 55 in the 190cc capacity.
The Intek was the predecessor of the 850-Series that went into production in the late 2000’s. Considering both share the same 190cc capacity and a very similar cylinder head/rocker cover layout, as well as the exact same bore and stroke, you may assume that the Intek and 850-Series are the same thing, but they are far from it.
Considering the fundamental differences in block design between a flat head and an OHV layout, you’d also assume that Briggs created an all-new block for the Intek. Nope, the Intek was created in the most cost-effective manner possible. The basic block and sump castings follow the same shape as the 190cc side-valve engine, although with modifications to eliminate the valve recess on the deck and redesigned cylinder fins. A new cylinder head was then created to mate to this new deck. But take note of how they kept the old valve spring pocket and cover, on the Intek this functions purely as a breather port. Also check out the channelled groove of the flywheel side of the block, identical to the side-valve.
L-Head (190cc) –
Intek -
Comparing Intek and 850-Series is a different story. The 850 uses a new block design, eliminating a bunch of legacy parts that Briggs had been using since the 60’s. The style of the cylinder head and rocker cover is a similar concept to the Intek, but the porting is totally different. The 850 has the carburettor and exhaust location reversed and functions as a cross-flow arrangement. The Intek had intake and exhaust ports vertically stacked, with fuel drawn from the bottom valve, the exhaust direct upward then into a transfer tube connected to the muffler. The exhaust layout of the Intek is probably the quirkiest part of the engine, that and the protruding valve cover.
Intek Block & Head –
850 Block & Head –
Also note how Briggs have gone about these cylinder heads. Compared to a Honda, the rockers and valve springs are mounted on top of the cylinder head casting, supported by a separate plate and gasket, then encased with a deep valve cover. With a Honda/Chonda/Krohler, the valve train is recessed and surrounded by the head casting and covered by a much shallower valve cover. This explains why the valve cover on an Intek or 850 juts so far forward. The newer 125, 140, 150 and 163cc domestic engines do the same.
With the Intek being so close in architecture to the Quantum L-Head's, naturally a lot of parts are common between them. For example, think air filters, the primer bulb, dipstick, fuel tank, starter recoil, sump and breather gaskets, ignition coil, and crank seals and general hardware. The Intek however uses a long reach sparkplug, same as used on all other OHV Briggs engines. However, it's the unique parts that pose a potential problem down the track. With less of these made, the demand for spare parts is lower and therefore less were made. That means a lot of parts are NLA and therefore harder to find suitable replacements. For example, the Intek uses a unique carburettor and carburettor rebuild kit, the carb itself NLA. The associated intake related gaskets likewise. The valve cover gasket, valve plate and valve plate gaskets are also hard to find.
The other Intek quirk is the sizable muffler. This is larger than the Quantum and 850, and comfortably bigger than any modern competitor. This is one area where Briggs have had a clear advantage over other brands, they just run quieter and have less "pitter-patter" than the Honda and Krohler. Actually, Honda and Krohler play funny buggers here because the included heat shield gives the impression of a larger muffler. But DFB, don't you like a noisy engine? I do, but not annoying high frequency noise.
148cc and 158 cc L-Head -
Quantum -
850-Series (chambered QPT version shown) -
Honda GC -
Krohler -
Intek -
I cut the front lawns with this mower today. What an absolute pearler! It feels super solid, but not heavy. The catcher is huge and easy to empty. And despite not being the more powerful 60 or 65, this engine has got so much grunt! It laughed at patches of thick, wet clover. The only thing that would make this mower better would be if it had self-propel.
So, I've checked off another bucket list lawn mower with this Intek engine. I've always been fascinated by them, and now I have one. I've also had someone talk up the Suzuki 2-Stroke, apparently they are much smoother and more responsive than a Victa Powertorque. Both Masport and Rover offered this engine choice, so I guess I'm looking for one of those now too. I'm still on the hunt for a Victa Twin, and either finding or making a 2000's era Victa Razor with the Briggs or Victa engine.
Another empty gallon.........................

Traditional quick detailers like this are no longer a go-to for many, but I still think they have a place. I'd say with the proliferation of rinse-less wash concentrates, most simply mix those up at a quick detailer dilution rather than buying a specific product.
I used Last Touch and Final Inspection as my only drying aids for many years, of which they did exactly what they say on the bottle. In many cases, these products are much easier to use with less streaking potential. For a while there, I was also using Megs Final Inspection as my clay lubricant as its considered a residue free product.


I've since replaced Final Inspection with either Carpro or Gyeon clay lubricants, and P&S Paint Gloss has replaced Last Touch.
Traditional quick detailers like this are no longer a go-to for many, but I still think they have a place. I'd say with the proliferation of rinse-less wash concentrates, most simply mix those up at a quick detailer dilution rather than buying a specific product.
I used Last Touch and Final Inspection as my only drying aids for many years, of which they did exactly what they say on the bottle. In many cases, these products are much easier to use with less streaking potential. For a while there, I was also using Megs Final Inspection as my clay lubricant as its considered a residue free product.
I've since replaced Final Inspection with either Carpro or Gyeon clay lubricants, and P&S Paint Gloss has replaced Last Touch.
Briggs & Stratton vs Honda -
As a teenager, I would ride my bike all over town to look at lawn mowers and chainsaws. My favourite place was the local Stihl dealer, who also sold Victa, Rover and SuperSwift. Not that I wasted their time, I’m sure I annoyed the salesmen doing this, I just wanted to look, dream, and collect brochures.
I still have all of those brochures, which I’ve found a great reference over the years. One of the most interesting I collected was a Briggs published comparative brochure titled as follows………………..
World Proven Innovative Technology vs Hi Tech, High Risk.
This is a very selective comparison between a Briggs & Stratton Intek and Honda GCV engine, presumably for dealer sales tactics and customer reference. I’ve seen similar internal dealer network publications comparing the FG Falcon with VE Commodore, again, highlighting strengths of the Falcon and weaknesses of the Commodore. In simple terms, it’s a sales tactic.
Now, I’m a Briggs boy down to my core, however, I’m not blind to their faults, nor do I take everything in this brochure as gospel. So, lets pick it apart…………………….
- The choice of competitor is odd. The GCV was and still is Honda’s homeowner grade engine, even if it appears to be more advanced. The unique split crankcase and integral cylinder head were done for speed of assembly on the production line, which in turn reduces per unit cost.
- The true competitor to the Intek was the GXV160, which is a traditional OHV layout with a conventional crankcase, sump and cylinder head design. Like the Briggs Intek, it too has a cast iron bore, making it a commercial grade engine. This is where the selectiveness of competitor comes into play because the GCV160 has an alloy bore and a smaller capacity. Honda would later add the iron-bore GSV160 and GSV190.
Even so, lets dissect this brochure page by page………………………….
Front Cover & Introduction -
Briggs implies the Intek is more technologically “innovative”. I think we can all agree that an OHC engine (GCV) is a superior technology compared to a pushrod OHV engine (Intek). While I’m not a fan of the GCV design, it’s a stretch to claim OHV is superior.


Camshaft Drive –
This section I’m on board with. The Intek uses a traditional gear-driven camshaft, lifters and pushrods. The Honda uses a wet belt to drive an overhead camshaft. As they mention, inspection requires removal of the rocker cover, which are known to warp upon removal and then require replacement. Also, there is no way of replacing that belt without total disassembly.


Durability (1) –
Here Briggs highlight the choice of aluminium or cast-iron bores, whereas the GCV160 was alloy only. Cast iron cylinder bores are more wear resistant, which in turn improves longevity. Also, you can safely hone an iron bore, whereas its not recommended to do the same on an alloy bore.
This publication obviously pre-dates the iron bore GSV variants.

Durability (2) –
The comparison here is the single stage air filtration of the Honda, where the Intek comes standard with a dual stage air filter, or three stage with the optional snorkel. During the late 2000’s, Victa was offering a snorkel system as an option on certain commercial models fitted with GC and GS Honda engines. Again, this brochure pre-dates that.

Serviceability -
This is another area where I side with Briggs. These GC/GS engines are a unique design that integrates the crankcase, sump, cylinder, and cylinder head in one single piece. That means you cannot access the valves or combustion chamber without total disassembly. So, if a valve issue presented itself, how many would pay to have an engine rebuilt rather than just buying a new mower or engine?
“You can’t remove the cylinder head to service the engine”.

Startability –
Both engines feature the same electronic ignition system, float-fed carburettors, and mechanical automatic decompression via the camshaft. In late 90’s and early 2000’s, these were well established features for this type of lawn mower engine.

Convenience, Comfort & Safety –
Here, Briggs boasts of a 25 to 35% increase in fuel tank capacity. This is relative because the larger capacity Intek engines consumed more fuel. I haven’t ran an Intek long enough to get a gauge on that, but I know that the 190cc Quantum and 190cc 850-Series engines like a good drink!
The muffler argument is quite neutral, but the Honda’s are much smaller in size and much louder in operation. Having said that, you get less valve tick with the Honda and you can actually idle them right down, the Intek doesn’t really idle.

Engine Capacity –
Briggs & Stratton use this page to boast about the capacity advantage of the Intek. “There is no substitute for cubic inches”. I’m not sure the engine capacity made a difference in power outputs, the smaller but more efficient valvetrain of the Honda meant it too made 5 – 5.5 hp. Torque is another story, the Briggs have always excelled there, so even if they made similar power, they had a higher resistance to bog or stall.
Again, this publication pre-dated the introduction of the 187cc GSV190 from Honda. Those were the best of both worlds, power AND torque.

The remaining pages are in summery –


My Comparisons –
Of the Honda engines I’ve used, I’ve always loved the fuel economy, smooth running, low idle speed and how easy they are to work on due to the tighter tolerances. However, I didn’t care for the weight of the GXV160, or the lack of torque. Also, my GSV190 was defective out of the box and died within the first 5 minutes of use.
It’s always been popular to hate on Briggs engines, but they have always been good to me. Yes, they are cheaply made, but the older and less advanced ones seemed to thrive on neglect. Of the modern ones, the 850’s have been nothing but reliable in my hands, all I’ve done is change the oil and air filters on a regular basis. I work them hard and they deliver.
As a teenager, I would ride my bike all over town to look at lawn mowers and chainsaws. My favourite place was the local Stihl dealer, who also sold Victa, Rover and SuperSwift. Not that I wasted their time, I’m sure I annoyed the salesmen doing this, I just wanted to look, dream, and collect brochures.
I still have all of those brochures, which I’ve found a great reference over the years. One of the most interesting I collected was a Briggs published comparative brochure titled as follows………………..
World Proven Innovative Technology vs Hi Tech, High Risk.
This is a very selective comparison between a Briggs & Stratton Intek and Honda GCV engine, presumably for dealer sales tactics and customer reference. I’ve seen similar internal dealer network publications comparing the FG Falcon with VE Commodore, again, highlighting strengths of the Falcon and weaknesses of the Commodore. In simple terms, it’s a sales tactic.
Now, I’m a Briggs boy down to my core, however, I’m not blind to their faults, nor do I take everything in this brochure as gospel. So, lets pick it apart…………………….
- The choice of competitor is odd. The GCV was and still is Honda’s homeowner grade engine, even if it appears to be more advanced. The unique split crankcase and integral cylinder head were done for speed of assembly on the production line, which in turn reduces per unit cost.
- The true competitor to the Intek was the GXV160, which is a traditional OHV layout with a conventional crankcase, sump and cylinder head design. Like the Briggs Intek, it too has a cast iron bore, making it a commercial grade engine. This is where the selectiveness of competitor comes into play because the GCV160 has an alloy bore and a smaller capacity. Honda would later add the iron-bore GSV160 and GSV190.
Even so, lets dissect this brochure page by page………………………….
Front Cover & Introduction -
Briggs implies the Intek is more technologically “innovative”. I think we can all agree that an OHC engine (GCV) is a superior technology compared to a pushrod OHV engine (Intek). While I’m not a fan of the GCV design, it’s a stretch to claim OHV is superior.
Camshaft Drive –
This section I’m on board with. The Intek uses a traditional gear-driven camshaft, lifters and pushrods. The Honda uses a wet belt to drive an overhead camshaft. As they mention, inspection requires removal of the rocker cover, which are known to warp upon removal and then require replacement. Also, there is no way of replacing that belt without total disassembly.
Durability (1) –
Here Briggs highlight the choice of aluminium or cast-iron bores, whereas the GCV160 was alloy only. Cast iron cylinder bores are more wear resistant, which in turn improves longevity. Also, you can safely hone an iron bore, whereas its not recommended to do the same on an alloy bore.
This publication obviously pre-dates the iron bore GSV variants.
Durability (2) –
The comparison here is the single stage air filtration of the Honda, where the Intek comes standard with a dual stage air filter, or three stage with the optional snorkel. During the late 2000’s, Victa was offering a snorkel system as an option on certain commercial models fitted with GC and GS Honda engines. Again, this brochure pre-dates that.
Serviceability -
This is another area where I side with Briggs. These GC/GS engines are a unique design that integrates the crankcase, sump, cylinder, and cylinder head in one single piece. That means you cannot access the valves or combustion chamber without total disassembly. So, if a valve issue presented itself, how many would pay to have an engine rebuilt rather than just buying a new mower or engine?
“You can’t remove the cylinder head to service the engine”.
Startability –
Both engines feature the same electronic ignition system, float-fed carburettors, and mechanical automatic decompression via the camshaft. In late 90’s and early 2000’s, these were well established features for this type of lawn mower engine.
Convenience, Comfort & Safety –
Here, Briggs boasts of a 25 to 35% increase in fuel tank capacity. This is relative because the larger capacity Intek engines consumed more fuel. I haven’t ran an Intek long enough to get a gauge on that, but I know that the 190cc Quantum and 190cc 850-Series engines like a good drink!
The muffler argument is quite neutral, but the Honda’s are much smaller in size and much louder in operation. Having said that, you get less valve tick with the Honda and you can actually idle them right down, the Intek doesn’t really idle.
Engine Capacity –
Briggs & Stratton use this page to boast about the capacity advantage of the Intek. “There is no substitute for cubic inches”. I’m not sure the engine capacity made a difference in power outputs, the smaller but more efficient valvetrain of the Honda meant it too made 5 – 5.5 hp. Torque is another story, the Briggs have always excelled there, so even if they made similar power, they had a higher resistance to bog or stall.
Again, this publication pre-dated the introduction of the 187cc GSV190 from Honda. Those were the best of both worlds, power AND torque.
The remaining pages are in summery –
My Comparisons –
Of the Honda engines I’ve used, I’ve always loved the fuel economy, smooth running, low idle speed and how easy they are to work on due to the tighter tolerances. However, I didn’t care for the weight of the GXV160, or the lack of torque. Also, my GSV190 was defective out of the box and died within the first 5 minutes of use.
It’s always been popular to hate on Briggs engines, but they have always been good to me. Yes, they are cheaply made, but the older and less advanced ones seemed to thrive on neglect. Of the modern ones, the 850’s have been nothing but reliable in my hands, all I’ve done is change the oil and air filters on a regular basis. I work them hard and they deliver.